Configuring the eG Agent to Monitor the Queue Manager and its Queues and Topics
Typically, to monitor a queue manager, the eG agent needs to be configured with access to the default server connection channel on WebSphere MQ – i.e., the SYSTEM.DEF.SVRCONN channel. In high security environments however, administrators may prefer not to expose this default channel and its access privileges to the eG agent. In such environments therefore, you need to do the following to enable the eG agent to monitor the queue manager:
- Create a Custom Channel
- Configure the eG tests to use the custom channel and the credentials of the user to monitor queues and topics
Let us now discuss each of the steps mentioned above in the upcoming sections.
Creating a Custom Channel
To create a custom channel for monitoring a Queue manager, do the following:
Execute the following command from the bin directory of the MQ Install directory to start the MQ Series commands (MQSC) for the queue manager:
runmqsc <Queue Manager name>
For example, if the name of the Queue manager is eGQMGR, then the command will be as follows:
runmqsc eGQMGR
Once the MQSC is started, you can execute commands to create a custom channel. Say for example, the name of the custom channel is eGChannel, execute the commands in the command prompt as follows:
DEFINE CHANNEL<eGChannel> CHLTYPE<SVRCONN> TRPTYPE<TCP>
If you wish to add a description to the custom channel, then you can do so by adding a DESCR section to the above mentioned command. In our example, the description is Server-Connection channel for eG. Therefore the command that needs to be executed is as follows:
DEFINE CHANNEL<eGChannel> CHLTYPE<SVRCONN> TRPTYPE<TCP> DESCR<Server-Connection channel for eG >
If the command exceeds the stipulated number of characters that need to be typed in the command prompt, then the command can be split by a ‘+’ symbol. In such cases, the command can be executed as follows (see Figure 1):
DEFINE CHANNEL<eGChannel> CHLTYPE<SVRCONN> TRPTYPE<TCP> +
DESCR<Server-Connection channel for eG >
The custom WebSphere MQ channel will now be created. For a custom channel to take effect in the WebSphere MQ server, either the security cache or the queue manager of the server needs to be refreshed. If the queue manager is refreshed, the current messages of the server may get deleted. Therefore, refresh the security cache by issuing the following command (see Figure 1):
REFRESH SECURITY<*>
Once the security cache is refreshed successfully, you can stop the MQ Series commands by issuing the following command:
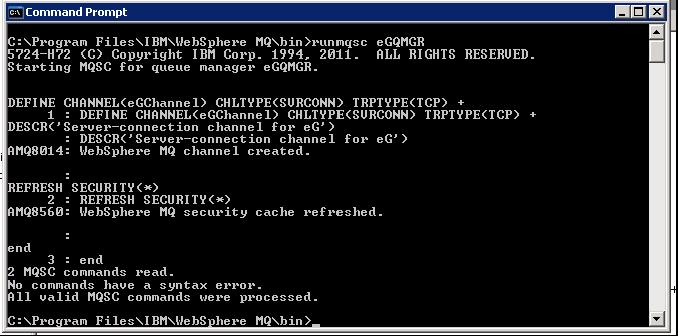
Figure 1 : Creating a custom channel
The custom channel is now ready for monitoring WebSphere MQ server.
