Installing eG BTM on a Multi-Server SAP Web Application Server Instance
In a multi-server environment, two/more Java server processes run within a single SAP WAS instance. For the eG agent to monitor business transactions to a multi-server SAP WAS instance, you need to BTM-enable each server Java process in that instance, separately.
To achieve this, follow the steps detailed below.
- First, login to the SAP WAS instance to be BTM-enabled.
- Open a browser on that instance and connect to the eG management console.
- Login to the eG admin interface.
- Follow the Agents -> BTM Profiler Download menu sequence in the eG admin interface.
-
Figure 1 will appear listing the servers that can be instrumented for APM by eG. In this list, locate the SAP Web Application server instance that you want to BTM-enable. Once you locate the server instance, click the Download icon corresponding to that instance to download the APM Profiler Agent to that instance.

Figure 1 : Download the APM Profiler Agent to the SAP WAS instance
- A zip file named javaagent_<Nick_name_of_SAPWAS_instance>_<Port_number_of_SAPWAS_instance will get downloaded. For instance, if you have managed the SAP WAS instance using the nickname 'sapwas' and the port number '50000', then the name of the zip file will be javaagent_sapwas_50000. Extract the contents of this file to any location on the SAP WAS instance.
- Next, navigate to the cluster folder of the SAP WAS instance. Within this folder, you will find Java server process-specific sub-folders. Create a folder named btm under each of these sub-folders.
-
Copy the contents of the javaagent_sapwas_50000 zip to the btm folder of each of the Java server process-specific folders (indicated by Figure 2).
-
Next, connect to the SAP Netweaver administrator tool by providing the URL: http://<IP_address_of_tool>:<Port_number_of_tool>/nwa/sysinfo
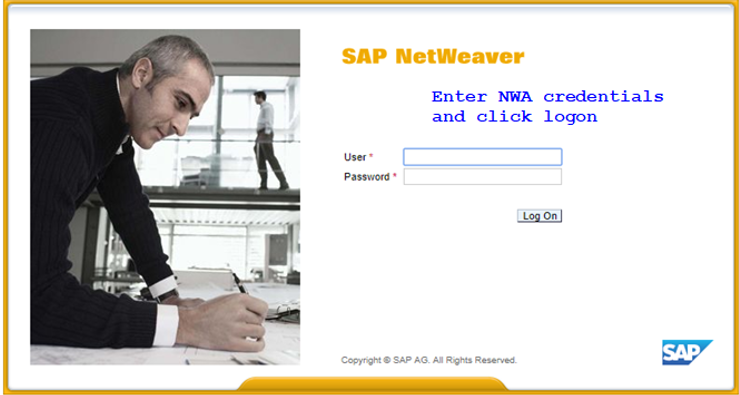
Figure 3 : The login page of the SAP Netweaver administrator tool
-
A login screen then appears (see Figure 3). Login to the system information application using administrator or j2ee_admin credentials. Upon successful login, Figure 4 will appear.
-
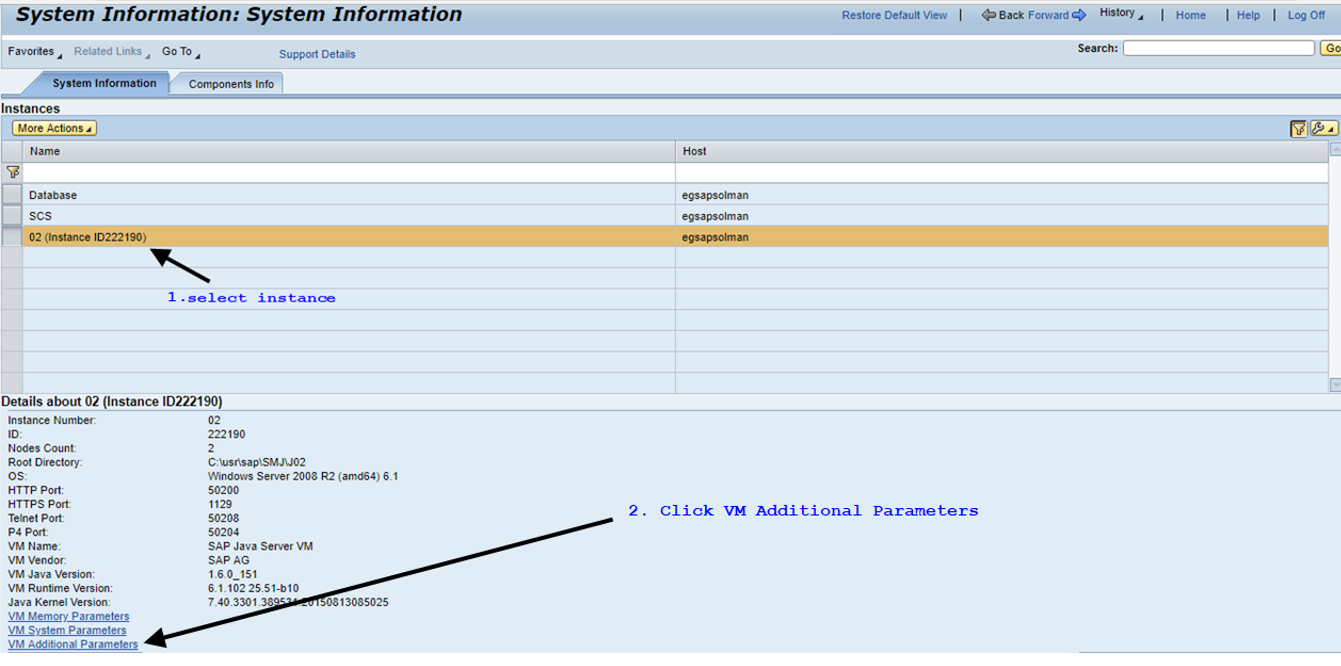
Select the instance to be BTM-enabled from the list of Instances in Figure 4. Then, click the VM Additional Parameters link indicated by Figure 4. This will open the Additional VM Parameters tab page (see Figure 5). Click the Add button in that tab page to add a new VM parameter.
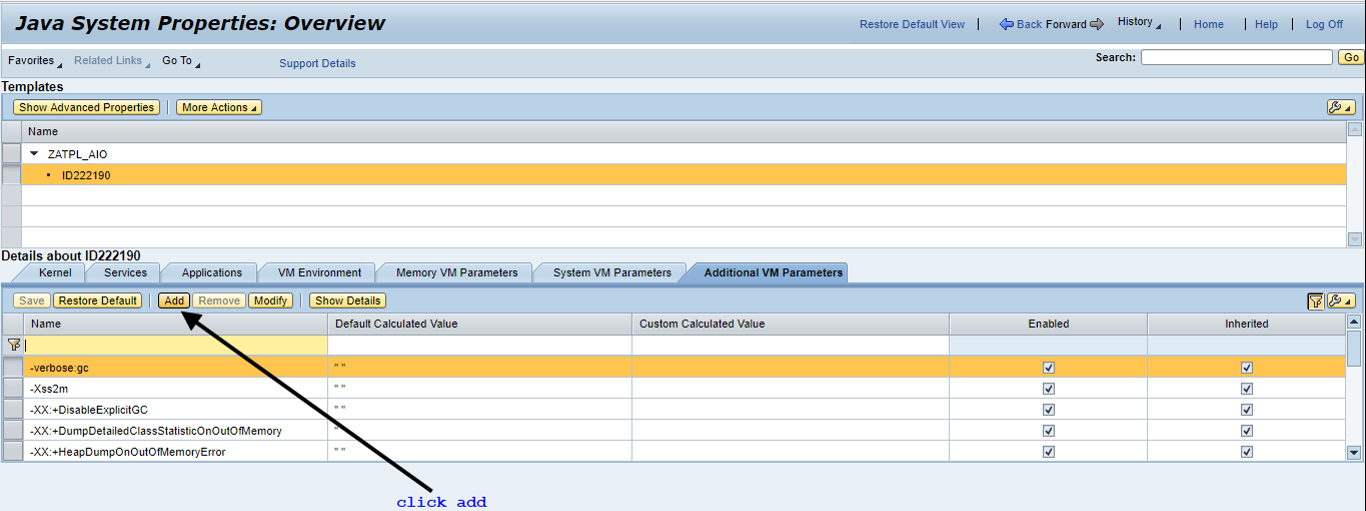
Figure 5 : Clicking the Add button in the Additional VM Parameters tab page
-
Figure 6 will then appear.
-
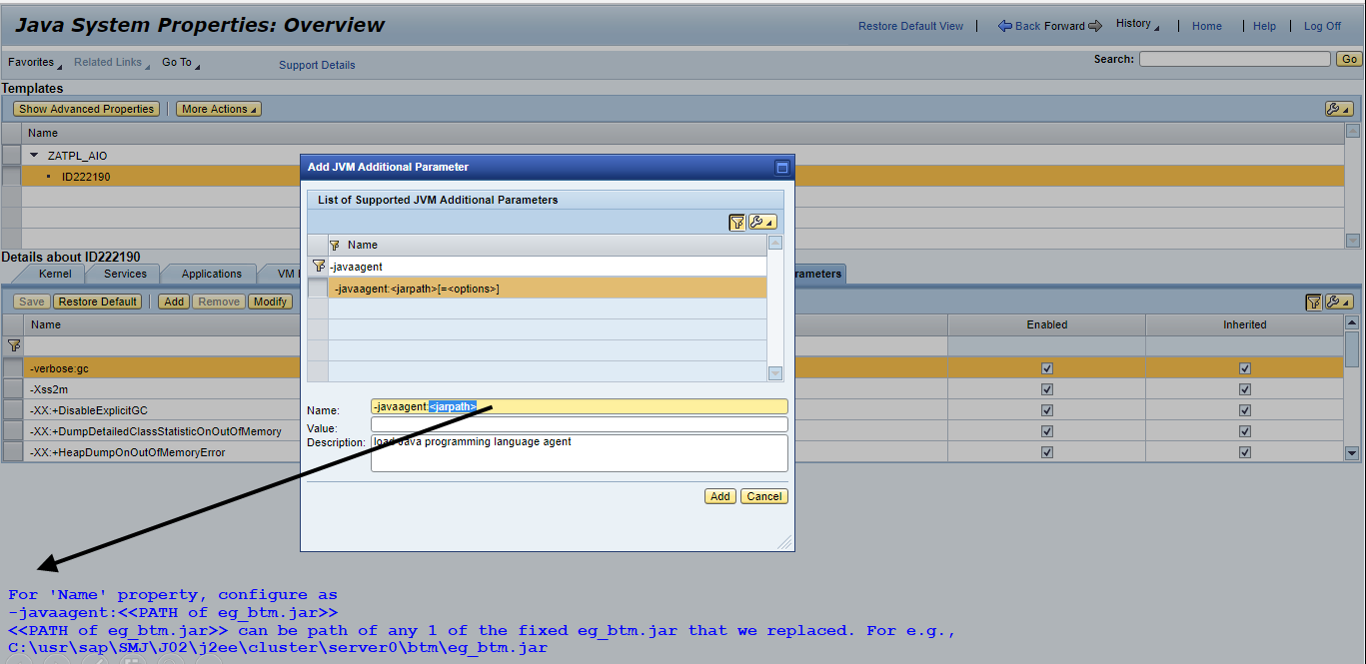
Specify the following in the Name text box in Figure 6:
-javaagent:<Path_to_eg_btm.jar_file>
Here, you can specify the full path to the eg_btm.jar file that is in the btm folder of any of the Java server processes in the target instance.
-
Then, in the Value text box, specify the following:
EG_PROPS_HOME=<Path_to_the_btmOther.props_file>,EG_LOG_HOME=<Path_to_the_btmLogging.props_file>
The path to these files will be different for each Java server process in the instance. Hence, when referring to the server process-specific sub-folder that contains these files, your path specification should include the ${NODE_INDEX} variable. This variable represents the node index of a Java server process - eg., the node index of server process server0 is 0, for server1 it is 1, and so on. SAP WAS will automatically substitute this variable with the node index of the corresponding server process, at runtime. A sample specification is provided below:
EG_PROPS_HOME=C:\usr\sap\SMJ\J02\j2ee\cluster\server${NODE_INDEX}\btm,EG_LOG_HOME=C:\usr\sap\SMJ\J02\j2ee\cluster\server${NODE_INDEX}\btm
- Finally, click the Add button in Figure 6 to add the new VM parameter.
-
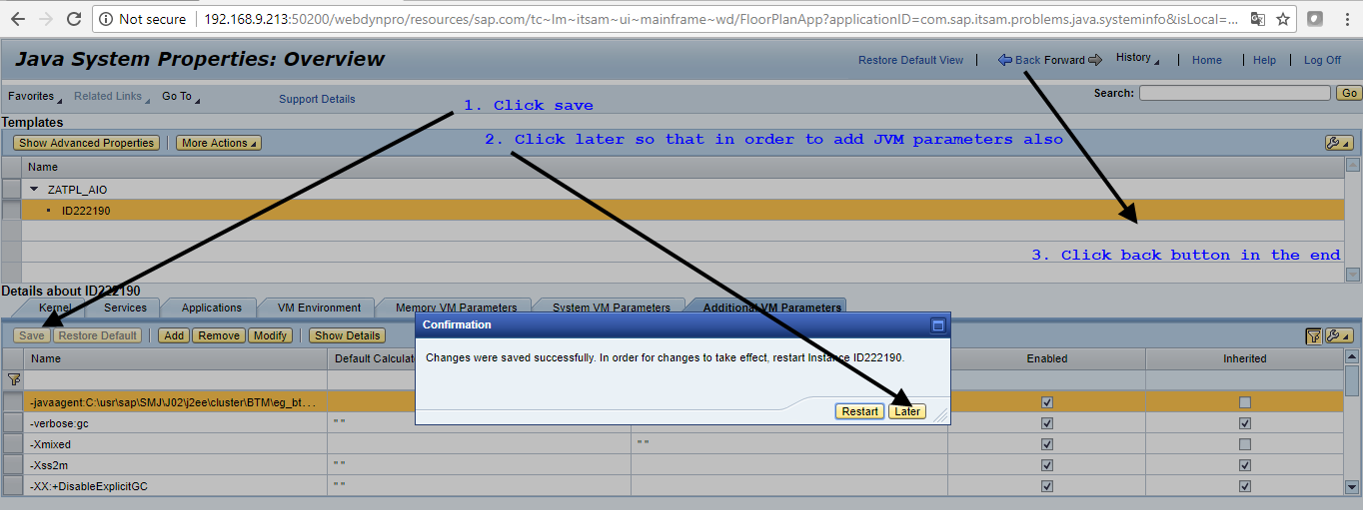
When Figure 6 appears, click the Save button to save the changes. A Confirmation message box (see Figure 7) will appear prompting you to confirm whether you want to restart the server now or later. Click Later in the message box and then click the Back button indicated by Figure 7.
-
In the Additional VM Parameters tab page, click the Add button once again to add a new VM parameter (see Figure 8).
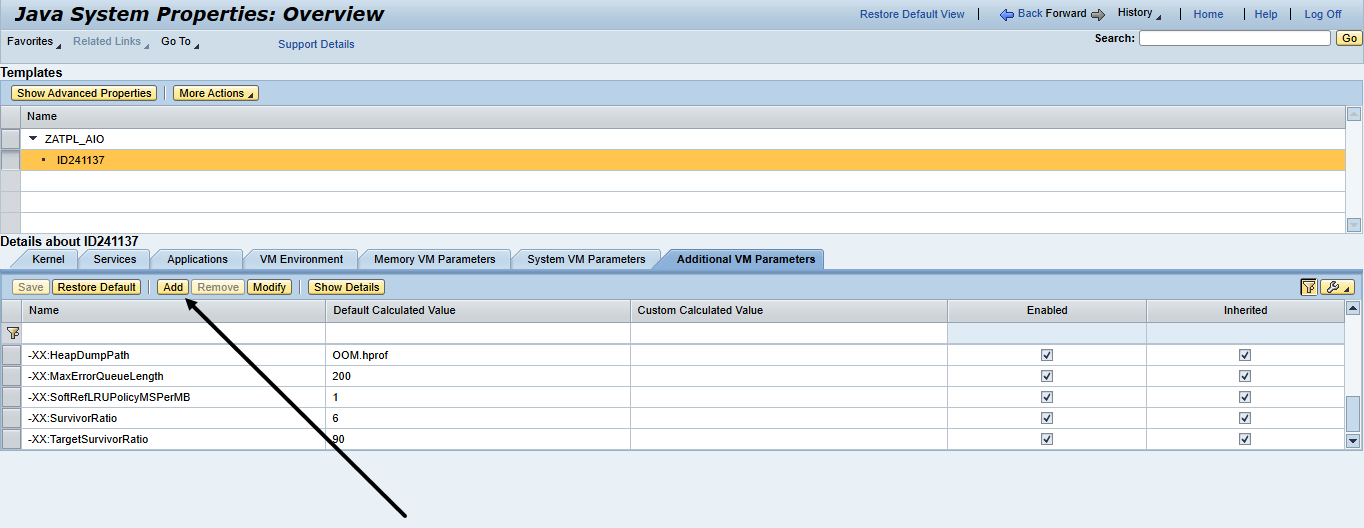
Figure 8 : Clicking the Add button in the Additional VM Parameters tab page
-
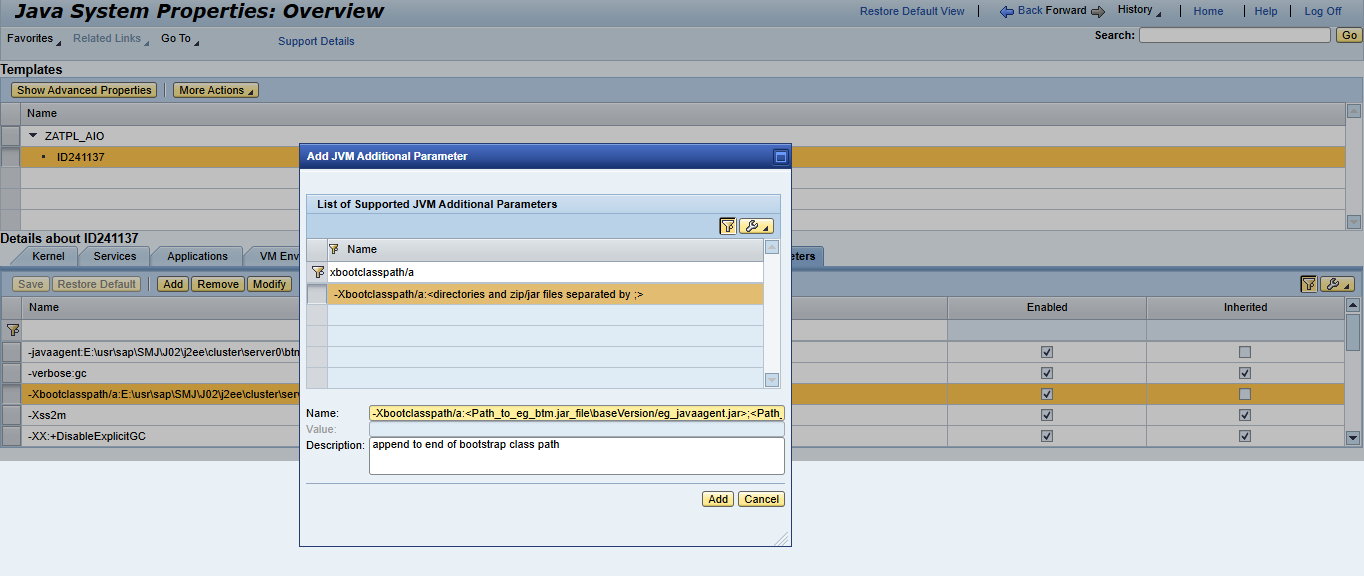
Figure 9 will then appear.
-
Specify the following in the Name text box in Figure 9.
For Windows OS : (semicolon ; is separator)
-Xbootclasspath/a:<Path_to_eg_btm.jar_file\baseVersion/eg_javaagent.jar>;<Path_to_eg_btm.jar_file\baseVersion/uuid-creator.jar>
For Linux OS : (colon : is separator)
-Xbootclasspath/a:<Path_to_eg_btm.jar_file\baseVersion/eg_javaagent.jar>:<Path_to_eg_btm.jar_file\baseVersion/uuid-creator.jar>
-
Save the changes and restart the Java server processes that have been BTM-enabled.
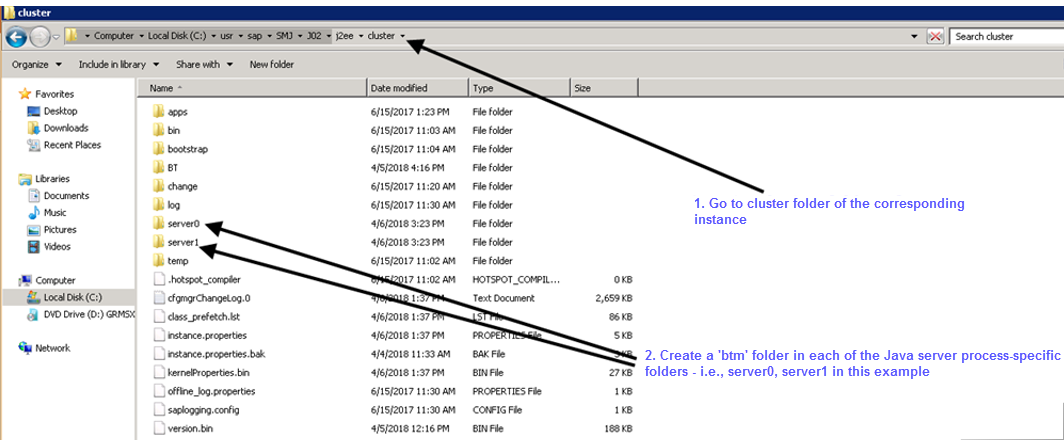
Figure 2 : Navigating to the cluster folder in the <SAP_WAS_INSTANCE_INSTALL_DIR>