Managing Agents in Multiple Private Networks
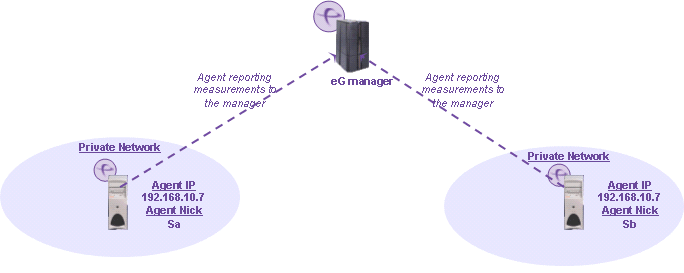
In some cases (especially in managed service provider - MSP environments), a single manager may be used to manage multiple private networks. The same private IP address could be used by different servers in the different networks. For example, server Sa in the first network and server Sb in the second network could both have the same private IP address 192.168.10.7. Different applications could be running on these servers. The eG architecture provides an elegant solution to allow these servers to be managed using a single manager. This solution involves configuring the eG manager to identify agents using their nick names and not their IP addresses. The steps in this regard are as follows:
-
First, add both the servers Sa and Sb via the eG admin interface with the same IP address but different nicknames (e.g., Sa and Sb as in Figure 1).
-
Next, understand how the eG manager in your environment is presently determining the identity of the eG agents – using the IP address of the eG agents, or their nick name? For this, check the status of the Verify if agent is reporting from configured IP parameter in the manager settings page (Configure -> Settings menu sequence) in the eG administrative interface. If this flag is set to No, it indicates that the eG manager is identifying the eG agents using their nick names and not their IP addresses. Since this is the desired setting, following step 1 alone would suffice to ensure that both Sa and Sb communicate with the eG manager.
On the other hand, if this flag is set to Yes in your eG manager installation, it indicates that your eG manager is currently identifying the eG agents using their IP address only. In such environments typically, many eG agents may not have been configured with nick names at all at the time of installation! In such a situation, if you set this flag to No, then agents without nick names will stop working! To avoid this, before proceeding any further, you must make sure that every eG agent installed in your environment is assigned a unique nick name! Since manual nick assignment can be cumbersome, the eG Enterprise system provides the following alternative:
- Edit the eg_tests.ini file in the <EG_INSTALL_DIR>\manager\config directory.
- Set the UpdateNicks parameter in the [agent_settings] section of the file to Yes.
-
Then, save the file.
Setting UpdateNicks to Yes ensures that every eG agent in the environment, which has no nick assigned to it, is automatically assigned the nick name that is specified in the eG admin interface for the application that is managed using that agent’s IP address. For instance, if no nick name has been assigned to the eG agent on host 192.168.10.10, and a Windows server has been managed on this host with the nick name win10 using the eG admin interface, then, this nick name will be automatically mapped to the eG agent on the IP address, 192.168.10.10.
Note:
- If you have already assigned nick names to one/more agents in your environment, then setting UpdateNicks to Yes will not change the original nick assignments of those agents.
- If UpdateNicks is set to Yes, then, for this setting to take effect, you need to enable auto-upgrade for all eG agents for which nicks are to be automatically assigned.
-
By default, it will take 1 day for the eG manager to update all eG agents with nick names. To override this default setting, do the following:
- Follow the Agents -> Upgrade -> Enable/Disable menu sequence in the eG admin interface.
- Select the Upgrade Settings option from the agents – upgrade page that appears next. Alternatively, you can also follow the menu sequence, Agents -> Upgrade -> Settings, to access this page.
- Then, from the How often agents should check for Auto Upgrade package list box, select the time interval at which you want the eG agents to be updated with nicks.
- If you want the updates to occur within the next 15 minutes, then, select the Upgrade now option from the agents – upgrade page, pick the agents for which nicks are to be auto-assigned from the auto upgradeable agents list, and click the Enable button therein.
- Once this is done, set the Verify if agent is reporting from configured IP parameter in the manager settings page (Configure -> Settings menu sequence) in the eG administrative interface to No.
Since the eG manager and agents have now been configured to use the nick name as the key to identify an agent/server, servers with the same IP address can be easily distinguished and managed by an eG manager.