How to Add a Custom Dashboard
Follow the steps mentioned below to add a custom My Dashboard.
-
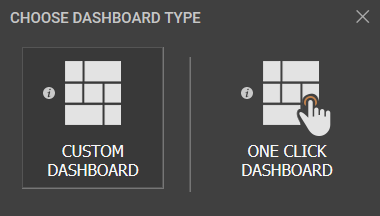
To add a custom My Dashboard, click the CUSTOM DASHBOARD option in Figure 1 .
-
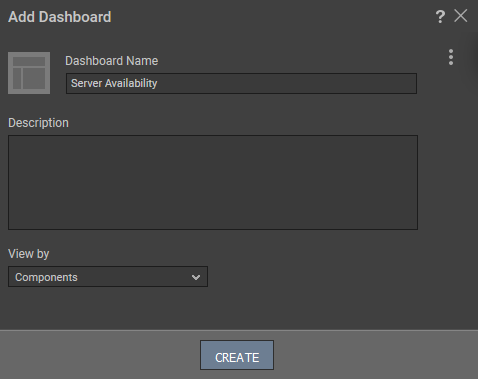
Figure 2 then appears.
-
In Figure 2, specify the following:
- Dashboard Name: Provide a name for the new dashboard.
- Description: Here, provide a brief description of the new dashboard.
- View by: To categorize the dashboard, or to view only the components available in the Zone/Segment/Services, select the option under the View by drop down. For example, selecting the Service option will list only the components that are part of a service. To view all the components in the environment, click on the Components option. By default, the Components option will be chosen in the View by list.
Click the CREATE button to create a new dashboard. There are a few parameters that are preset while a dashboard is being created. If you wish to alter those preset parameters while creating a dashboard, click the
 icon in Figure 2. will then appear.
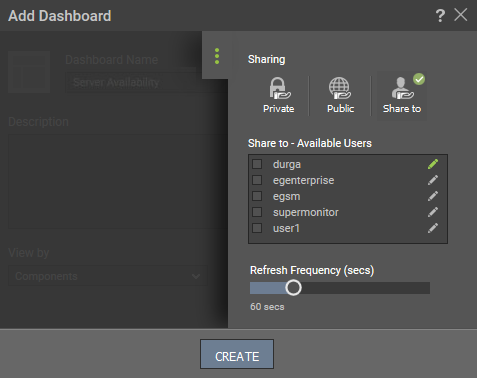
Figure 3 : The parameters that are preset while creating a dashboard
The preset parameters are defined below:
-
Sharing: Indicates whether or not you want to share the new dashboard with other users, and if so, what should be the level of sharing. For this, pick any of the following options from the Sharing drop-down list. By default, the Private option is chosen from this list.
- Private: Indicates that the user building the dashboard is alone authorized to view/modify/delete the dashboard. This is the default option.
- Public: Allows all users to the eG Enterprise system to view (not modify/delete) the dashboard that is being created.
-
Share: You can select this option to share the dashboard with specific users to the eG Enterprise system. From the Share to - Available Users list that then appears (see Figure 5), select the users with whom you want to share the dashboard by clicking the check box in front of each user. You can also provide read/write access to the users with whom you have shared the dashboard by clicking on the
 icon against the user. Once the user is provided read/write access, the
  icon is displayed against the user.
 Note:
In a SaaS deployment of eG Enterprise, if a user belonging to an organization had created the dashboard, then the Share to - Available Users list will list all the other users belonging to the organization. However, if a user belonging to an Organizational Unit (of an Organization) had created the My Dashboard, then, he/she will be allowed to share the dashboard only with the users belonging to the OU to which he/she belongs to as well as with the independent users of the Organization. If such a user wishes to share the dashboard across the users of a different OU within the organization to which he/she belongs to, then, he/she can set the allowSharingAcrossOU flag available in the [MISC_ARGS] section of the eg_ui.ini file available in the <eG_INSTALL_DIR>/manager/config folder to Yes. By default, this flag is set to No.
If you do not want your users to share any of the My Dashboard they create with all registered users (i.e., make the dashboard public), then, you can restrict public access to My Dashboards. For this, a RestrictPublicDashboards flag has been introduced in the [DASHBOARD_SETTINGS] section of the eg_customdashboard.ini file available in the <eG_INSTALL_DIR>/manager/config folder. Setting this flag to Yes will remove/hide the Public option from the Sharing list of Figure 3. By default, this flag is set to No.
- Refresh frequency: By default, this slide bar is set to 60 seconds indicating that the dashboard needs to be refreshed after this time interval. You can use this slide bar to set a refresh frequency of your choice.
-
Finally, click the Create button to create the new dashboard.
-
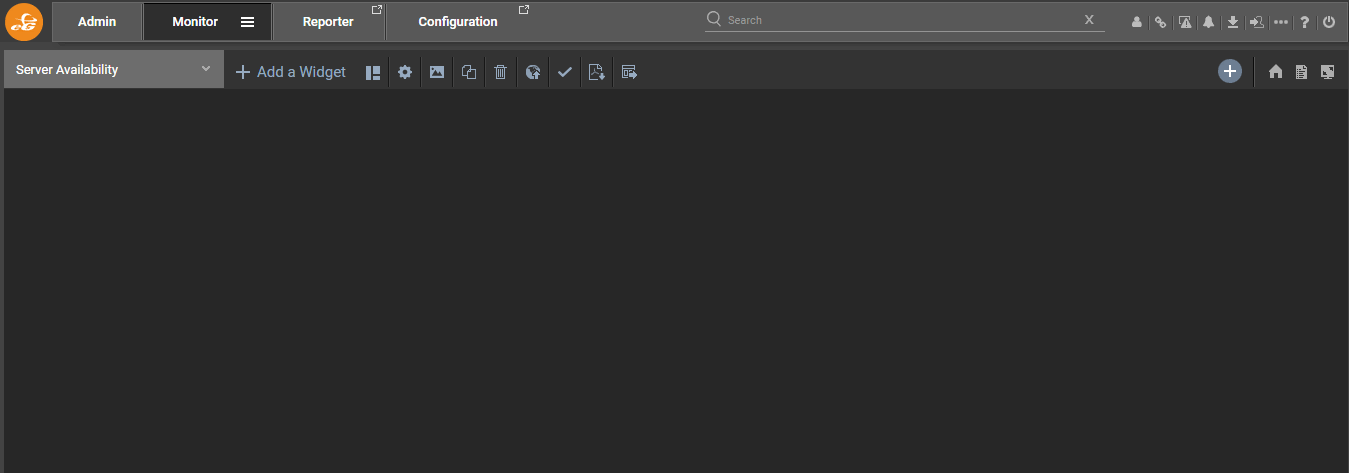
By default, the name of the dashboard that you have created will be listed in the list box that appears in the left top corner of . The icon ribbon available next to the list box helps you to design the look and feel of the dashboard. To design a dashboard i.e., to add widgets to the dashboard, you need to click the Add a Widget button in . Designing a My Dashboard