Troubleshooting Office 365 Monitoring
Here, we have discussed some issues that you may face when monitoring Office 365 and how to resolve them.
Troubleshooting Failure of eG Agent to Report Metrics
If the eG agent is unable to report metrics on Office 365 performance, then you may want to check whether/not the Microsoft Azure Active Directory Module for Windows PowerShell and the Microsoft Online Services Sign-in Assistant for IT ;Professionals RTW are properly installed on the eG agent host. To perform this check, do the following:
- On the eG agent host, click Start, and search for Windows Powershell ISE. Once it is found, run Windows Powershell ISE ;in the elevated mode.
-
First, check if the PackageManagement module is installed properly. For that, type Install-Module, and see if the auto-complete feature of Windows automatically lists the command you were about to type (see Figure 1).

Figure 1 : Checking if the PackageManagement module has been installed properly
- If the command auto-completes, it means that the PackageManagement module has been installed properly. If the command does not auto-complete, then you can conclude that the PackageManagement module has not been installed on the eG ;agent host. In this case, first install this module on the eG agent host. You can download the installable from the URL: https://download.microsoft.com/download/C/4/1/C41378D4-7F41-4BBE-9D0D-0E4F98585C61/PackageManagement_x64.msi
-
If you find that the PackageManagement module has been installed properly, proceed to check if the Microsoft Azure Active Directory Module for Windows PowerShell and the Microsoft Online Services Sign-in Assistant for IT Professionals RTW are properly installed on the eG agent host. To perform this check, with the Windows Powershell ISE in the elevated mode, type the following commands one after another:
Connect-MSolService
Get-MsolDomain
Get-MsolGroup
-
If these commands auto-complete - i.e., if Windows lists these commands even before you type them fully - you can conclude that the Microsoft Azure Active Directory Module for Windows PowerShell and the Microsoft Online Services Sign-in Assistant for IT Professionals RTW are properly installed on the eG agent host. On the other hand, if the commands do not auto-complete, then you must proceed to install both the aforesaid modules on the eG agent host. To know how to install, refer to the Pre-requisites for Monitoring Microsoft Office 365 Environments.
Troubleshooting Failure of eG Tests that Use the Microsoft Graph API
If the tests that use the Microsoft Graph API fail to run and report metrics, then check the error log (in the <EG_AGENT_INSTALL_DIR>\agent\logs\ directory) for the following error:

Figure 2 : Error that will be logged in the eG agent's error log if eG tests that use the Microsoft Graph API fail to report metrics
If the error message highlighted in Figure 2 is logged in the error log, it is a clear indicator that the tests failed because the files required for running the tests are either unavailable on the eG agent host or are blocked.
To check if the files are available, open the C:\Program Files\WindowsPowerShell\Modules\AzureAD\2.0.2.182\ folder on the eG agent host. See if the following files are available in the said folder:
-
Microsoft.IdentityModel.Clients.ActiveDirectory.dll
-
Microsoft.IdentityModel.Clients.ActiveDirectory.Platform.dll
-
Microsoft.IdentityModel.Clients.ActiveDirectory.Platform
-
Microsoft.IdentityModel.Clients.ActiveDirectory
If you find the aforesaid files therein, then it can only mean that the tests failed because the files are blocked. In which case, proceed to unblock the files. To unblock, follow the steps below:
-
Open Windows Explorer and navigate to the C:\Program Files\WindowsPowerShell\Modules\AzureAD\2.0.2.182\ folder.
-
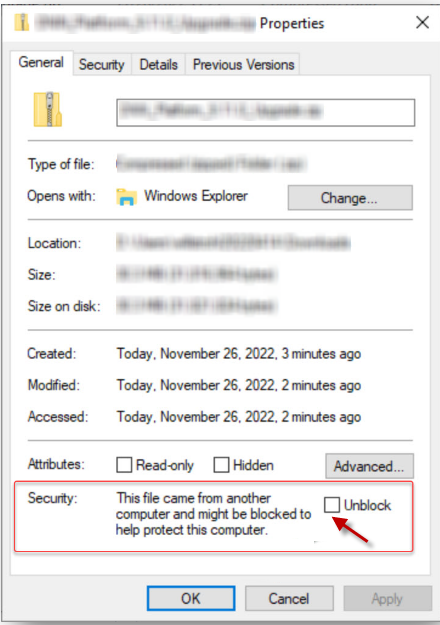
Right-click on any of the files in that folder, and select the Properties option from the shortcut menu that pops up.
-
Figure 3 will then appear.
-
To unblock the chosen file, select the Unblock check box in the Security section of Figure 3.
-
Finally, click the OK button in Figure 3 to save the changes.
-
Repeat steps 2-5 for each of the files in that folder.
Once this is done, the tests will start running and reporting metrics.
On the other hand, if the aforesaid files are not present in the C:\Program Files\WindowsPowerShell\Modules\AzureAD\2.0.2.182\ folder, then you should first make them available on the eG agent host and then unblock them. For that, follow the steps detailed in point 4 of
Troubleshooting 'Out of Memory' Exception
When monitoring large Office 365 environments, you may sometimes run into a 'System.OutOfMemoryException' in powershell. This can happen, if Windows powershell does not have enough memory to process large volumes of data. If you encounter this exception, then you will have to increase the powershell memory of the eG agent monitoring one/more Office 365 components. For this, follow the steps below:
- Login to the system hosting the eG agent.
- Launch Windows PowerShell in elevated mode.
-
Execute the following commands one after another:
sl WSMan:\localhost\Shell
Set-Item .\MaxMemoryPerShellMB 4096
cd..
cd plugin
Set-Item .\microsoft.powershell\Quotas\MaxConcurrentCommandsPerShell 4096
Restart-Service winrm
Troubleshooting Hexadecimal Values Being Reported Instead of User Names and Site URLs
The detailed diagnosis of a few Office 365 tests may sometimes report hexadecimal values (such as GUID, UUID etc.) in the place of user names and site URLs. You may notice similar issues in certain widgets of the Office 365 dashboards.
Typically, the eG agent gathers information such as user names and URLs from activity reports built using the Microsoft Graph API. Recently however, Microsoft chose to hide user/site details from activity reports by default, in an effort to comply with local privacy laws. Because of this default setting, Microsoft 365 replaced use names and site URLs in reports with hexadecimal values. Consequently, the eG agent too reported the same values in its detailed diagnosis and dashboards.
To resolve this issue, change the following account setting in the Microsoft 365 admin center.
-
Go to the Microsoft 365 admin center.
-
Go to Settings > Org settings > Reports.
-
Clear the In all reports, display de-identified names for users, groups, and sites. option.
Troubleshooting Disk Space Contentions in the System Hosting the eG Agent
If you notice abnormal disk space usage on the system that hosts the eG agent monitoring Microsoft Office 365 components, then search that system for tmpEXO files. These files are temporary files that the Exchange Online Management Module's PowerShell cmdlets automatically create whenever they run to collect metrics.
Since these files are created every time the cmdlets are run, they can grow significantly in number over time, thereby hogging disk space and causing a serious space crunch on the eG agent host. To avoid this, it is recommended that you manually delete these files at frequent intervals. To save the time and trouble involved in this manual exercise, you can also have the eG agent periodically check for the existence of these files and automatically delete them from the agent host. For this purpose, follow the steps below:
-
Login to the eG administrative interface.
-
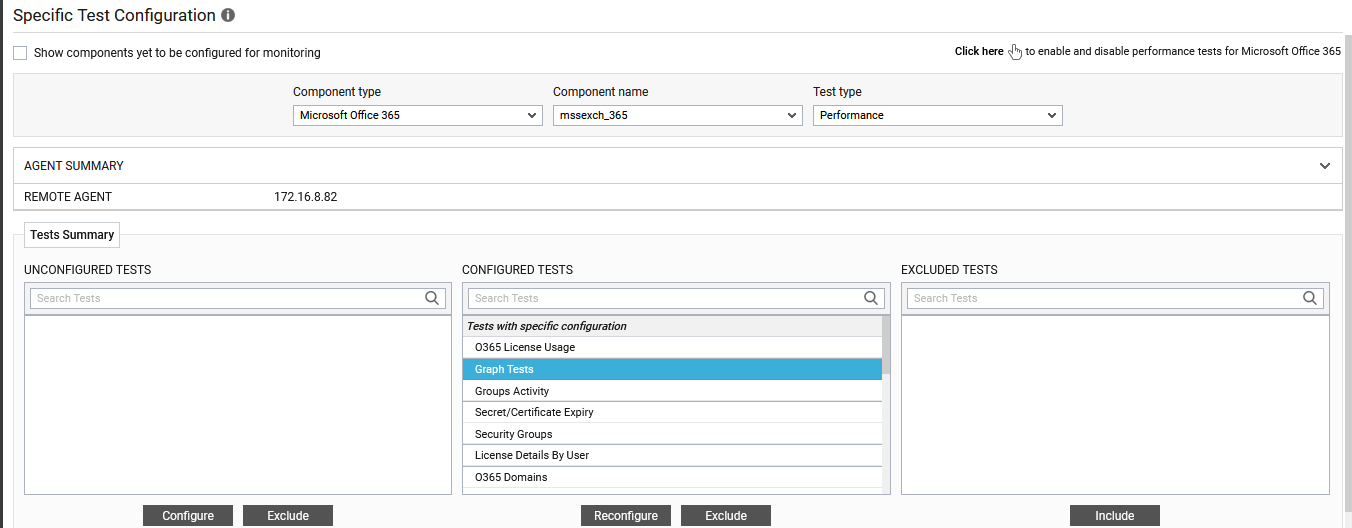
Follow the Infrastructure -> Agents -> Tests -> Specific Configuration menu sequence in the eG admin interface.
-
Figure 4 will then appear. Here, select Microsoft Office 365 (or any monitored Office 365 product) as the Component type, and select the monitored Component of that type. Upon doing so, all the fully-configured tests of the chosen component will be displayed in the CONFIGURED TESTS list box. From this list, select the Graph Tests test, as indicated by Figure 4, and click the Reconfigure button.
-
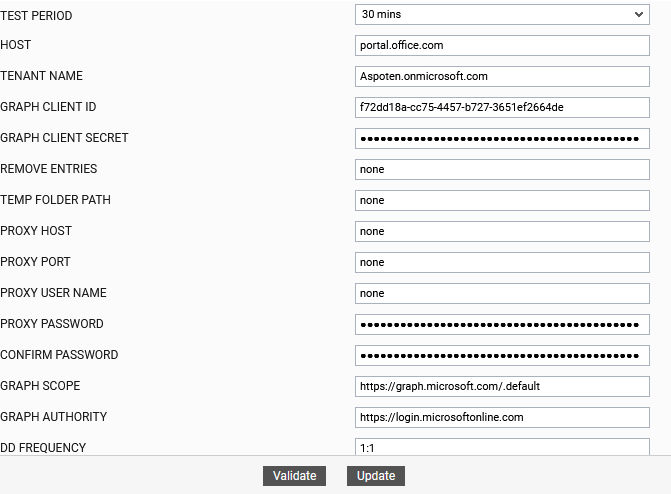
Figure 5 will then appear displaying the parameters of the Graph Tests test. By default, the TEMP FOLDER PATH parameter of the test is set to none. This setting ensures that the test automatically deletes the tmpEXO files that are created in the default location - i.e., C:\Windows\Temp. If these files are created in a different location in your environment - say, C:\Windows\SystemTemp - then you will have to change the value of the TEMP FOLDER PATH parameter to reflect the correct location.
-
Once this is done, click the Update button in Figure 5 to save the changes to the test configuration.
-
This way, whenever the Graph Tests test runs (default: every 30 minutes), it will search the folder specified in the TEMP FOLDER PATH parameter for the tmpEXO files, and automatically delete those files if found.