User Reports
The eG manager also provides administrators the ability to define reports for individual users. To define a user report, select the UserReports option from the Reporter menu of the Settings tile in the eG administrative interface. Like Default Reports, User Reports can also be categorized as Network, System, Application and Site.

Figure 1 : The eG User Report configuration
Network Reports
For configuring Network reports, do the following:
- Click Add New option from Figure 1.
- From Figure 2 that appears, select a user from the User list.
- Next, select the Network option (see Figure 2).
- Then, select a Report type from the list box (see Figure 2).
- Next, to select the measures for which a report of the selected type is to be generated, first, choose the Test that generates the measures (see Figure 2).
- Upon selection of a test, all the measures associated with the selected test, but which are not yet associated with the given User, Category type, and Report type combination, will appear in the Disassociated Measures list.
-
Now, from the Disassociated Measures list, select the measures for which reports of the selected type are to be generated. Next, click on the < button to transfer the selected measures to the Associated measures list (see Figure 2).
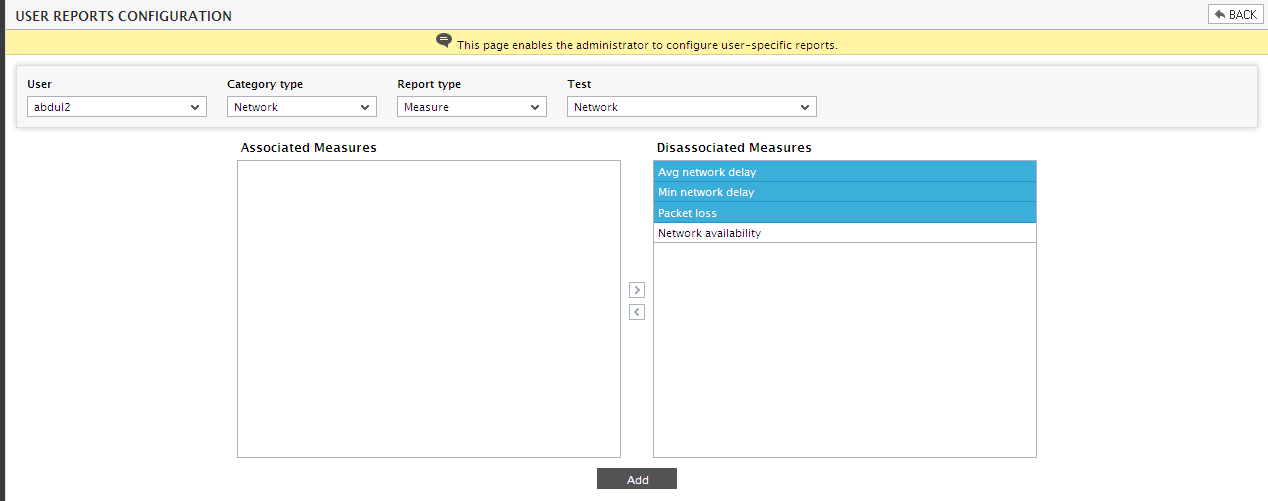
- Now, whenever the chosen user logs into the eG Reporter and attempts to generate Network Reports of the selected Report type, the same will be generated for each of the measures available in the Associated Measures list. In the example illustrated by Figure 2, note that the Avg network delay, Min network delay and Packet loss measures associated with the Network test have been chosen for generating Network reports for the user abdul2. If summary reports are to be generated for the same set of measures, then click on the Add to Summary button in Figure 1.
- Settings so updated can be deleted using the
 button.
 - Now, to disassociate the measures, select them from the Associated Measures list, click on the > button, and finally, click on the Add button.
System Reports
For configuring reports of the System category, select the user from the User list, choose the System option and then proceed in the same manner as discussed for Network reports.
Application Reports
For configuring reports belonging to the Application category, do the following:
- Select a user from the User list (see Figure 3).
- Then, choose the Application option.
- Then, select a Report type (Measure/Summary) from the list box (see Figure 3).
- Next, for generating reports for measures associated with a particular component type, select a Component type.
- Then, from the Component list box that lists all the managed components of the selected Component type, select the Component for which reports are to be generated (see Figure 3).
- Also, the Test list box will be populated with all the tests associated with the Component. From this list box, select the test that generates the measures for which reports are required (see Figure 3).
- Once a test is selected, all the measures associated with the selected test will appear in the Disassociated Measures list (see Figure 3).
-
Now, from the Disassociated Measures list, select the measures for which reports of the selected type are to be generated. Next, click on the < button to transfer the selected measures to the Associated Measures list (see Figure 3).
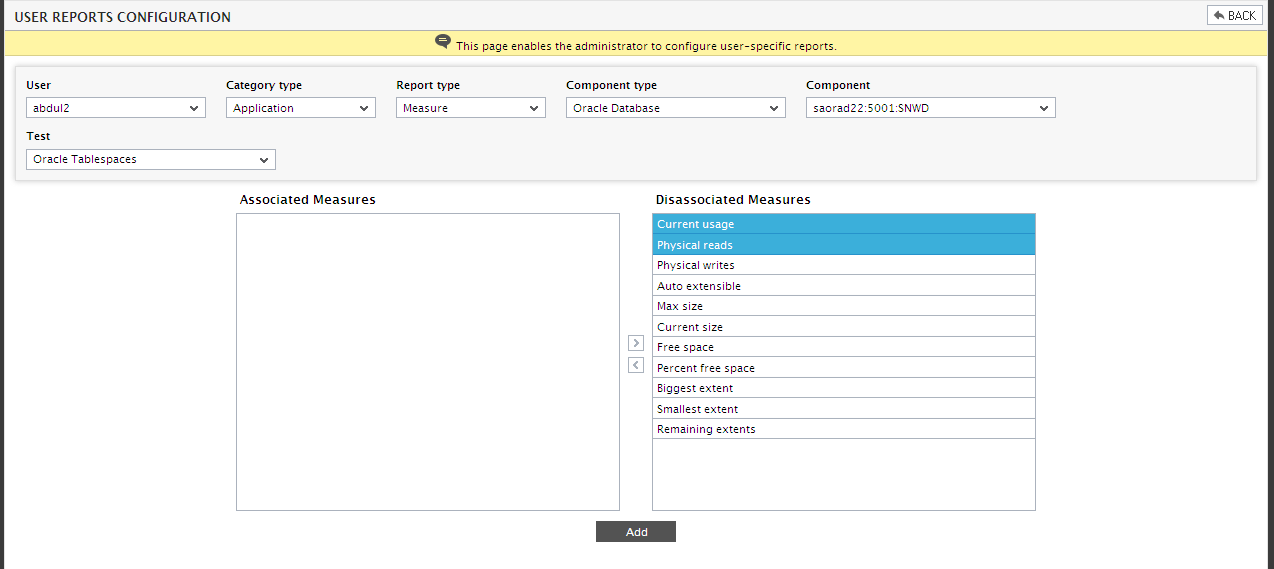
- Now, whenever the chosen user logs into the eG Reporter and attempts to generate Application Reports of the selected Report type, the same will be generated for each of the measures picked from the Associated Measures list. In the example illustrated by Figure 3, the Current usage and Physical reads measure of the Oracle Tablespaces test has been selected for generating Application-Measure reports for the user abdul2. If summary reports are to be generated for the same set of measures, then click on the Add to Summary button.
- Settings so updated can be deleted using the button.
- Now, to disassociate the measures, select them from the Associated Measures list, click on the > button, and finally, click on the Add button.
Site Reports
For configuring reports belonging to the Site category, do the following:
- Select a user from the User list (see Figure 4).
- Next, select the Site category type (see Figure 4).
- Then, select a Report type (Measure/Summary) from the list box (see Figure 4).
- Once this is done, all the measures that have already been associated (if any) with the given combination of Category type, and Report type, and User will be displayed.
- Also, the Test list box will be populated with all the tests associated with the site. From this list box, select the test that generates the measures for which reports are required (see Figure 4).
- Once a test is selected, all the measures associated with the selected test will appear in the Disassociated Measures list (see Figure 4).
- Now, from the Disassociated Measures list, select the measures for which reports of the selected type are to be generated. Next, click on the < button to transfer the selected measures to the Associated Measures list (see Figure 4).
-
Finally, click on the Add button.
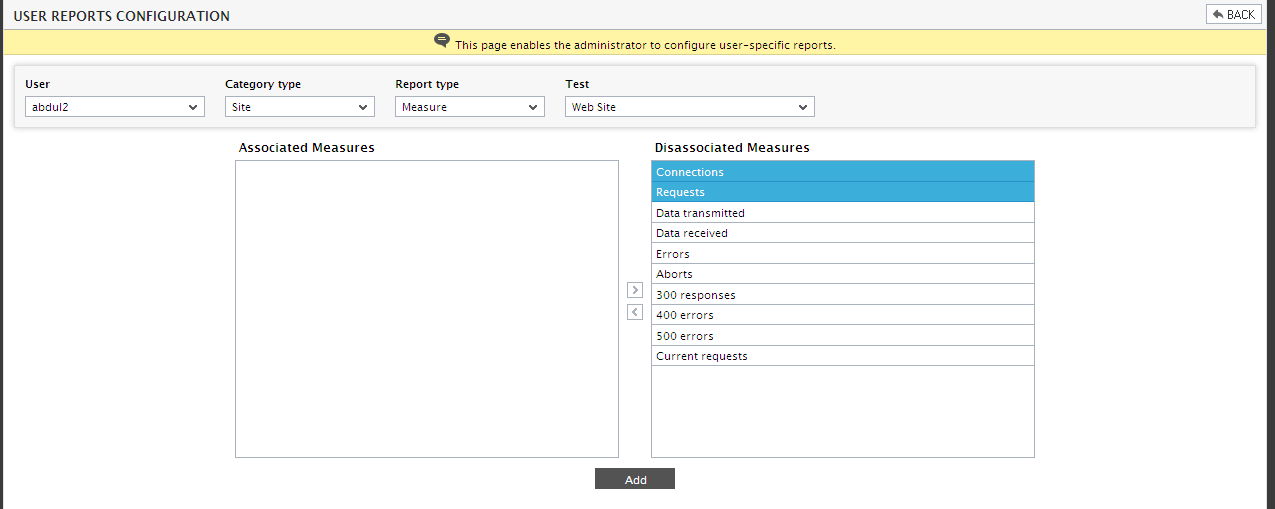
- In the example illustrated by Figure 4, the Connections and Requests measures have been chosen for generating Site-Measure reports for user abdul2. If summary reports are to be generated for the same set of measures, then click on the Add to Summary button.
- Settings so updated can be deleted using the button.
-
Now, to disassociate the measures, select them from the Associated Measures list, click on the > button, and finally, click on the Add button.
Note:
User report specifications get the highest precedence, followed by component-specific reports. Default report settings come into effect if neither user nor specific reports apply.