Installing and Configuring the .NET Core Profiler
A .NET Core profiler can be deployed on:
-
Kestrel web servers running on Linux
-
Kestrel web servers running on Windows
-
IIS web servers
The procedure for deploying the profiler is different for each of the afore-mentioned environments.
Configuring the .NET Core Profiler for a Kestrel Web Server on Linux
To BTM-enable a .NET Core web application hosted by a Kestrel web server on Linux (i.e., Ubuntu or CentOS), follow the steps discussed below:
-
Login to the Kestrel web server hosting the .NET Core web application as a root user.
-
Install the eG agent on that server, if it is not installed already.
-
Next, proceed to attach the profiler to the .NET core application. To achieve this, you need to set certain mandatory settings. If the target application is run from the web server Terminal, then you need to run a command on the Terminal to define these settings. On CentOS, this command is as follows:
export Environment=CORECLR_PROFILER={950A85A8-9E1B-4611-BEA6-E5A20686387E} \
CORECLR_ENABLE_PROFILING=1 \
CORECLR_PROFILER_PATH=<Actual_Path>/lib/NetCoreBTM/CentOS/eGCoreCLRMonitor.so
On Ubuntu, this command is as follows:
export Environment=CORECLR_PROFILER={950A85A8-9E1B-4611-BEA6-E5A20686387E} \
CORECLR_ENABLE_PROFILING=1 \
CORECLR_PROFILER_PATH=<Actual_Path>/lib/NetCoreBTM/Ubuntu/eGCoreCLRMonitor.so
Make sure that you replace the <Actual_Path> (in both the above commands), which is highlighted in both commands above, with the path to the eG installation directory.
On the other hand, if the target application is run as a service, then you need to configure the settings in the corresponding service file, as depicted below:
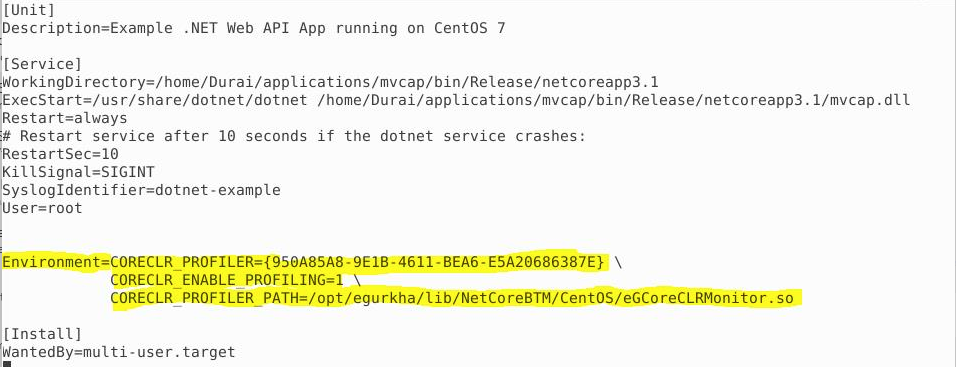
Figure 1 : Configuring Environment Variables in the service file corresponding to the monitored application on Kestrel Linux
By default, the .NET Core profiler is bundled with the eG agent on Linux. The default location of the profiler therefore is: /opt/egurkha/lib/NetCoreBTM/CentOS/eGCoreCLRMonitor.so. The CORECLR_PROFILER_PATH parameter in the highlighted entry in Figure 1 is pre-configured with this location. If you move the profiler file, eGCoreCLRMonitor.so, to any other location on the eG agent host, then remember to change the value of this parameter.
-
Restart the web server.
-
Finally, verify that the profiler has been properly configured. For this, you can do one of the following:
-
Check whether the eG module has loaded into the Kestrel application process. To check this, run the following command at the prompt:
lsof -p <pid> | grep eGCoreCLRMonitor
In the above command, replace <pid> with the process ID of the .NET Core application being monitored.The output of the command (see Figure 2) should display the path to the eGCoreCLRMonitor. If it does, then it means that the profiler has successfully loaded.

-
Check whether the profiler log is created in the /opt/egurkha/agent/logs/ folder. If it is, then it means that the profiler has been successfully configured.
-
Configuring the .NET Core Profiler for a Kestrel Web Server on Windows
To BTM-enable a .NET Core web application hosted by a Kestrel web server on Windows, follow the steps discussed below:
-
Login to the Kestrel web server hosting the .NET Core web application.
-
Install the eG agent on that server, if it is not installed already.
-
Next, proceed to attach the profiler to the .NET core application. To achieve this, you need to set certain mandatory settings. If the target application is run from the command prompt, then issue the following command at the prompt to define these settings:
setx CORECLR_ENABLE_PROFILING "1"
setx CORECLR_PROFILER "{950A85A8-9E1B-4611-BEA6-E5A20686387E}"
setx CORECLR_PROFILER_PATH_32 "C:\eGurkha\bin\NetCoreBTM\x86\eGCoreCLRMonitor.dll"
setx CORECLR_PROFILER_PATH_64 "C:\eGurkha\bin\NetCoreBTM\x64\eGCoreCLRMonitor.dll"
setx EG_DOTNETCORE_PORT "14003"
Ensure that the EG_DOTNETCORE_PORT parameter is configured with the exact port at which the profiler listens for requests from the eG agent. By default, this is port 14003.
If the target application is run from the powershell prompt, then issue the following command from the powershell prompt:
$Env:CORECLR_ENABLE_PROFILING = "1"
$Env:CORECLR_PROFILER = "{950A85A8-9E1B-4611-BEA6-E5A20686387E}"
$Env:CORECLR_PROFILER_PATH_32 = "C:\eGurkha\bin\NetCoreBTM\x86\eGCoreCLRMonitor.dll"
$Env:CORECLR_PROFILER_PATH_64 = "C:\eGurkha\bin\NetCoreBTM\x64\eGCoreCLRMonitor.dll"
$Env:EG_DOTNETCORE_PORT = "14003"
Here again, make sure that you configure the EG_DOTNETCORE_PORT parameter with the exact port at which the profiler listens for requests from the eG agent. By default, this is port 14003.
-
Next, restart the web server.
-
Finally, verify that the profiler has been properly configured. For this, you can do one of the following:
-
Check whether the eG module has loaded into the Kestrel application process. To check this, run the following command at the prompt:
tasklist /M /FI "PID eq 10392" | find "eGCoreCLRMonitor"
10392 in the above command is the process ID of w3wp.exe or dotnet.exe.
If this command returns the value eGCoreCLRMonitor.dll(see Figure 3), you can conclude that the profiler has been loaded correctly. If not, then its an indication that the profiler has not been loaded.

-
Check whether the profiler log is created in the <EG_AGENT_INSTALL_DIR>\agent\logs\NetCoreProfLogs folder. If it is, then it means that the profiler has been successfully configured.
-
Configuring the .NET Core Profiler for an IIS Web Server
An IIS web server can host both .NET and .NET Core applications. This is why, before attempting to BTM-enable a web site/application on IIS, you need to check whether that web site/application runs on a .NET framework or .NET Core framework. For this, do the following:
-
Login to the IIS web server.
-
Open the IIS Console.
-
In the tree-structure in the left panel of the console, expand the Sites node and right-click on that web site/application that you intend to BTM-enable. From the shortcut menu that appears, pick the Explore option (see Figure 4).
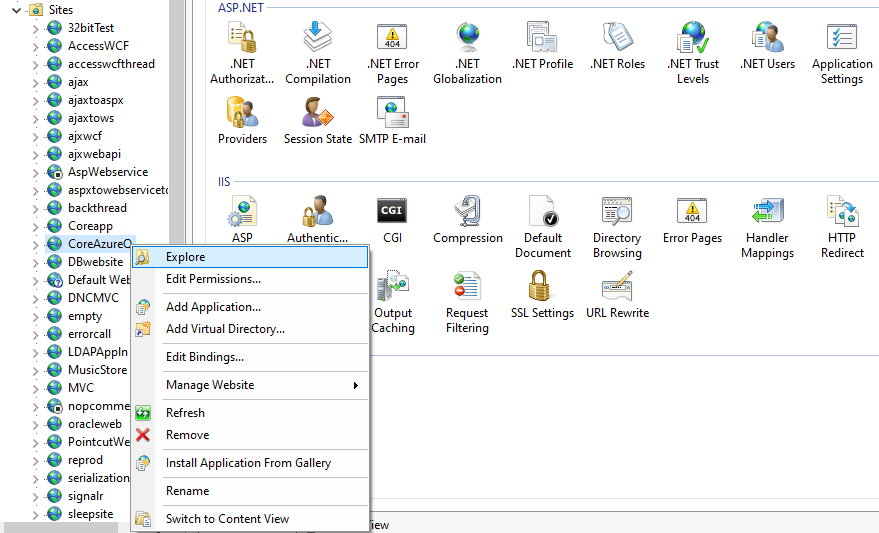
Figure 4 : Choosing to Explore the properties of the target site/application
-
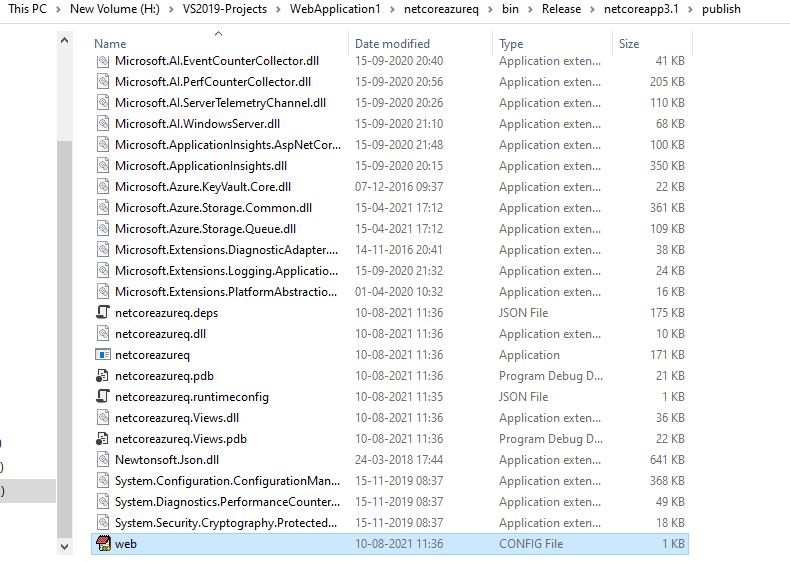
This will open the application install directory. Browse the directory that opens to find the web.config file (see Figure 5).
-
In the web.config file, search for the tag, aspNetCore. If you find it, then it means that the application is a .NET Core application; if not, you can conclude that it is a .NET application.

Figure 6 : Searching for the tag aspNetCore
If you find that the application is indeed a .NET Core application, then follow the steps discussed below to BTM-enable that application:
-
Login to the IIS web server hosting the .NET Core web application.
-
Install the eG agent on that server, if it is not installed already.
-
Next, proceed to attach the profiler to the .NET core application. To achieve this, you need to edit the web.config file on the server, and insert the following code block under the aspNetCore tag:
<environmentVariables>
<environmentVariable name="EG_DOTNETCORE_SITENAME" value="Name_IIS_WEBSITE" />
<environmentVariable name="CORECLR_ENABLE_PROFILING" value="1" />
<environmentVariable name="CORECLR_PROFILER" value="{950A85A8-9E1B-4611-BEA6-E5A20686387E}" />
<environmentVariable name="CORECLR_PROFILER_PATH_32" value="<Actual_Path>\bin\NetCoreBTM\x86\eGCoreCLRMonitor.dll" />
<environmentVariable name="CORECLR_PROFILER_PATH_64" value="<Actual_Path>\bin\NetCoreBTM\x64\eGCoreCLRMonitor.dll" />
</environmentVariables>
Make sure that you replace the <Actual_Path> (in the entry above), which is highlighted in both commands above, with the path to the eG installation directory. Likewise, the Name_IIS_WEBSITE should be replaced by the actual name of the monitored web site on IIS. Figure 7 depicts a web.config file with a sample <environmentVariables> code block.
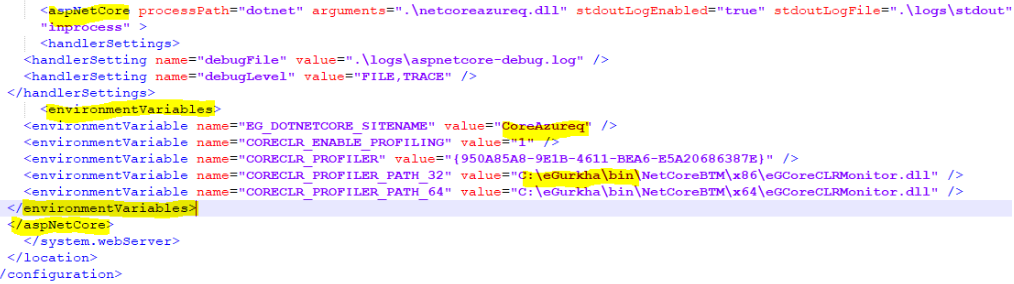
Figure 7 : The web.config file with a sample <environmentVariables> code block
-
Finally, restart the web server.