How to Configure Published Resources for Monitoring?
To configure the applications / desktops that the simulator has to launch, click on the ![]() icon against Published Resources in .
icon against Published Resources in .
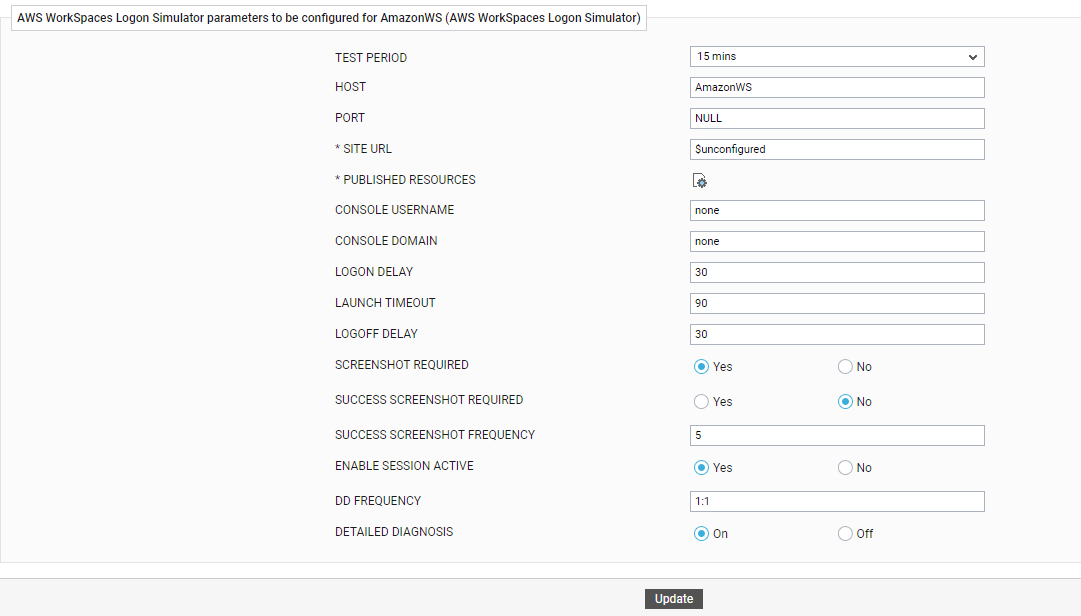
Figure 1 : The Amazon WorkSpaces Logon Simulator Test configuration page
Figure 2 will then appear.
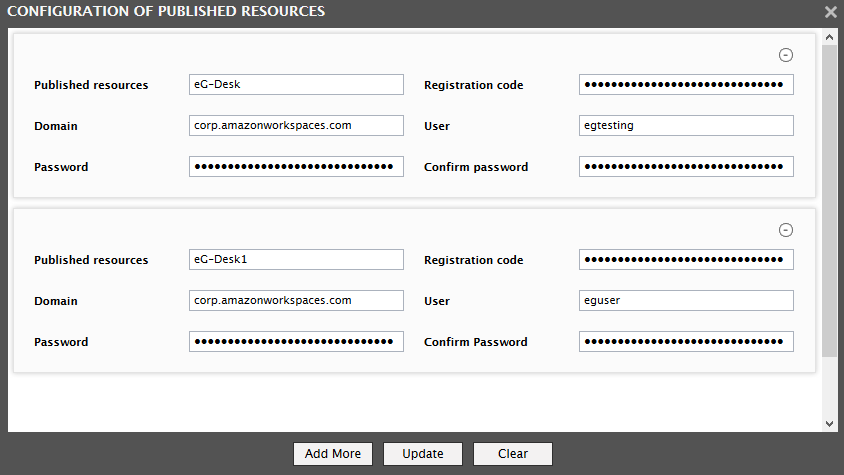
Figure 2 : Configuring the published resources to be launched
Using Figure 2, you can easily configure multiple resources that you want the simulator to launch and also the valid user credentials for accessing each resource. For this, follow the steps below:
-
In the Published resources text box, specify the published resource that is to be launched. The resource should be a virtual desktop. When providing the desktop name, make sure you provide the same name using which the desktop on the web console of the virtual private cloud. Also, make sure that the User you specify is authorized to launch the desktop configured in the Published resources.
Note:
The resources can be specified either in lower case or upper case or a combination of both.
- Then, using the Registration code, Domain, User, Password, and Confirm Password parameters, configure the credentials of the user who is authorized to launch the configured resources.
-
Registration code verification, is a security process in which the user provides an authentication to verify who they say they are. By default, the Amazon WorkSpaces is enabled with a registration code authentication. To authenticate the specified User login, the Amazon WorkSpaces client will require an additional layer of security other than the Password you have provided. This is the piece of information that only the User knows or has immediately in hand - such as a registration code that the AWS WorkSpace provides.
-
If you do not want to configure any more resources for launching, then click the Update button to save the changes. To add another resource for launching, click the Add More button. This will add an empty record in the CONFIGURATION OF PUBLISHED RESOURCES pop up window. Here, specify the names of more Published resources, and then use the Registration code, Domain, User, Password, and Confirm Password parameters to provide the credentials of a user who is authorized to launch those resources.
- If you do not want to configure any more resources for launching, then click the Update button in Figure 2 to save the changes. To add another resource for launching, click the Add More button. This will add an empty record to Figure 2. Here, specify the names of more Published resources, and then use the Domain, User, Password, and Confirm Password parameters to provide the credentials of a user who is authorized to launch those resources.
- At any given point in time, you can exclude/delete a resource from the simulation by clicking the
 button corresponding to that resource in Figure 2.
 - You can also clear all the configured resources and their launch details at one shot, by clicking the Clear button in Figure 2.