Adding/Modifying Components in Bulk
Using the eG admin interface, you can also add/modify two/more components in bulk in the eG Enterprise system. This is very useful, particularly in large IT environments, where massive server farms may have to be managed. In such environments, manually adding every server in a farm to the eG Enterprise system would require a lot of administrative time and effort. Likewise, if the details of many managed components need to be changed - eg., if the port number and monitoring approach (agent-based / agentless) for all IIS web servers need to be changed - the administrator could effect these changes in only component at a time. Bulk addition/modification of components significantly reduces administrator workload in large IT infrastructures by simplifying multi-component management and maintenance.
For adding components in bulk, do the following:
- Login to the eG admin interface.
- Follow the Infrastructure -> Components -> Add/Modify menu sequence.
-
In Figure 3 that then appears, click the Bulk Add/Modify button.

-
Figure 4 will then appear. To add components in bulk, select the Add option from Figure 4.
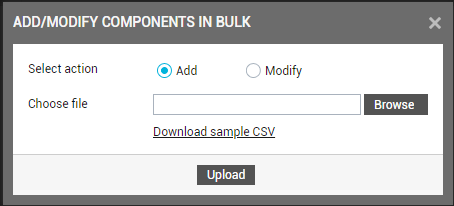
- Typically, you need to enter the details of all the components you want to add in a CSV file. This file should then be uploaded to the eG manager, so that all the components configured in the CSV file are added to the eG Enterprise system at one shot. To help you build this CSV file quickly, eG Enterprise provides you with a ready-to-use template. Click on the Download sample csv link in Figure 4 to download this CSV sample/template to the local host.
-
Next, proceed to edit the downloaded CSV sample/template. The template is pre-configured with columns to capture information pertaining to a component - eg., component type, name, port number, etc. In other words, there is a column in the template for every field in the ADD COMPONENT page of the eG admin interface. When editing the template, make sure you fill each column with the information related to the component you want to add. Columns not applicable to the component to be added can be left empty - for example, if you are adding a Windows server, you need not provide a port number and an SID. A single row in the CSV file will contain all the details required for adding a single component to the eG Enterprise system. For adding multiple components therefore, multiple rows of data will have to be provided, as depicted by Figure 5.

Figure 5 : Editing the CSV sample/template to include the details of all components to be added in bulk
Note:
You can add rows of component information to the CSV file, but you should not add new columns to it. Nor can you change the labels of the existing columns.
-
Once the CSV file is filled in and is ready to be uploaded, save the file. When saving, you can change the name and/or location of the file, if you so want.
Note:
Make sure that you do not change the file type (.csv) when saving the file.
-
Then, using the Browse button in Figure 4, browse for the location of the CSV file. Once the location is specified (see Figure 6), click the Upload button to upload the file to the eG manager.
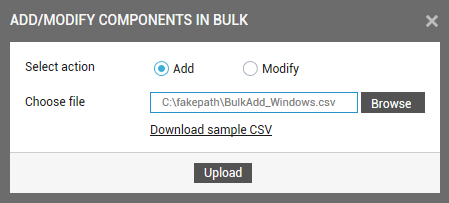
Figure 6 : Uploading the CSV file containing the details of components to be added in bulk
-
If you have not explicitly assigned an external agent to any of the components added using the CSV file, then eG Enterprise automatically assigns an external agent to them. A message to this effect appears when you attempt to upload the CSV file (see Figure 7).
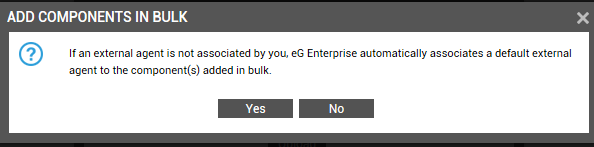
Figure 7 : Confirming the assignment of a default external agent to components that have not been explicitly assigned an external agent
- Click the Yes button in Figure 7 to confirm the external agent assignment and proceed with the CSV file upload.
- Once the CSV file is successfully uploaded to the eG manager, the manager will use the eG CLI to execute commands for adding all the components configured in the CSV file.
-
If the bulk addition succeeds/fails, a message to the corresponding effect will appear. To troubleshoot failures, use the egCLI.log file in the <EG_MANAGER_INSTALL_DIR>\manager\logs directory (in Windows; in Unix, this will be /opt/egurkha/manager/logs directory).
For modifying components in bulk, do the following:
- Login to the eG admin interface.
- Follow the Infrastructure -> Components -> Add/Modify menu sequence.
-
In Figure 8 that then appears, click the Bulk Add/Modify button.
-
Figure 9 will then appear. To modify components in bulk, select the Modify option from Figure 9.
- Typically, you need to enter the details of all the components you want to modify in a CSV file. This file should then be uploaded to the eG manager, so that the configuration of all the components specified in the CSV file are modified at one shot. To help you build this CSV file quickly, eG Enterprise provides you with a ready-to-use template. Click on the Download sample csv link in Figure 9 to download this CSV sample/template to the local host.
-
Next, proceed to edit the downloaded CSV sample/template. The template is pre-configured with columns for capturing the changes pertaining to a component - eg., component name, port number, etc. In other words, there is a column in the template for every field in the MODIFY COMPONENT page of the eG admin interface. To change a particular information pertaining to a component, identify the column that captures that information and change its value for that component (as depicted by Figure 10).

Figure 10 : Editing the CSV sample/template to record the changes to be made to the component details
Note:
You can make changes to any of the existing values. You can also configure values for columns that were previously empty. However, you should not add new columns to the CSV file. Nor can you change the labels of the existing columns.
-
Once the CSV file is filled in and is ready to be uploaded, save the file. When saving, you can change the name and/or location of the file, if you so want.
Note:
Make sure that you do not change the file type (.csv) when saving the file.
-
Then, using the Browse button in Figure 9, browse for the location of the CSV file. Once the location is specified (see Figure 10), click the Upload button to upload the file to the eG manager.
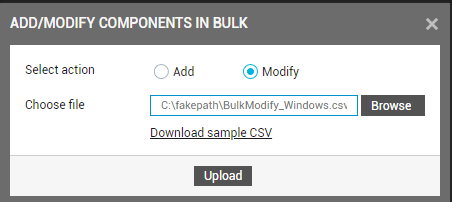
Figure 11 : Uploading the CSV file containing the details of components to be modified in bulk
-
Once a component is modified, the performance data previously collected for that component will be lost. A message to this effect will then appear (see Figure 12).
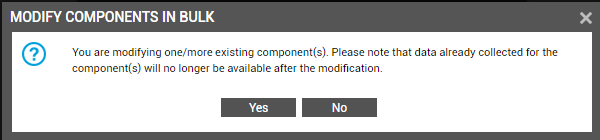
Figure 12 : A message box warning you that performance data previously collected for a modified component will be lost once the changes are updated
- Click the Yes button in Figure 12 to proceed with the CSV file upload.
- Once the CSV file is successfully uploaded to the eG manager, the manager will use the eG CLI to execute commands for modifying all the components configured in the CSV file.
-
If the bulk modification succeeds/fails, a message to the corresponding effect will appear. To troubleshoot failures, use the egCLI.log file in the <EG_MANAGER_INSTALL_DIR>\manager\logs directory (in Windows; in Unix, this will be /opt/egurkha/manager/logs directory).