Adding a new Performance Rating Test
To ascertain the overall performance of a disk on a Microsoft Windows server, a help desk executive has to traverse through the metrics of the Disk Activity test and the Disk Space test. The help desk executive finds it difficult to view each and every measure of both these tests separately. Let us now help him/her in adding a new Performance Rating test so that he/she can figure out the overall performance of the disk at a single glance. To add a new Performance Rating test, follow the steps mentioned below:
-
Follow the menu sequence: Admin -> Performance Rating -> Add/Modify Tests. Figure 1 will then appear stating that there are no user-defined Performance Rating test in your environment.
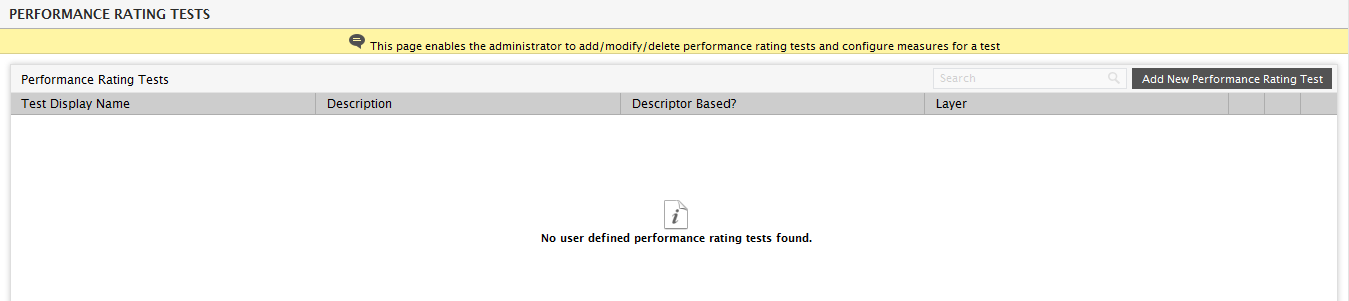
Figure 1 : A message stating no user defined Performance Rating tests are found in your environment
-
By default, if you have managed Citrix/VDI servers in your environment and enabled the user-related tests, then, the Performance Rating tests that are pre-configured and bundled with the eG Enterprise will automatically appear in the PERFORMANCE RATING TESTS page as shown in Figure 2.
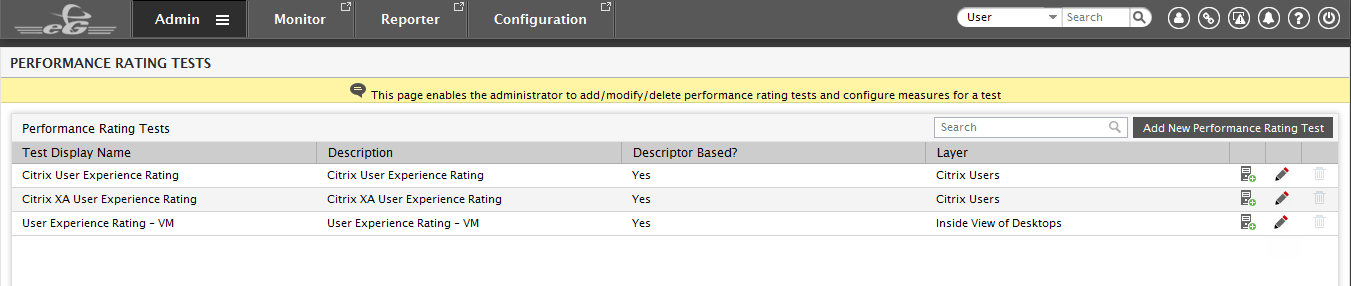
Figure 2 : The list of pre-configured Performance Rating tests
-
If you wish to view the component types to which a pre-configured test is associated with, then click the
 icon against a chosen Performance Rating test (see Figure 2). Figure 3 then appears listing all the component types to which the test is associated with.
Figure 3 : The component types to which a pre-configured Performance Rating test is associated with
Note:
You cannot delete a pre-configured Performance Rating test.
- To add a new Performance Rating test, click the Add New Performance Rating Test button in Figure 1.
-
Figure 4 will then appear.
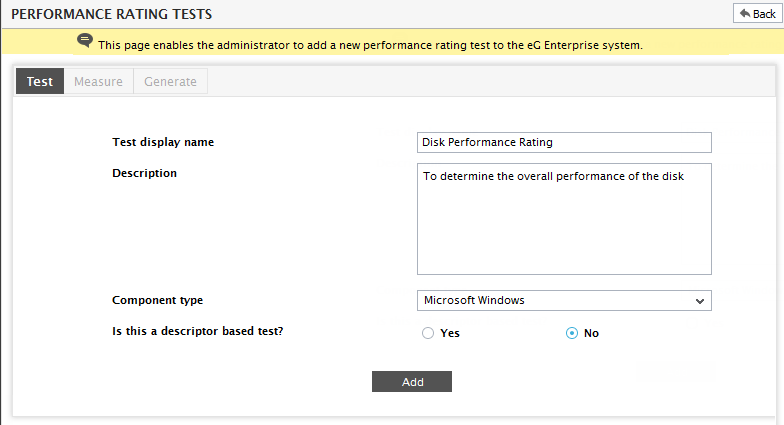
- Here, specify the name of the Performance Rating test that you wish to add in the Test display name text box.
- Once the test name is specified, you need to provide a description of the test in the Description text box.
-
Select the component type to which you wish to associate your test from the Component type list.
Note:
The Component Type list will be populated only with the component types that are managed in your infrastructure.
- Next, specify whether the Performance Rating test of your choice is descriptor based or not by selecting Yes or No against the Is this test a descriptor based test? flag. By default, this flag is set to No.
- If the Is this a descriptor based test? flag is set to No, then, clicking the Add button will reveal Figure 6.
-
Alternately, if you want your Performance Rating test to derive its descriptors from a test associated with the chosen Component type, then, set the Is this a descriptor based test? flag to Yes. The Derive descriptors from the test list as shown in Figure 5 will then appear listing all the tests applicable to the chosen Component type.
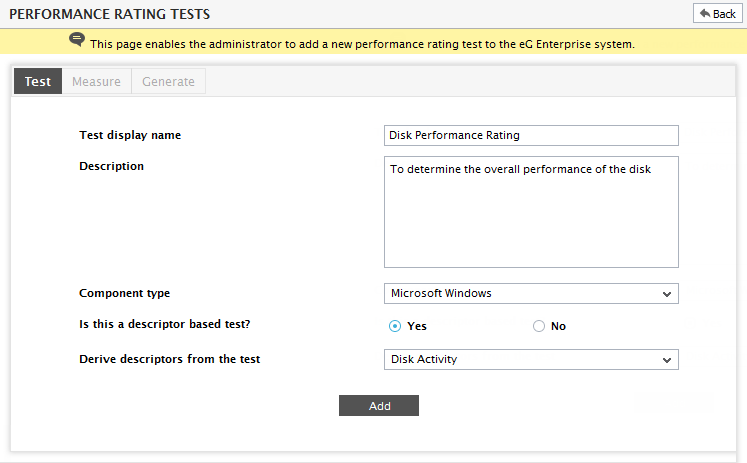
Figure 5 : Choosing a test whose descriptors will be applicable for the newly created Performance Rating test
-
Select a test from the Derive descriptors from the test list and click the Add button. Figure 6 will then appear.
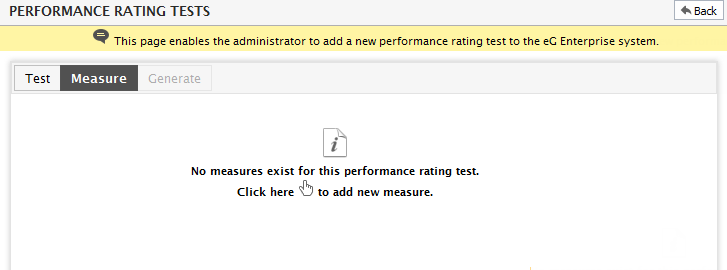
Figure 6 : The Measure tab where no measures are associated with the Performance Rating test
- By default, no measure will be associated with the test. To add measures for the test, click the Click here link in Figure 6.
-
Figure 7 will then appear using which you can configure the measures for your test.
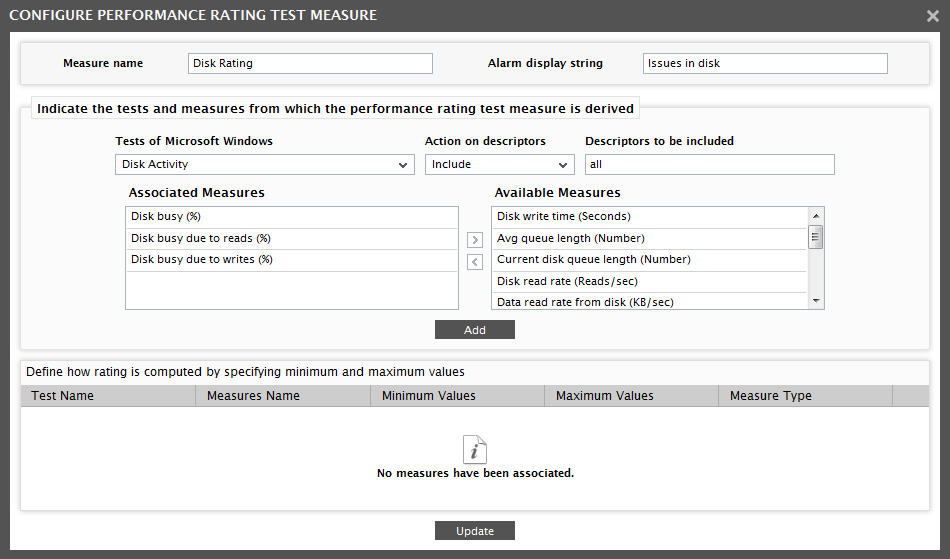
Figure 7 : Configuring measures for the Performance Rating test
- Specify the following in Figure 7.
- First, specify the name of the measure that you wish to add in the Measure name text box.
-
In the Alarm display string, specify the alert message that is to be displayed when a threshold violation is detected for the measure that you are configuring.
Note:
The Alarm Display String text box is limited to 32 characters only. Therefore, specify a short alert message that does not exceed 32 characters.
- The tests associated with the component type that you have chosen from the Component Type list box of Figure 7 will now be populated in the Tests of list box. To select the measures for your test, it is first necessary to select the test to which the measures are associated with. Select the test from the Tests of list.
- Now all the measures pertaining to the chosen test will be listed in the Available measures list. To include the measures of your choice, select the measures from the Available measures list and click the < button. Your selection will now be moved to the Associated measures list.
- If the test that you have chosen from the Tests for list is descriptor based, then you can either include all the descriptors of the test or include only a few of the descriptors. This can be achieved using the Action on Descriptors list. By default, the Include option will be chosen from the Action on Descriptors list and all option will be displayed in the Descriptors to be included text box. If you wish to include only a few of the descriptors of the chosen test, then you can do so by specifying a comma-separated list of descriptors in the Descriptors to be included text box.
-
Likewise, if you wish to exclude certain descriptors, then you can do so by selecting the Exclude option from the Action on Descriptors list and then specify a comma-separated list of descriptors in the Descriptors to be excluded text box. By default, none will be displayed in the Descriptors to be included/Descriptors to be excluded text box.
Note:
You can also include/exclude descriptors based on specific patterns. By default, the *_on_* pattern is supported.
- Once you have chosen the test, measures and the descriptors to be included/excluded, click the Add button in Figure 7.
-
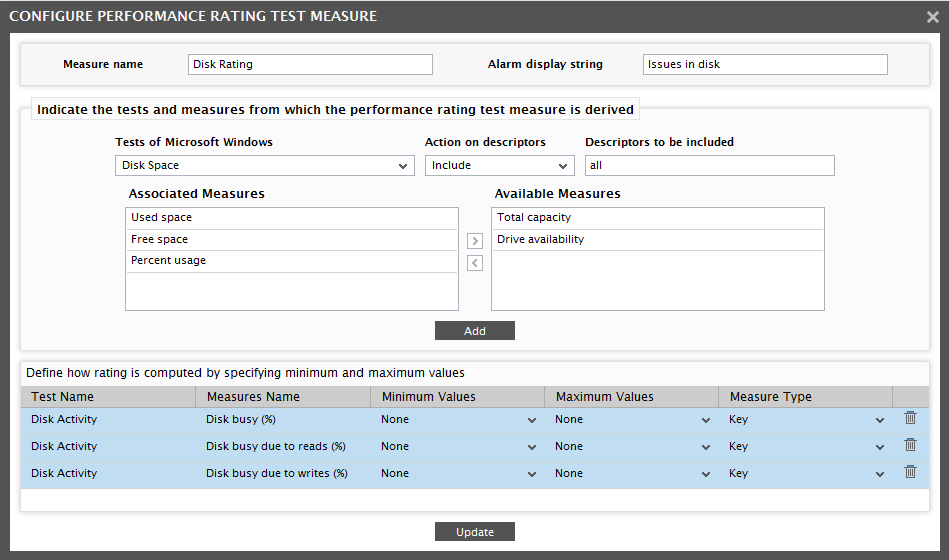
Your selection will now be listed in the section below as shown in Figure 8. Now, specify the maximum/minimum values against each measure based on which the Performance Rating will be computed. The Minimum Values specified should be in ascending order and the Maximum Values specified should be in descending order. By default, the Minimum Values/Maximum Values should be in the format: Critical/Major/Minor.
-
Next, specify whether the measure should carry a higher weightage in the calculation of the Performance Rating or a normal weightage by selecting either Key or Non-key from the Measure Type column.
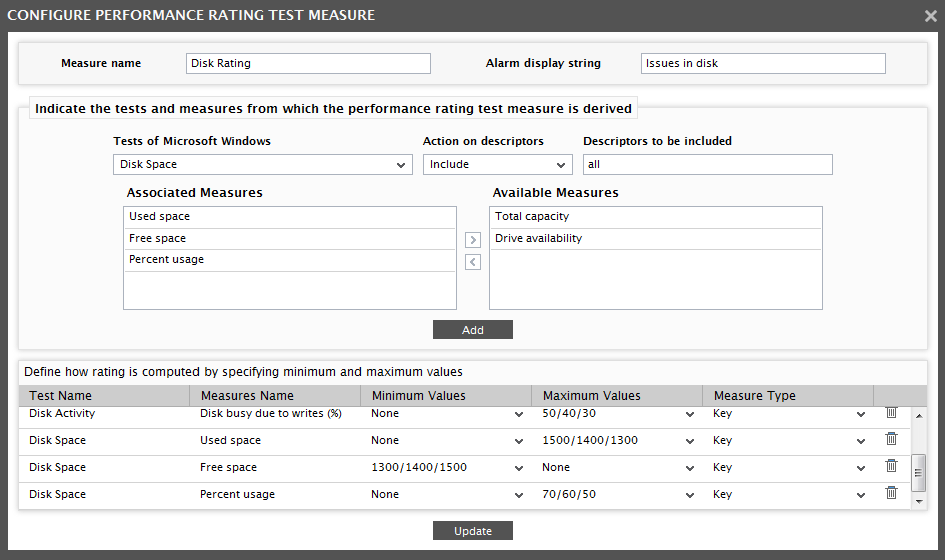
Figure 9 : Setting the Minimum and Maximum values for the chosen measures
-
If you wish to delete your selection, then you can do so by clicking the
 button (see Figure 9).
Note:
By default, the Maximum Values and Minimum Values column will be None. While adding the measures for calculating the Performance Rating, only either the Maximum Values or the Minimum Values column can be None. If both the columns are None, Figure 10 will appear.
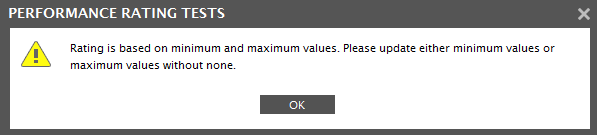
Figure 10 : A message stating both the minimum values and maximum values cannot be none
-
Clicking the Update button in Figure 9 will lead you to the Generate tab as shown in Figure 11.
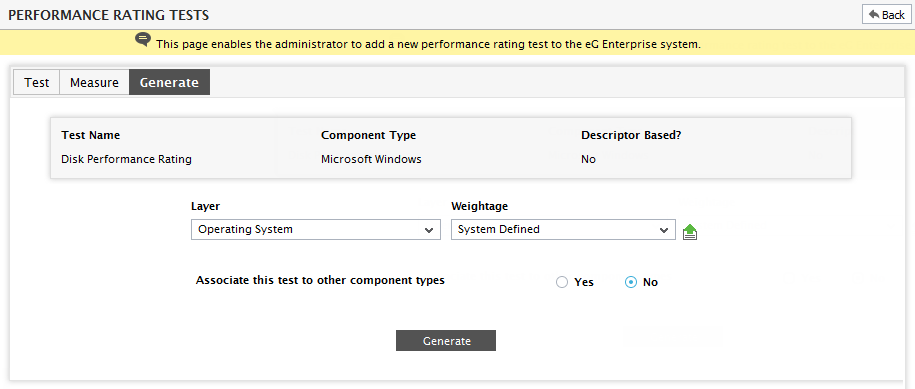
Figure 11 : Associating the Performance Rating Test to a layer
- In Figure 11, select the layer to which your test should be associated with.
- Next, choose the weightage that needs to be applied to the measures for calculating the overall performance of your measure. The weightage to be applied can either be System Defined or Custom Defined.
-
If you have chosen System Defined from the Weightage list, then upon clicking the
 icon adjacent to the list, Figure 12 will appear listing the default system defined weightage values for the measures that are to be configured.
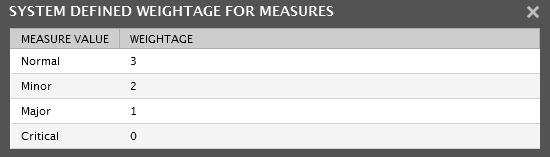
-
If you have chosen Custom Defined option from the Weightage list, then you would be required to provide your own wieghtage values for key measures in the Weightage for Key measures section and non-key measures in the Weightage for non-key measures section as shown in Figure 13.
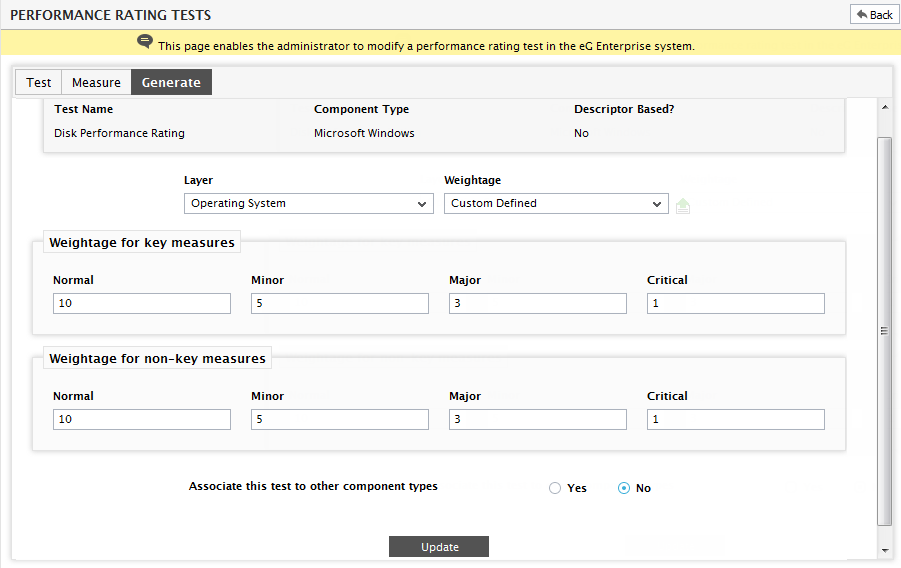
Figure 13 : Applying your own weightage for Key and Non-key measures
Note:
If you have chosen the Weightage as System Defined, then the weightage applied for both Key measures and Non-key measures will be the same.
-
If you wish to associate your Performance Rating test to other component types, set the Associate this test to other component types flag to Yes. By default, this flag is set to No. If the flag is set to Yes, then the Available Component Types list will list all the component types that are associated with the chosen test and layer. Select the component types to which you wish to associate the test and click the < button. Your selection will now be transferred to the Associated Component Types list.
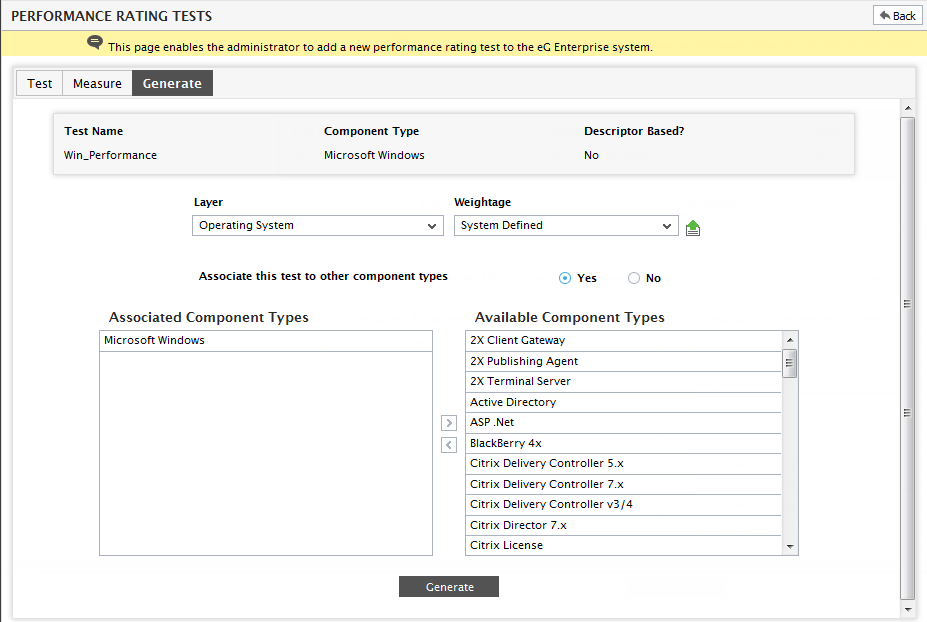
Figure 14 : Associating the Performance Rating test to other component types
-
Clicking the Generate button in Figure 14 will configure the Performance Rating test.
Note:
The Available Component Types list will list all the component types that are associated with the test based on which the Performance Rating test is derived and the layer to which the Performance Rating test is associated with. The user should therefore intelligently associate the test to other component types. If the user chooses a component type that does not support the chosen layer, then the Performance Rating test will not report metrics.
- Next, logout of the eG administrative interface and proceed to login back to the eG Enterprise as a monitor user. You can now notice the newly configured test in the layer and component type that you have associated with.