Auto-Discovering a Segment Topology that is Not Associated with a Zone
The eG agent has the ability to auto-discover individual components and the component topology. The ability to auto-discover the relationship between components, when enabled, helps administrators draw an almost accurate segment topology with minimal user intervention and time! By default, the ability of the eG agent to automatically discover topology is enabled. However, this default setting will take effect only if the eG agent has the ablity to automatically discover components. This is because, topology discovery cannot be performed without component discovery. To enable the eG agent to perform component discovery, follow the steps detailed in Enabling/Disabling Component Discovery by eG Agents. If both component discovery and topology discovery capabilities of the eG agent are enabled, then, follow the Infrastructure -> Segments -> Discovered menu sequence to auto-discover a segment. If no auto-discovered segments pre-exist, Figure 1 will appear. In such a case, check the ‘discovery status’ displayed at the right, top corner of Figure 1 to determine whether/not topology discovery has been turned on. If not, then click the Click here link alongside to instantly switch to the discovery page to enable topology auto-discovery. If you then come back to Figure 1, auto-discovered topologies will be listed.
You can save any of the listed topologies as a segment using this page, or can modify/delete the discovered topologies.
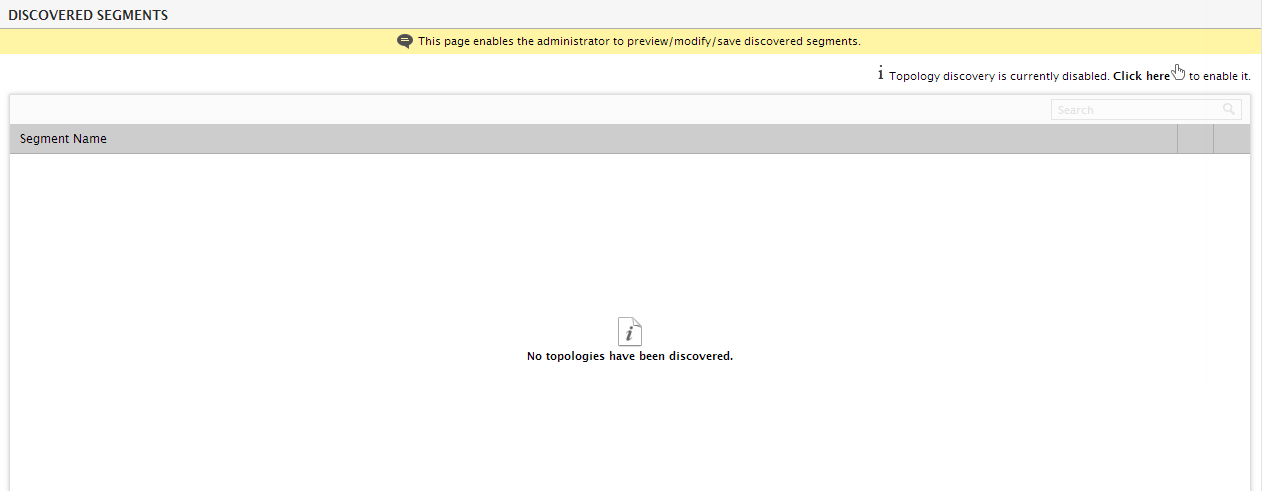
Figure 1 : The AUTO TOPOLOGY page
To modify the topology of a segment, do the following:
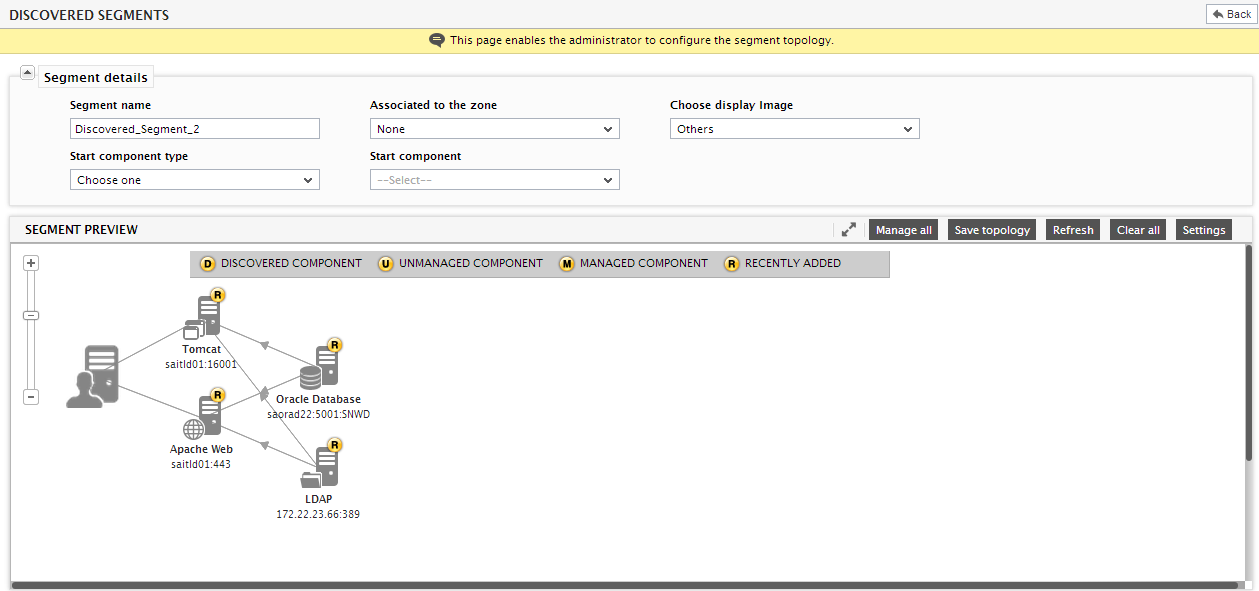
- Click the Modify icon corresponding to the discovered topology.
-
Figure 2 will then appear providing a preview of the discovered topology.
-
If for some reason, any segment component was not automatically discovered by the eG agent, you can alter the segment topology 'on-the-fly' to include that component(s). For instance, say, the LDAP server in Figure 2 talks to 2X Terminal server. Since the eG agent has not auto-discovered the inter-connection between the LDAP server and the 2X Terminal server, let us manually weave this relationship into the segment topology. To do this, first, right-click on the segment component with which the 2X Terminal server interacts - in the case of our example, it is the LDAP server. Doing so will bring up a shortcut menu as depicted by Figure 3.
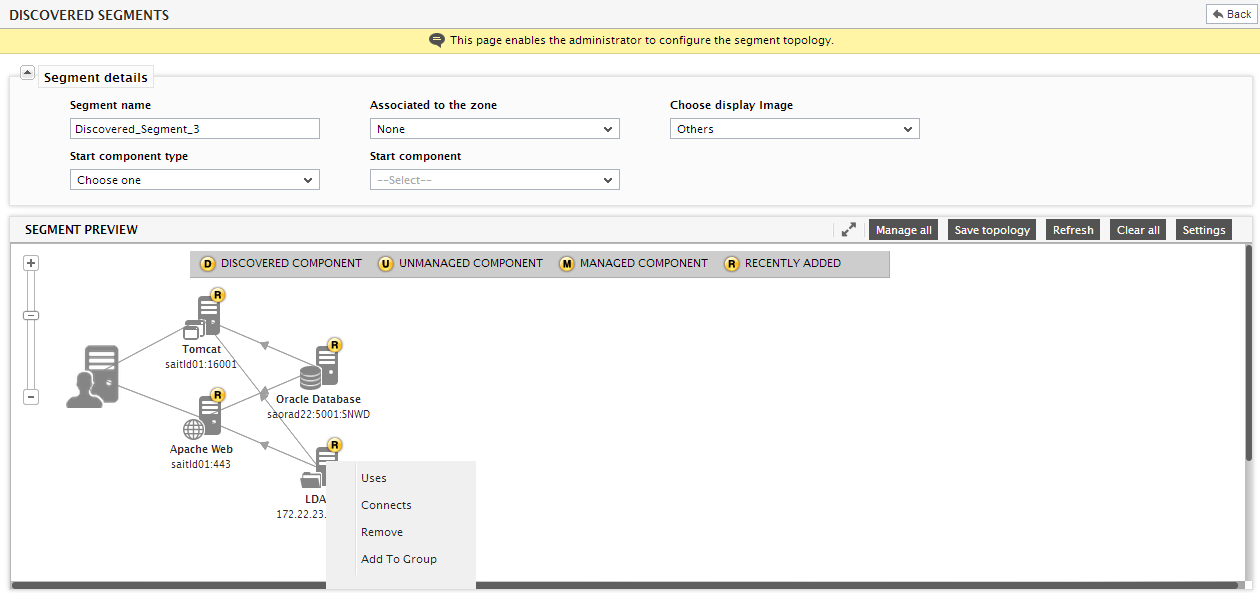
Figure 3 : Modifying the auto-discovered topology to include a new component
-
To establish a Uses connection between the LDAP and 2X Terminal Server, pick the Uses option from the shortcut menu of Figure 3. This will invoke Figure 4.
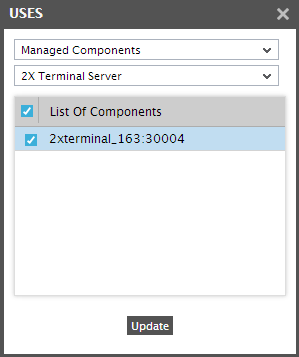
Figure 4 : Selecting the component to be added to the auto-discovered topology
-
To an auto-discovered topology, you can add any managed component or a component that has just been discovered and is yet to be managed. To add a managed component to the topology, select the Managed Components option from Figure 4. For adding a component that has only been discovered and not managed, select the New option from Figure 4. The 2X Terminal server in our example has already been managed. Therefore, pick the Managed Components option from Figure 4, and select 2X Terminal server from the list of component types. All managed 2X Terminal servers will then appear in the list of components section. Click on the check box alongside the LDAP server that you want to add to the topology. The topology will instantly change to reflect the addition (see Figure 5).
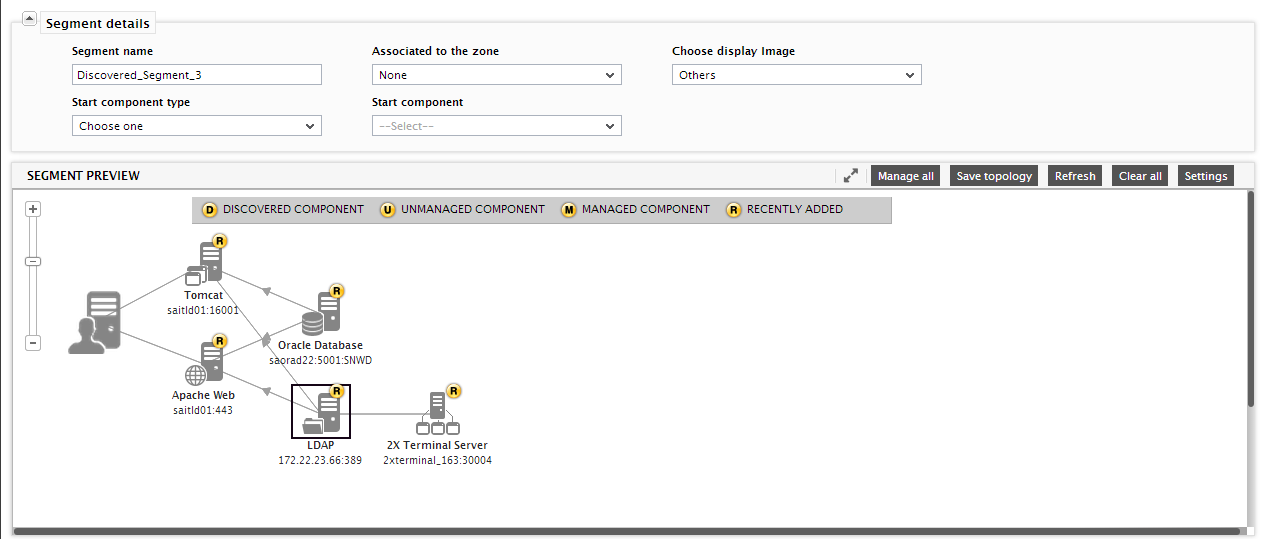
Figure 5 : A new component added to an auto-discovered topology
- Likewise, you can add multiple components to an auto-discovered topology.
- In addition to components, component groups can also be added to the topology.
-
Besides adding components/component groups, you can also remove one/more components/groups from an auto-discovered topology. For instance, consider the auto-discovered topology of Figure 6.

Figure 6 : Modifying an auto-discovered topology by removing a component from it
-
Assume that you want to remove the 2X Terminal server component from the topology. For this, first, right-click on the 2X Terminal server server to be removed, and pick the Remove option from the shortcut menu (see Figure 7).
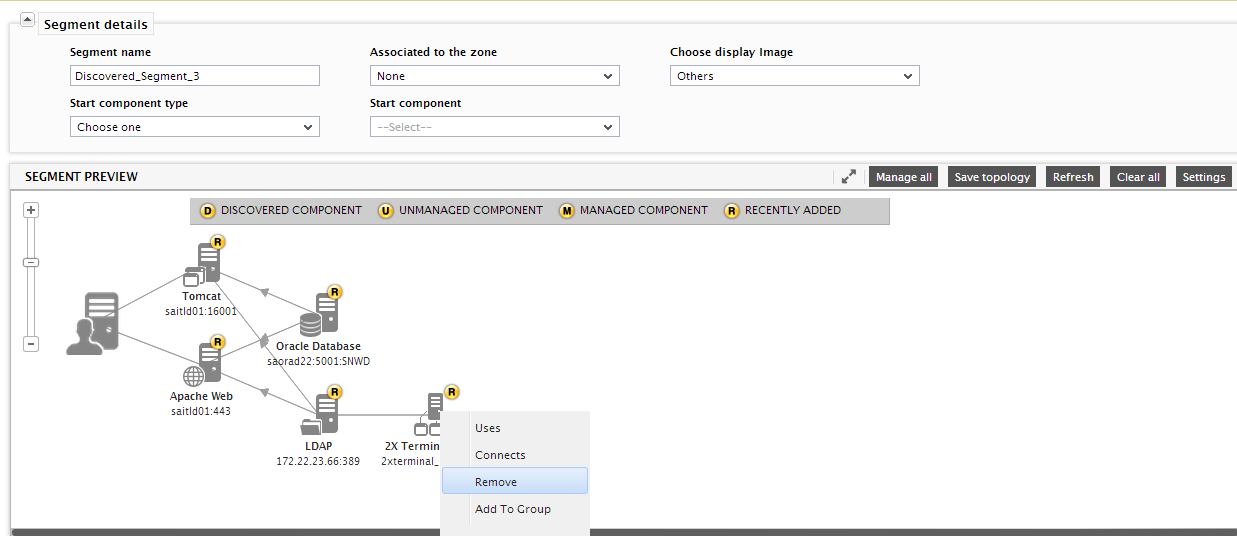
Figure 7 : Removing a component from the auto-discovered topology
-
The change will be immediately reflected in the topology, as depicted by Figure 8 below.

-
You can then proceed to save the topology. However, note that a segment topology can contain only 'managed components'. In the case of the example illustrated by Figure 9, the Tomcat server is yet to be managed. To be able to save the topology, you first need to manage this server. For this, right-click on the Tomcat server in the segment topology of Figure 9, and pick the Manage option (see Figure 9)
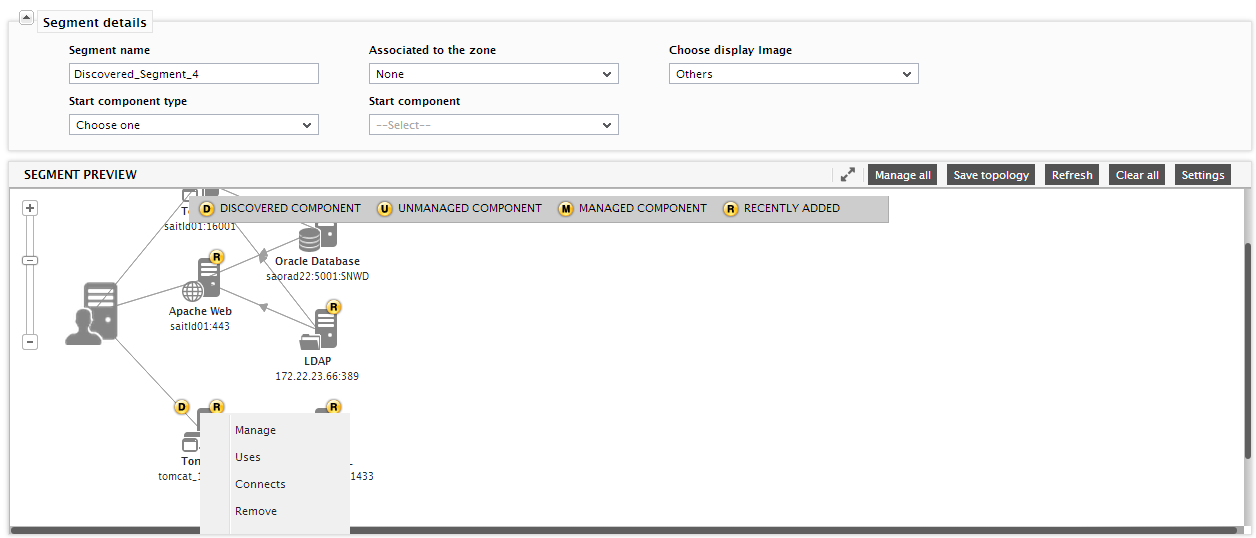
Figure 9 : Managing a newly discovered server in an auto-discovered topology
-
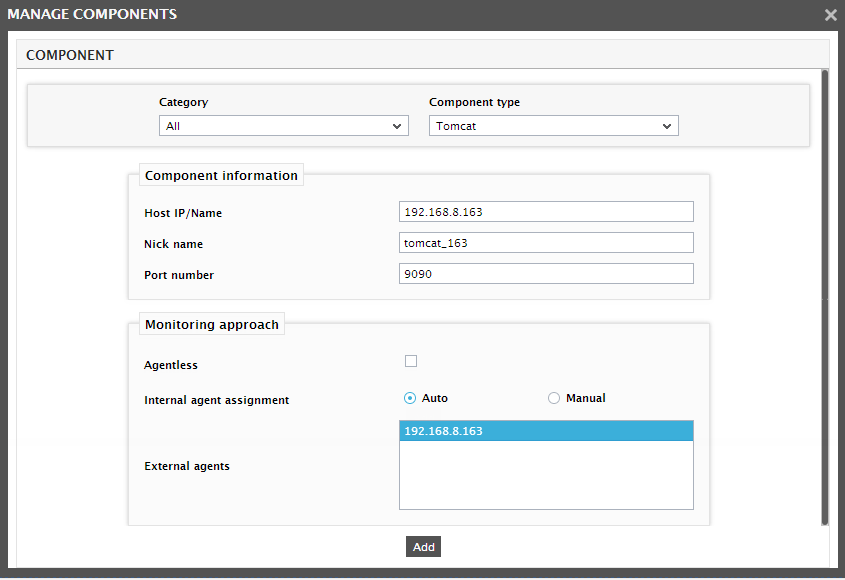
Figure 10 will then appear, using which you can change the configuration of the server being managed. The Nick name of the server, the status of the Agentless flag and the Internal agent assignment flag (if available), and the External agent assigned to the server can be changed. Click the Add button in Figure 10 to add the server.
-
With that, the unmanaged server has been managed. The topology display too will change to this effect (see Figure 11).
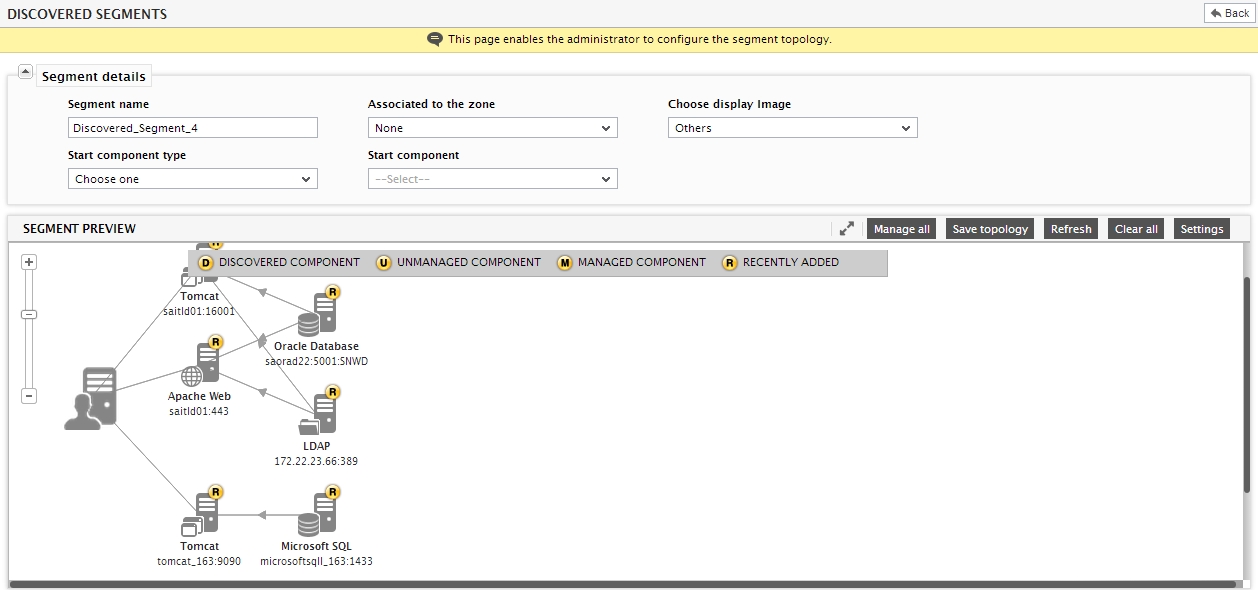
Figure 11 : The auto-discovered topology after an unmanaged server is managed
-
You can now save the topology by clicking the Save topology button above the segment preview in Figure 12.
- You can click on the Refresh button in Figure 12 to refresh a topology, so that it displays recent additions/removals. To clear a topology, select the Clear all button in Figure 12.
- In a topology with a limited number of newly discovered components, you can right-click on each unmanaged component to manage it, as discussed previously. However, when many components in a topology are unmanaged, managing each component one after another, will be a cumbersome task! To save the time and trouble involved in this exercise, the discovered segments page provides you with the option to manage all the newly discovered components in the topology at one shot! For that, you need to click the Manage all button in Figure 12, pick the components you want to manage from the window that then pops up, and click the Add/Manage button to manage your selection.