Configuring Services
So far we have not only seen how individual components are discovered and managed, but also how they can be interlinked into different segments. The different components working together deliver services for end users. The eG manager allows users to add one or more services for monitoring. A service can comprise just one or more independent components offering an end-user service (e.g., a web service offered by a web server).
Alternatively, a service can be a number of components working in conjunction. For example, a mobile payment service could involve a user accessing the service via an SMS gateway, which in turn hands of the request to a middleware application server. The application server could use a database for data storage / verification and rely on an external payment gateway. The collection of components and their interdependencies constitutes a service. Different business processes of an organization could be represented as a service. Note that a single segment topology can support multiple services and a single service may involve a subset of the components in a segment.
A service that can be associated only with a web server or a web application server is a web site. eG agents have the capability to monitor the performance of specific business functions supported by a web site. Such business functions are called transactions in the eG Enterprise system.
The topology configured in the previous section deals only with web servers and not with services. The next step in administering eG Enterprise is to configure services. To configure a service, an administrator has to first choose the Services sub-menu of the Infrastructure menu. Through the Topologies option of the Service sub-menu, the administrator can configure services.
Clicking on the Topologies option results in the currently configured services being displayed (see Figure 5). If the services listed include web sites, then such entries will be followed by the word ‘Site’ within brackets (see Figure 5). The existing details about the service can be modified using the  icon corresponding to a service. To delete a service, just click the
  icon corresponding to it. If more than one service is to be deleted, mark the services for deletion by selecting the check boxes corresponding to them. Then, click on the
  icon at the right, top corner of the page. To mark all the displayed services for deletion, click on the check box corresponding to the Service Name column label in Figure 5, and then click the icon.
If a large number of services have been configured, locating the service to be modified/deleted would become quiet a challenge. This page therefore allows you to quickly search for a service, by first specifying the whole/part of the service name in the Search text box, and then clicking the  icon next to the text box. All services with names that embed the specified string will then appear.

Figure 5 : List of services configured
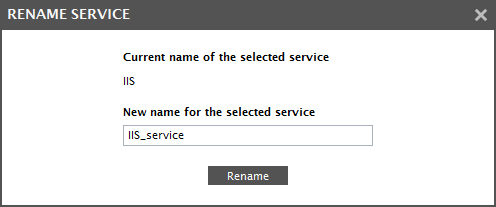
You can even change the name of a service by clicking on the Rename icon corresponding to it. Provide the New name for the selected service in Figure 6 that appears and click the Rename button therein to register the new name. This will automatically change the service name across the eG user interface.
Note:
Since renaming changes the name of a service across the user interface, you will no longer be able to access performance data of the service for the period prior to the name-change using the monitoring/reporting consoles. Therefore, exercise caution when renaming a service.
New services can be added for monitoring by eG Enterprise using the Add New Service button in Figure 5.
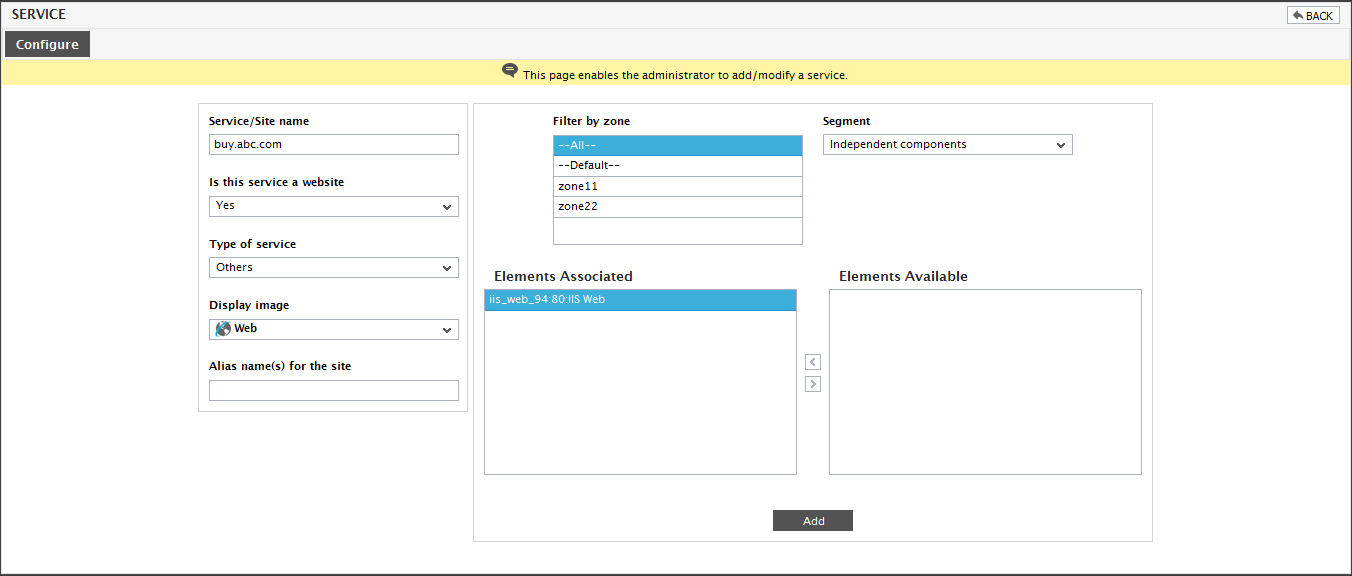
Figure 7 : Adding a new web site
-
Using the service page (see Figure 7), an administrator can add a new web site / any other service. Figure 7 illustrates how the administrator can add a web site. The administrator has to specify the name of the new web site in the Name of the Service/Site text box. For e.g., when accessing a URL of the form http://www.abc.com/, the service name should be provided as www.abc.com.
Note:
You cannot add a service with the name new.
-
From the Is this service a website? list box, select Yes as shown in Figure 8 to configure a web site service. This indicates that the specified service is to be added as a web site. Then, Choose a display image for the service.

-
A single site can be addressed by various other names in the environment (e.g., www.abc.com may also be accessed as www.abc.com:80, abc.com, us.abc.com, 172.169.10.20 etc.). These names (or IP address:port combinations) can be specified in the Alias name(s) for the site text box. This input field is optional. To ensure that all requests to a website are captured, it is essential to ensure that all the alias names for a site are specified accurately. The administrators can specify a maximum of six alias names, each of which should be comma separated.
While multiple alias names can be specified for a site, in the monitor interface, all the statistics pertaining to this web site will be reported using its site name that is specified in the Name of the Service/Site text box.
- If you want your Service/Site to contain a component/segment that is already within a zone, then select that zone from the Filter by zone list. By default, the --All-- option is displayed indicating that all independent components/segments in the monitored infrastructure are available for creating a new service/site. The Segment list of Figure 8 contains the list of fully configured segments in the target environment that contains at least a single web or application server. The site can be associated with any of these segments. If you choose Independent components from the Segment list, then all the independent components in the managed infrastructure will be listed in the Elements Available list. To associate the components to the Service/Site, select the component from the Elements Available list and click the < button. This will transfer your selection to the Elements Associated list. To remove an associated component, click the > button.
- Click the Add button to add the service. The topology will then appear in a new Topology tab as shown in Figure 9.
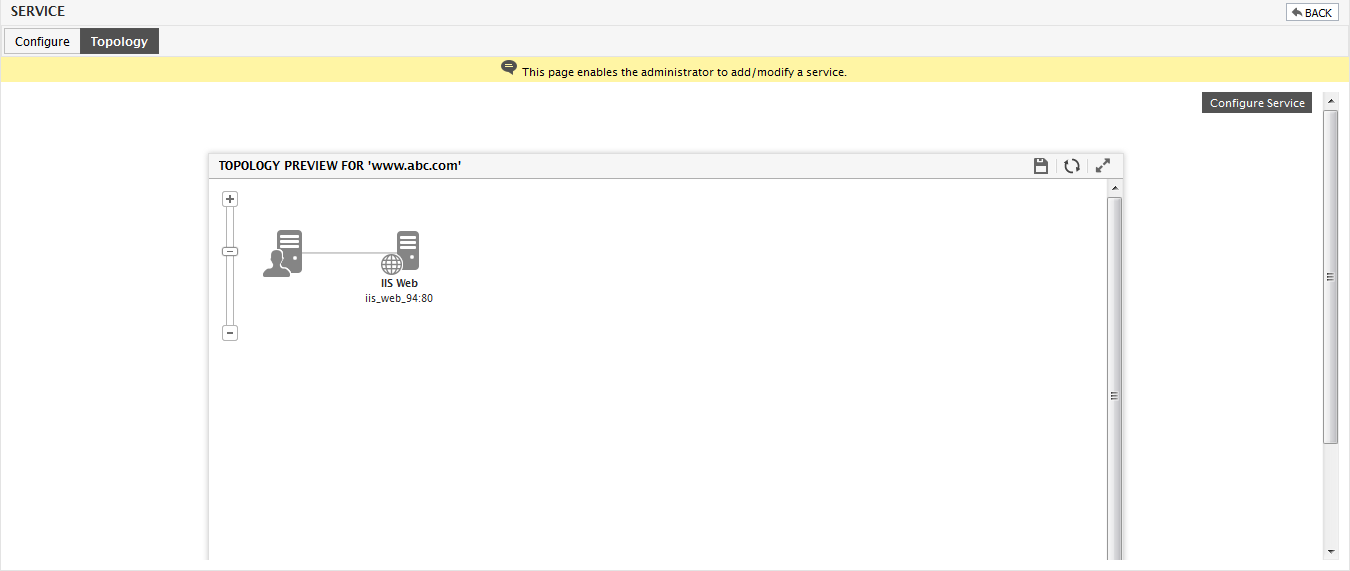
Figure 9 : Viewing the Service topology
If you have chosen to add both segments as well as independent components from the Segment list of Figure 7, the Service topology as shown in Figure 10 will appear.
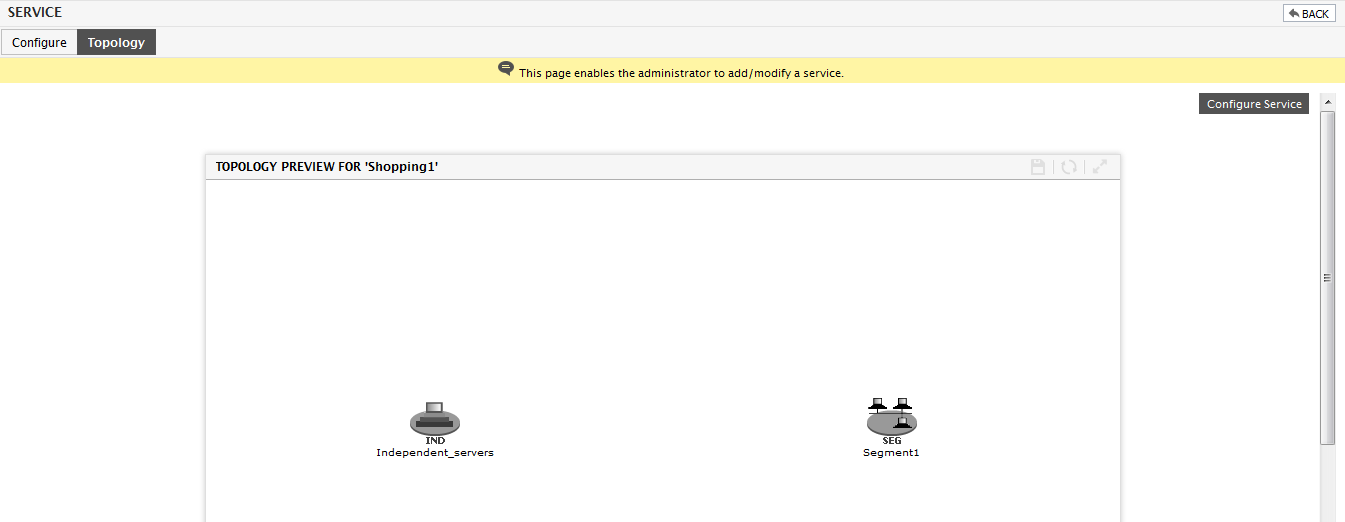
Figure 10 : The Service topology that appears when a segment is associated with the service
Clicking on the segment will lead you to the topology of the segment as shown in Figure 11.
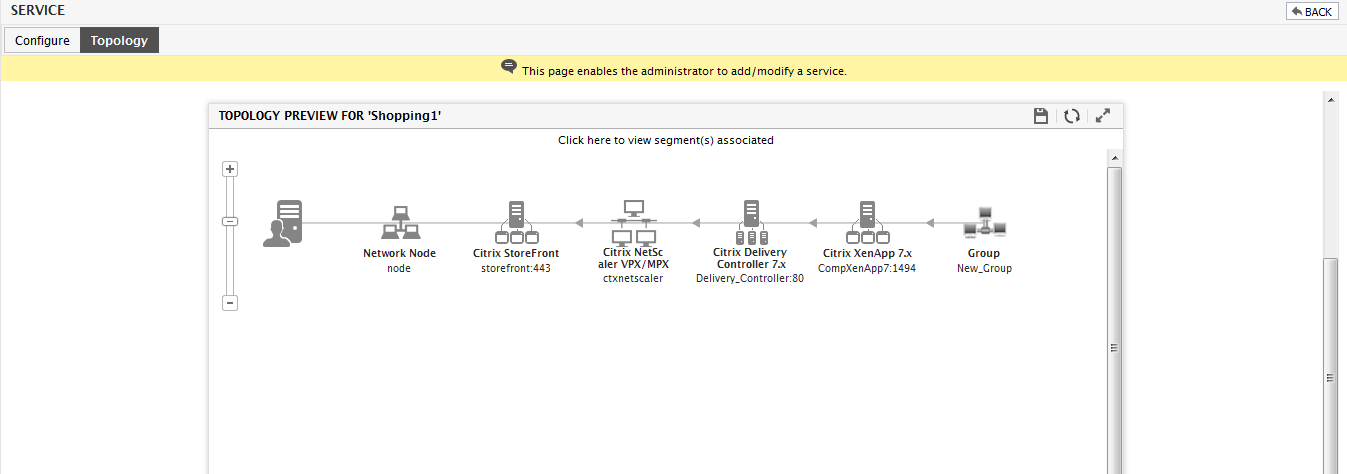
Figure 11 : The topology of the segment associated with the service
Note:
By default, when a segment associated with a service is modified (by adding/removing components from the segment), the change will be automatically reflected in the service configuration. To ensure that such an automatic service updation does not occur, set the Update_Service parameter in the [MISC] section of the eg_topology.ini file (in the <EG_INSTALL_DIR>\manager\config directory) to no (by default, this will be set to yes).