Configuring Zones
Large infrastructures spanning geographies can pose quite a monitoring challenge owing to the number of components involved and their wide distribution. Administrators of such infrastructures might therefore prefer to monitor the infrastructure by viewing it as smaller, more manageable business units. In eG parlance, these business units are termed zones. A zone can typically comprise of individual components, segments, services, and/or other zones that require monitoring. For example, in the case of an infrastructure that is spread across the UK, USA, and Singapore, a zone named USA can be created consisting of all the components, segments, and services that are operating in the US branch alone. The USA zone can further contain an East-coast zone and a West-coast zone to represent infrastructure and services being supported on the two coasts of the US.
While a service/segment contains a group of inter-related components with inter-dependencies between them, a zone contains a group of components, services, segments, or zones that may/may not have inter-dependencies.
To create a zone, do the following:
- Follow the menu sequence: Infrastructure -> Zones.
-
A zones page will appear listing the existing zones (see Figure 3). If no zones pre-exist, then a message to that effect will appear here.
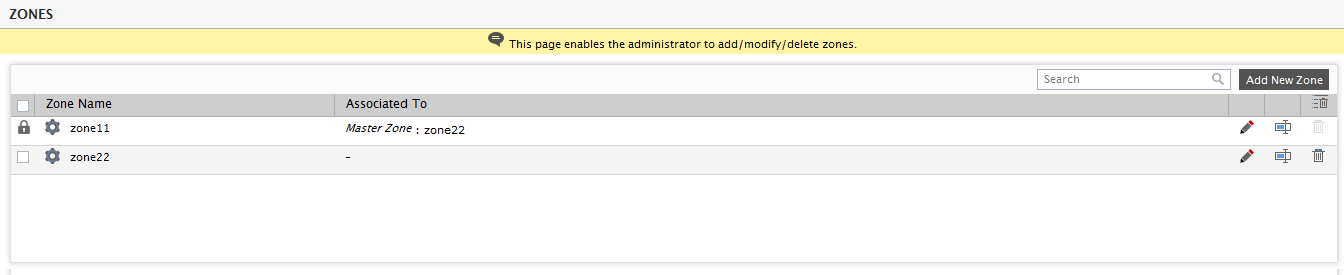
Figure 3 : List of existing zones
To modify a zone, click on the
 icon corresponding to that zone in Figure 3. To delete a zone, click on the
  icon corresponding to it. To delete multiple zones at one shot, first mark the zones for deletion by selecting the check boxes corresponding to them. Then, click on the
  icon that is available just below the Add New Zone button in Figure 3. To mark all the displayed zones for deletion, click on the check box corresponding to the Zone Name column label in Figure 3, and then click the icon. If a large number of zones have been configured, locating the zone to be modified/deleted would become quiet a challenge. This page therefore allows you to quickly search for a zone, by first specifying the whole/part of the zone name in the Search text box, and then clicking the
  icon in the text box. All zones with names that embed the specified string will then appear.
 You can even change the name of a zone by clicking on the
 icon corresponding to it. Provide the New name for the selected zone in Figure 4 that appears and click the Rename button therein to register the new name. This will automatically change the zone name across the eG user interface.
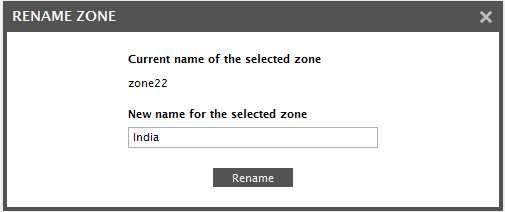
Note:
Since renaming changes the name of a zone across the user interface, you will no longer be able to access performance data of the zone for the period prior to the name-change using the monitoring/reporting consoles. Therefore, exercise caution when renaming a zone.
- To create a new zone, click on the Add New Zone button in Figure 3.
- Figure 5 will then appear. Specify the name of the zone in the Zone name text box.
- Pick a display image for the zone from the Display image list.
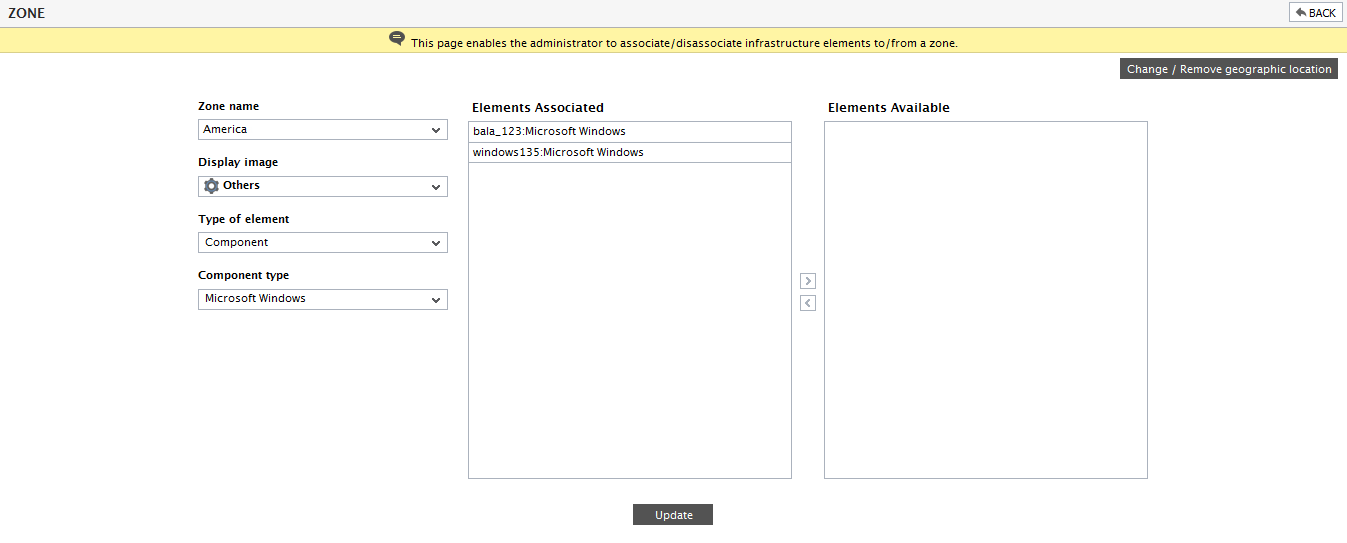
- Then, select the Type of element that you want to add to the zone – this can be a component/segment/service/service group/component group/zone. If you choose Component from the Type of element list, then the Component type list will appear.
- Select the component type of your choice from the Component type list.
-
All elements of the chosen Type of element will then be listed in the Elements Available list of Figure 5. An element can be a component of a particular component type/ segment/ service/group/ zone.
-
From the Elements Available list, select the elements to be added to the new zone and click the < button in Figure 5. This will transfer the selection to the Elements Associated list as depicted by Figure 6.
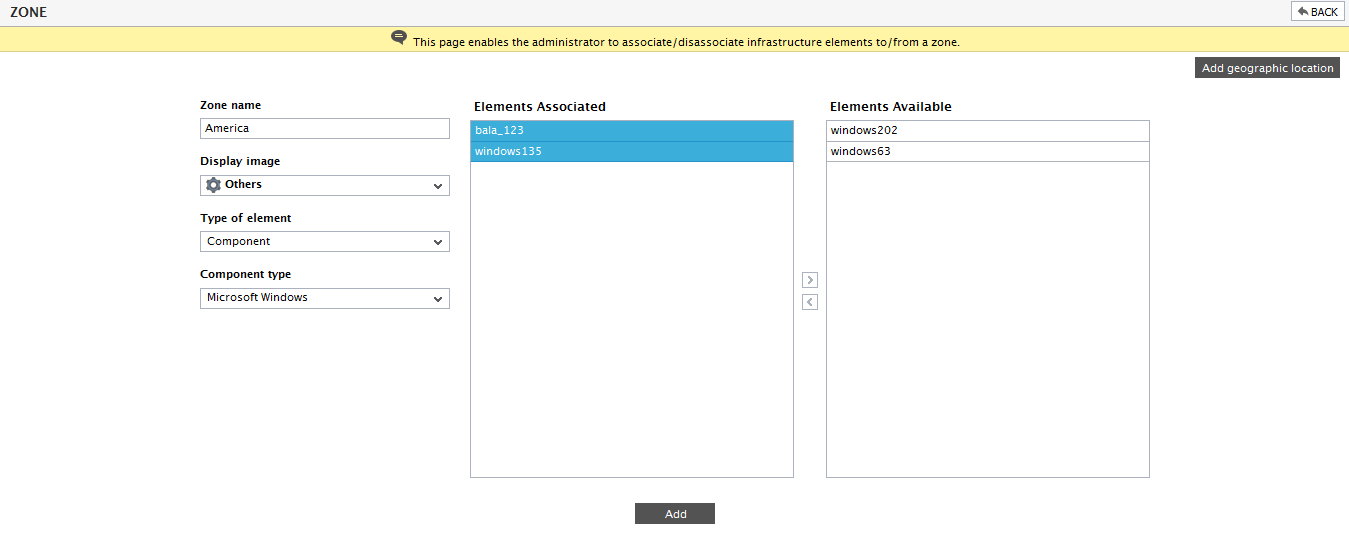
- Similarly, multiple components/services/segments/zones can be associated with a new zone.
- To disassociate an element from the zone, select the element from the Elements Associated list and click the > button in Figure 6.
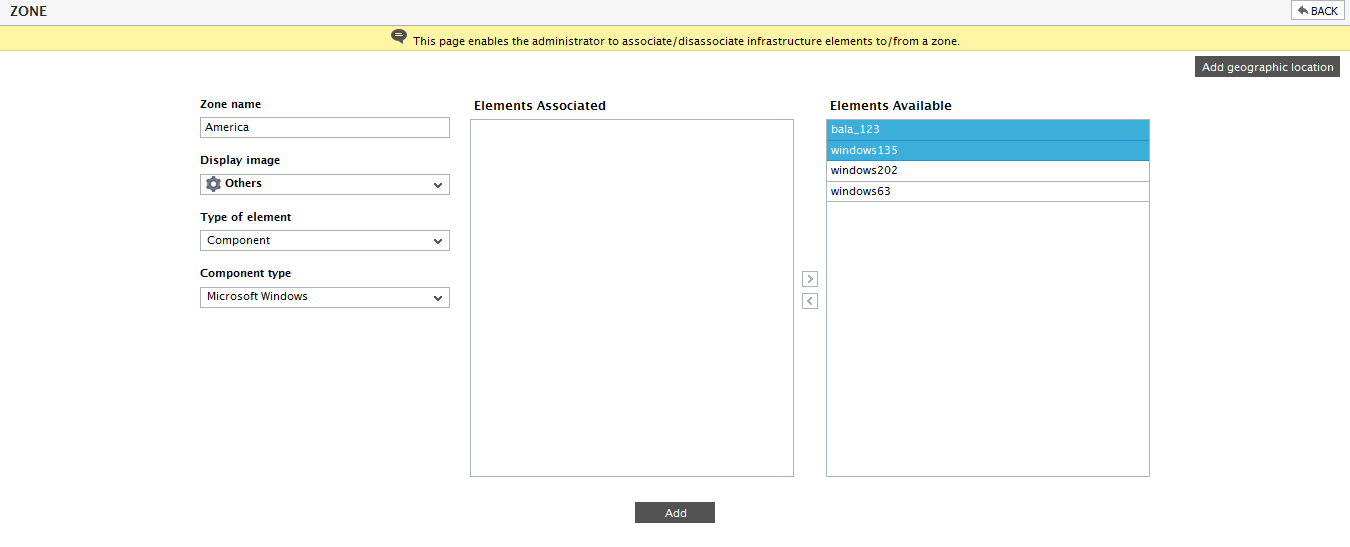
Figure 5 : Selecting elements for association
Typically, zones can be used to represent the status of the IT infrastructure in a specific geographic location. eG Enterprise allows you to drill down on a geographic map to visually figure out the exact geographic area where a zone operates, and instantly evaluate the performance of the different zones spread across the different locations worldwide. To enable such an analysis, you first need to indicate the geographic location of the configured zones using the built-in map interface of eG Enterprise To access this interface, click on the Add geographic location button in Figure 5. Figure 7 then appears revealing a world map. The geographic map display for zones is achieved through an integration of the eG Enterprise management console with the Google maps service.
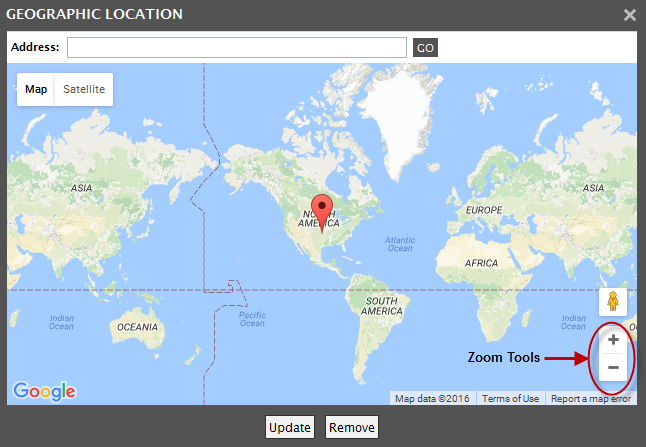
Figure 7 : The eG Enterprise map interface
Note:
By default, eG Enterprise allows you to mark the location of a zone using its map interface. If, for some reason, you want the map option disabled, then, do the following:
- Edit the eg_ui.ini file in the <EG_INSTALL_DIR>\manager\config directory
- By default, the mapEnabled parameter in the [zone_map] section of the eg_ui.ini file is set to yes. To disable maps, set this flag to no; doing so ensures that the Add geographic location link no longer appears in Figure 5.
- Finally, save the eg_ui.ini file.
Note:
If you are unable to view the zone map even after enabling it, then, follow the troubleshooting steps provided in the Troubleshooting chapter of this document to resolve the issue.
-
Use the arrow buttons indicated by Figure 7 to scroll right, left, up, or down, and the '+' and '-' buttons in the interface to zoom the map in and out, respectively. Now, to mark the geographic location of say, the east_coast zone, which represents the eastern coast of USA, first zoom into the North American continent in the world map. For that, move a little to the left of the map by clicking on the left arrow button in Figure 7. Then, to zoom into the country of USA in North America and view all its states as well, keep clicking on the '+' button in Figure 7 until USA and its states are visible in the map (see Figure 8).
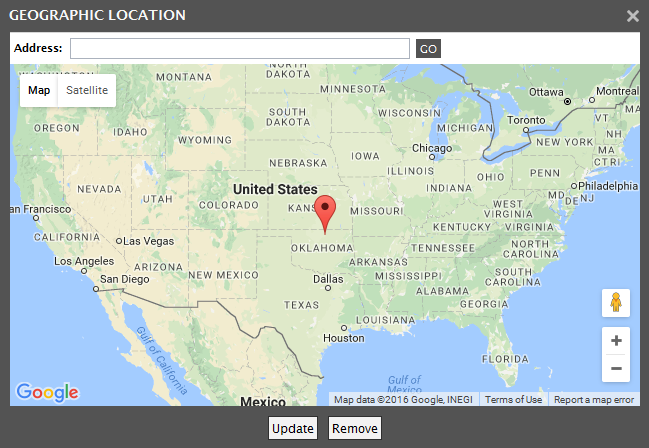
- Next, place your mouse pointer on any state in the east coast of USA, say New York, and then click on that state. To save the marking marked by the location pointer, click the Update button. To delete it, click the Remove button in Figure 9. To simply close the map interface, just click on the X button at the right, top corner of Figure 9.
-
Once you exit the map interface, you will return to the zone page. If you have marked the location of the zone in the map and have updated the marking, then the Add Geographic location link in the zone page will change to Change / Remove geographic location, as depicted by Figure 10. At any later point in time, you can make location changes in the map by clicking on this link.
-
Once the zone configuration is complete, click on the Back button at the top of Figure 9 to open the zones page. The newly created zone will now appear here (see Figure 10).

Figure 10 : The newly created zone appearing in the LIST OF ZONES page
-
If any of the listed zones is a member of another zone, then such ‘child’ zones will be preceded by a ‘lock’ symbol.
Note:
A zone can be associated with multiple zones. For example, a zone named newyork can be added to the east_coast zone and also to the USA zone. However, a parent zone cannot be added to a child zone. For example, you can add newyork to east_coast, but subsequently, you cannot add east_coast to newyork.