Configuring the Mail Alert Settings
To configure the mail alert settings, select the Alert Settings from the Mail Settings menu of the Alerts tile. Figure 1 will then appear.
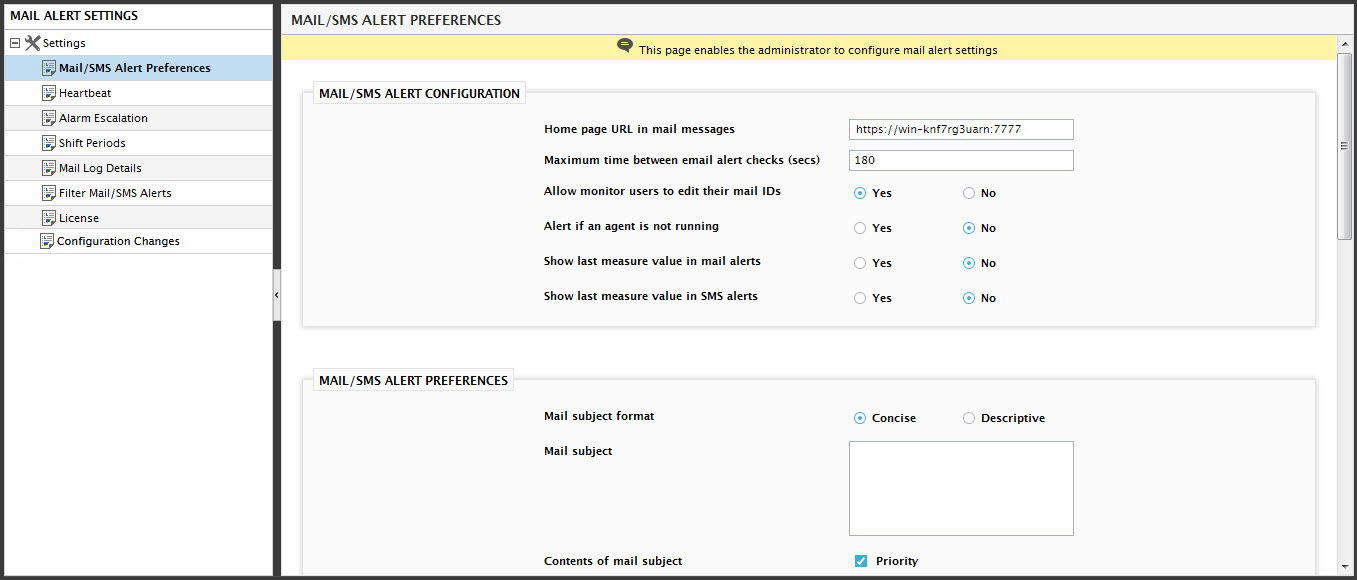
Figure 1 : The MAIL ALERT SETTINGS page
As can be inferred from Figure 1, the mail alert settings panel to the left provides a Settings tree-structure – each node of the tree represents a collection of parameters that an administrator can set, in order to control the email alerting function of the eG manager. The contents of the right panel will change in context to the node chosen from the Settings tree.
The sub-sections below discuss each of these nodes elaborately.
Mail/SMS Alert Configuration
Click on the Mail/SMS Alert Preferences node to define when and how email alerts should be sent. The right panel will change to display a wide array of options, starting with the MAIL/SMS ALERT CONFIGURATION section you see in Figure 2.
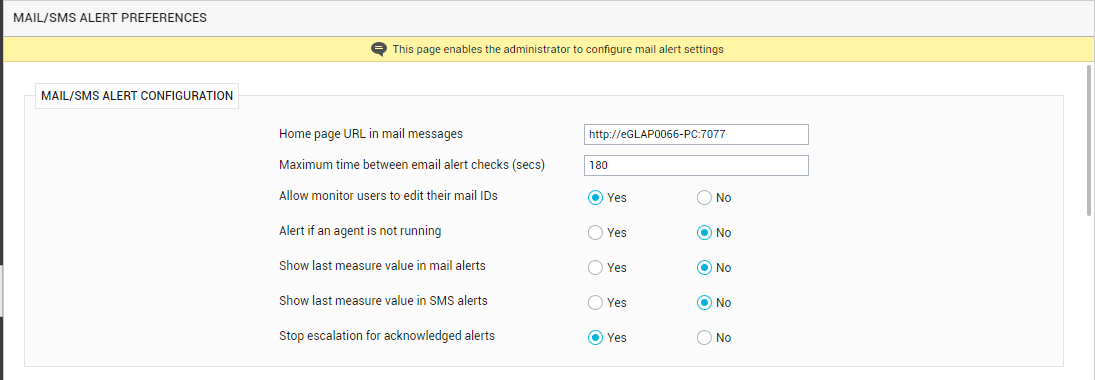
Figure 2 : The Mail/SMS Alert Configuration section of the Mail Alert Settings page
In the mail/SMS alert configuration section of Figure 2 above, you can configure the following:
- Home page URL in mail messages: If a user has been configured to receive email alerts in the HTML message mode, then alarms sent by mail to that user will carry a hyperlink named Home at the right top corner. The destination of the hyperlink can be configured in this text box. By default, clicking on the Home link will connect you to the eG manager and open the login screen. By providing a specific URL here, you can ensure that monitor users are lead to the specified URL upon clicking the Home hyperlink. Note that the URL specified here will appear on the title bar of the eG management console as soon as you login.
- Maximum time between email alert checks: By default, the eG Enterprise system sends email alerts every 3 minutes (i.e., 180 seconds). In some environments, one/more tests could be run very frequently, say every 1 minute or 30 seconds. If these tests report abnormalities, then the user will receive an email alert of the issue only at the 3rd minute. What’s worse, if the issue detected by the test is resolved by the time the email alert is sent out by the eG manager, then the user might not even know that a problem had occurred - critical problems could thus go unnoticed! To avoid this, you can reduce the frequency at which the eG manager sends out email alerts. For this, you need to override the default value (of 180 seconds) displayed against the Maximum time between email alert checks text box.
- Allow monitor users to edit their mail IDs: By default, the password and e-mail/mobile no. settings in the user profile page are editable. However, for security purposes, if the password and e-mail/mobile no. settings need to be rendered non-editable, then, set this flag to No.
-
Alert if an agent is not running: You can configure the eG Enterprise system to send out email alerts when an agent stops running. To do so, set this flag to Yes.
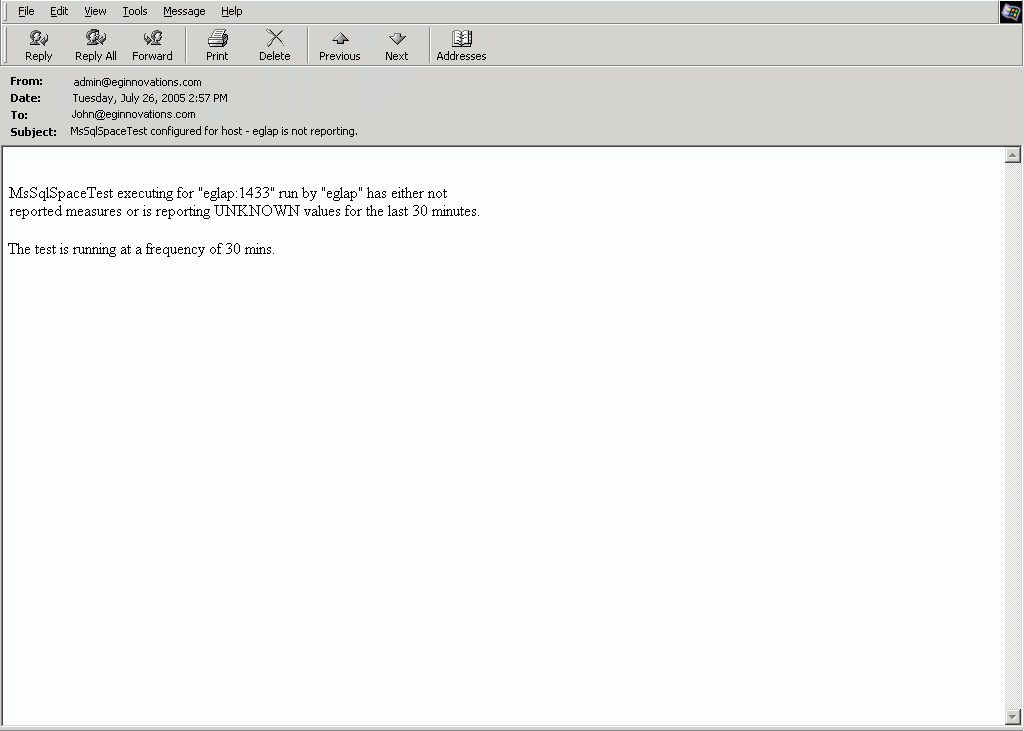
Figure 3 depicts the email alert received by the eG administrator, when some of the agents are not reporting measures to the manager.
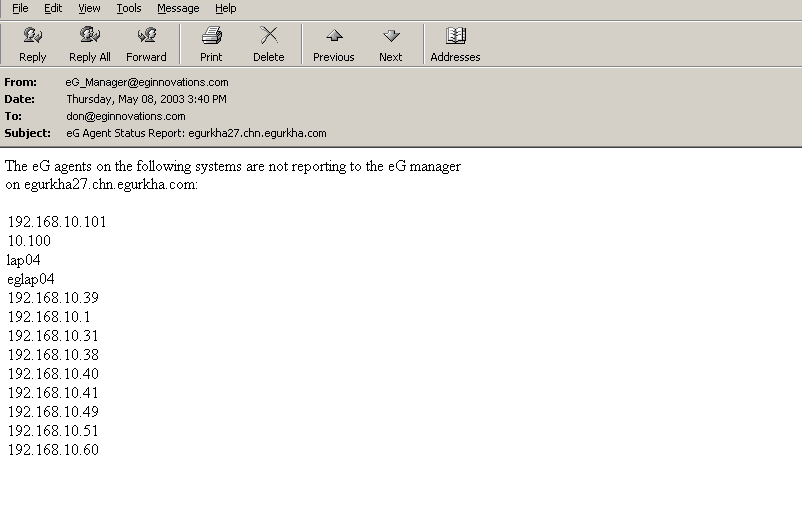
Figure 3 : Email alert received by the administrator when agents do not report measures to the manager
Note:
An eG agent can be configured to run specific tests once a day or once every few hours. You can configure the eG manager to exclude tests that are infrequently run when it determines whether an agent is running or not. To do this, modify the value of NotReportingCutoffFactor in the [MISC_ARGS] section of the eg_services.ini file. By default, tests running with measure period of greater than 20 minutes are not considered by the eG manager for determining if an agent is running or not.
- Show last measure value in mail alerts: If you want the email alert to display the value that was last reported for the problem measure, then set this flag to Yes. If this is done, then the test name, measure description, and last measure value will by default be included in every email alert. Accordingly, in the Mail preferences sub-section of the mail/sms alert preferences section (see Figure 2), the Test, Measure, and Last measure value check boxes will appear selected, but will be rendered non-editable. If you do not want the last measure value in your email alert, then set the Show last measure value in alerts flag to No. In this case therefore, the Last measure value check box will not even be available for selection in the Mail preferences sub-section. As for the Test and Description check boxes, they will appear selected by default, but administrators can uncheck the check boxes if they do not want to include this information in the email alerts.
- Show last measure value in SMS alerts: If you want the SMS alerts to display the value that was last reported for the problem measure, then set this flag to Yes. If this is done, then the test name, measure description, and last measure value will by default be included in every SMS alert. Accordingly, in the SMS preferences sub-section of the mail/sms alert preferences section (see Figure 2), the Test, Measure, and Last measure value check boxes will appear selected, but will be rendered non-editable. If you do not want the last measure value in your SMS alert, then set the Show last measure value in SMS alerts flag to No. In this case therefore, the Last measure value check box will not even be available for selection in the SMS preferences sub-section. As for the Test and Description check boxes, they will appear selected by default, but administrators can uncheck the check boxes if they do not want to include this information in the email alerts.
-
Stop escalation for acknowledged alerts: An acknowledgement is an indication that the corresponding alert is being investigated; the purpose of alarm escalation is also similar - i.e., to have someone look into/investigate an alert that has been pending for a long time. Escalating an acknowledged alert would not only be redundant, but will also result in an enterprise unnecessarily throwing more administrative resources on problems that are already being attended to. This is why, by default, eG Enterprise does not escalate acknowledged alerts. Accordingly, this flag is set to Yes by default. In some environments however, managers may want to be alerted if a user who volunteered to resolve a problem (by acknowledging it) is unable to solve it within a stipulated time. In such environments, it may be useful to escalate acknowledged alerts. For this, you may want to set this flag to No.
Note:
If administrators choose to escalate acknowledged alarms, they can additionally configure the eG manager to send the acknowledgment description as part of the email/escalation alert. This way, help desk managers can understand that the problem is being looked into, know who is looking into it, and demand status updates from that specific executive. If you wish to include the acknowledgment description in the email and escalation alarm mails, then set the AckDetailsWithEmailAlerts flag in the [misc_args] section of the eg_services.ini file (in the <EG_INSTALL_DIR>\manager\config directory) to Yes. By default, turning this flag on will ensure that the descriptions related to the Top 3 acknowledgments based on the acknowledgement time are included in the email/escalation mails. This default number can however be overridden. For this, set the value of your choice against the NoOfAcknowledgementsInMail flag in the [misc_args] section of the eg_services.ini file. If both the Stop escalation for acknowledged alertsand AckDetailsWithEmailAlerts flags are set to Yes, then the Stop escalation for acknowledged alerts flag setting takes precedence and the alarm escalation stops for an acknowledged alarm.
Mail Alert Preferences
To configure the subject and format for email/SMS alerts, use the mail/sms alert preferences section (see Figure 4).
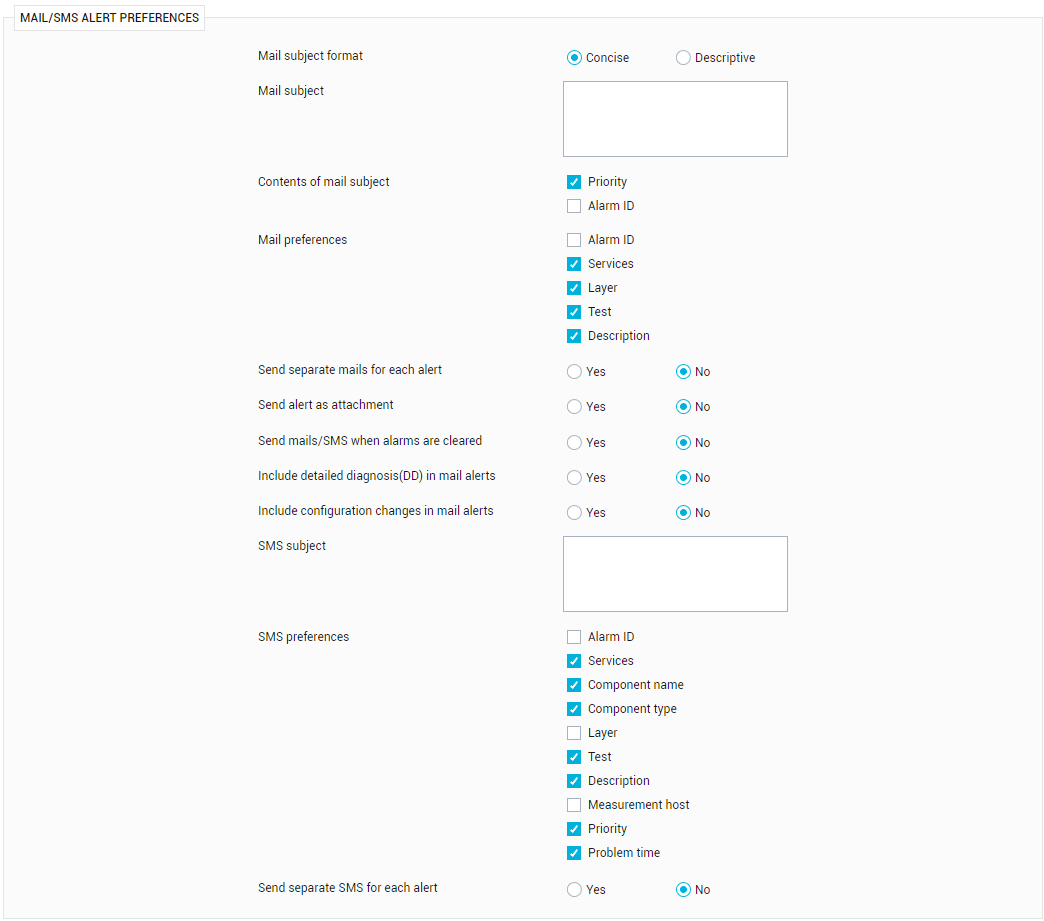
Figure 4 : Mail/SMS Alert preferences section of the Mail Alert Settings page
The administrator can customize the subject of the alarm mails by specifying an appropriate subject. Towards this end, the administrator will first have to indicate whether he/she needs to provide a simple, brief subject, or a more descriptive subject. To provide a short and crisp subject, select the Concise option against Mail subject format. In which case, the administrator has to specify the mail subject in the Mail subject text box (see Figure 5).
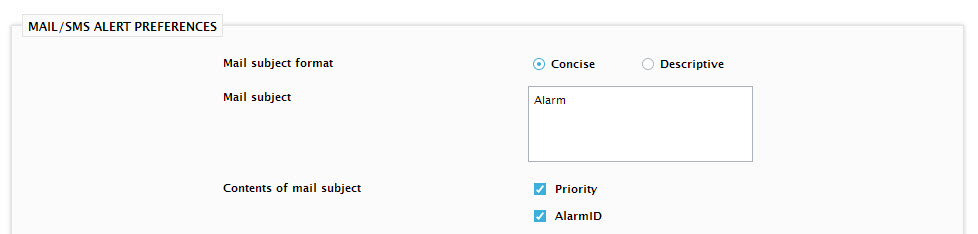
Figure 5 : Building a ‘Concise’ mail subject
By default, the Concise mail subject will include the alarm priority - accordingly, the Priority check box will be selected by default in the Contents of mail subject section. If you want to exclude the priority from the mail subject, simply deselect the Priority check box. If required, you can also add the AlarmID to the mail subject. Everytime an alarm is generated, the eG Enterprise system automatically assigns a unique AlarmID to it. To include this ID in the Concise mail subject, select the AlarmID check box.
To provide an elaborate subject, which should include the names and/or types of components to which the alarms pertain, select the Descriptive option. In this case, administrators will be allowed to “build” the entire mail subject, by first specifying how the subject should begin in the Start of mail subject text box (see Figure 6). Then, he/she should choose the Contents of mail subject by selecting the desired check boxes. A typical mail subject can include one/more of the following:
- Services: The name of the business services impacted by the performance problem
- Component name: The name of the problem component
- Component type: The name of the problem component-type
- Layer: The name of the problem layer
- Test: The test that reported the problem measure(s)
- Description: The problem descriptor (if any), and a brief description of the problem
- Priority: The problem severity (Critical/Major/Minor)
- Last measure value: The last value reported by the problem measure; this check box will appear only if the Show last measure value in alerts option in the MAIL/SMS ALERT CONFIGURATION section is set to Yes.
-
Alarm ID: You can choose to include this ID in your email subject by selecting this check box.
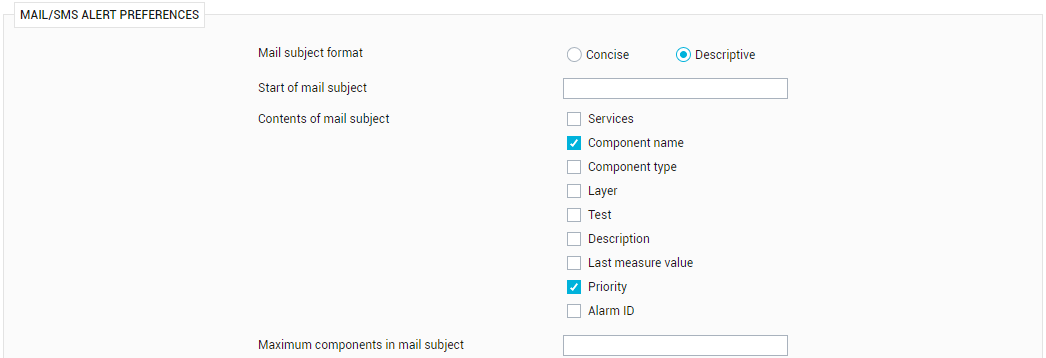
Figure 6 : Building a 'Descriptive' mail subject
For instance, assume that, except the Services and Alarm ID check boxes, all the other check boxes in the Contents of mail subject section are selected. Now, say that the DiskSpace test mapped to the Operating System layer of a component named Event50 has detected a Critical space crunch in the C drive of that component. The corresponding email alert will therefore carry the following subject:
Critical,Event50,Host system,Operating System,DiskSpace,Capacity is low{C},98
From the above example, it is clear that the above email alert is of the following format:
<Priority>,<Component Name>,<Component Type>,<Layer>,<Test>, Alarm description {Descriptor},Last measure value
The maximum number of problem components to feature in the mail subject should also be indicated in the Maximum components in mail subject text box.
Note:
The Descriptive mail subject discussed above will take effect only if the following conditions are fulfilled:
- The user profile must be configured to receive email alerts for New alarms.
- The Send separate mails for each alert flag should be set to Yes.
In this case, note that the Maximum components in mail subject setting becomes irrelevant. On the other hand, if the mail subject is set to Descriptive, the user profile is configured to receive alerts for the Complete list of alarms, and the Send separate mails for each alert flag is set to No, then the subject of the resulting email alert will indicate only the <ComponentName> <ComponentType>. In this case however, the Maximum components in mail subject setting gains significance.
Similarly, if the mail subject is set to Descriptive, the user profile is configured to receive alerts for the New list of alarms, and the Send separate mails for each alert flag is set to No, the resulting email alert will not display the variables chosen from the Contents of mail subject section; instead, a mail subject of the format, <ComponentName> <ComponentType>, will accompany each mail alert generated. Here again, the Maximum components in mail subject setting gains significance.
Besides the mail subject, the contents of an email alert can also be customized by selecting the relevant check boxes from the Mail Preferences section of Figure 4.
Note:
If the Show last measure value in mail alerts flag in the MAIL/SMS ALERT CONFIGURATION section is set to Yes, then the Test and Description check boxes against Mail preferences will be automatically deselected. This means that if you choose to include the problem measure value in your email alerts, then the test name and descriptor will by default be included in those alerts. On the other hand, if you choose not to include the last measure value in the email alerts, then you have the option to/not to include the problem test name and/or descriptor in the email alerts.
If multiple alarms are generated simultaneously, then the eG Enterprise system, by default, sends a single email alert comprising of all the alarm information. Accordingly, the Send separate mails for each alert flag is set to No by default. To ensure that a separate email is sent for every alarm, select the Yes option.
Note:
The "separate email/SMS alert" flag setting will take effect only if a user is configured to receive email/SMS alerts for the Newalarms. For users who are configured to receive the Complete Listof alarms, details of multiple alarms will continue to be clubbed in a single email/SMS regardless of the flag setting.
Figure 7 depicts a sample email alert sent out by the eG manager.
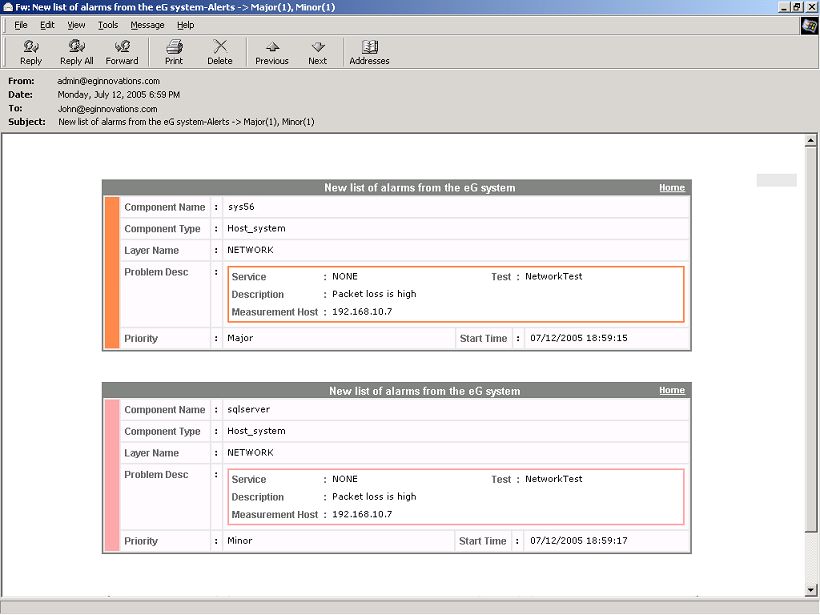
Figure 7 : An email alert with the default mail subject
Note:
- If the eG agent detects an issue in a test Descriptor, then the email alert will also include the descriptor name. If another descriptor of the same test suffers a performance setback later, then users who are configured to receive only Newalarms, will receive a single email containing the information pertaining to both the alarms. Moreover, the start Date and time for both the problems, as indicated by the alert, will be that of the first alarm.
- Similarly, when the alarm priority changes - say, from Critical to Major - the email alert for the Major alarm will carry the Date and time of the original Critical alarm.
In some environments, the mail servers used for processing email alerts might not be adequately configured to support certain data types/fonts used in the email content. In such cases, alarm information included in the body of the mail could appear distorted / misaligned. To avoid this, the eG manager can be configured to send alerts as attachments, so that users can open the alarm information and view it using any program that they choose.
To achieve this, set the Send alert as attachment flag in Figure 4 to Yes. By default, this flag is set to No. Note that both HTML and text alerts can be sent as attachments. Figure 8 depicts a sample HTML alert attached to an email.
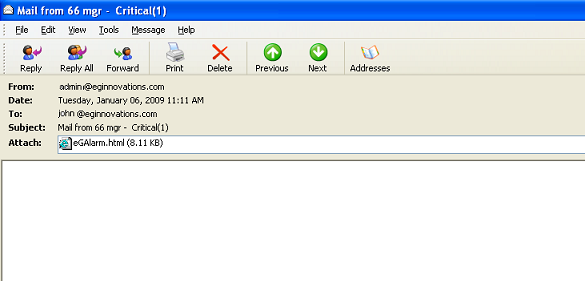
Figure 8 : Alert sent as an attachment
The eG Enterprise system can also be configured to send email alerts/SMS when a problem gets fixed. This can be done by setting the Send mails/SMS when alarms are cleared flag in Figure 4 to Yes. A sample normal alert is shown below:
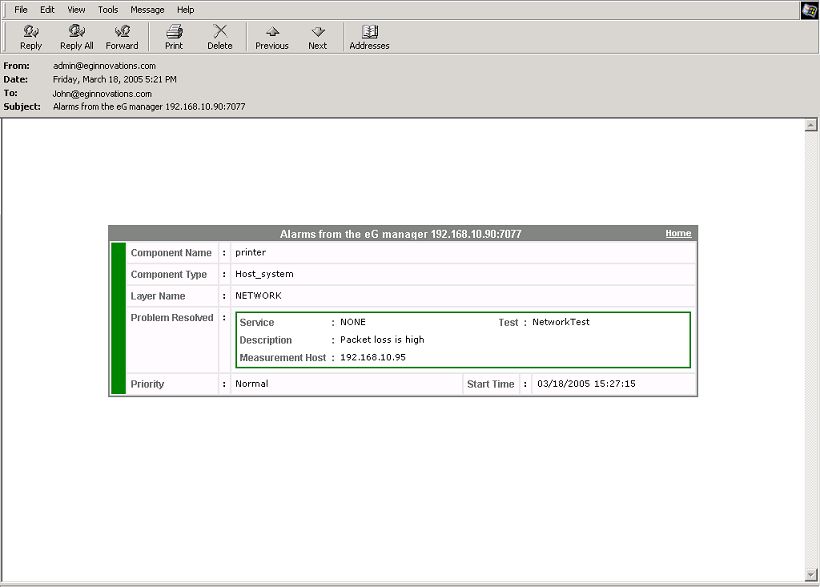
Figure 9 : A normal alert sent by the eG Enterprise system
Besides the above-mentioned information, the email alerts sent by the eG Enterprise system can also be configured to include the detailed diagnosis of the problem measures. For instance, an email alert indicating excessive CPU utilization on a host can also be configured to list the top 10 CPU-consuming processes on that host. This way, administrators can easily perform further diagnosis without having to login to the monitor interface; the required information will be available in the email itself.
To ensure that the detailed diagnosis information accompanies the alarm details, set the Include detailed diagnosis (DD) in mail alerts flag to Yes.
Note:
Once this flag is switched on, then users who are configured to receive the New list of alarms will begin receiving email alerts with DD. However, in the case of users who have been configured to receive the Complete list of alarms, the eG manager will only send email alerts without DD.
Figure 10 depicts a sample HTML email alert with DD information.
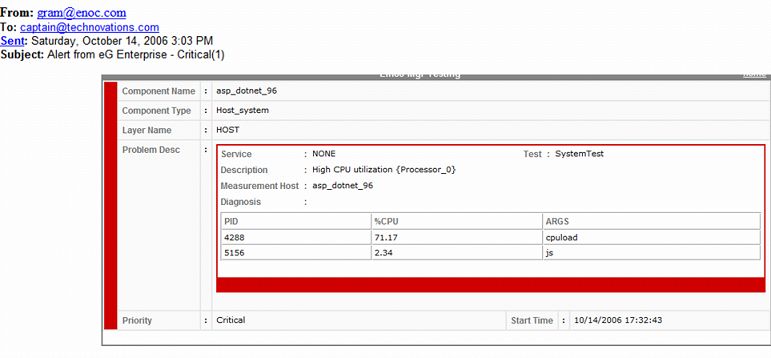
Figure 10 : A sample email alert with Detailed Diagnosis information
You can also make sure that configuration changes are also intimated to administrators via email alerts. For this, set the Include configuration changes in mail alerts flag to Yes.
SMS Alert Preferences
Similarly, for alarm information transmitted via SMS, an administrator can provide a subject of his/her choice in the SMS subject text box. By default, the contents of the SMS will include the alarm priority. The user can customize the other details to be displayed in the mobile phone’s console by selecting the relevant check boxes in the SMS preferences section. By default, the Component Name, Component Type, Description, Services, Test, Priority, and Problem time are selected. If you want, then you can have your SMS alerts display the Alarm ID, Layer, and/or Measurement Host.
If multiple alarms are generated simultaneously, then the eG Enterprise system, by default, sends separate SMS alerts for every alarm. Accordingly, the Send separate SMS for each alert flag in Figure 4 is set to Yes by default. To ensure that a single SMS alert comprises of information pertaining to all the simultaneous alarms, set this flag to No.
Note:
The "separate email/SMS alert" flag setting will take effect only if a user is configured to receive email/SMS alerts for the Newalarms. For users who are configured to receive the Complete Listof alarms, details of multiple alarms will continue to be clubbed in a single email/SMS regardless of the flag setting.
Note:
- The sms subject and sms preferencesfields will appear only if the eG license enables the SMS alerting capability. If the license information screen displays a No against SMS Alerts, then the SMS subject and settings cannot be configured.
- To stop receiving email alerts, the administrator can remove the eG Administrator mail ID from the mail/sms setting page (see ). For that, he/she would have to remove the mail host first, and then the eG Administrator mail ID, and finally, click the update button.
Enabling WhatsApp Alerting
You can also configure eG Enterprise to communicate alerts via WhatsApp.
For that, do the following:
-
In the WHATSAPP ALERT CONFIGURATION section of Figure 11, move the Enable whatsapp alerts slider to the right to enable whatsapp alerting.
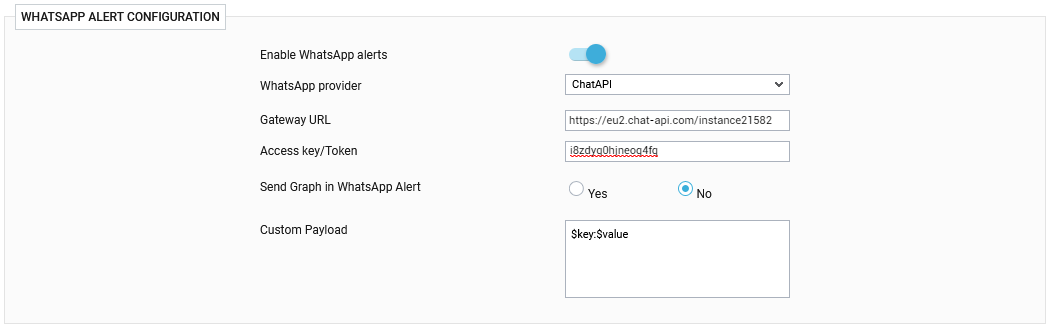
Figure 11 : Enabling WhatsApp alerting using a gateway provider
-
Next, choose a WhatsApp provider. eG Enterprise is capable of using one of the following gateway APIs to send out WhatsApp alerts:
- Twilio: Twilio is a cloud communications platform that provides a set of tools and services for developers to build and integrate various communication functionalities into their applications. It allows developers to add capabilities such as voice calling, video calling, messaging (SMS, MMS), and more to their web and mobile applications through a set of APIs. For WhatsApp alerting, the eG manager leverages Twilio's Content Template Builder. Using this builder, one can create and send rich messaging content over any Twilio-supported messaging channel.
- Chat API: Chat API is designed to create chat bots and integrate WhatsApp with business systems
-
WhatsMate: WhatsMate provides API service for WhatsApp messaging.
The sections that follow will discuss how to configure eG Enterprise to use each one of the gateways / providers listed above.
Enabling WhatsApp Alerting Using Twilio
By default, Twilio is chosen as the WhatsApp provider (see Figure 12).
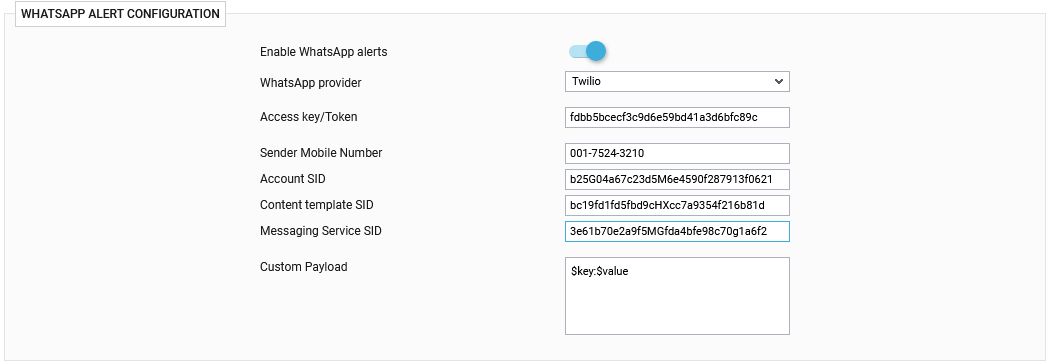
Figure 12 : Configuring WhatsApp Alerting using Twilio
Before you proceed to integrate with Twilio for WhatsApp alerting, ensure that the following pre-requisites are fulfilled:
-
Signup for Twilio and obtain a valid Account SID; refer to Twilio documentation to know how to achieve this.
-
Activate the Twilio Sandbox for WhatsApp. This is a pre-configured environment in the Twilio Console for testing the following functionality:
-
Sending business-initiated messages
-
Replying to user-initiated messages
-
Configuring a Webhook URL and a status callback URL
Note:
-
WhatsApp messages can be sent to only those end users who have joined your Sandbox. Messaging other users will fail with Error 63015.
-
Sandbox numbers are restricted to 1 message every 3 seconds.
-
The Sandbox session expires three (3) days after joining. After this, end users will have to manually rejoin the Sandbox to continue receiving messages.
-
-
Generate an Access Token for enabling the eG manager to interact with the Twilio Sandbox for WhatsApp channel; refer to Twilio documentation to know how such a token can be generated. Note that Sandbox tokens expire, and you will need to generate a new one after a certain period.
-
Obtain a Sender mobile number; typically, the Sandbox is pre-provisioned with a Twilio phone number that is shared across all sandbox users. However, this can be used for testing and discovery purposes only. In production environments therefore, follow the steps below to obtain a Sender mobile number:
-
Login to the Twilio console;
-
Register the eG manager as WhatsApp sender;
-
Register your Twilio phone number and have all message templates submitted for approval, as these must be approved by WhatsApp.
-
Once the request is approved, proceed to use the registered number as the WhatsApp sender.
-
-
Create content templates using the Twilio Console's Content Template Builder. Then, submit them for Twilio's approval and obtain a Content Template SID. To know how to do this, refer to the Twilio documentation. Note that the content template's body must contain the text "eG Alerts - {{1}}".
-
Create a Messaging Service from Twilio and obtain a Message Service SID. Refer to Twilio documentation for more information on configuring a messaging service.
Once the pre-requisites are fulfilled, proceed to use Figure 12 for configuring the Twilio WhatsApp channel for sending WhatsApp alerts to recipients. For that, you need to provide the following information in Figure 12:
-
Access key/token: The token is a secret key used for authenticating API requests. In this text box, provide the token that was generated for authenticating requests from the eG manager to the Twilio Sandbox for WhatsApp channel.
-
Sender mobile number: In testing environments, provide the shared mobile number that is assigned for all Sanbox users. In production environments however, use the number that was registered using the Twilio console and the message templates of which were approved by WhatsApp.
-
Account SID: This is a unique identifier for your Twilio account. You will obtain this SID when signing up for Twilio. You should be able to find the Account SID in the landing page as soon as you login to the Twilio console.
-
Content Template SID: This is a unique identifier for a specific, pre-approved message template created in the Twilio Content Template Builder. It is required when sending templated WhatsApp messages outside of the customer service window, as WhatsApp requires all outbound messages to be approved templates.
In this text box, specify the SID of the content template that you have specifically built to send eG alerts as WhatsApp messages to configured recipients. To determine the content template SID, do the following:
-
Go to the Twilio Console.
-
Select the Services option.
-
Go to the Content Templates Builder.
-
Select the template you will be using for eG alerts and get that template's SID. Copy the SID that appears and paste it in the Content Template SID text box in Figure 12.
-
-
Messaging Service SID: This is a unique ID for a Twilio Messaging Service, which you can create to manage and distribute high message volumes across multiple senders for channels like WhatsApp.
In this text box, specify the SID of the messaging service that you have specifically configured for eG's use. To determine the SID of the messaging service, follow the steps below:
-
Go to the Twilio Console.
-
Select the Messaging option.
-
Locate the messaging service you will be using for the purpose of sending WhatsApp alerts to eG Enterprise, and select that service.
-
Get the SID of that messaging service.
-
Once the SID appears, copy it and paste it in the Messaging Service SID text box in Figure 12.
-
-
Custom Payload: Use custom payload to customize the alert information you send to Twilio, so that it includes additional static information. Typically, the details of an eG alert are sent as JSON payload to the Twilio Sandbox for WhatsApp channel. Every piece of information contained within an eG alert - eg., priority, component name, component type etc. - is represented in the JSON file as a $key:$value pair, where 'key' denotes the alert field, and 'value' denotes the actual value of that field at run time. The 'key' is configured based on what Twilio's REST API supports. For instance, if the API represents alarm priorities using the key 'prior', then the same key will be used in the JSON file for denoting alarm priorities. Accordingly, the entry for alarm priority in the JSON file will be $prior:$value. The $value will be Critical, Major, Minor, or Normal, depending upon the actual priority of the alarm being sent.
If you want eG incidents routed to the Twilio Sandbox for WhatsApp channel to include additional information, then you can define a Custom Payload for that information as a $key:$value pair. For example, say, you want incidents to indicate the FQDN of the eG manager that generated the incidents. Say that the FQDN of your eG manager is egmanager.innovations.com. To include this information in Twilio's WhatsApp alerts, do the following:
-
First, check whether Twilio's API supports a 'key' that can be used for capturing the 'source' of alerts/incidents. If no such key exists, then you cannot proceed with the Custom Payload configuration. On the other hand, if such a key is available, then proceed to replace the $key in your Custom Payload specification, with that key value. For the purpose of our example, let us assume that the API supports the key named 'source'. In this case therefore, substitute '$key' with 'source'.
-
Then, proceed to explicitly specify the FQDN of your eG manager in the place of $value. This is because, you can use the Custom Payload configuration to add only 'static' information - i.e., information that you explicitly configure, and hence will never change. In the case of our example therefore, the $value will be egmanager.innovations.com.
-
The complete Custom Payload specification will now be: source:egmanager.innovations.com
-
Enabling WhatsApp Alerting Using ChatAPI
If Chat API is chosen as the WhatsApp provider, then do the following before you proceed with the configuration:
- Make sure you create a sender account for eG Enterprise in Chat API using WhatsApp Web.
-
Once eG Enterprise is registered as a sender, an authorization token will be granted to it. Make a note of this authorization token.
Once the aforesaid pre-requisites are fulfilled, proceed with the configuration as depicted by Figure 11 above. This requires you to provide the following information:
- Against Gateway URL, specify the Chat API URL to which eG Enterprise should connect, in order to send eG alerts.
- Specify the authorization Access key/Token that you were provided at the time of registering eG Enterprise with Chat API.
- If you want to send time-of-day graphs of the problem measures via WhatsApp, then turn on the Send Graph in WhatsApp Alert flag to Yes. By default, this flag is set to No.
-
If you want, you can use Custom Payload to customize the alert information you send to ChatAPI, so that it includes additional static information. Typically, the details of an eG alert are sent as JSON payload to ChatAPI. Every piece of information contained within an eG alert - eg., priority, component name, component type etc. - is represented in the JSON file as a $key:$value pair, where 'key' denotes the alert field, and 'value' denotes the actual value of that field at run time. The 'key' is configured based on what ChatAPI supports. For instance, if the API represents alarm priorities using the key 'prior', then the same key will be used in the JSON file for denoting alarm priorities. Accordingly, the entry for alarm priority in the JSON file will be $prior:$value. The $value will be Critical, Major, Minor, or Normal, depending upon the actual priority of the alarm being sent.
If you want eG incidents routed to ChatAPI to include additional information, then you can define a Custom Payload for that information as a $key:$value pair. For example, say, you want incidents to indicate the FQDN of the eG manager that generated the incidents. Say that the FQDN of your eG manager is egmanager.innovations.com. To include this information in ChatAPI's WhatsApp alerts, do the following:
-
First, check whether ChatAPI supports a 'key' that can be used for capturing the 'source' of alerts/incidents. If no such key exists, then you cannot proceed with the Custom Payload configuration. On the other hand, if such a key is available, then proceed to replace the $key in your Custom Payload specification, with that key value. For the purpose of our example, let us assume that the API supports the key named 'source'. In this case therefore, substitute '$key' with 'source'.
-
Then, proceed to explicitly specify the FQDN of your eG manager in the place of $value. This is because, you can use the Custom Payload configuration to add only 'static' information - i.e., information that you explicitly configure, and hence will never change. In the case of our example therefore, the $value will be egmanager.innovations.com.
-
The complete Custom Payload specification will now be: source:egmanager.innovations.com
-
Enabling WhatsApp Alerting Using WhatsMate
On the other hand, if you want to use WhatsMate for generating WhatsApp alerts, select WhatsMate as the WhatsApp provider. Before proceeding any further, make sure you do the following:
- Subscribe to a WhatsMate Premium plan.
-
Upon successfully subscribing to that plan, you will receive an email from WhatsMate containing a personalized Client ID and Client Secret. Make a note of these.
Then, proceed as indicated by Figure 13.
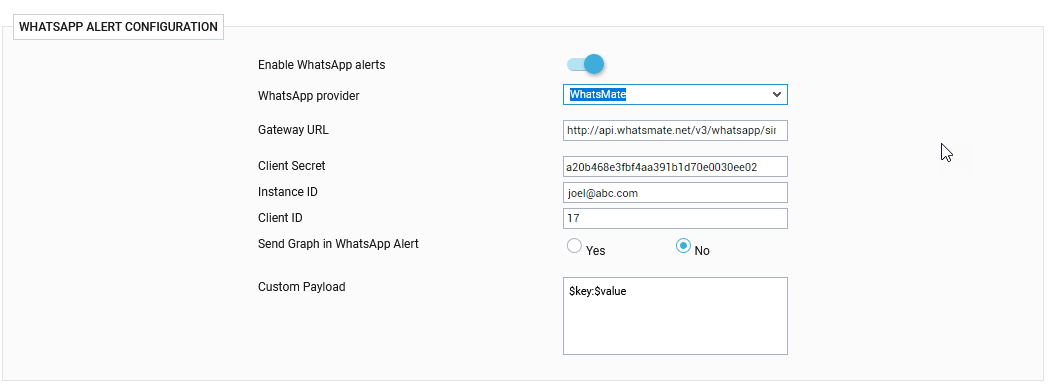
Figure 13 : Enabling WhatsApp alerting via WhatsMate
In Figure 13, specify the following:
- Gateway URL: Specify the URL to the WhatsMate REST API to which eG alerts are to be sent.
- Client ID and Client Secret: Specify the Client ID and Client Secret that would have been sent to you by email after you subscribe to the Premium plan.
- Instance ID: Specify your gateway's instance ID. This ID will given to you once you subscribe to WhatsMate.
- Send Graph in WhatsApp Alert: If you want to send time-of-day graphs of the problem measures via WhatsApp, then turn on the Send Graph in WhatsApp Alert flag to Yes. By default, this flag is set to No.
-
If you want, you can use Custom Payload to customize the alert information you send to the WhatsMate REST API, so that it includes additional static information. Typically, the details of an eG alert are sent as JSON payload to the WhatsMate API. Every piece of information contained within an eG alert - eg., priority, component name, component type etc. - is represented in the JSON file as a $key:$value pair, where 'key' denotes the alert field, and 'value' denotes the actual value of that field at run time. The 'key' is configured based on what the WhatsMate API supports. For instance, if the API represents alarm priorities using the key 'prior', then the same key will be used in the JSON file for denoting alarm priorities. Accordingly, the entry for alarm priority in the JSON file will be $prior:$value. The $value will be Critical, Major, Minor, or Normal, depending upon the actual priority of the alarm being sent.
If you want eG incidents routed to the WhatsMate API to include additional information, then you can define a Custom Payload for that information as a $key:$value pair. For example, say, you want incidents to indicate the FQDN of the eG manager that generated the incidents. Say that the FQDN of your eG manager is egmanager.innovations.com. To include this information in the WhatsApp alerts, do the following:
-
First, check whether the WhatsMate API supports a 'key' that can be used for capturing the 'source' of alerts/incidents. If no such key exists, then you cannot proceed with the Custom Payload configuration. On the other hand, if such a key is available, then proceed to replace the $key in your Custom Payload specification, with that key value. For the purpose of our example, let us assume that the API supports the key named 'source'. In this case therefore, substitute '$key' with 'source'.
-
Then, proceed to explicitly specify the FQDN of your eG manager in the place of $value. This is because, you can use the Custom Payload configuration to add only 'static' information - i.e., information that you explicitly configure, and hence will never change. In the case of our example therefore, the $value will be egmanager.innovations.com.
-
The complete Custom Payload specification will now be: source:egmanager.innovations.com
-
WhatsApp Alert Preferences
Use Figure 14 to configure the subject and body of your WhatsApp alerts.
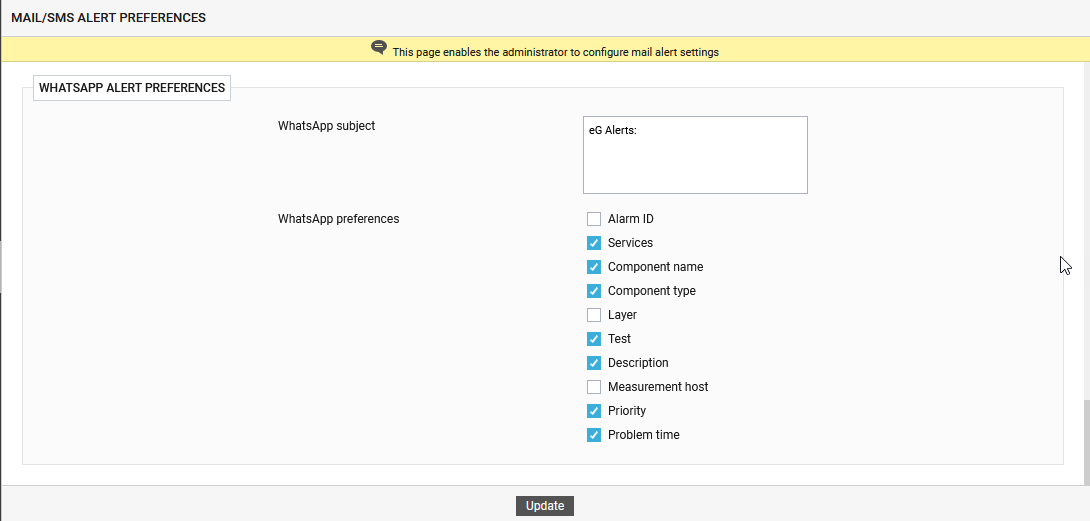
Figure 14 : Configuring WhatsApp Preferences
-
For alert information transmitted via WhatsApp, you can provide a subject of your choice in the WhatsApp subject text box.
-
Next, select the required check boxes in the WhatsApp preferences section of Figure 14 to indicate what type of alert information you want included in your WhatsApp alerts. By default, details such as the Alarm ID, name of the problematic Layer, and the Measurement Host that reported the problem measure will be excluded from WhatsApp alerts. This is why, the check boxes representing the aforesaid details are 'unchecked' by default in Figure 14. To include any of these details in the WhatsApp alert, simply select the corresponding check box.
Then, to complete the configuration, the mobile numbers that should receive the WhatsApp alerts should be specified. For that, each user who wants to receive WhatsApp alerts should edit their user profile in the eG Enterprise system, select one/more alarm priorities for email/SMS alerting (see Figure 15), and in the To text box under Mail ID/Mobile No, specify a comma-separated list of mobile numbers that should receive the WhatsApp alerts. Every mobile number entered should be prefixed by its country code (see Figure 15). Finally, click the Submit button.
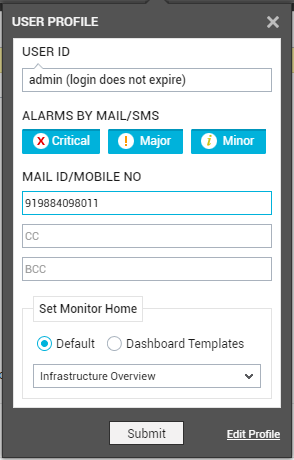
Figure 15 : User profile configured to receive WhatsApp alerts
Figure 16 illustrates some sample WhatsApp alerts sent by the Twilio Sandbox for WhatsApp Channel.
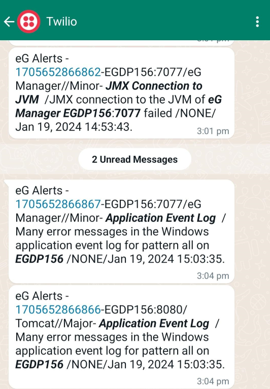
Figure 16 : Sample WhatsApp Alerts sent by Twilio
Troubleshooting WhatsApp Alerting
If you run into issues with WhatsApp alerting, then you can use the egwhatsappaudit_log file in the <EG_MANAGER_INSTALL_DIR>\manager\log directory (on Windows; on Unix, this will be /opt/egurkha/manager/log directoryt) to troubleshoot those issues.
Heartbeat Configuration
If you click on the HeartBeat node in the Settings tree in the left panel of Figure 1, a HEART BEAT section (see Figure 17) is provided for configuration in the MAIL/sms ALERT PREFERENCES page.
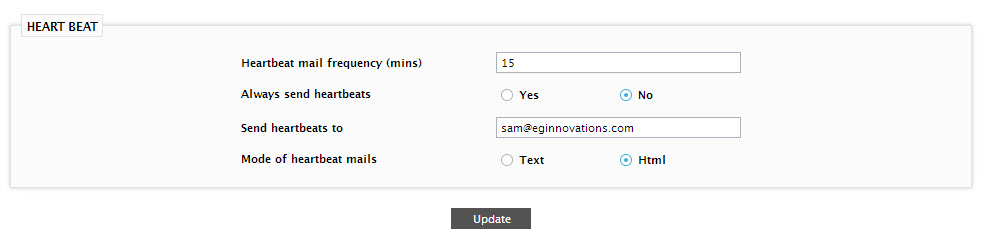
Figure 17 : Heartbeat section of the Mail Alert Settings page
Some administrators rarely login to the eG Enterprise system, preferring instead to rely on email alerts to be notified of problems. In such situations, if the email system that is used by the eG Enterprise system fails, administrators will not be notified of problems. A “heartbeat” function is supported by eG Enterprise to let administrators know that the email alerting functionality is operational. To configure heartbeat mails, specify the following in the heart beat section of Figure 17:
-
Heartbeat mail frequency: Specify (in minutes) how frequently the eG Enterprise system needs to send out heartbeat mails, against this parameter. If this parameter is left unconfigured, then the eG Enterprise system will not send any heartbeat mails.
Note:
The Heartbeat mail frequency should be greater than or equal to the Maximum time between email alert checks.
- Always send heartbeats: This parameter and the rest of the parameters in this section will appear, only if a valid integer value is provided against the Heartbeat mail frequency text box. If the heartbeat mails are to be sent out regardless of whether or not email alerts have been sent during the specified frequency, then, set the Always send heartbeats flag to Yes. By setting this parameter to No, you can make sure that the heartbeat mails are sent only if email alerts are not received by the users during the set Heartbeat mail frequency.
- Send heartbeats to: To ensure that the heartbeat mails are sent to specific individuals, provide their mail ids as a comma-separated list in this text box.
- Mode of heartbeat mails: You can also choose between sending the mails as Html or Text, by selecting the corresponding option from this section.
Figure 18 depicts a sample heartbeat mail.
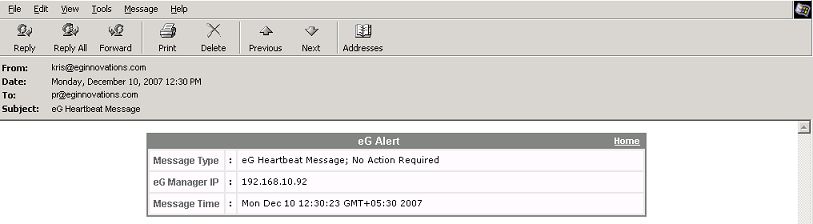
Figure 18 : A sample heartbeat mail
Alarm Escalation
To ensure the continuous availability of mission-critical IT services, it is essential that problems be detected at the earliest and remedial action be initiated immediately. Naturally, the performance of an IT operations team is assessed by its ability to proactively isolate problems and by the speed with which the identified issues are fixed. As most IT operations teams are required to support strict service level guarantees, problems that remain unnoticed or unresolved for long periods of time could result in service level violations, warrant severe penalties, and ultimately even impact the reputation of the service provider.
The eG Enterprise, with its patented correlation technology and its multi-modal (email/SMS/pager/console) problem alerting capability accurately identifies potential issues in the monitored environment, and intimates the concerned IT operators before any irredeemable damage is done. To enable IT managers to proactively track the performance of their operations teams, eG Enterprise also includes a time-based alarm escalation capability. With this capability, when a problem remains unresolved for a long time period, the eG Enterprise manager automatically escalates the alarm to one or more levels of IT managers. The alarm escalation is based on a pre-defined escalation period, which is configured by the administrator of eG Enterprise.
The escalations are personalized for each user - i.e., each user in the eG Enterprise system is associated with multiple levels of managers. When an alert that has been sent to a user is not resolved within the escalation period, the alert is forwarded to the first level of management. If the problem remains unresolved for another escalation period, the second level of management is informed, and so on. By hierarchically escalating problems to IT managers, eG Enterprise ensures that the management staff stays informed of the state of the mission-critical IT services they control, and that they can intervene in a timely manner to ensure quick and effective resolution to key problems.
The settings for escalation can be defined in the alarm escalation section (see Figure Figure 19) of the Mail Alert Settings page. To access this section, click on the Alarm Escalation node in the Settings tree in the left panel of Figure 1.
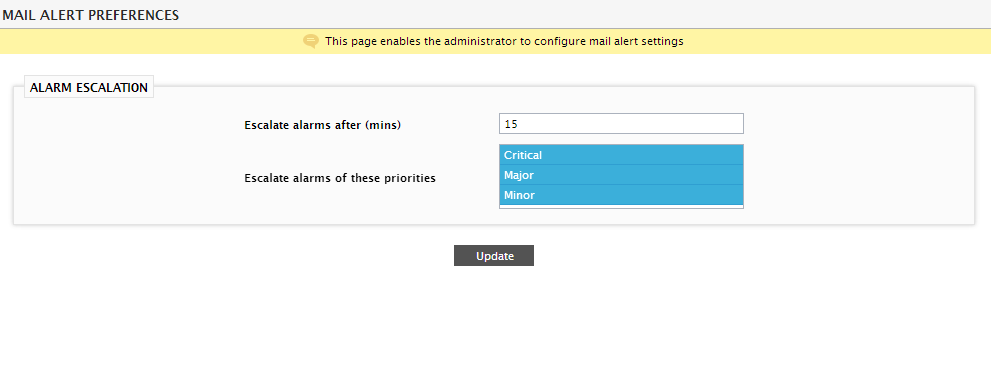
Figure 19 : Alarm Escalation section of the Mail Alert Settings page
-
Escalate alarms after: Here, specify the duration beyond which the eG Enterprise system needs to escalate a problem to the next level.
Note:
The duration specified against the Escalate alarms after text box, should be greater than or equal to the Maximum time between email alert checks.
-
Escalate alarms of these priorities: This parameter will appear only if a valid integer value is provided in the Escalate alarms after text box. You can indicate the type of problems that need to be escalated, by selecting one/more of the alarm priorities listed here.
Note:
For alarm escalation to work effectively, the Escalate alarms of these priorities specification should be the same as or a subset of the Alarms by mail / SMSsetting (see Figure 6) for a user. For example, if a user is configured to receive email/SMS alerts for Criticalissues only and the Escalate alarms of these priorities parameter is set to Major and Minor, then the Criticalalerts will not be escalated at all. However, if the AlarmEscalationType is set to Critical, Major, and Minor, or simply Critical, then the Criticalalerts will be escalated.
Figure 20 depicts a sample escalation mail:
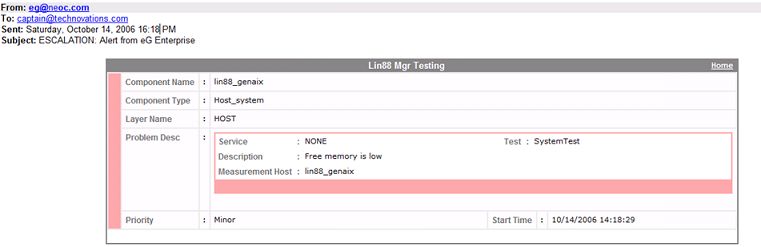
Figure 20 : An escalated email alert
Shift Period Configuration
Some environments - especially the ones that span geographies - could have operators working in shifts; for instance, an MSP environment could comprise of one/more user groups, which might work only in the nights, in order to provide help-desk services to the customers in a particular geographic region. These users naturally, would want to receive email alerts of issues only during their working hours; during the rest of day, they may prefer to be alerted via SMS. To facilitate this, eG Enterprise allows you to configure shift periods for individual users. For this, click on the Shift Periods node of the Settings tree in the left panel of Figure 1.
Separate shift periods can be configured for receiving email alerts, SMS alerts, and escalation mails. By default, this capability is bundled with the eG Enterprise. Accordingly, the Allow shift period configuration flag is set to Yes by default in the SHIFT PERIODS CONFIGURATION section (see Figure 21) of the Mail Alert Settings page. You can then proceed to configure the Maximum number of day-shift combinations as well. By default, a maximum of 5 day-shift pairs can be configured per user. You can override this default setting by choosing a different number from the Maximum number of day-shift combinations list.
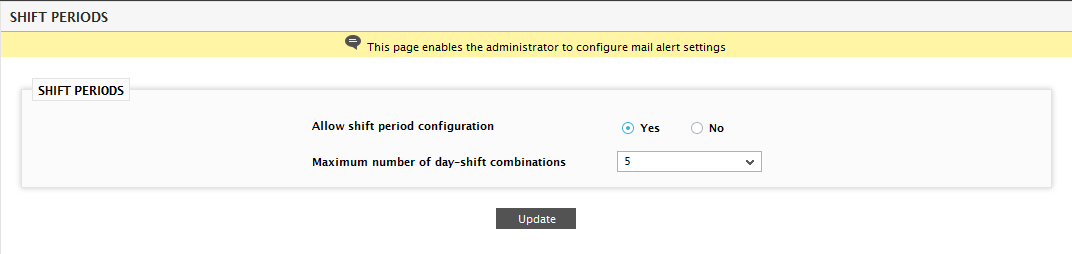
Figure 21 : The Shift Period Configuration section of the Mail Alert Settings page
In environments where shifts are not relevant, shift period configuration would be meaningless. In such environments therefore, you can disable this capability by setting the Allow shift period configuration flag to No. When this is done, the Maximum number of day-shift combinations list will automatically disappear.
Mail Log Details
The eG manager can be configured to send out email alerts of performance issues to specified recipients. However, in environments where the mail server is not properly configured, critical problem information might not reach users on time, thus causing problems to persist, aggravate, or be unnecessarily escalated to higher authorities. It is hence necessary to continuously track the status of the email activity generated by the eG manager and also provide administrators with alternative access to problem information (in the event of failure of the mail system). To ensure this, eG Enterprise allows mail logging. To enable mail logging, first, click the Mail Log Details node of the Settings tree in the left panel of Figure 1. The right panel will then change to display the mail log details section as depicted by Figure 22.
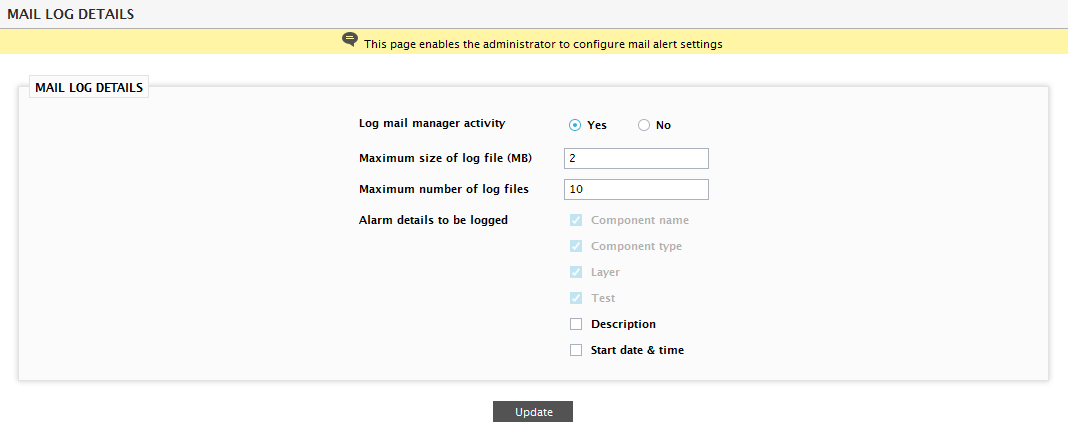
Figure 22 : The Mail Log Details section of the Mail Alert Settings page
By default, the mail logging capability is disabled. To enable the capability, all you have to do is to enable a flag called Log mail manager activity in the MAIL LOG DETAILS section as shown in Figure 22. By setting this flag to Yes, you can ensure that a log file is created in the /opt/egurkha/manager/log/egmailmanager directory, where the following alarm details are logged by default:
- Whether the email alert was successfully sent or not
- The severity (critical/major/minor) of the problem for which the alert was raised
- The problem component
- The problem component-type
- The problem layer
- The test that reported the problem measurement
If required, you can modify the default settings, by selecting/deselecting the relevant check boxes in this section. For instance, by selecting the Description and Start date & time check boxes, you can make sure that the mail log also records the details of problem descriptors, a brief description of the problem, and the problem date and time.
Assume that the Processes test has raised an alert indicating that a critical process is not running on the event log server. The default log entry that corresponds to this event would be: Mail send failed [Critical,Event92,Event Log,Application Processes,Processes.
If you have enabled the Description and the Start date & time check boxes, the log entry would be:
Mail send failed [Jan.21.2008 14:21:28,Critical,Event92,EventLog,ApplicationProcesses,Processes{+firefox -> Process not running}.
Besides, to ensure that a single log file is not overloaded with problem details or does not grow enormously in size, you can trigger the creation of additional log files as soon as the size of a log file exceeds a pre-configured limit. This ceiling can be set using the Maximum size of the logfile(MB) text box. Once this limit is reached, the eG manager creates a new log file, copies the old data to it, and starts logging the latest information to the older log file. In environments where there is excessive mail activity, this can result in a large number of log files, which might in turn consume too much space on the eG manager host. In such a case, you can conserve space on the eG manager host using the Maximum number of log files configuration. If such a limit is configured, then the eG manager will continue creating new log files only till such time that the said file limit is reached. Beyond this point, no additional log files will be created; instead, the eG manager will overwrite the currently open log file with the newer problem information.
Note:
Like email activity, the eG manager can also be optionally configured to maintain logs of the alarms generated by it. In some environments, this could serve as a tool for effective ‘postmortem’ analysis of problem situations - i.e., administrators can use the logs to be informed of problems that might have occurred during a period of their non-availability. Auditing of alarms reveal when an alarm was generated, the nature of the problem reported by the alarm, what were the problems clubbed together, and which problem is the source of a set of related problems. In some other environments, alarm logging could be a ‘must have’; such environments may host applications that read the alarm information stored in the logs for converting them into email/SMS alerts.
To enable alarm logging, do the following:
- Edit the eg_services.ini file in the <eg_install_dir>\manager\config directory.
- In the [misc_args] section of the file, set the need_alarmlog parameter to true, to enable alarm logging.
- To indicate what type of alarm information needs to be stored in the logs, use the alarmlog_format parameter. By default, the alarm priority, the problem layer, the alarm ID, the problem description, the problem component name, the component type, and the last measurement time are logged in the log file. Accordingly, the default alarm_log format is: PRIORITY:LAYER:PROBLEM_DESC:ALARM_ID:COMP_NAME:COMP_TYPE:MSMT_TIME
- Indicate the separator that separates alarm details against the alarmlog_seprt parameter.
- Also, specify how frequently (in milliseconds) the alarm log configurations need to be refreshed against the alarm_log_refresh_interval parameter. If this parameter is set to 0 or is left blank, then, by default, the alarm log configurations will be refreshed every 30 minutes - i.e., 1800000 milliseconds.
- Besides, to ensure that a single log file is not overloaded with problem details or does not grow enormously in size, you can trigger the creation of additional log files as soon as the size of a log file exceeds a pre-configured limit. This ceiling can be set using the alarm_log_max_size parameter. Once this limit is reached, the eG manager creates a new log file, copies the old data to it, and starts logging the latest information to the older log file. In environments where tto many alarms are generated, this can result in a large number of log files, which might in turn consume too much space on the eG manager host. In such a case, you can conserve space on the eG manager host by specifiying the maximum number of log files that can be created using the alarm_log_max_files configuration. If such a limit is configured, then the eG manager will continue creating new log files only till such time that the said file limit is reached. Beyond this point, no additional log files will be created; instead, the eG manager will overwrite the currently open log file with the newer problem information.
- Finally, save the eg_services.ini file.
Enabling/Disabling Email/SMS Filtering
By default, a user receives email/SMS alerts for all issues pertaining to all components assigned to him/her. In some circumstances, the user may not want to receive all of these alarms. For instance, in a large, multi-tier infrastructure, a user may be monitoring all the applications and network devices involved in supporting a business service. However, the user may have primary responsibility only for some of the components supporting the business service (e.g., a network administrator’s primary responsibility is to monitor the network devices). In such cases, while the user may want to view the status of all the components of the business service, he/she may want to receive email or SMS alerts pertaining to specific components of the infrastructure alone (e.g., network devices).
To enable such selective alerting, eG Enterprise provides administrators with the option to configure the eG manager to not send out email/SMS alerts related to specific layers/components/component-types/tests for specific users.
By default, the ability to filter mail/SMS alerts is disabled. To enable it, first, click the Filter Mail/SMS Alerts node of the Settings tree in the left panel of Figure 1. This will open the filter mail/sms alerts section in the right panel (see Figure 23). Here, set the Allow mail filter configuration flag to Yes. This will allow Admin users to configure email/SMS filters for user profiles. To allow non-admin users to alter the email/SMS settings defined by the Admin user, set the Allow non-admins to update flag to Yes.
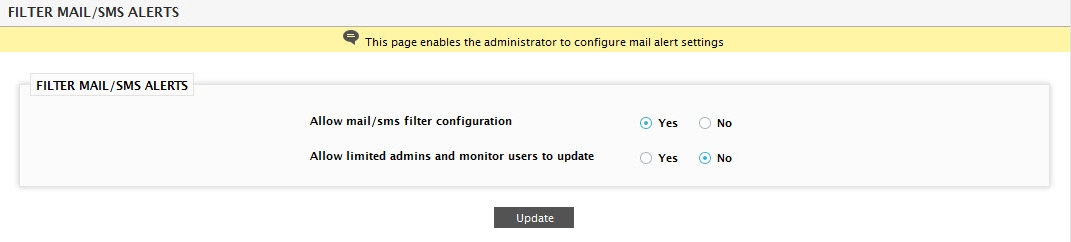
Figure 23 : Filter Mail Alerts section of the Mail Alert Settings page
To update the changes, click the Update button in Figure 23.
Note:
Besides intimating users of problems with components and their subsequent return to normalcy, eG Enterprise can also be configured to send out emails / SMS when the state of a component becomes unknown. To configure unknown state mails/SMS, do the following:
-
Edit the eg_services.ini file in the <EG_INSTALL_DIR>\manager\configdirectory to set the values of the parameters in the [unknown_status_reporting] section, as shown below:
UnknownStateMail=No
UnknownStateSMS=No
UnknownStateInfoMail=
UnknownStateInfoSMS=
UnknownStateMailList=
UnknownStateSMSList=
DefaultUnknownStatePeriod=In order to receive unknown state mails, set the UnknownStateMail parameter to Yes. The default is No. Similarly, specify Yes against UnknownStateSMS parameter to be able to receive SMS alerts when the state of a component changes to Unknown. The eG Enterprise system can also be configured to send out unknown state alerts even if the state of a test descriptor changes to Unknown, by setting the UnknownStateInfoMail parameter to Yes. To receive SMS alerts to that effect, set UnknownStateInfoSMS to Yes. You can even specify the users who should receive the email/SMS alerts by providing a comma-separated list of mail ids and mobile numbers (as the case may be) against the UnknownStateMailList and UnknownStateSMSList parameters, respectively. The eG Enterprise system will email/SMS the configured users only when a component remains in the Unknown state for the duration specified in the DefaultUnknownStatePeriod parameter. This duration can also be set specific to a test, by inserting the test name as a parameter in the [unknown_status_reporting] section and providing a value against it, as shown below:
OraTableSpacesTest=60
The DefaultUnknownStatePeriod will automatically apply to all those tests which do not have a specific unknown state period or which have been misspelt in the [unknown_status_reporting] section.
- Finally, save the eg_services.ini file.
-
Figure 24 depicts a typical unknown state mail alert.
The eG manager also has the ability to monitor itself and to generate alarms to the administrator when any of the eG manager processes fail, or when the database server used by the eG manager is inaccessible. In these cases, the eG manager alerts the administrator by generating email alerts to the eG Administrator mail ID.
Enabling/Disabling License Alerts
The LICENSE PREFERENCES section helps administrators to quickly configure the eG manager to send out email alerts that periodically inform them about license usage. This way, administrators can detect a probable license crunch, well before it occurs!
To avail email alerts on license validity and license utilization information, first, click the License node of the Settings tree in the left panel of Figure 1. This will open the LICENSE PREFERENCES page in the right panel (see Figure 25).
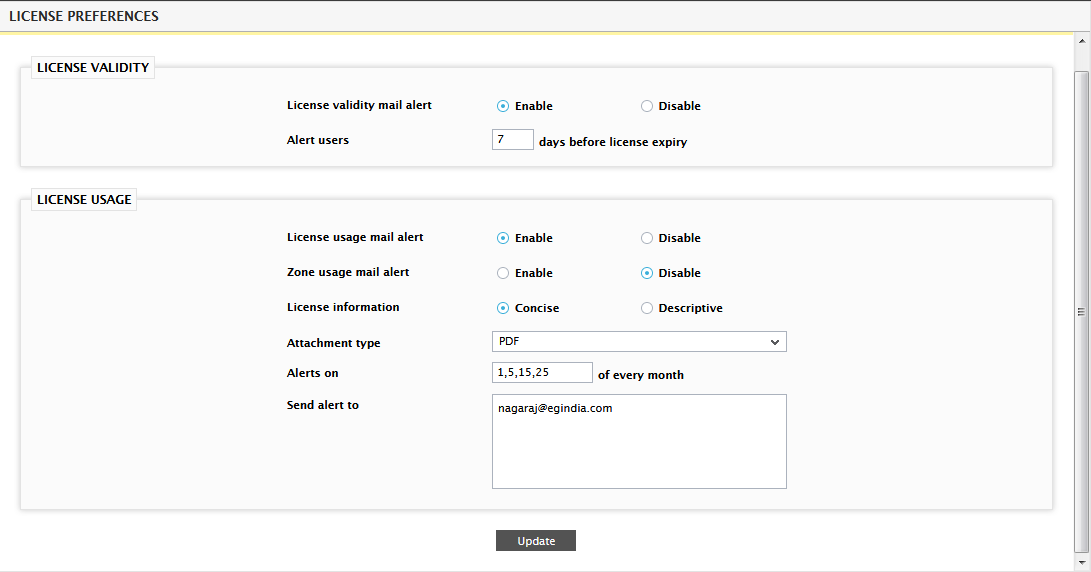
Figure 25 : The License Preferences section in the Mail Alert Settings page
In the LICENSE VALIDITY section, set the License validity mail alert flag to Enable. This will allow the administrators to receive email alerts on the validity of the eG manager license. Once the License validity mail alert is set to Enable, administrators would be required to provide the number of days prior to which they would wish to be alerted on license expiry. For this, specify the number of days before which you should be alerted about the license expiry against the Alert users text box. By default, the eG manager sends out the email alert before 7 days to license expiry.
Note:
The email alert on license expiry will be sent once in a day.
Likewise, to be alerted on the license utilization, set the License usage mail alert flag in the LICENSE USAGE section to Enable. If an MSP/partner, that has deployed multiple eG Managers across different customer locations, wants to know license usage info for billing purposes, they should be able to generate a report of license count consumed by each eG Manager delivered to them by email, making license management and billing extremely easy. To achieve this, once the License usage mail alert flag is enabled, you should do the following:
-
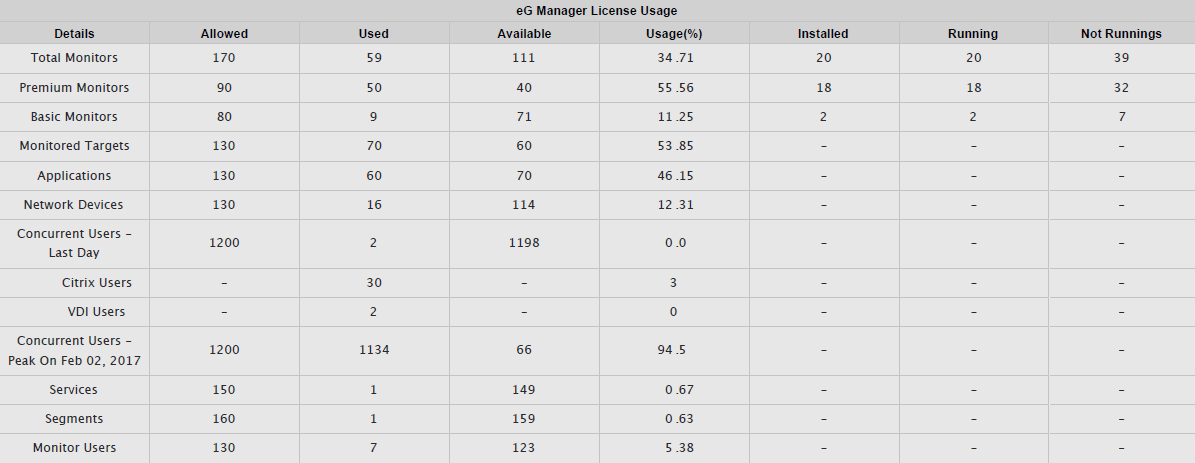
Specify whether the generated license usage report should be Concise or Descriptive against the License information flag. If Concise option is chosen, then the license usage report would have the basic amount of information that an administrator should be aware of (see Figure 26).

-
On the other hand, if the Descriptive option is chosen, a detailed license usage report would e sent to the administrators (see Figure 27).
- Choose how the license usage report should be attached in a mail from the Attachment Type list. By default, PDF option is chosen from this list. If you wish to receive the report as a CSV format, then select CSV from this list. If you wish to view the information in a text format within the email, then select Encrypted Text option.
- Then, need to specify the dates on which the alert should be received. For this, specify a comma-separated list of dates(ranging from 1 to 31) against the Alerts on text box.
- Then, specify a comma-separated list of email IDs to which the email alerts have to be sent in the Send alert to text box.
- Similarly, if administrators wish to be alerted to the license utilization in each zone configured in their environment, then, they can set the Zone usage mail alert to Enable.
Enabling mail alerts for configuration management console
The CONFIGURATION CHANGES section (see Figure 28) helps administrators to receive alerts on the configuration changes detected on the servers/components monitored by the eG manage. Setting the Enable configuration change alert flag to Yes helps administrators to receive email/sms alerts on the configuration changes detected on the servers/components. By default, this flag is set to No.
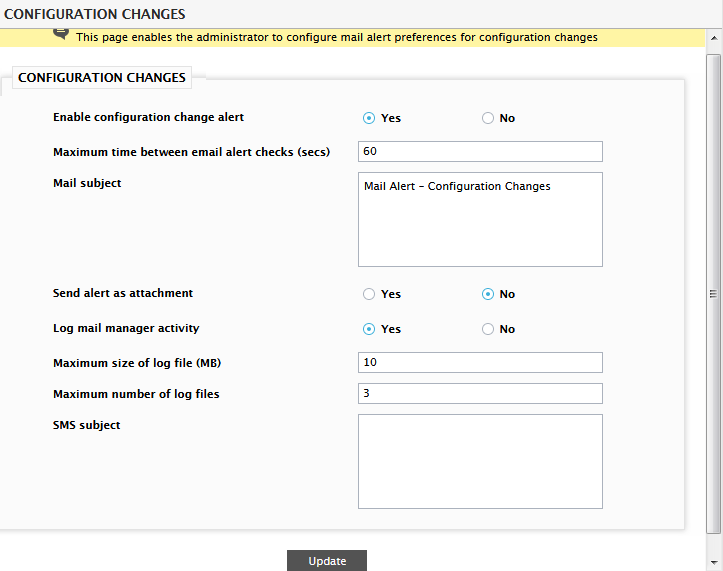
Figure 28 : The Configuration Changes section in the Mail Alert Settings page
Once the flag is set to Yes, the following parameters are required to be configured:
- Maximum time between email alert checks (secs): By default, the eG Enterprise system sends email alerts every 3 minutes (i.e., 180 seconds). In some environments, one/more tests could be run very frequently, say every 1 minute or 30 seconds. If these tests report abnormalities, then the user will receive an email alert of the issue only at the 3rd minute. What’s worse, if the issue detected by the test is resolved by the time the email alert is sent out by the eG manager, then the user might not even know that a problem had occurred - critical problems could thus go unnoticed! To avoid this, you can reduce the frequency at which the eG manager sends out email alerts. For this, you need to override the default value (of 180 seconds) displayed against the Maximum time between email alert checks text box.
- Mail subject: The administrator can customize the subject of the alarm mails by specifying an appropriate subject in the Mail subject text box.
-
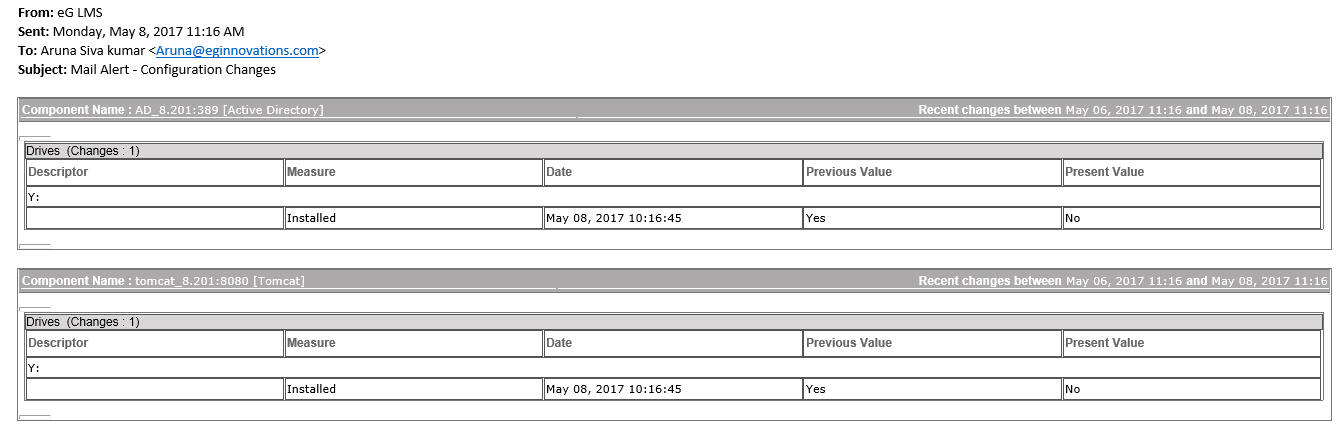
Send alert as attachment: In some environments, the mail servers used for processing email alerts might not be adequately configured to support certain data types/fonts used in the email content. In such cases, alarm information included in the body of the mail could appear distorted / misaligned. To avoid this, the eG manager can be configured to send alerts as attachments, so that users can open the alarm information and view it using any program that they choose. To achieve this, set the Send alert as attachment flag in Figure 28 to Yes. By default, this flag is set to No. Note that both HTML and text alerts can be sent as attachments. Figure 29 depicts a sample HTML alert attached to an email.
- Log mail manager activity: The eG manager can be configured to send out email alerts of configuration changes on the monitored servers to specified recipients. However, in environments where the mail server is not properly configured, critical problem information might not reach users on time, thus causing problems to persist, aggravate, or be unnecessarily escalated to higher authorities. It is hence necessary to continuously track the status of the email activity generated by the eG manager and also provide administrators with alternative access to problem information (in the event of failure of the mail system). To ensure this, eG Enterprise allows mail logging. To enable mail logging, set the Log mail manager activity flag to Yes. By default, this flag is set to No. By setting this flag to Yes, you can ensure that a log file is created in the <eG_Install_Directory>/manager/log/egmailmanager directory.
- Maximum size of log file (MB): To ensure that a single log file is not overloaded with problem details or does not grow enormously in size, you can trigger the creation of additional log files as soon as the size of a log file exceeds a pre-configured limit. This ceiling can be set using the Maximum size of the logfile(MB) text box.
- Maximum number of log files: Once the maximum size of log file limit is reached, the eG manager creates a new log file, copies the old data to it, and starts logging the latest information to the older log file. In environments where there is excessive mail activity, this can result in a large number of log files, which might in turn consume too much space on the eG manager host. In such a case, you can conserve space on the eG manager host using the Maximum number of log files configuration. If such a limit is configured, then the eG manager will continue creating new log files only till such time that the said file limit is reached. Beyond this point, no additional log files will be created; instead, the eG manager will overwrite the currently open log file with the newer problem information.
- SMS subject: The eG manager is capable of sending SMS alerts to the users regarding configuration changes on the monitored servers/components. To ensure alerts are sent with a subject of his/her choice of the administrator, specify a subject in the SMS subject text box.