Defining a Quick Maintenance Policy and Associating it with Hosts / Tests / Components
eG Enterprise provides a single, easy-to-use interface for creating a maintenance policy and associating the policy to specific infrastructure elements.
To create a maintenance policy, do the following:
-
Select Maintenance Policies from the Alerts menu. This will open the MAINTENANCE POLICies page. If maintenance policies pre-exist, then this page will reveal the list of maintenance policies, a summary of the policy specifications, and the components/hosts/descriptors/tests to which each policy applies (see Figure 1).

- If you do not want to view the list of elements to which a policy applies, then simply uncheck the associated elements check box at the top of the MAINTENANCE POLICIES page.
- To add a new policy, click on the encircled ‘+’ button in the policy tool bar at the right, top corner of Figure 1.
- In Figure 2 that appears, provide a name for the new policy against the Policy name text box.
-
From the Frequency list box of Figure 2, select any of the following options:
- First day of month: If the maintenance procedure is performed on the first day of every month, then, select this option.
- Last day of the month: If the maintenance procedure is performed on the last day of every month, then, select this option.
- Daily: If the maintenance procedure is performed every day, then, select this option.
- Day of the Week: If the maintenance procedure is performed on a particular day in a week, then, select this option. When this option is chosen, a Day of the Week list box appears alongside that allows you to specify the exact day of the week on which maintenance is to be performed. From the Occurs list, you an choose the exact week of the month on which the maintenance is to be performed. If you wish to perform the maintenance on a chosen day every week, then choose Every option from the Occurs list. This way, administrators can set maintenance policies in a more granular way.
- Date of the Month: If the maintenance procedure is performed on a particular date of a month, then, select this option. When this option is chosen, an Occurs list box appears alongside that allows you to specify the exact date of the month on which maintenance is to be performed.
-
Date: If the maintenance procedure is performed on a specific date, then, select this option. Then, using the Calendar option that appears alongside, specify the exact date on which maintenance is to be performed.
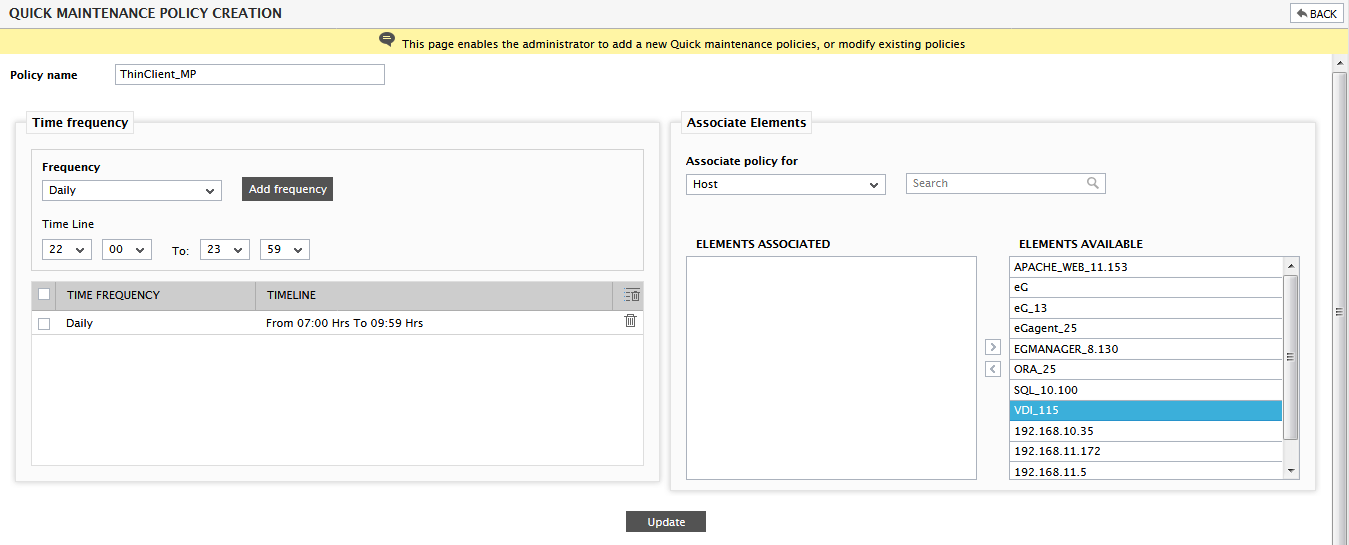
- Next, specify the duration of maintenance using the From and To fields against Time Line (see Figure 2).
- Then, add these specifications using the Add Frequency button (see Figure 2). Similarly, multiple specifications can be added as part of a single policy.
- To delete a particular entry, select it from the list by clicking on the check box corresponding to it in Figure 2, and click the Delete icon corresponding to it. To mark all the entries for deletion, simply select the check box at the top of the specification table (i.e., the check box alongside the column heading Time Frequency), and then click the Delete icon.
-
Now, using the Associate Elements section, you can associate the created policy to a Host, Component, Test, Test for Host, Descriptor, Descriptor for Component, Test for Component, or Server/VM/Desktop (WildCard). To achieve this, select the relevant option from the Associate policy for list in Figure 3.
Note:
By default, the Host option is not available for a user possessing the MonitorWithLimitedAdmin privilege. If such a user wants to create a Maintenance policy and associate the policy with a host, then he/she should do the following:
- Open the eg_maintenance.ini file available in the <EG_INSTALL_DIR>\manager\config folder.
- Set the showHostForLimitedAdmin to yes. By default, this flag is set to No.
- Finally, save the file.
This will ensure that the Host option is listed in the Associate Policy for list.
- If the Host is chosen, then the list of hosts being monitored will appear in the elements aVAILABLE list (see Figure 3). If the ELEMENTS AVAILABLE list is too long and searching for the element of your choice requires endless scrolling, then you can use the Search text box. By simply typing your search criteria will populate the ELEMENTS AVAILABLE list with the result set of the searched criteria.
-
Then, click on the < button to add the policies selected from the ELEMENTS AVAILABLE list to the ELEMENTS associated list (see Figure 3). You can also add individual policies to the ELEMENTS associated list by just double-clicking on the policy name in the ELEMENTS AVAILABLE list . If a maintenance policy is associated with a host, then such a policy will suppress the alerts generated by all the layers of all the applications executing on that host (i.e., applications managed by eG Enterprise that share the same IP address-nick name combination).
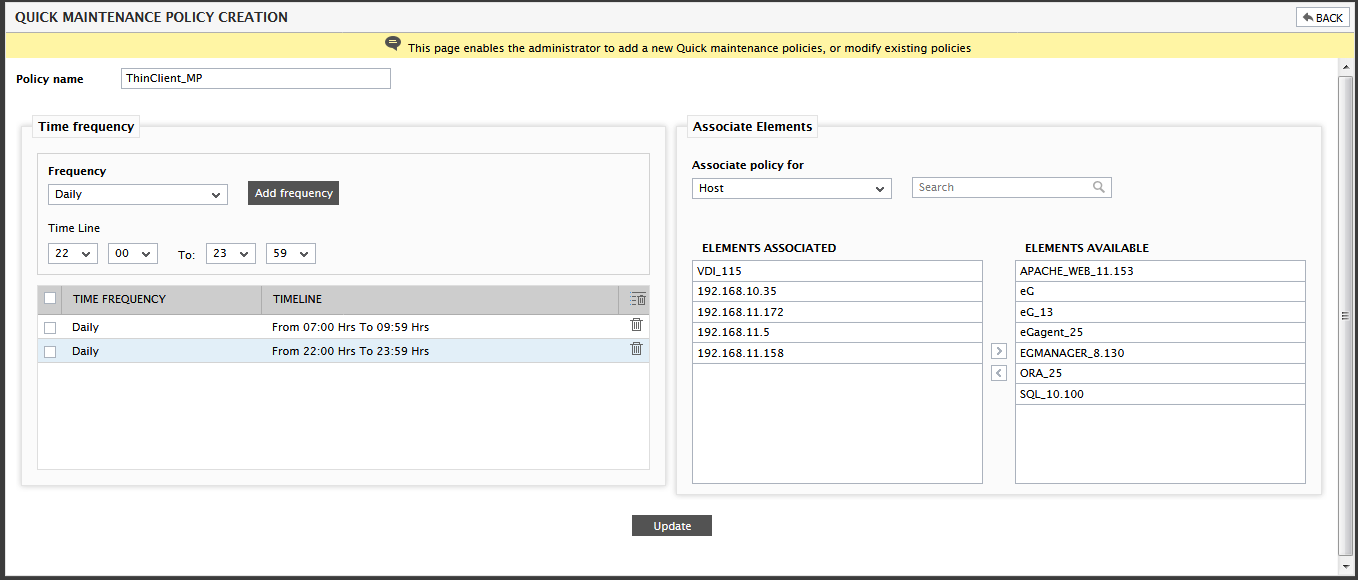
- To remove an entry from the ELEMENTS associated list, select it from the list, click on the > button, or just double-click on the entry you need to remove.
-
Besides hosts, a maintenance policy can also be associated with one/more components. By associating a maintenance policy with a component, administrators can automatically suppress those alerts that are raised on the application-specific layers of that component - in other words, such a policy will not govern the alerts related to the host layers of that component.
To map a maintenance policy to a component, first, select the Component option from the Associate policy for list. To save you the time and trouble involved in selecting the required components from a broad component window, eG Enterprise provides you with multiple filter options. You can narrow your search for components using any one of the filter criteria available in the Selectcomponents by list. These criteria are as follows:
- Zone
- Segment
- Service
- Component type
-
If you want to associate one/more components included in a particular zone with a policy, then select Zone from the Select components by list, and then choose the desired zone from the Zone list as depicted in Figure 4. This will list all the components in the chosen zone in the elements AVAILABLE list. Select the component(s) from this list and click the < button, or double-click on the desired component to add it to the ELEMENTS associated list. Finally, click the Update button. If the ELEMENTS AVAILABLE list is too long and searching for the element of your choice requires endless scrolling, then you can use the Search text box. By simply typing your search criteria will populate the ELEMENTS AVAILABLE list with the result set of the searched criteria.
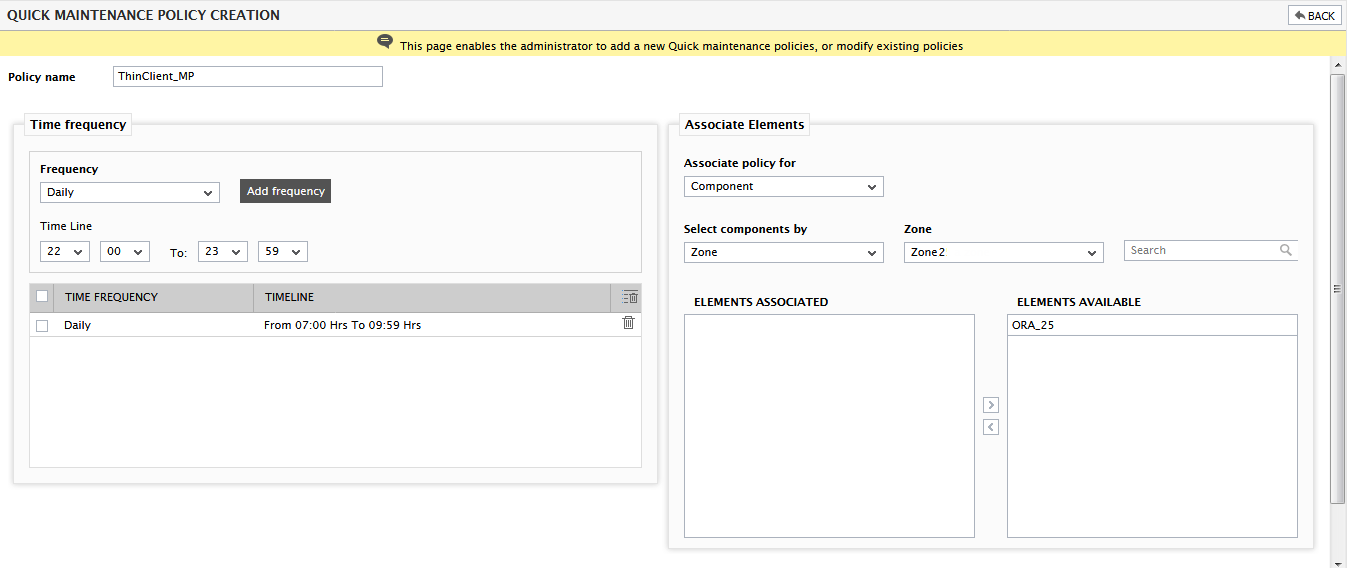
Figure 4 : Associating a policy to the components in a particular zone
-
Similarly, if your maintenance policy has to be applied to one/more components that are part of a segment, select Segment from the Select components by list, and choose the desired segment from the Segment list (Figure 4). Doing so ensures that all the components of the chosen segment are listed in the elements AVAILABLE list. Select the component from this list and click the < button, or double-click on a component to add it to the ELEMENTS associated list. Finally, click the Update button. If the ELEMENTS AVAILABLE list is too long and searching for the element of your choice requires endless scrolling, then you can use the Search text box. By simply typing your search criteria will populate the ELEMENTS AVAILABLE list with the result set of the searched criteria.
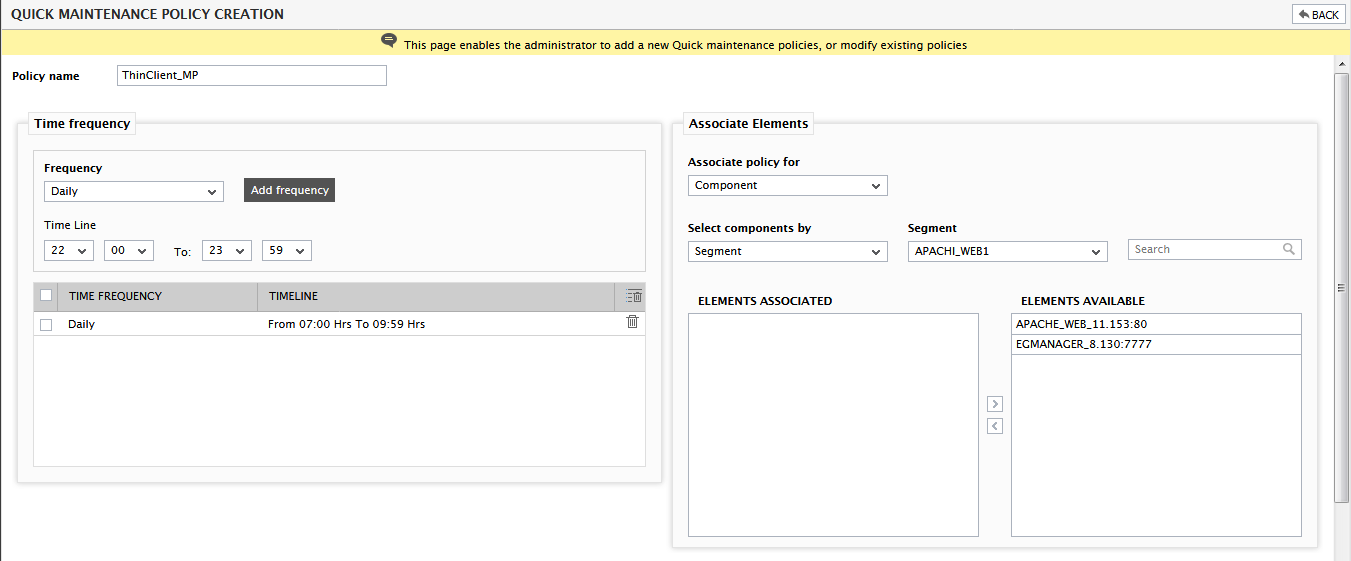
Figure 5 : Associating a policy with the components in a particular segment
-
If Service is selected from the Select components by, you will be allowed to pick a Service, and then associate a maintenance policy with one/more components engaged in the delivery of that service as depicted in Figure 5. Once a service is chosen, the service components will be listed under elements AVAILABLE. Select the component(s) of interest to you from this list and click the < button to transfer your selection to the ELEMENTS associated list. Alternatively, you can double-click on individual components to move them to the ELEMENTS associated list. Finally, click the Update button. If the ELEMENTS AVAILABLE list is too long and searching for the element of your choice requires endless scrolling, then you can use the Search text box. By simply typing your search criteria will populate the ELEMENTS AVAILABLE list with the result set of the searched criteria.
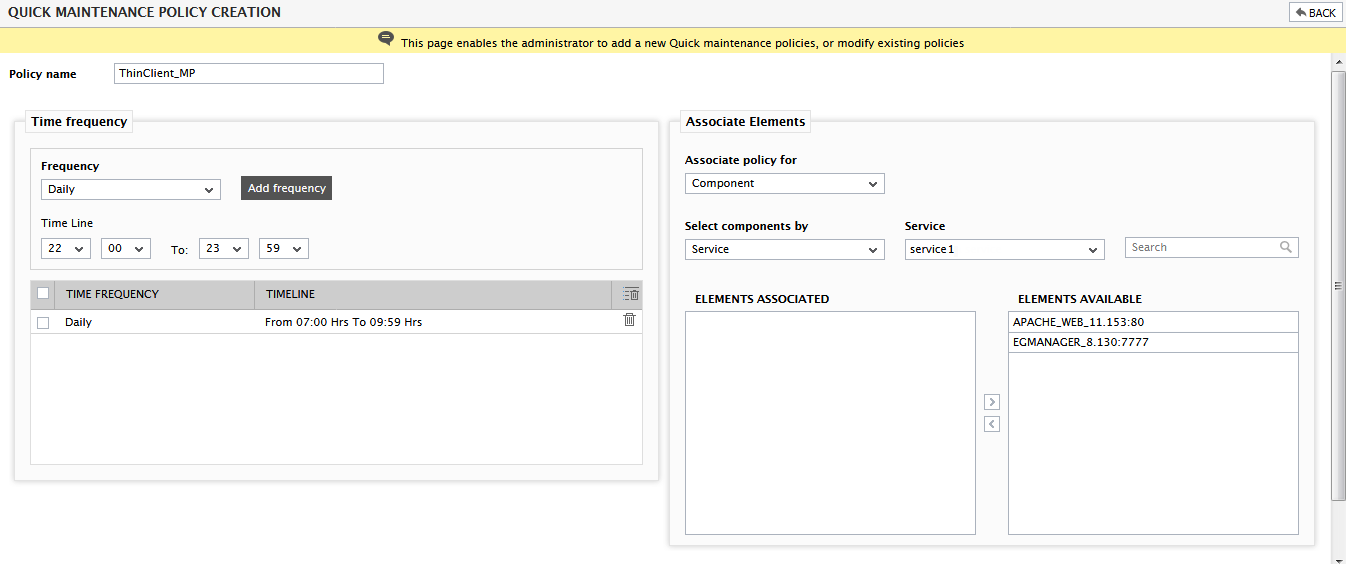
Figure 6 : Associating a policy with the components engaged in the delivery of a service
-
Likewise, to associate one/more components of a specific type with a policy, first select Component Type from the Select components by. Next, select the desired component type from the Component Type field (see Figure 6). This in turn results in the display of all managed components of that particular type in the elements aVAILABLE list. Select the component from this list and click the < button or double-click on individual component to associate the selected component to the ELEMENTS associated list. Finally, click the Update button. If the ELEMENTS AVAILABLE list is too long and searching for the element of your choice requires endless scrolling, then you can use the Search text box. By simply typing your search criteria will populate the ELEMENTS AVAILABLE list with the result set of the searched criteria.
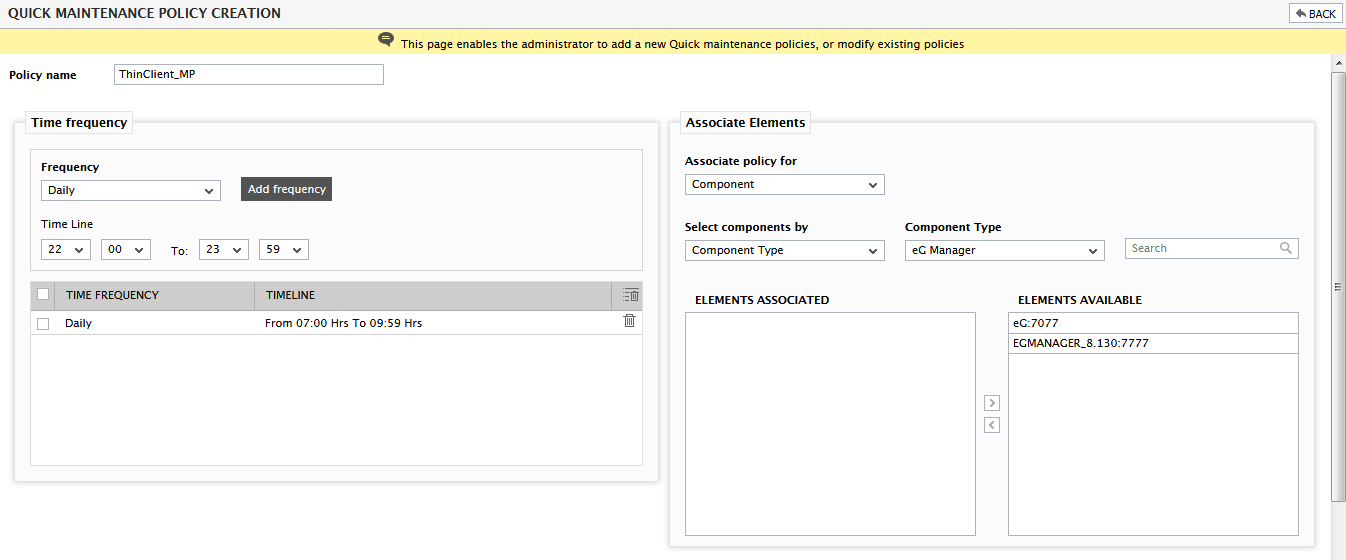
Figure 7 : Associating a policy with the components of a particular type
-
Now, if Test is chosen from the Associate policy for list in Figure 7, then the elements AVAILABLE list will, by default, be populated with the complete list of tests that are enabled and are running for all the managed components in the environment (see Figure 7). In environments where a multitude of components are being monitored, a long list of tests may appear in the elements available list. Administrators may have to scroll down the list relentlessly to pick the tests of interest to them. To condense the elements available list so that administrators have a less number of tests to choose from, use the Filter By drop-down. This drop-down is populated with the complete list of managed component types in the environment. Select a particular component type from the Filter By list so that the elements available list displays only those tests that execute on the managed components of the chosen type. If the ELEMENTS AVAILABLE list is too long and searching for the element of your choice requires endless scrolling, then you can use the Search text box. By simply typing your search criteria will populate the ELEMENTS AVAILABLE list with the result set of the searched criteria.
To suppress alerts generated by specific tests, first, select the required tests from this list and click the > button. Alternatively, you can double-click on individual tests to add them to the ELEMENTS associated list. Finally, click the Update button. A maintenance policy, once associated with a test, will automatically apply to all components on which the chosen test executes.
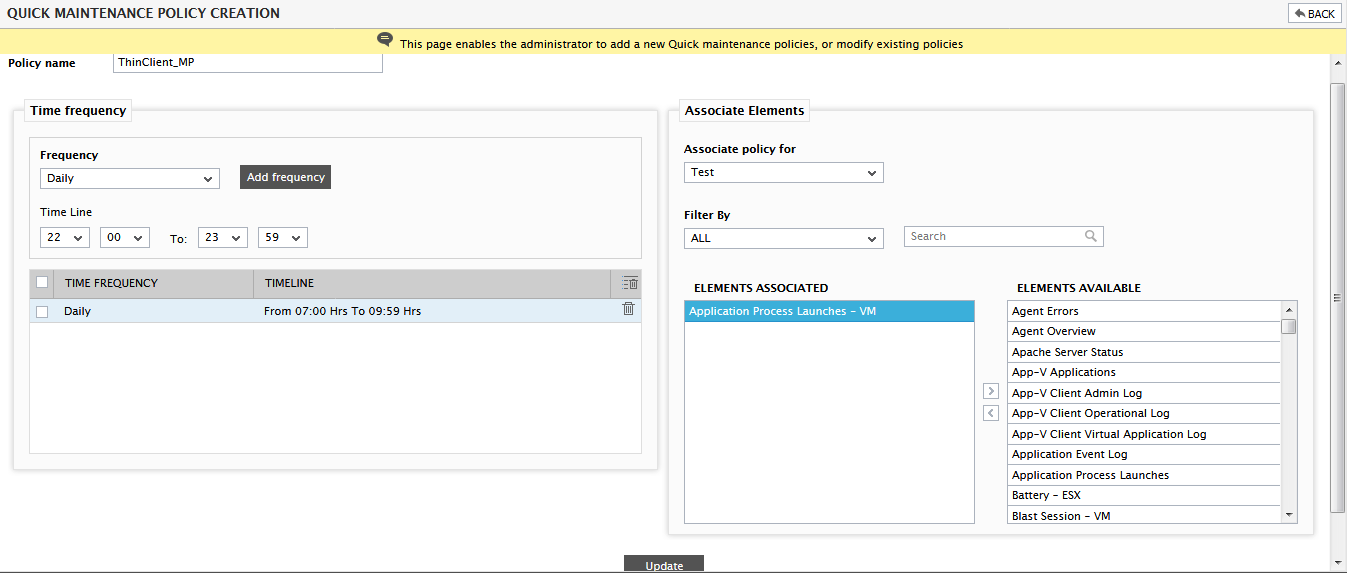
Figure 8 : Associating a policy with a test
-
Maintenance policies can also be set for individual descriptors. By selecting the Descriptor option from the Associate Policy for list, you can assign maintenance policies to specific descriptors, and thus suppress the alerts pertaining to such descriptors across all the components to which they apply. For instance, all the managed MS SQL servers in an environment could have been shutdown as part of routine maintenance. To avoid been repeatedly alerted to the non-availability of the SqlServer process on multiple servers, administrators may want to suppress these process-related alerts across all the monitored SQL servers in the environment. The Descriptor option enables the administrator to achieve this. If the Descriptor option is chosen, all the descriptor-based tests will be available for selection in the Test list that appears. Selecting a test from this list will populate the ELEMENTS AVAILABLE list with the descriptors that currently exist for the chosen test. If the ELEMENTS AVAILABLE list is too long and searching for the element of your choice requires endless scrolling, then you can use the Search text box. By simply typing your search criteria will populate the ELEMENTS AVAILABLE list with the result set of the searched criteria. Select the descriptor of interest to you from the list and click the < button, or double-click on the descriptor to add it to the ELEMENTS ASSOCIATED list. Once this is done, the maintenance policy will be automatically assigned to all components that report measures for the chosen descriptor. Finally, click the Update button.
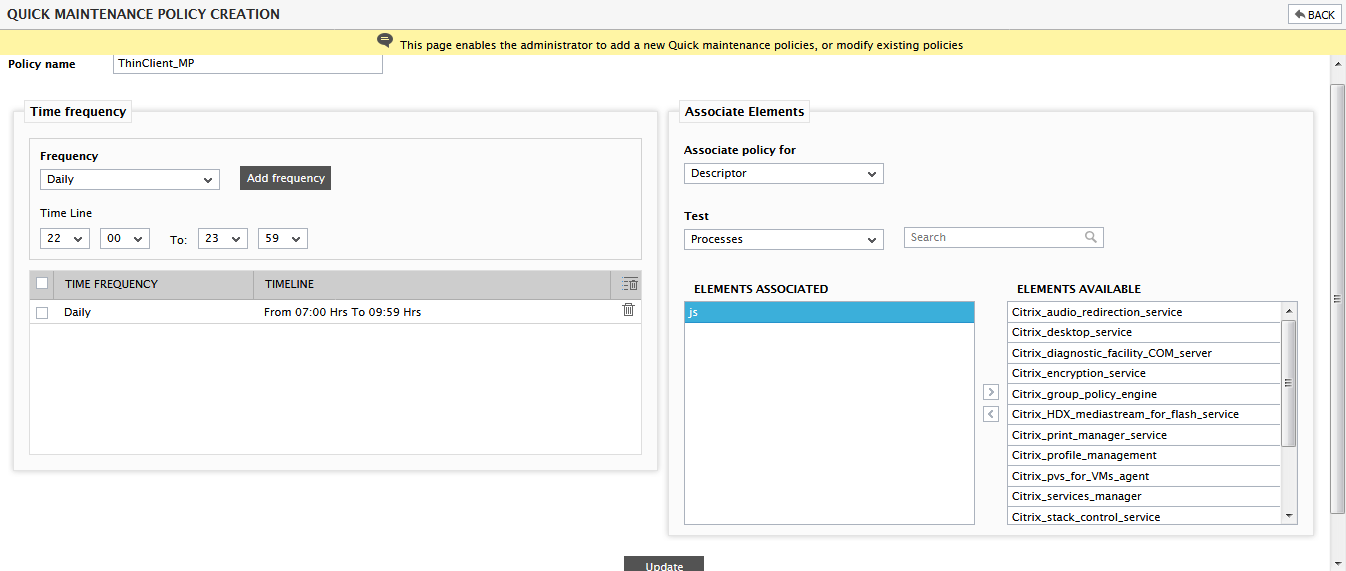
Figure 9 : Associating a policy with one/more descriptors
-
You can also suppress alerts pertaining to one/more descriptors of a specific component alone. For instance, if one/more VMs on a particular virtual host are stopped for routine maintenance, then, you may not want the eG Enterprise system to unnecessarily alert you to the non-availability of such VMs. To achieve this, you need to first select the Descriptor For Component option from the Associate policy for list. Next, select the Component of interest to you (in the case of our example, this will be the virtualized component that hosts the VMs). Once the descriptor-based tests mapped to the chosen component populate the Test list, pick the test for which alarm suppression should occur. All the descriptors supported by that test will then appear in the elements available list. If the ELEMENTS AVAILABLE list is too long and searching for the element of your choice requires endless scrolling, then you can use the Search text box. By simply typing your search criteria will populate the ELEMENTS AVAILABLE list with the result set of the searched criteria. From this list, choose the descriptors for which alerts are to be suppressed and click the < button to transfer the selection to the elements associated list. Alternatively, you can double-click on your selection in the elements available list to perform the transfer. Finally, click the Update button to associate the maintenance policy being configured with the descriptors in the elements associated list. If you want to automatically apply the maintenance policy to all the managed components that support the chosen descriptors, click the Apply To All Servers button.
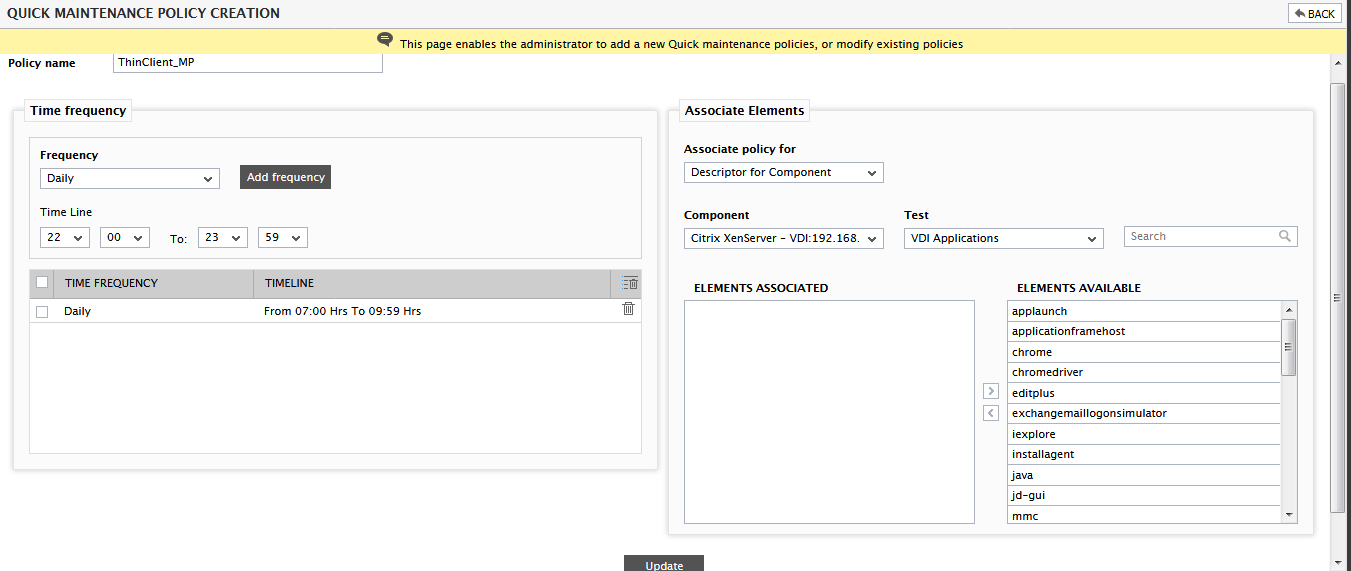
Figure 10 : Assigning a maintenance policy to the descriptors of a specific component
-
If the Test for Host option is chosen from the Associate policy for list, then all the host-level tests that are actively reporting measures will be available for selection in the Test list that appears (see Figure 10). When you select a Test from this list, all the managed systems for which the chosen test reports measures will be made available for selection in the elements available list. In large environments where tens of components are being monitored, you may have a very long list of systems to choose from. In such a case, you can filter your elements available list further by picking a component type from the Filter by type list. By default, the all option is chosen from the Filter by type list. Selecting a particular component type from this drop-down will populate the elements available list with only those hosts on which the components of the chosen type are executing. If the ELEMENTS AVAILABLE list is too long and searching for the element of your choice requires endless scrolling, then you can use the Search text box. By simply typing your search criteria will populate the ELEMENTS AVAILABLE list with the result set of the searched criteria. Select a host from this list and click the < button or double-click on individual test to associate the selected test to the ELEMENTS ASSOCIATED list. Finally, click the Update button.
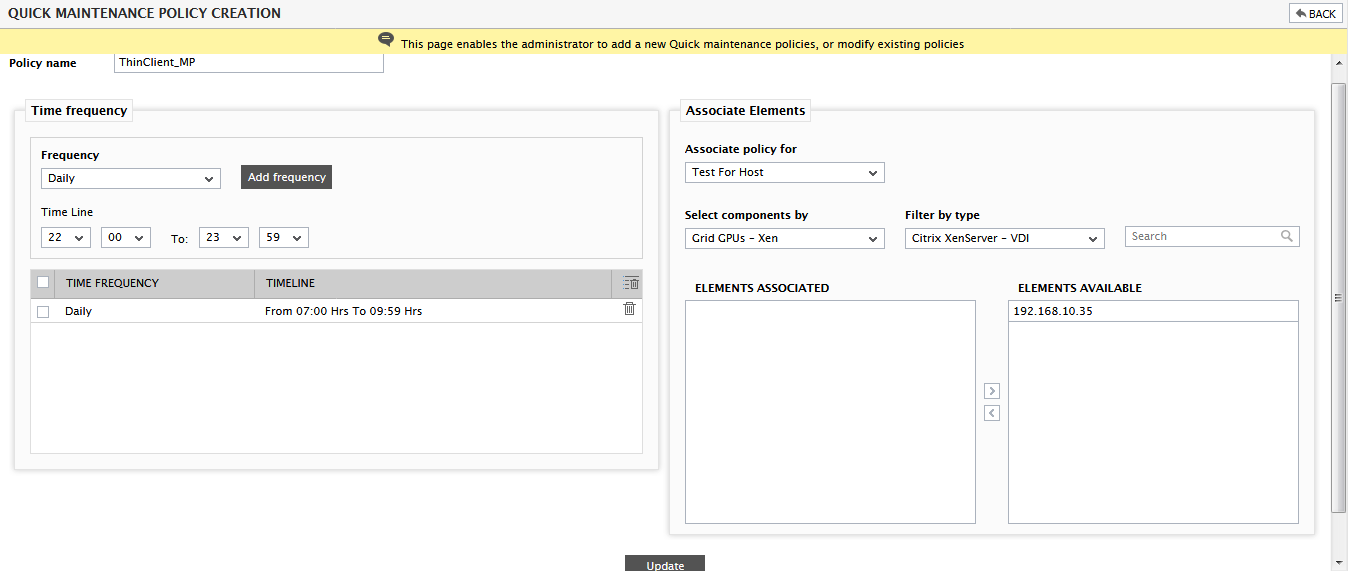
Figure 11 : Associating a policy with the host for a particular test
-
Likewise, if the Test for Component option is chosen from the Associate policy for list, then all the application-level tests that are actively reporting measures will be available for selection in the Test list that appears (see Figure 12). Typically, when you select a test from the Test list, all the managed components to which that test is applicable will be displayed in the elements available list. In environments where a large number of components are monitored, the elements available list may be too long, making selection difficult. In such cases, you can run a quick search on the elements available list to easily locate the specific component(s) of interest to you. For this purpose, use the Search text box. Specify the whole/part of the component name to search for in the Search text box and click the ‘magnifying glass’ button alongside. Doing so will instantly populate the elements available list with all those managed components with names that contain the specified Search string. With a smaller list of components to select from, you can comfortably pick and choose the components that you want to associate with the maintenance policy from the elements available list, and click the < button (or double-click on individual test) to associate the selection to the ELEMENTS associated list. Finally, click the Update button. If a maintenance policy is associated with a test that executes on a particular component, then the alerts generated by that test when executing on that component alone will be suppressed.

Figure 12 : Associating a policy with a test that applies to a chosen component
-
In large physical/virtualized environments characterized by hundreds of components/VMs/desktops, administrators found it difficult to associate a maintenance policy with multiple hosts/VMs/desktops at one shot. This is because, in such environments, to select the elements to be associated with a maintenance policy, administrators had to endlessly scroll down a long list of elements. To enable administrators of these environments to quickly and easily associate a maintenance policy with multiple hosts/VMs/desktops of interest to them, you can choose the Server/VM/Desktop (Wild Card) option from the Associate Policy for list . Once this option is chosen, a Wild Card Patterns text box will appear using which you can specify the pattern of your choice. This will automatically set the maintenance policy for all the hosts / virtual machines / desktops with names that match that pattern.
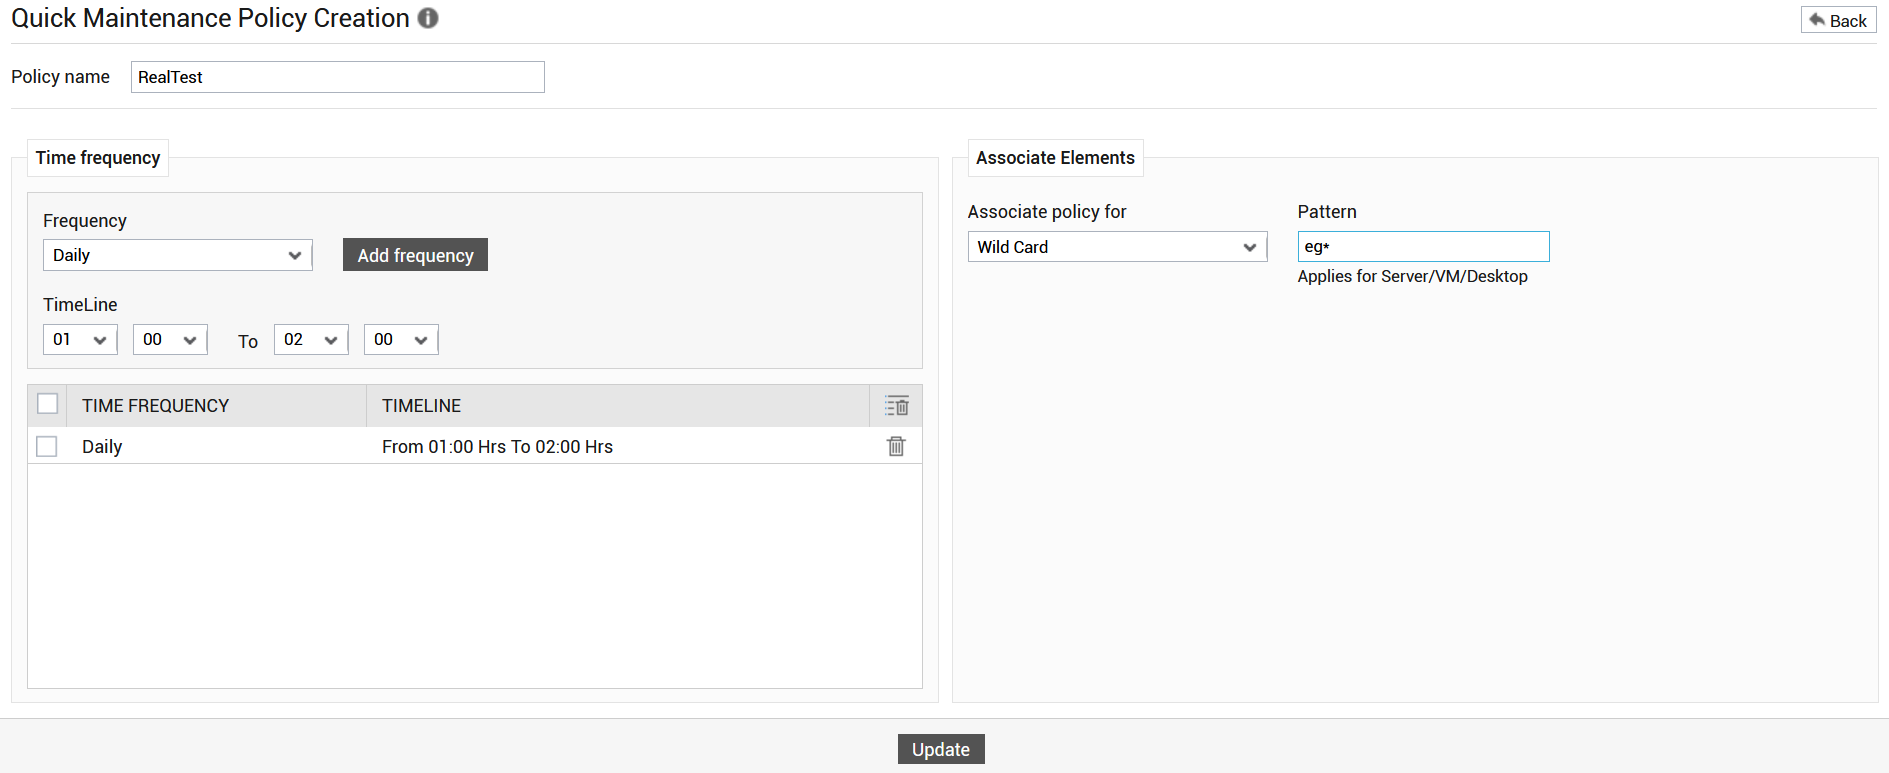
Figure 13 : Specifying a Wild card pattern
-
You can even specify a comma-separated list of wild card patterns. Wild card patterns can be specified to search for a Host/VM/Desktop that starts with the string specified in the pattern, that ends with the specified pattern and that contains the specified pattern. To apply maintenance policies to the Host/VM/Desktop names that starts with the specified pattern, use the following syntax:
<Pattern>*
To apply maintenance policies to the Host/VM/Desktop names that ends with the specified pattern, follow the syntax mentioned below:
*<Pattern>
To apply maintenance policies for the Host/VM/Dssktop names that contain the specified pattern, use the below syntax:
*<Pattern>*
-
Multiple maintenance policies can be created in the same manner discussed above.
Note:
- If a user with Limited administrative access - i.e., a user who is only authorized to configure tests, thresholds, and/or maintenance policies for components associated with them - creates a quick maintenance policy, then such a policy can be associated with a Component, a Test for Component, or a Descriptor for Component alone.
-
When users with Complete component access logs into the eG management console, the quick maintenance policies created by users with Limited administrative access will be displayed throughout the user interface in the following format:
PolicyName (Name_of_user_who_created_the_policy)
- A user with Limited administrative access can view in the tree structure (in the maintenance policy page) only those quick maintenance policies that he/she has created.