Determining the Status of the eG Agents
The eG manager determines and reports the operational status of all the eG agents in the target environment. The sections that follow will discuss how to view this status information.
If you select the Agent Status option from the Agents tile, you will be lead to Figure 1 , which will provide status information for agents based on the agent types.
To obtain the status of the eG agents of a particular type, the administrator has to first select the type of agent (whether basic, premium, external, or remote) from the Agent type list box. If the Named User license is enabled, eG Enterprise provides you with a single, central interface using which you can instantly ascertain the current status of the internal agents (if any) that are monitoring the thin client and VDI components in your environment! In this case, an additional Agents for user licensed types option will appear in the Agent type list box. eG Enterprise does not need a license to perform self-monitoring of the eG agent. If you would like to instantly ascertain the current status of those agents that are performing self monitoring, you can do so by choosing the Agent with no license type from the Agent type text box. However, this section will list the agents only if the component is managed in an agent-based manner.
The IP address / host names of the agents of the selected type will then be displayed. A  symbol against each agent indicates that the agent has been deployed. A
  symbol appears against each agent implying that the agent has not been deployed. While the
  symbol indicates that the agent is running currently, the
  Status column indicates that the eG agent is not running.
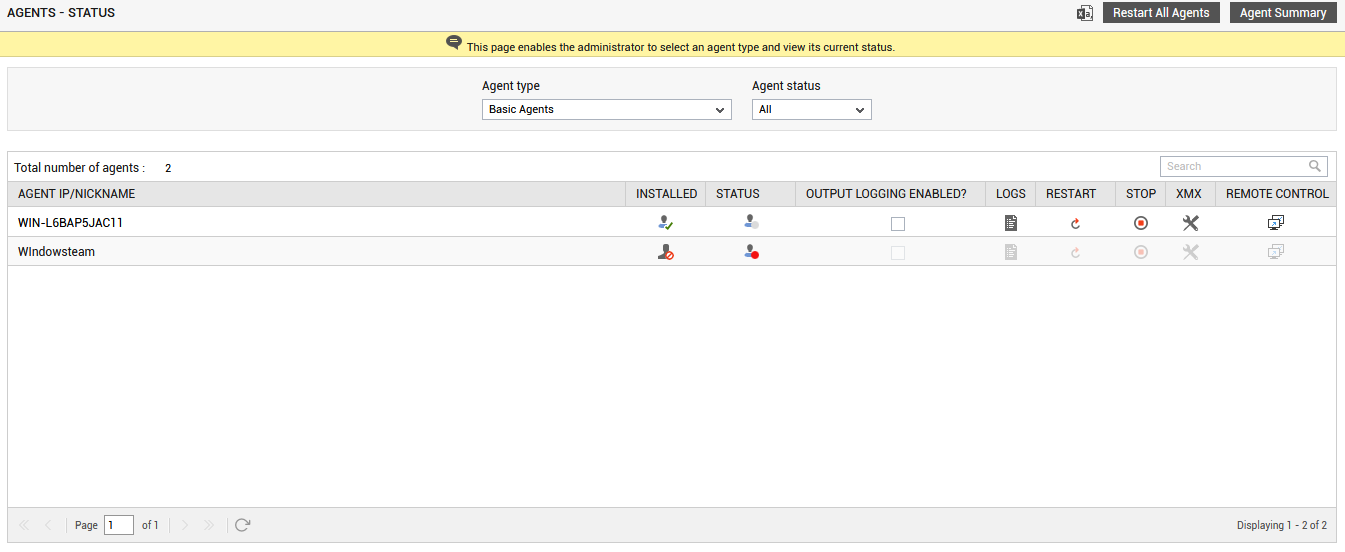
Figure 1 : Status information for agents
Also, using the Search text box, you can find out the status of a particular agent. To know the status of a particular agent, just specify the IP address / host name of that agent in the Search text box, and then click the ‘magnifying glass’ icon next to it. The status of the specified agent will then appear. If the exact IP address / host name of the agent is not known, then a string or a character that features in the IP / host name of the agent can be provided in this text box (see Figure 2). Multiple search conditions can be specified as a comma-separated list.
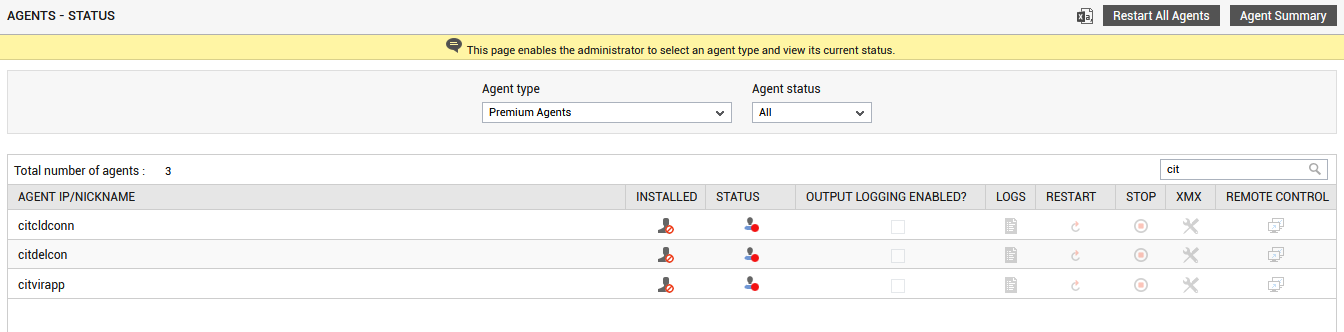
Figure 2 : Searching for agent status
To know the agents that are currently in a particular state, simply select an Agent status (which can be Running/Not Running/All). The default selection here is All.
You can even remotely initiate an agent-restart, by simply clicking on the Restart icon that corresponds to an agent. To restart all agents, click on the Restart All Agents button in Figure 2. Doing so immediately sends out restart requests to all the agents that are currently running and reporting metrics to the eG manager. If an agent is not running currently, then eG Enterprise sends out the restart request soon after that agent starts running.
To obtain a brief summary of all the agents installed in the target environment, click the Agent Summary button. Figure 3 then appears. Using this page, you can easily figure out the eG agents that are currently running and those that are not at a single glance.

Figure 3 : The AGENT SUMMARY window
From Figure 3, you can infer the following:
-
The AGENT TYPE column lists the type of agents (basic, premium, external, or remote) that are installed in the target environment.
-
Against each agent type, the total number of agents that are installed in the target environment is specified in the TOTAL AGENTS column.
-
The total number of agents that are currently running is specified in the RUNNING column. The total number of agents that are not running currently is specified in the NOT RUNNING column.
You can even export the summary of the agents by clicking the ![]() icon available in the top right corner of Figure 3.
icon available in the top right corner of Figure 3.
You can also stop an eG agent from the eG management console itself, using this page. Click on the Stop icon corresponding to an eG agent in Figure 1, to stop that agent. Doing so immediately sends out a stop request to that agent. The next time that agent sends metrics to the manager, it reads the stop request and serves it.
If an administrator needs to be alerted upon login, about agents that are not reporting measures to the manager, then do the following:
- Open the eg_services.ini file in the <EG_HOME_DIR>/manager/config directory.
- In the [misc_args] section, set the AlertAgentsNotRunning flag to Yes (default is No).
-
Once this is done, the next time the administrator logs into the admin interface, a message listing the agents that are not running will be displayed.
Note:
An eG agent can be configured to run specific tests once a day or once every few hours. You can configure the eG manager to exclude tests that are infrequently run when it determines whether an agent is running or not. To do this, modify the value of NotReportingCutoffFactor in the [MISC_ARGS] section of the eg_services.ini file. By default, tests running with measure period of greater than 20 minutes are not considered by the eG manager for determining if an agent is running or not.
-
Also, by default, output logging is disabled for the eG agents configured in an environment. eG Enterprise allows you to enable output and error logging for a specific agent from the eG administrative interface itself, thereby saving you the trouble of running the RunAgent.bat file to achieve the same. When output logging is enabled, an agentout.log file is created in the <EG_INSTALL_DIR>\agent\logs directory to which details of the tests run and measures reported by that agent to the manager are recorded. To enable output logging for an agent, set the Output Logging Enabled? flag for that agent to on. When you attempt to enable output logging, a message box shown by Figure 4 will appear, requesting your confirmation to enable output logging for that agent.
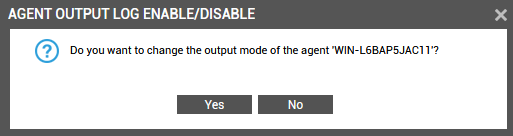
Figure 4 : A message box requesting your confirmation to enable output logging
-
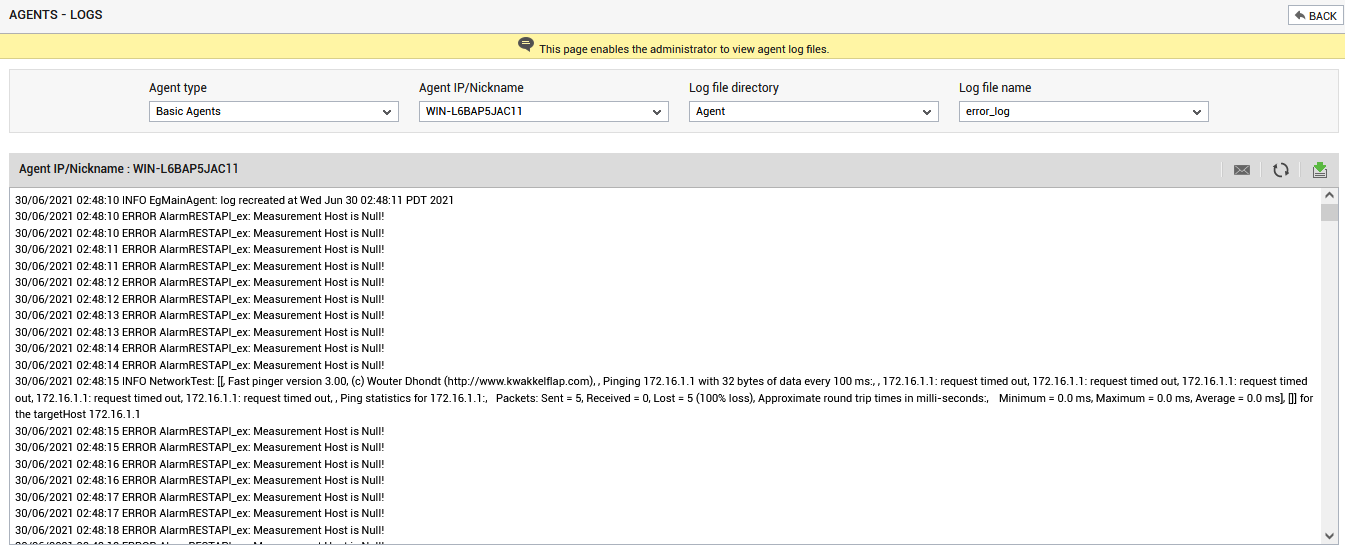
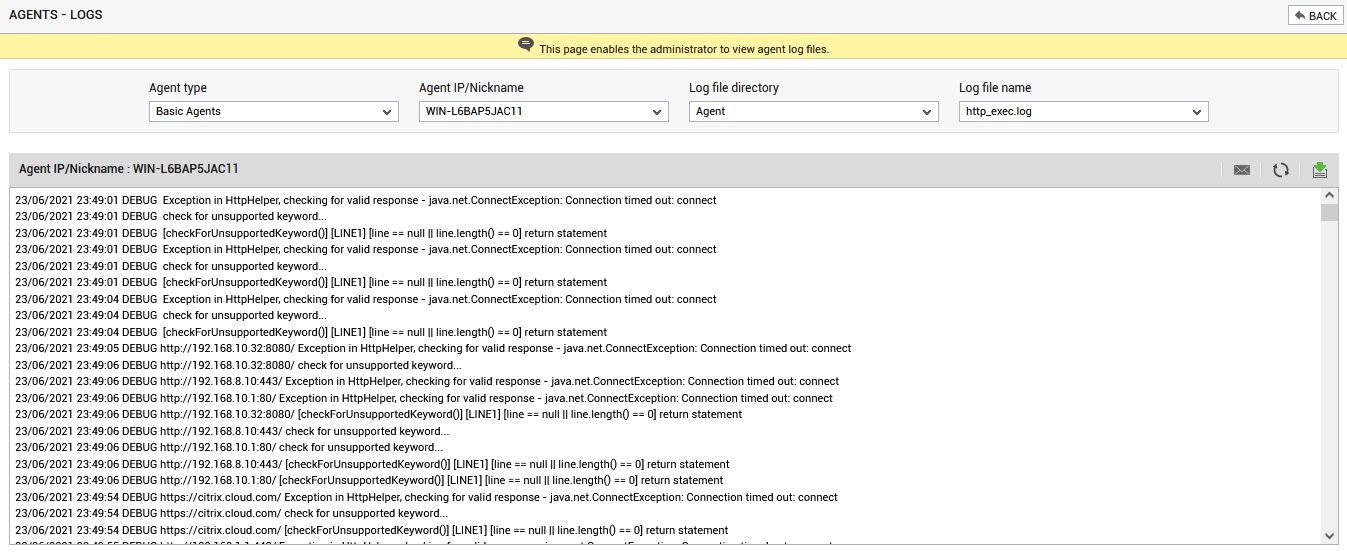
Click on the ok button in the message box to enable output logging or the Cancel button to disable it. You can then click on the logs icon that corresponds to an agent in to view both error logs and output logs related to that agent. Clicking on the logs icon corresponding to that agent will lead you to Figure 5, where the contents of the error_log of the corresponding agent can be viewed by default.
Note:
If you have turned on output logging for an eG agent using the agents – status page, then you should not turn off output logging for that eG agent by manually running the RunAgent.bat file. Likewise, if you have turned on output logging for an eG agent by running the RunAgent.bat file, then you should not turn it off using the agents – status page.
-
You can pick any log file from the Log file name list to view its contents (see Figure 6).
- At any given point in time, you can click the Refresh button at the right, top corner of the area where the log file contents are displayed to refresh the contents of the log file. This way, you can make sure that the log file you are viewing is up to date.
- You can also click on the Download button next to the Refresh button to download the chosen log file.
-
eG's Remote Control Action capability allows an administrator to remotely and securely access any monitored server in an IT infrastructure and to execute remote commands in order to perform detailed analysis of problems and to initiate corrective actions against them. eG Enterprise allows you to pick and choose the agents you want to remotely control, and run commands on them. For this, you can click the icon against an agent listed in Figure 1. Figure 7 then appears.

Figure 7 : Executing a command on the eG agent in Control mode
-
To remotely execute a command on the agent in the Control mode, do the following in Figure 7:
-
By default, the agent on which you wish to remotely execute the command will be specified in the Agent IP / Nick name text box.
-
In oder to execute the commands remotely on the agent, the eG agent should be in Control Mode. To this effect, CONTROL MODE will be specified by default in the Mode of operation text box.
-
Then, from the Command list box, select the command to be executed remotely. By default, the Command list contains a set of pre-configured, ready-to-use commands. If the command to be executed is already available in the Command list, select it, and specify the Arguments (if any), that may be supported by the chosen command.
-
If the command you want to execute is not pre-configured, then you have the following options:
-
First, add the command to the Command list using the REMOTE CONTROL COMMAND page of the eG administrative interface, and then select that command from the Command list, OR,
-
Directly issue the command using the REMOTE CONTROL page of the eG monitor interface. Please check whether you are authorized to execute a remote command that is outside of the Command list.
Note:
By default, only the admin user has the right to directly execute a command on the agent host. To grant such a right to any other user(s), follow the steps given below:
-
Edit the eg_controls.ini file in the <EG_INSTALL_DIR>\manager\config directory
-
In the [CONTROL_DEFAULTS] section of the file, you will find an AllowOtherCommands parameter that is set to admin, by default. This indicates that, by default, only the admin user is privileged to execute commands other than the ones listed in the Commands list.
-
To extend that right to other users, specify a comma-separated list of user names against the AllowOtherCommands parameter:
AllowOtherCommands=admin,john,elvis,brian
-
Finally, save the eg_controls.ini file.
-
-
Once the right is granted to you, you can proceed to directly execute an ‘unregistered’ remote command by selecting the Execute command option from the Command list, and providing the Command Syntax.
-
Then, set the value of Output required to Yes to view the output of the specified command. Otherwise, select No.
-
Then, enter the Timeout period. This is the duration for which the eG manager will wait for an output for the specified command. Upon the expiry of the period, the command execution will be automatically terminated.
-
Finally, execute the command by clicking the Execute button.
-
If Output required is set to Yes, then you will view the output of the executed command.
Note:
An agent will remain in the Control mode for 5 minutes, after which, it will return to the Normal mode.
-
-
Clicking on an agent displayed in Figure 1 will lead the users to an Agent Information page (see Figure 8), which provides some agent-related information. This includes:
- The Agent IP/Nickname
- An indicator as to whether the auto upgrade capability has been Enabled for that agent, or Disabled
- The ID of the last upgraded package (if any) (if no upgrading has occurred, then this will be ‘None”)
- The date and time at which the agent was last upgraded
- The HostName of the agent
- The operating system on which the agent is executing
- The current version of the agent
- The date and time at which the agent last updated the manager with configuration changes
- A Reset button
- A Restart Agent button
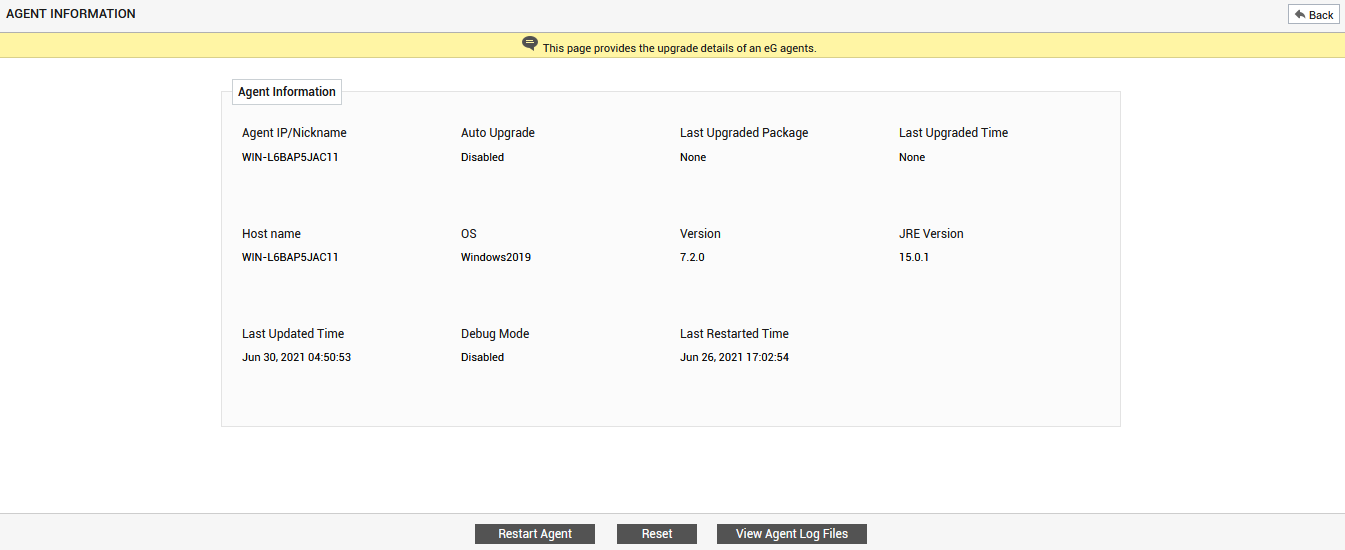
Figure 8 : A page displaying the upgrade information of an agent
- Once an agent is upgraded, information regarding the upgraded package will be registered with the manager. Figure 8 provides that information. Now, the next time the agent requests for an upgrade, the manager checks whether any newer upgrades are available. If any such upgrade is found, it sends the same to the agent. If for some reason the information pertaining to the last upgrade has to be cleared from the agent’s upgrade history, then click on the Reset button. This ensures that the details of the last upgrade are lost, and helps the agent download the last upgrade once again from the manager. To restart the agent, click on the Restart Agent button in Figure 8. To view agent logs, click on the View Agent Log Files button in Figure 8.
-
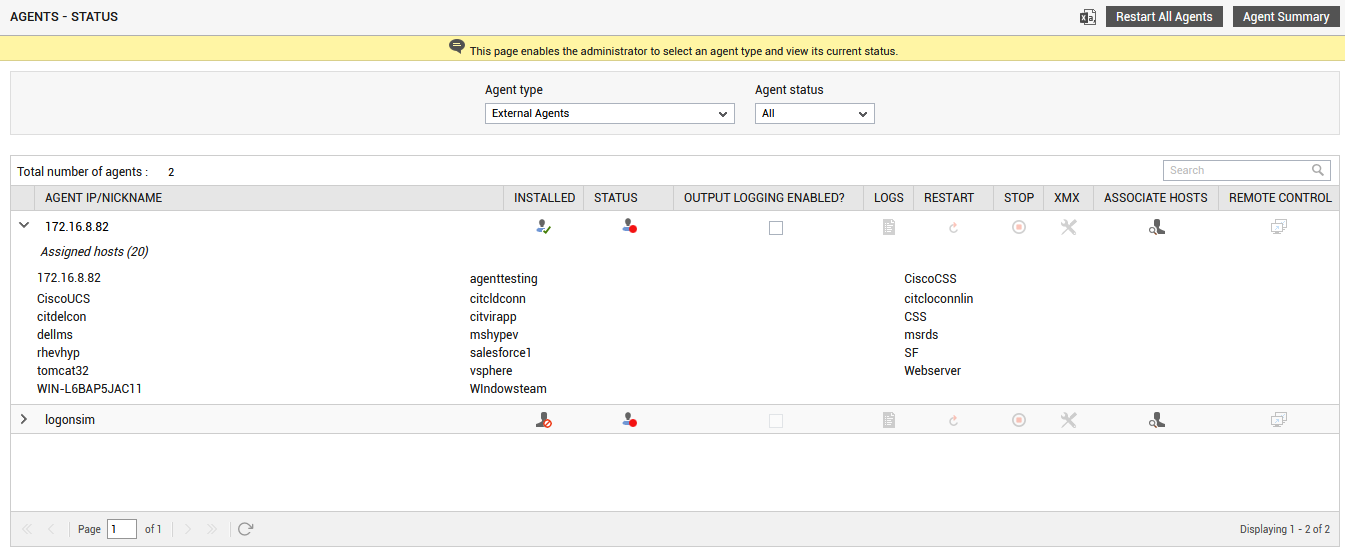
Moreover, if the Agent type chosen from Figure 1 is External Agents or Remote Agents, then you will also be able to view the count of hosts assigned (if any) to each external/remote agent. For this, you will have to click on the ‘+’ button that pre-fixes an agent (see Figure 9). Beneath the assigned host count, you can see that Figure 9 also reveals which specific hosts have been assigned to that agent. From a single glance therefore, you can precisely identify the external/remote agents that are been actively utilized, and those that are not.
-
In some environments, multiple agents may be used to monitor their infrastructure and each agent may be monitoring a large number of components. Similarly, in MSP environments, components may be discovered dynamically and hence the components assigned to the eG agent may also change dynamically. In such cases, memory allocated to the eG agents may not be adequate for monitoring and hence may cause overheads. Administrators often found it difficult to increase the heap memory allocated to each eG agent by editing the RunAgent.bat file available in the <EG_INSTALL_DIR>\lib directory. To alleviate such difficulties and to increase the heap memory of the eG agent instantly, you can click on the icon that corresponds to the eG agent in Figure 1. Figure 10 will then appear.

-
In Figure 10, the heap memory that is already allocated to the eG agent will be listed against the Existing Xmx value (MB) field. In the New Xmx value (MB) text box, specify the heap memory that you wish to allocate to the eG agent. Clicking the Update button will register your changes.
-
To add more hosts to an external/remote agent, click on the
 button corresponding to an agent in Figure 9. This will open Figure 11, using which you can assign more hosts to the agent or disassociate existing hosts from it.
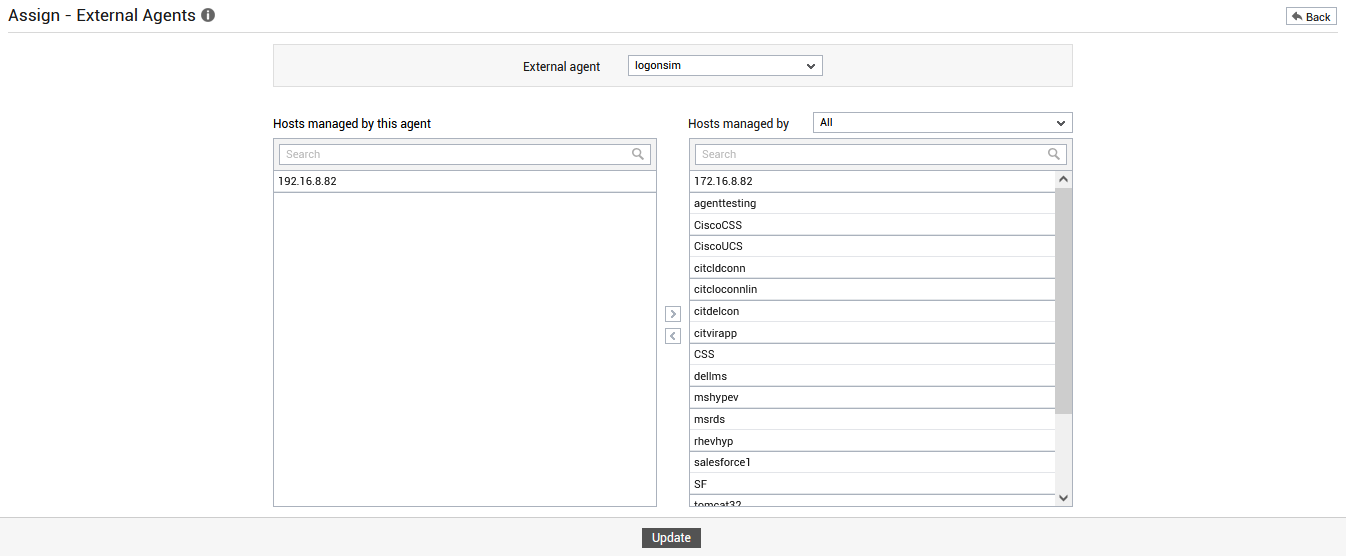
Figure 11 : Associating/Disassociating hosts from an external agent
-
If the Agent type chosen from Figure 1 is Agents for user licensed types, then you will be able to view the status (whether installed or not and whether running or not) of those agents that are monitoring the thin client and VDI components in your environment in an agent-based manner – in other words, by selecting this option, you can determine the status of those internal agents that are monitoring the thin client and VDI components.
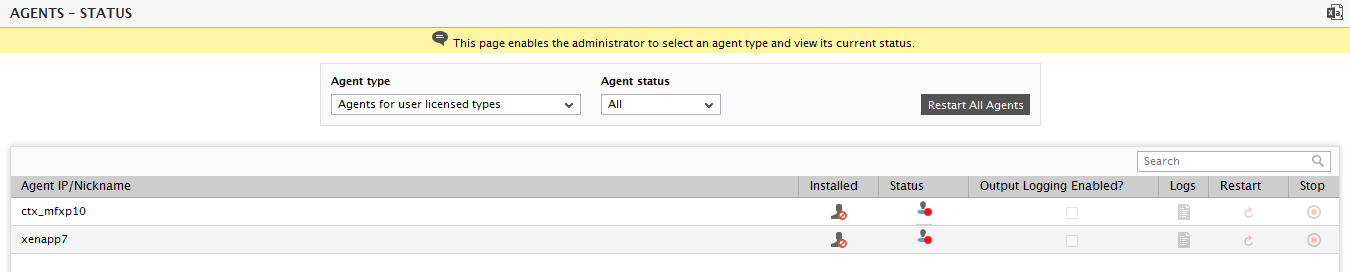
Figure 12 : Viewing the status of the agents of type 'Agents for user license types'
-
If the Agent type chosen from Figure 1 is Agents with no license, then you will be able to view the status (whether installed or not and whether running or not) of those agents that are performing self monitoring of the eG agents in your environment in an agent-based manner – in other words, by selecting this option, you can determine the status of those agents that are monitoring the eG agent component type.
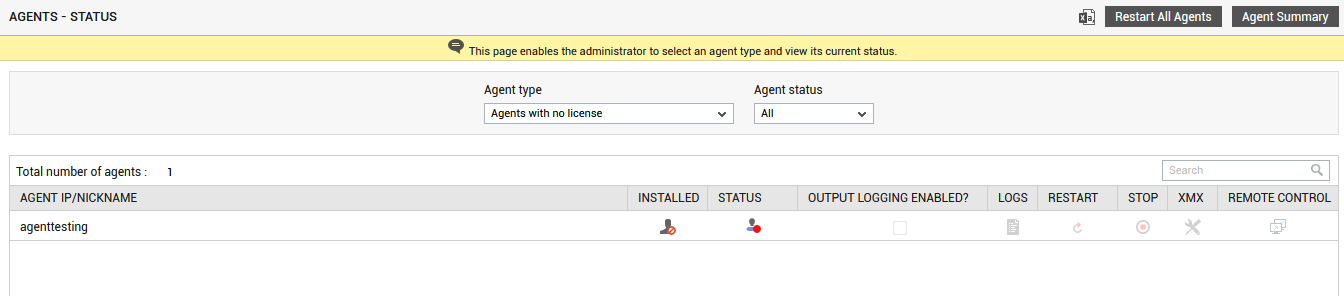
Figure 13 : Viewing the status of the agents of type 'Agents with no license'