Discovering Components in a Configured IP Range using the eG Manager
The eG manager performs discovery using one/more of the following approaches:
- Using a novel port scanning algorithm on systems in configured IP address ranges ; this is the most common technique and is ideal for discovering port-based components;
- Using the SSNMP community string; this is ideal for discovering network devices/storage systems in a configured IP range, as they do not listen on any port;
- Using proprietary APIs provided by the target applications/infrastructure - eg., virtual platforms such as VMware vSphere, public cloud platforms such as Amazon AWS etc.
This section topic discusses how IP range-based discovery and SNMP-based discovery can be configured.
Enabling/Disabling IP Range-based Discovery Using the eG Manager
To configure discovery, click on the  icon available in the Admin tab. Then, select the Discovery option in the Infrastructure tile.
Figure 1 then appears. As you can see, Figure 1 displays two panels - a left panel comprising of a Discovery tree structure, which consists of nodes and sub-nodes that enable you to quickly navigate the discovery-related options, and a context-sensitive right panel that changes according to the node chosen from the tree.
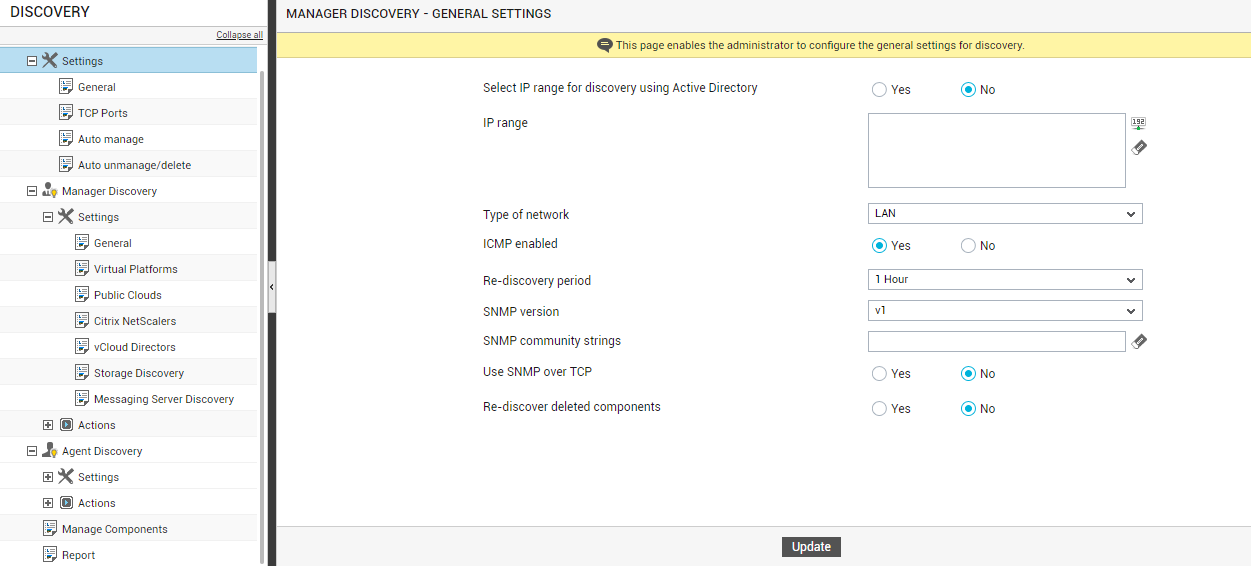
Figure 1 : The Discovery tree and the context-sensitive right panel
To hide the tree, click on the left-arrow button indicated by Figure 1. To unhide the tree, click on the right-arrow button that appears thereafter.
By default, the IP range-based component discovery approach is enabled for an eG manager. If you want to disable it, do the following:
-
Select the Enable/Disable sub-node of the Actions node under Manager Discovery in the discovery tree in the left panel of Figure 1. The right panel will then change as depicted by Figure 2.
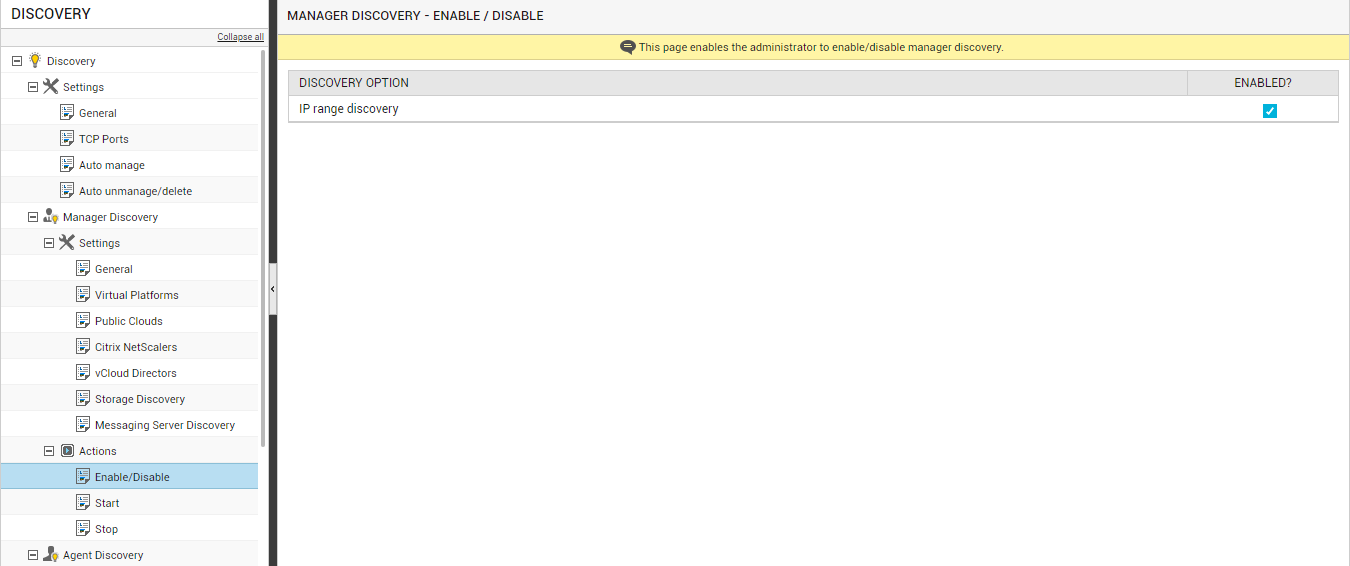
Figure 2 : Checking whether/not IP range-based discovery is enabled for the eG manager
-
By default, the IP range discovery check box in Figure 2 will be selected. To turn off this capability, deselect the Enabled? check box in Figure 2. A message box depicted by Figure 3 will then appear requesting your confirming to enable the capability. Click Yes in the message box to confirm enabling. Doing so will invoke a message box shown by Figure 4, which informs you of the success of the operation.
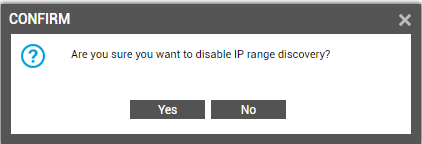
Figure 3 : A message box requesting your confirmation to disable IP range-based discovery
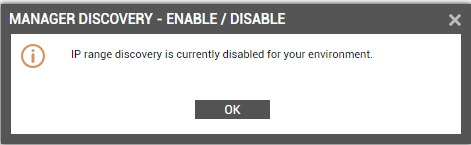
Figure 4 : A message box that appears once IP range-based discovery is successfully disabled
You can enable IP range-based discovery at any point in time by simply selecting the Enabled? check box in Figure 2.
Configuring Common Settings
Next, proceed to define the discovery settings that are common to both the eG manager and eG agent-based discovery processes.
To configure these settings, do the following:
-
Select the Generaloption under the Settings sub-node of the Discovery node in the discovery tree in Figure 5.
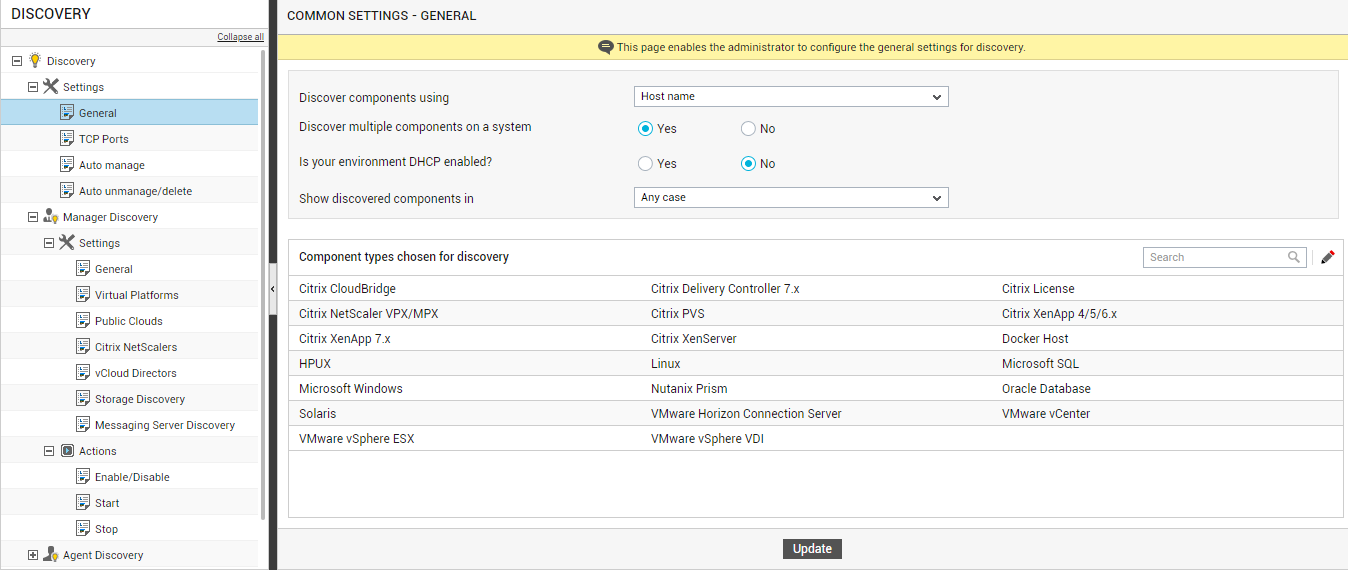
- Then, in the right panel, pick an option from the Discover components using list to indicate what you want to set as the nick name of the discovered components – the IP address of the components or the Host name? In DHCP environments typically, you may want the host name to be set as the nick name of the components, as the IP address may keep changing. Therefore, Host name option is chosen as default from this list.
-
In the eG Enterprise system, priorities are pre-assigned to different applications for the purpose of auto-discovery. By default, the eG manager/agent discovers applications based on the priorities/weightages that have been pre-configured for them. This is because, the Discover multiple components on a system flag is set to No by default. In this case, the discovery process first looks for high priority applications on a host. As soon as high priority applications are discovered on a host, discovery will stop; this means that all low priority applications on that host will be ignored by the discovery process. However, if no high priority applications are discovered on a host, then the discovery process will look for low priority applications on that host. Weights are pre-assigned to low priority applications based on how important it is to monitor them. If only low priority applications are available on a host, then the eG manager will auto-discover only that application on the host that has been assigned the highest weightage; all other low priority applications on that host will hence be ignored. This capability ensures that eG Enterprise’s discovery process only discovers the key components that administrators are likely to be interested in monitoring.
However, if the Discover multiple components on a system flag is set to Yes, then the eG manager will auto-discover all applications on a host, regardless of the priorities/weights assigned to them.
Note:
The high priority and low priority applications are pre-configured in the eg_services.ini file in the <EG_INSTALL_DIR>\manager\config directory. While the the high priority applications are pre-defined in the [HIGH_PRIORITY_COMPONENTS]section of the file, the low priority applications are pre-defined in the [low_priority_applications] section. If you want to add a component to the list of high priority applications, then append an entry of the following format in the [HIGH_PRIORITY_COMPONENTS]section of the file.
InternalName_of_ComponentType=HIGH
For instance, if you want the Citrix XenDesktop Director component to be set as a high priority component during discovery, then append the following entry to the [HIGH_PRIORITY_COMPONENTS] section:
Citrix_XcXenDesktop_Director=HIGH
Likewise, to set a component as a low priority component, append an entry of the following format to the [low_priority_applications] section of the eg_services.ini file:
InternalName_of_ComponentType=Weightage_Assigned
The Weightage_Assigned should be a value between 1 and 10, where 1 is the lowest and 10 is the highest. For instance, if you want the Citrix XenDesktop Director component to be set as a low priority component with the weightage 10, then the entry in the [low_priority_applications] section should be as follows:
Citrix_XcXenDesktop_Director=10
Finally, save the eg_services.ini file.
-
Next, indicate whether/not the target environment is DHCP-enabled. By default, the Is your environment DHCP-enabled? flag is set to No. If the environment is DHCP-enabled, then set this flag to Yes. Doing so ensures that discovery is performed using the host names of applications and not their IP addresses.
Note:
If the Is your environment DHCP-enabled? flag is set to Yes, then the Discover components using flag will automatically change to Host name, if it had been set to IP address earlier.
- The Show discovered components in flag becomes relevant only if the Host name option is chosen from the Index components using list. In this case, from the Show discovered components in drop-down, select the case to be applied to host/nick names during discovery. If you want host/nick names of discovered components to be in lower case only, then select the Lowercase option. If this is done, even if a host/nick name is in upper case during discovery, it will be automatically changed to the lower case. Select the Uppercase option if you want the host/nick names of discovered components to be in upper case only. By selecting this option, you can make sure that even host/nick names that are in lower case during discovery are automatically changed to the upper case. Select the Any case option, if you want discovery to dynamically decide at runtime which case to apply. If this option is selected, then the very first time discovery runs post the selection, it will automatically determine whether the host/nick names discovered are in upper case/lower case. The case so determined will be automatically applied to all host/nick names that are discovered subsequently. For instance, if, soon after selecting the Any case option, discovery runs and discovers a host/nick name in the upper case, the case of all host/nick names discovered subsequently will automatically change to uppercase.
-
Then, proceed to select the types of components that you want the discovery process to auto-discover. The component types selected by default will be listed in the Component types chosen for discovery section. To override this default selection, click the
 icon available at the far end of the section. Figure 6 will then appear. Select a Category from Figure 6. All component types under the chosen Category that have been selected for discovery will be listed in the Selected component types list of Figure 6. To include more component types for discovery, just select the component types from the Available component types list and click the <button. This will transfer your selection to Selected component types list as depicted by Figure 7. Then, click the Apply button.
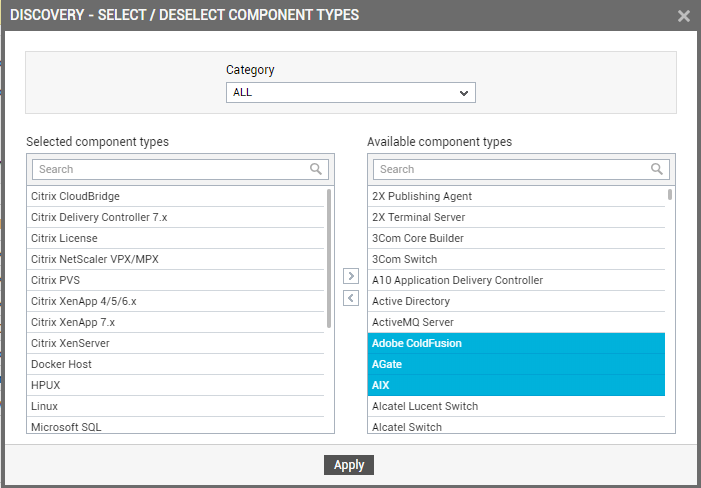
Figure 6 : Component types selected by default
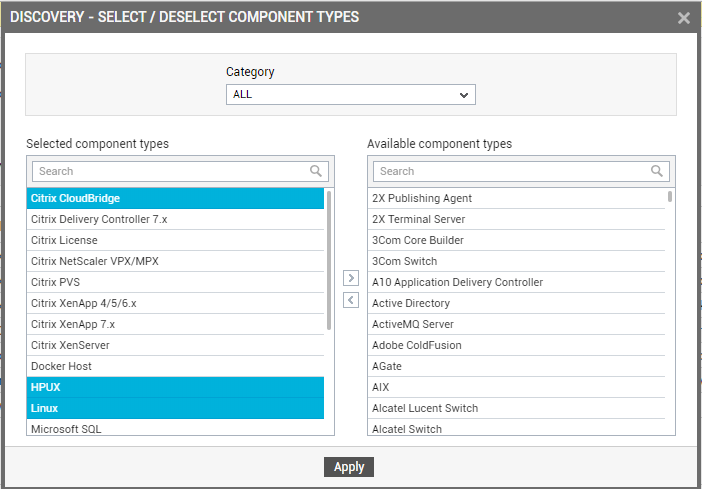
Figure 7 : Deselecting components to be excluded from discovery
- In the same way, you can configure components from more categories for discovery.
Configuring the Ports for Discovery
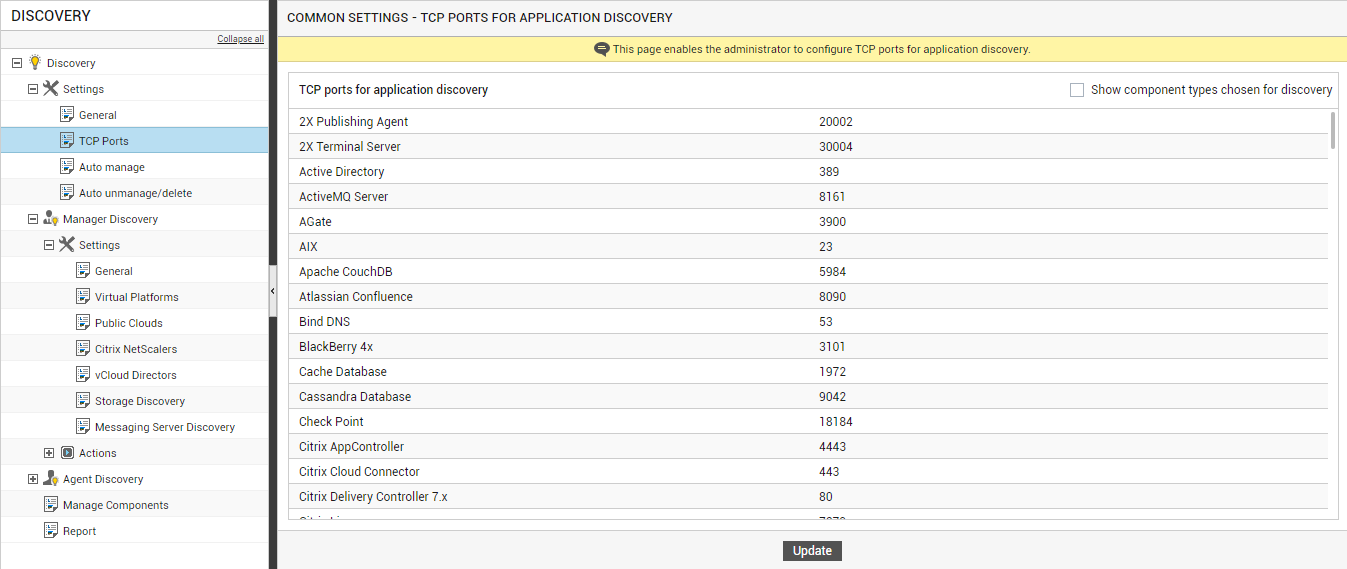
Next, proceed to configure the ports for discovery. Discovery of components in a given IP range is typically based on the port number(s) on which the components are listening. Each component type supported by eG Enterprise is mapped to a set of port numbers. You can, if need be, change the default port preferences mapped to each component type. For instance, the default port mapped to an Apache Tomcat server is 8080. If your environment comprises of a few Tomcat servers that listen on port 8080 and a few others that listen on port 8088, the discovery process will by default discover only those Tomcat servers that run on port 8080. To ensure that the discovery process automatically discovers the Tomcat servers that listen on 8080 and the ones that listen on 8088, do the following:
- Click the TCP Portsoption under the Settings sub-node of the Discovery node in the DISCOVERY tree in the left panel of Figure 5.
-
A TCP ports for application discovery section will then appear in the right panel as depicted by Figure 6. This section will reveal the default ports for all component types that eG Enterprise monitors out-of-the-box.
-
If you want to view the ports configured for all those component types that have been explicitly chosen for auto-discovery, then select the Show component types for discovery check box in Figure 8. The component types and port configurations displayed in the TCP ports for application discovery section will then change, as depicted by Figure 9.
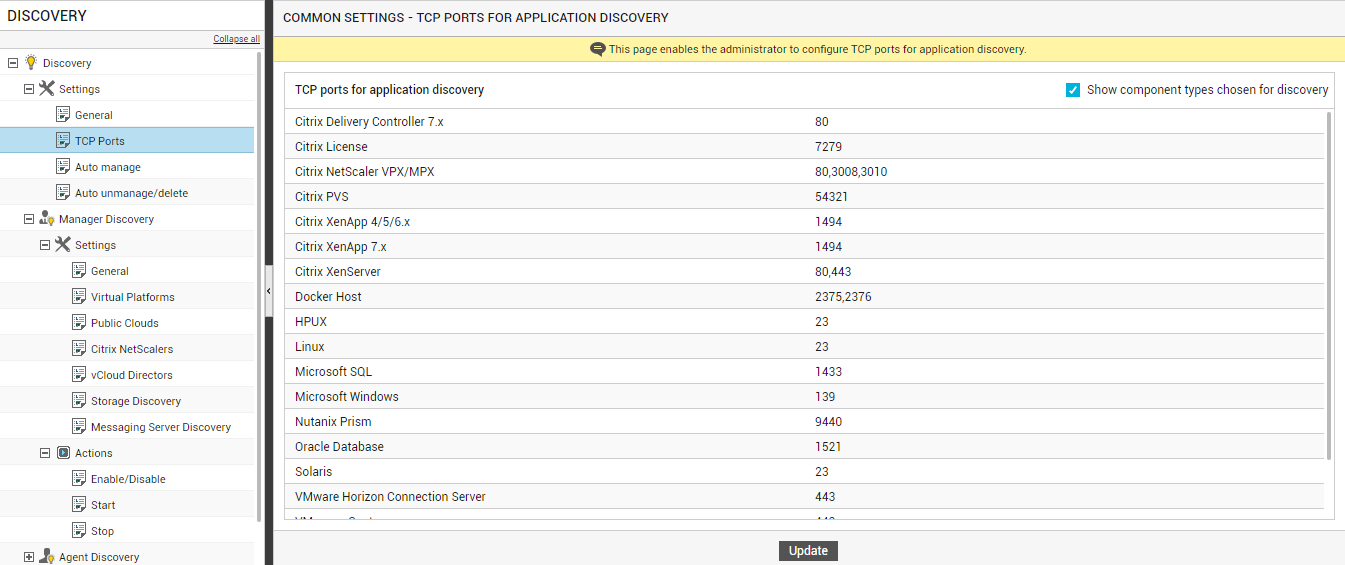
Figure 9 : Viewing the default TCP ports for components types that have been chosen for auto-discovery
-
To edit the port(s) at which the Tomcat server listens, scroll down the TCP ports for application discovery section until you can see the Tomcat entry. Then, click on the ports displayed against Tomcat. The ports will become editable as indicated by Figure 8. To make sure that the Tomcat servers listening on 443 are also discovered, append that port number of the existing list of Tomcat ports, using the comma as a separator (see Figure 8).
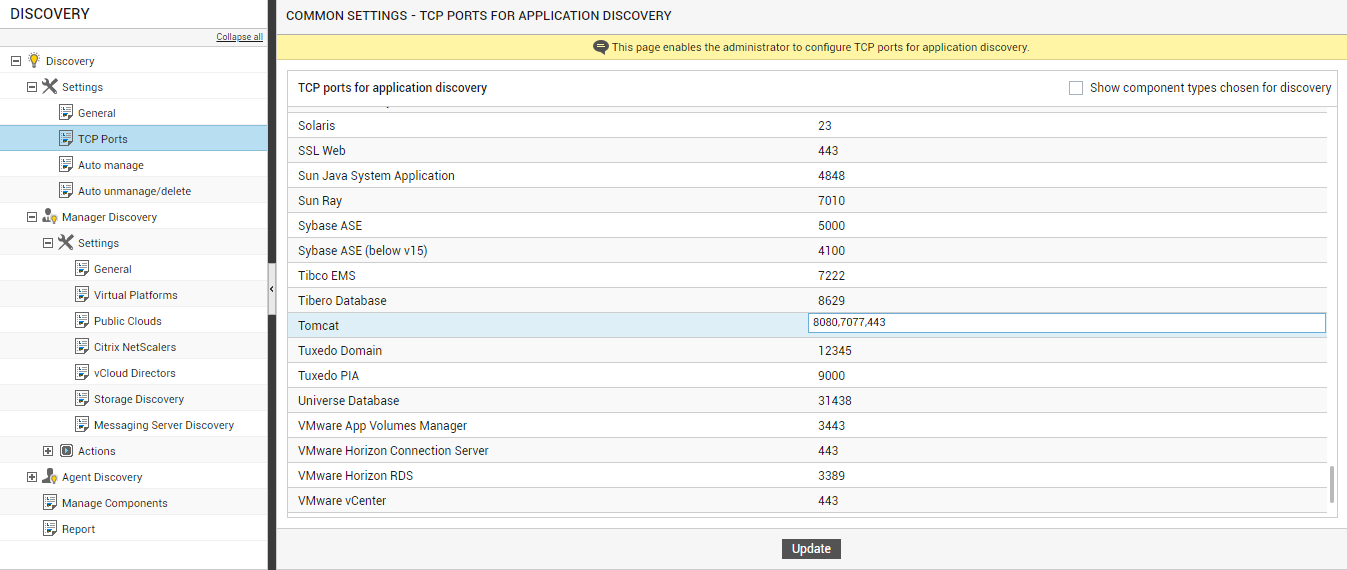
Figure 10 : Editing the ports for the Tomcat server
- Finally, click the Update button in Figure 8 to save the changes.
Configuring the IP Range and SNMP Community String for Discovery
After indicating what types of components listening on which ports need to be discovered, proceed to define the General discovery settings.
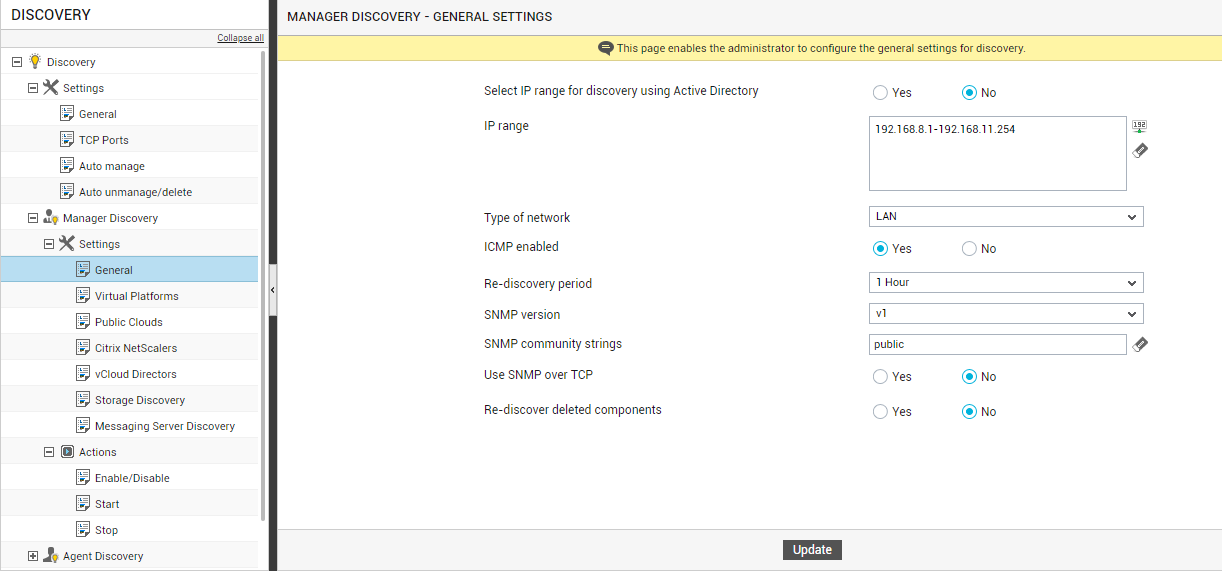
For this, click the General option under the Settings sub-node of the Manager Discovery node in the discovery tree in the left panel of Figure 1. Accordingly, the right panel will display the manager discovery – general settings page (see Figure 1).
To start the discovery process, you must specify the IP address range(s) that characterize the target environment in the general settings page. You can provide the IP range for discovery in one of the following ways:
- You can manually specify the IP range for discovery;
- You can instruct the eG manager to automatically discover the IP range from the target environment;
- If your eG manager integrates with an Active Directory server, then, you can discover the range of IP addresses available in a particular subnet of a chosen domain;
To manually specify the IP range, do the following:
- Set the Select IP range for discovery using Active Directory flag to No.
-
Provide an IP address manually in the IP range text area as depicted by Figure 11. While many environments have a single IP address range, some environments may involve components at different locations, with each location using a different IP address range. To support these different types of environments, the eG administrative interface permits the administrator to enter one or more IP address ranges that characterize the target environment, one below the other.
Note:
Both IPv4 and IPv6 ranges are supported. However, a single IP range can include either IPv4 addresses or IPv6 addresses only, and not a combination of both.
To make sure that the eG manager auto-discovers the IP range available in the target environment, do the following:
- Set the Select IP range for discovery using Active Directory flag to No.
- Click the Fetch IP range for this environment icon next to the IP range text area in Figure 12.
-
This will automatically populate the IP range text area with the range of IP addresses available in the target environment.
Figure 12 : Automatically discovering the IP range of the target environment
If you want to fetch the IP range from the AD server with which the eG manager integrates, do the following:
- Set the Select IP range for discovery using Active Directory flag to Yes (see Figure 13).
- Pick a domain from the Active Directory Domain list (see Figure 13).
- The sites in the chosen domain will then be available for selection. Select an Active Directory Site from the list (see Figure 13).
- Next, pick one/more subnets from the Select SubNet(s) From Site list (see Figure 13).
-
This will automatically populate the IP range text area with the range of IP addresses in the chosen subnets (see Figure 13).
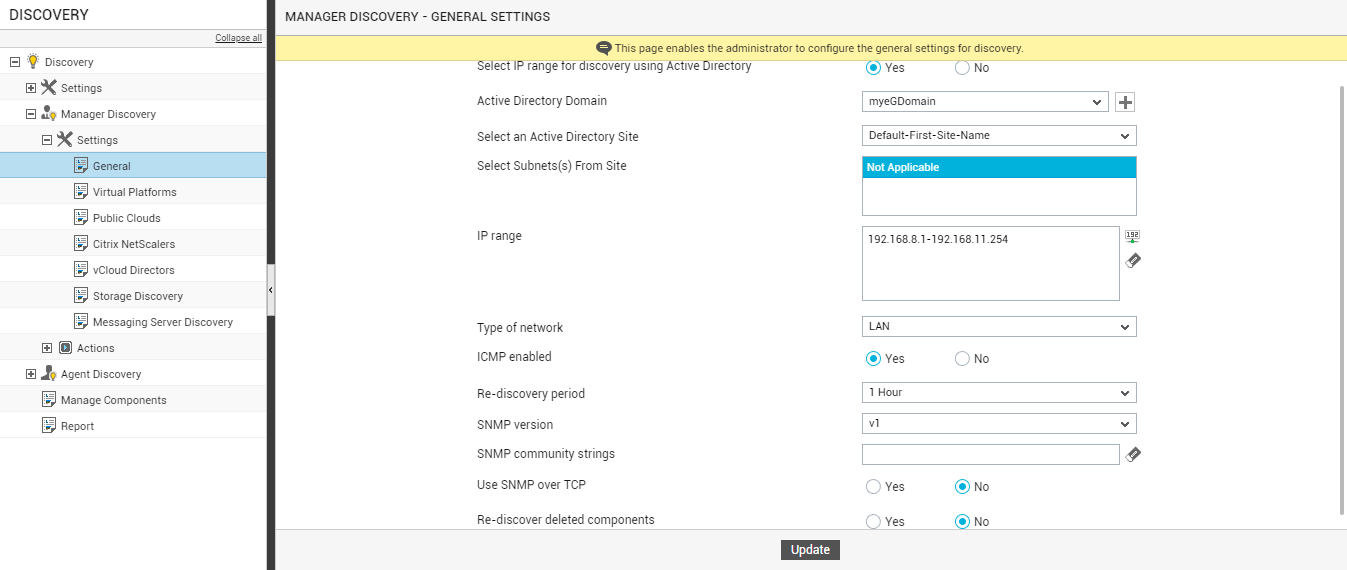
Figure 13 : Fetching the IP range from the Active Directory server
Next, from the Type of Network list box in Figure 13, choose the type of network being discovered. The default choice is a Local Area Network (LAN), wherein network delays are of the order of a few tens of milliseconds. To support networks that span multiple geographic locations, an administrator can change the network type to a Wide Area Network (WAN) in which case, the network delays are of the order of seconds. By default, the eG manager attempts to use the Internet Control Message Protocol (ICMP) to figure out which hosts are available in the target environment. Once the hosts that are available are detected, the manager usx`xes a simple port scanning technique to discover the components running on these hosts. For security reasons, some environments may not allow ICMP traffic through their networks. To inform the eG manager of such a restriction, use the ICMP enabled option. If this value is set to “No”, the eG manager directly uses the port scanning technique for each of the hosts in the specified IP address ranges.
The Re-discovery period in Figure 13 determines the frequency with which the discovery process executes. This frequency governs how quickly the eG manager is able to discover components that may have been newly added to the target environment. The default is 1 hour.
Then, proceed to indicate how network devices are to be discovered by the eG manager. Typically, SNMP is used to discover network devices. The version of SNMP used by network devices in the target environment should first be selected from the SNMP version list in Figure 13. The SNMP community strings using which the network device discovery is to be performed should then be provided as a comma-separated list. This specification can be cleared at any point in time by clicking the Clear the community string icon (i.e., the ‘eraser’ icon) next to the SNMP community strings text box.
By default, in an IT environment, all data transmission occurs over UDP. Some environments however, may be specifically configured to offload a fraction of the data traffic – for instance, certain types of data traffic or traffic pertaining to specific components – to other protocols like TCP, so as to prevent UDP overloads. In such environments, you can instruct the eG manager to conduct the discovery-related data traffic over TCP (and not UDP). For this, set the Use SNMP over TCP flag in Figure 13 to Yes. By default, this flag is set to No.
By default, components that are deleted will not be discovered again. Accordingly, the Re-discover deleted components flag in Figure 13 is set to No by default. If you want the eG Enterprise system to re-discover deleted components, then set this flag to Yes.
Finally, click the Update button in Figure 13. This will start the discovery process.
Starting/Stopping the Discovery
To start discovery, select the Start option under the Actions sub-node of the Manager Discovery node in the discovery tree in the left panel of Figure 13. Figure 14 will then appear, requesting your confirmation to start the discovery process. Click Yes here to start discovery. If you do not want to start discovery, click No.
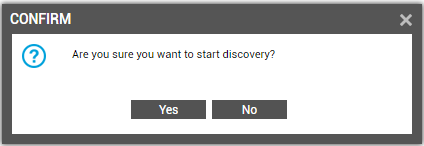
Figure 14 : A message box requesting your confirmation to start discovery
Clicking Yes in Figure 14 will invoke Figure 15. Using Figure 15, you can track the progress of the discovery and can also identify the types of components that have been discovered using the page that appears in the right panel when the Start node is selected.
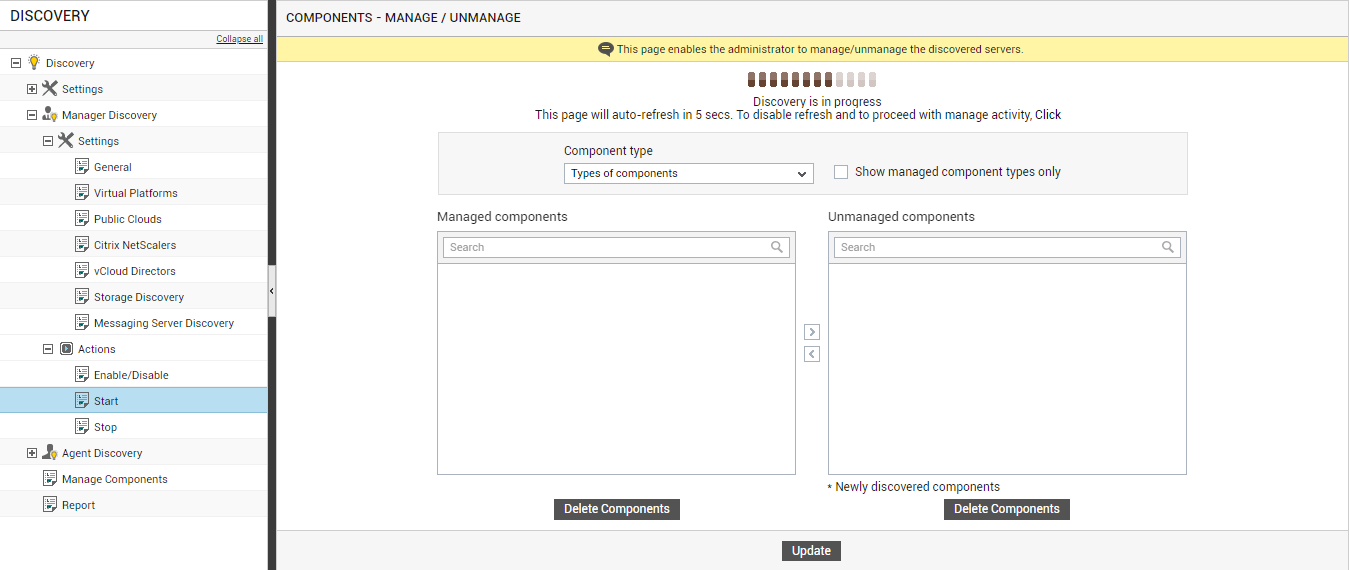
Figure 15 : Discovery in progress
The Component type list in Figure 14 lists the types of applications/devices that the discovery process has discovered.
You can stop the discovery process any time after it is started by clicking the Stop option under the Actions sub-node of the Manager Discovery node in the Discovery tree in the left panel of Figure 13 . Figure 16 will then appear requesting your confirmation to stop discovery.
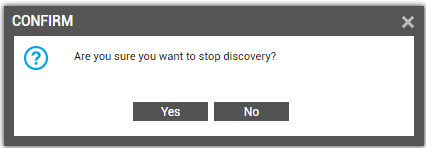
Figure 16 : A message box requesting your confirmation to stop discovery
Click the Yes button in Figure 16 to stop discovery and the No button to continue discovery.