SAML Enablement for Single Sign-On
Single Sign-On (SSO) is an authentication process that allows a user to access multiple applications with one set of login credentials. By logging in once, you can access all services registered with the credentials.
The key benefits of SSO are as follows:
- Improves user productivity
- Reduces risk of bad password habits
- Simplifies login process for end-users
eG Enterprise supports SSO through SAML (Security Assertion Markup Language). SAML is an open standard that allows identity providers (IdP) to pass authorization credentials to service providers (SP).
A service provider (SP) needs the authentication from the identity provider (IdP) to grant authorization to the user. An identity provider performs the authentication that the end user is who they say they are and sends that data to the service provider along with the user’s access rights for the service.
An SSO Login can be SP-initiated or IdP-initiated. In the case of an SP-initiated SSO login:
- An end-user first connects to the SP and selects the SAML IdP that will provide the authentication.
- Upon selection of an IdP, the SP will automatically direct the end-user to the login page of the IdP, where the user will have to provide his/her login credentials.
- Once the IdP verifies and validates the credentials, the end-user will be automatically logged into the SP portal. What an end-user can do in the SP portal depends upon the access rights/privileges that have been configured for that user in the SP.
In the case of an IdP-initiated login:
- An end-user provides his/her login credentials in the IdP's login page.
- Upon successfully logging into the IdP's portal, the end-user chooses the SP that he/she wants to connect to.
- Once the SP is chosen, the end-user will be automatically directed to the SP's portal. What an end-user can do in the SP portal depends upon the access rights/privileges that have been configured for that user in the SP.
eG Enterprise supports both SP-initiated and IdP-initiated SSO logins via SAML. To configure support for such logins, the following broad steps should be followed:
- Enable support for SSO logins;
- Configure SAML as the Authentication Provider for eG Enterprise;
- Configure eG Enterprise as an SP in one/more IdPs;
- Configure one/more IdPs in eG Enterprise;
- Configure eG users to use SAML for authenticating their logins
Each of these steps have been elaborately discussed below.
Enabling the SSO Feature in eG Enterprise
To achieve this, follow the steps below:
- Login to the eG admin interface.
- Follow the Settings -> Manager menu sequence.
- Expand the Account Security node in the left panel of the MANAGER SETTINGS page, and select the Single Sign-On sub-node within.
-
The right panel will change to display a Single Sign-On section (see Figure 245).
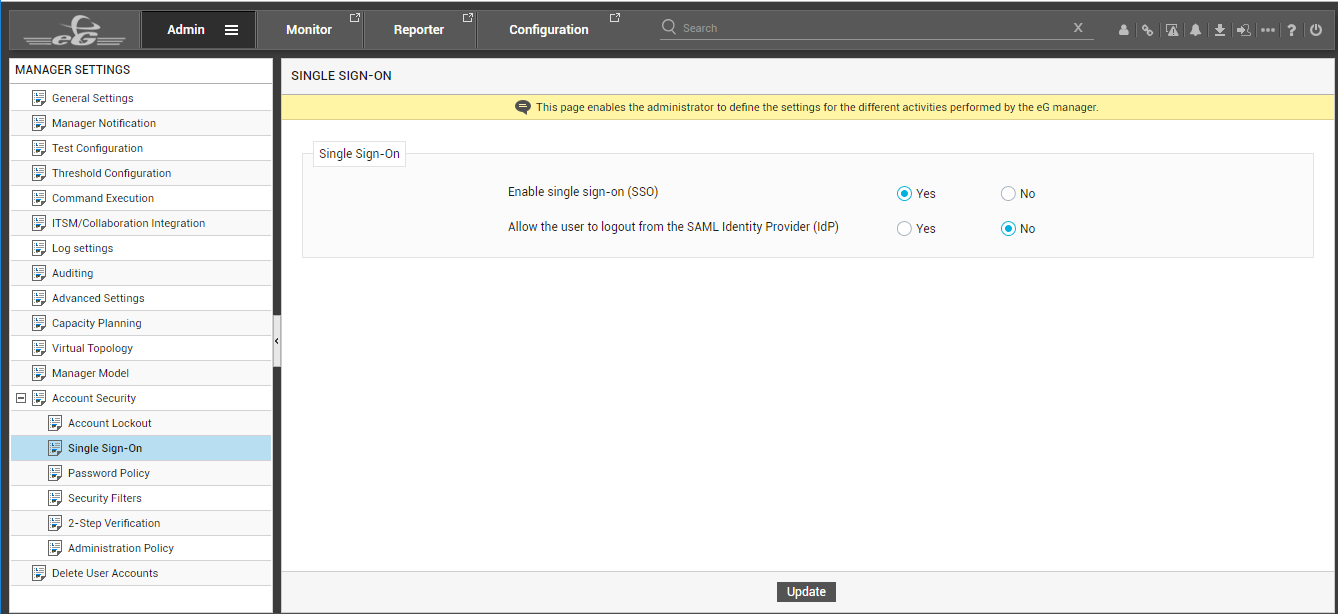
- In the right panel of Figure 245, set the Enable single sign-on (SSO) flag to Yes, to enable support for SSO.
-
If SSO is enabled, you can configure any user login to eG Enterprise to be authenticated by an IdP that the user chooses at the time of the login. This means that after a user successfully logs into eG Enterprise via an IdP, a session for that user will be open both on eG Enterprise and the IdP. However, by default, if the user logs out of eG Enterprise, that user's session on the IdP will continue to remain open. This is because, the Allow the user to logout from the SAML Identity Provider (IdP) flag is set to No by default.
Sometimes, an open session on an IdP may leave the door open for Cross-Site Request Forgery (CSRF) and session hijacking attacks. To avoid such attacks, you may want to enable SAML Single Logout (SLO). This additional protocol helps address the problem of orphaned logins. If SLO is enabled, then all server sessions established via SAML SSO can be automatically terminated by initiating the logout process once. SLO can be initiated from either the SP or the IdP. Where eG Enterprise is the SP, you can initiate SLO from eG Enterprise by setting the Allow the user to logout from the SAML Identity Provider (IdP) flag to Yes. This setting ensures that if a user who is logged into eG Enterprise via SAML SSO logs out, his session on the IdP is automatically killed.
Note:
- As mentioned earlier, if the Allow the user to logout from the SAML Identity Provider (IdP) flag is set to No, then, even if a user logs out of eG Enterprise, his/her user session on IdP will continue to remain active. In this case, if the same user attempts to connect to the eG management console yet again, he/she will not be expected to enter his/her login credentials again; instead, the user will automatically login to the console upon hitting the eG manager's URL. This is because, when connecting to the eG manager, the user will only 'reconnect' to the session that is already open on the IdP. Since the IdP has already validated the user credentials in the 'active' session, the user will be allowed to automatically login to the eG management console.
- If the user clears his/her browser cache after logging out of an SP, then that user's session on IdP will be terminated instantly, even if the Allow the user to logout from the SAML Identity Provider (IdP) flag is set to No.
- Finally, click the Update button.
Configuring SAML as the Authentication Provider for eG Enterprise
For this, do the following:
- Login to the eG admin interface.
-
Follow the Settings -> Manager menu sequence. Figure 246 will then appear. Click the General Settings node in the tree structure in the left panel of Figure 246. Upon selection, the contents of the right panel will change to display the General Settings section, as depicted by Figure 246.
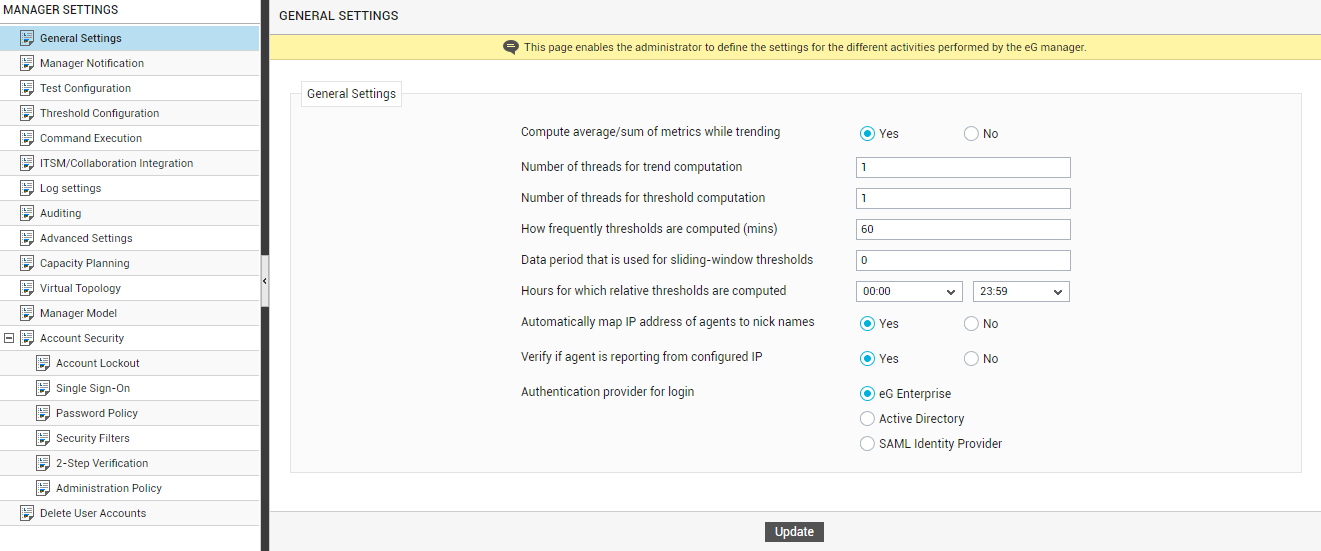
Figure 246 : Selecting the authentication provider for logins
- Set SAML Identity Provider as the Authentication provider for logins to eG Enterprise and click the Update button.
Configuring eG Enterprise as a Service Provider in the IdP
The next step is to configure eG Enterprise as an SP in the IdP. The procedure for this differs from one IdP to another. Some of the popular IdPs are OneLogin, Active Directory (AD), Microsoft Azure Active Directory (AD), AD FS, Okta etc. The procedure for configuring OneLogin and Azure AD are detailed below. For any other IdP, please refer to the documentation provided by that IdP.
Configuring eG Enterprise as a Service Provider in OneLogin
To register eG Enterprise as an SP with OneLogin, you can follow the steps detailed below:
- Login to the OneLogin console.
-
Click on the Configuration option in the left panel of the console to configure a new SP (see Figure 247).
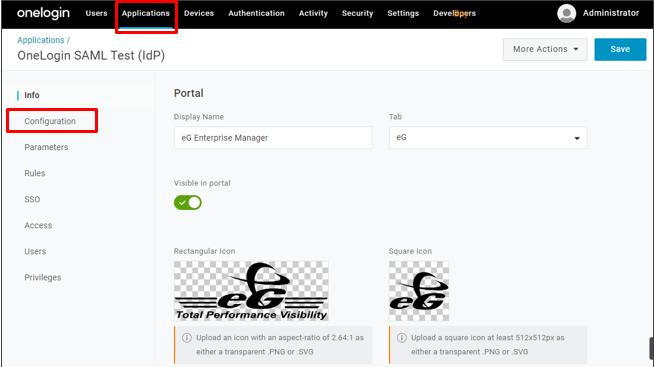
- In the right panel, provide a Display Name for the new SP.
- Upload an icon for the SP that you want displayed in OneLogin.
-
Then, if you want to initiate Single Logout (SLO) from the IdP, provide the SAML Single Logout URL of the SP - in our case, this should be the Single Logout URL of eG Enterprise (see Figure 248). In case of IdP-initiated SLO, whenever a user attempts to log out of the IdP, the IdP generates a digitally signed LogoutRequest and appends it to the SP's SLO endpoint, which is a dedicated URL that expects to receive SLO messages from the IdP. This is the URL that you should specify against SAML Single Logout URL. Once the SP receives the LogoutRequest at the SAML Single Logout URL, it validates the request, terminates its own login session for the end-user, and sends out a LogoutResponse to the IdP. Upon receipt of the response from SP, the IdP terminates its session.
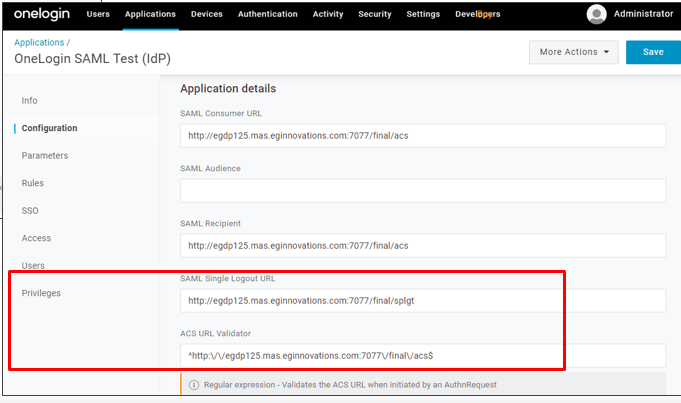
Figure 248 : Specifying the Single Logout URL and ACS URL of eG Enterprise
-
Then, specify the ACS URL Validator of eG Enterprise. To configure an IdP to work with an SP, an Assertion Consumer Service (ACS) URL has to be specified. The ACS URL is an endpoint on the service provider where the identity provider will redirect to with its authentication response. This endpoint should be an HTTPS endpoint because it will be used to transfer Personally Identifiable Information (PII).
Note:
Where eG Enterprise is the SP, follow the steps below to determine the values to be configured against SAML Single Logout URL and ACS URL Validator:
- Login to the eG admin interface.
- Follow the User Management -> SAML Identity Providers menu sequence.
-
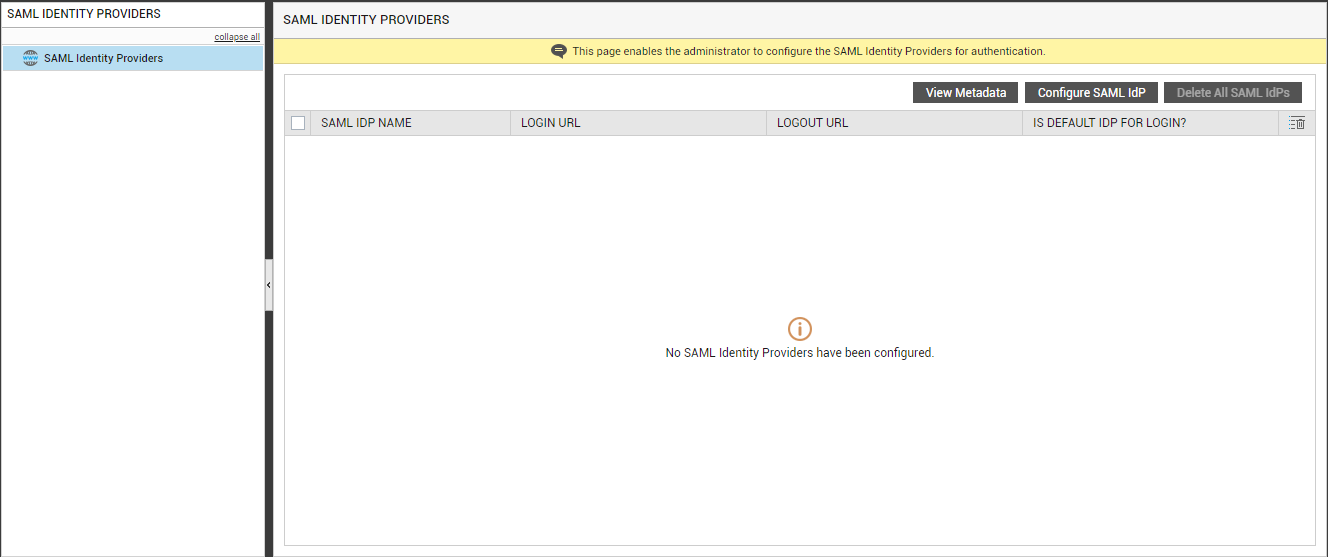
When Figure 249 appears, click the View Metadata button therein. The message box that then pops up (see Figure 249) clearly displays the ACS URL and Logout URL of eG Enterprise.
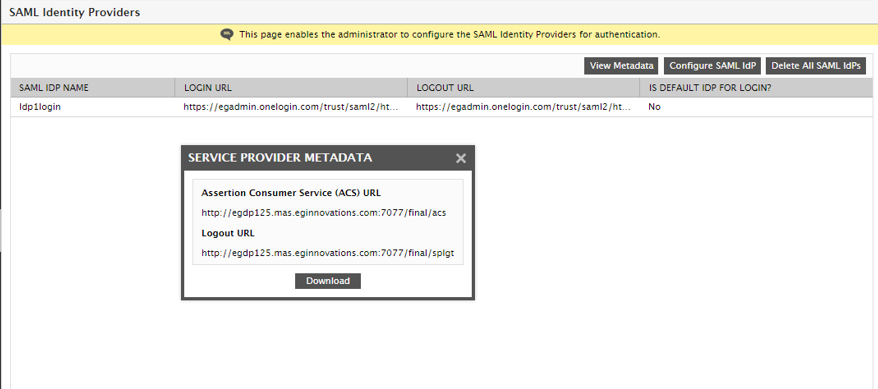
Figure 249 : Determining the ACS URL and Logout URL of eG Enterprise
- Finally, click the Save button to save the configuration.
Configuring eG Enterprise as a Service Provider in Microsoft Azure Active Directory (AD)
To register eG Enterprise as an SP with Microsoft Azure Active Directory, you can follow the steps detailed below:
-
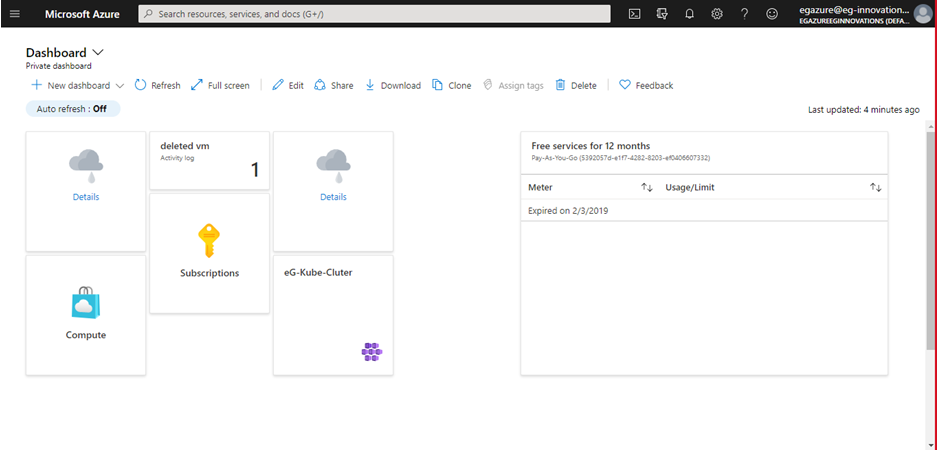
Login to the Microsoft Azure portal as a valid Azure user. Figure 250 will then appear.
-
Click on the 'hamburger' icon at the top, left corner of Figure 265. From the menu that drops down, select Azure Active Directory. Figure 266 will then appear. Next, click on the Enterprise applications option from the Manage section in the left panel of Figure 266.
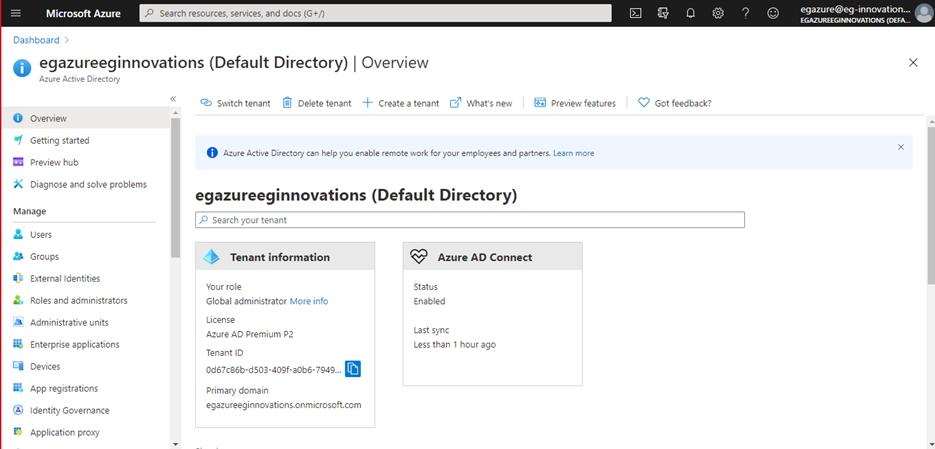
Figure 251 : Selecting the Enterprise applications option
-
Figure 8 will then appear. To create a new application, click on the New application link in the right panel of Figure 267.
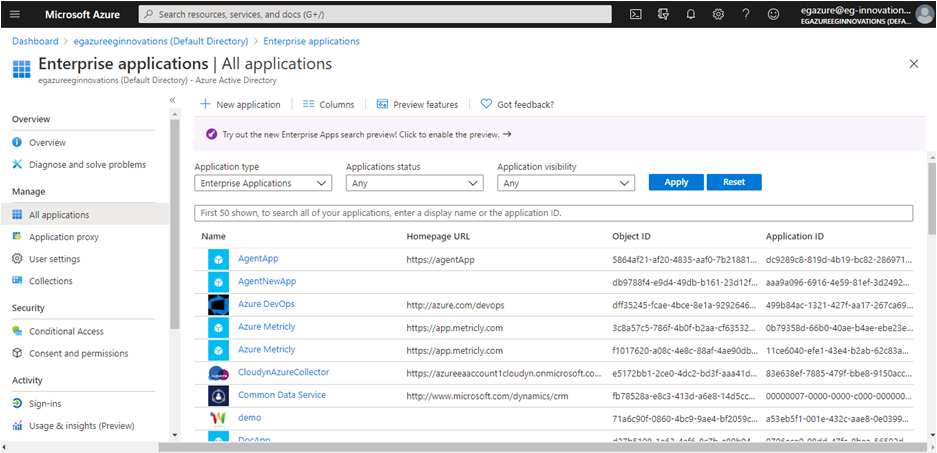
Figure 252 : Clicking on the New application link
-
Figure 253 will then appear. Here, click on the Click here to switch back to the old app gallery experience link.
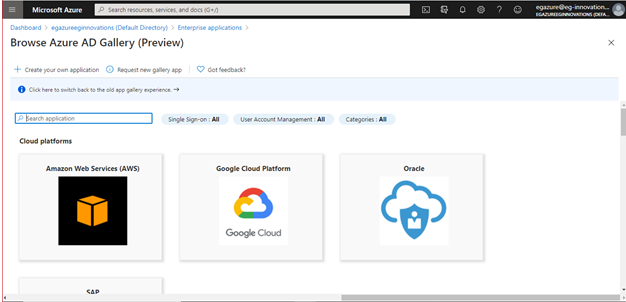
Figure 253 : Choosing to switch back to the old app gallery experience
-
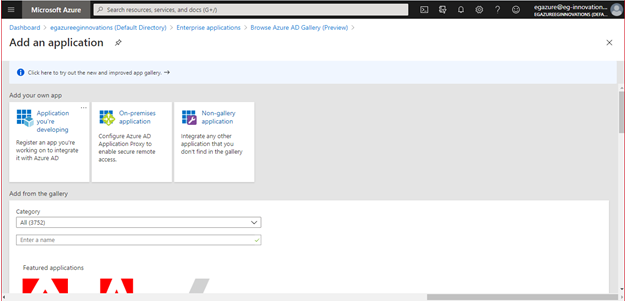
When Figure 254 appears, click on the Non-gallery application tile.
-
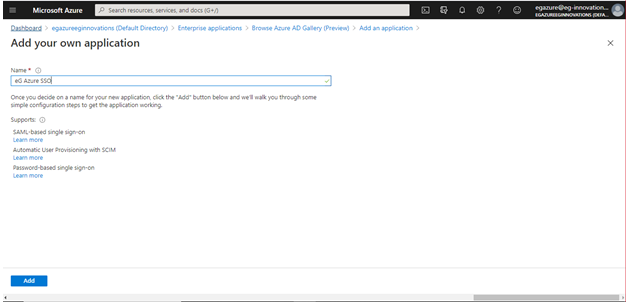
In Figure 255 that then appears, specify the Name of the custom application that you intend to create. Then, click the Add button in Figure 255.
-
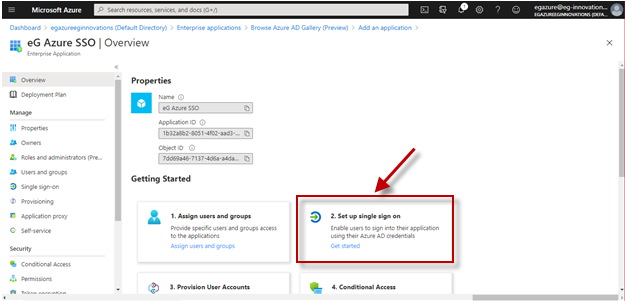
Once the application is successfully created, Figure 256 will appear. Click on the Set up single sign on tile in Figure 256 to configure SSO for the new application.
-
When Figure 257 appears, select the SAML tile.

-
Next, click on the Edit option in the Basic SAML Configuration section of Figure 258.
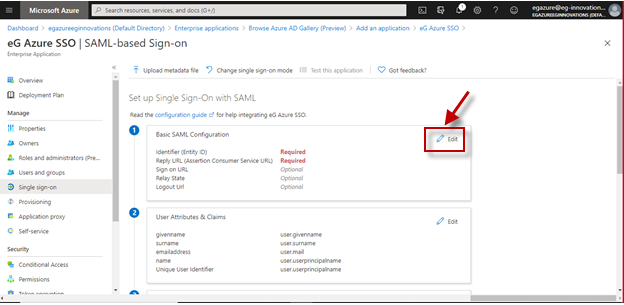
Figure 258 : Clicking on the Edit option in the Basic SAML Configuration section
-
In Figure 259 that then appears, first specify the Identifier (Entity) IDof the eG manager.
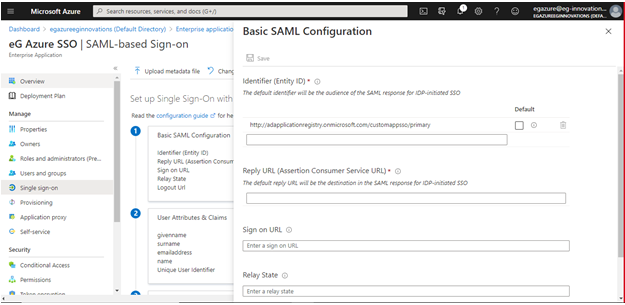
-
Then, specify the Reply URL (Assertion Consumer Service URL). To configure an IdP to work with an SP, an Assertion Consumer Service (ACS) URL - i.e., Reply URL - has to be specified. The ACS URL is an endpoint on the service provider where the identity provider will redirect to with its authentication response. This endpoint should be an HTTPS endpoint because it will be used to transfer Personally Identifiable Information (PII).
-
Next scroll down Figure 259 to specify the Logout URL (see Figure 260). If you want to initiate a log out from the IdP, provide the logout URL of the SP - in our case, this should be the logout URL of eG Enterprise (see Figure 248). In case of IdP-initiated logout, whenever a user attempts to log out of the IdP, the IdP generates a digitally signed LogoutRequest and appends it to the SP's SLO endpoint, which is a dedicated URL that expects to receive SLO messages from the IdP. This is the URL that you should specify against Logout URL. Once the SP receives the LogoutRequest at the Logout URL, it validates the request, terminates its own login session for the end-user, and sends out a LogoutResponse to the IdP. Upon receipt of the response from SP, the IdP terminates its session.
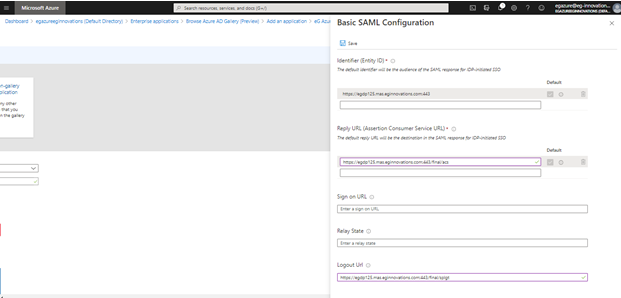
Figure 260 : Configuring the Logout URL
Note:
Where eG Enterprise is the SP, follow the steps below to determine the values to be configured against Identifier ID, Logout URL and Reply URL (or ACS URL):
-
Login to the eG admin interface.
-
Follow the User Management -> SAML Identity Providers menu sequence.
-
When Figure 249 appears, click the View Metadata button therein. The message box that then pops up (see Figure 249) clearly displays the Logout URL and ACS URL (i.e., Reply URL) of eG Enterprise. In the ACS URL, the string that precedes '/final...' is the Identifier (Entity) ID. For instance, in Figure 249 below, the Identifier ID is http://egdp125.mas.eginnovations.com:7077/.
Figure 261 : Determining the Identifier ID, ACS URL, and Logout URL of eG Enterprise
-
-
Finally, click the Save button at the top of Figure 249 to save the configuration. will then appear.
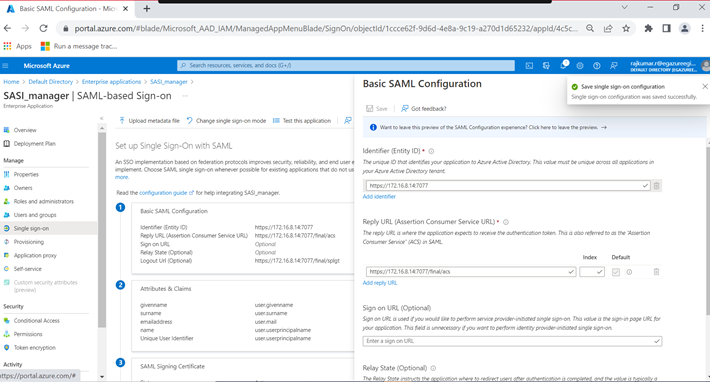
Figure 262 : The page that appears once the basic SAML configuration is saved
-
Next, go back to the Overview panel of Figure 257, and click on the Assign users and groups tile this time. Then, click on the Users and groups option in the left panel. Figure 263 then appears.
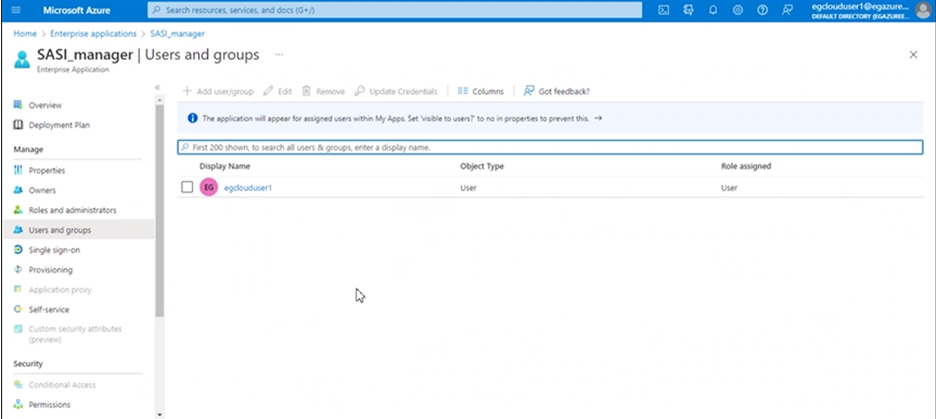
-
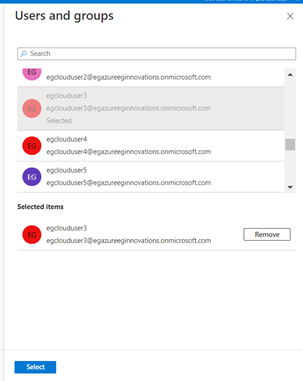
To add a new user, click on the Add user/group link in the right panel. Figure 264 then appears. Select the user who is to be allowed access to the application.
Configuring One/More IdPs in eG Enterprise
After registering eG Enterprise as an SP with the IdP, proceed to configure the IdP in eG Enterprise. For that, do the following:
- Login to the eG admin interface.
- Follow the User Management -> SAML Identity Providers menu sequence.
-
Figure 265 then appears, listing all the IdPs (if any) that pre-exist in the eG Enterprise system. To create a new IdP, click the Configure SAML IdP button in Figure 265.
-
Figure 266 then appears. Here, first specify the Identify Provider (IdP) Name. Then, specify the Login URL of the IdP. If Azure AD is the IdP, then make sure you specify the Login URL displayed in here.

- Next, if you want the SP - i.e., eG Enterprise - to initiate a SAML Single Logout (SLO), then specify the Logout URL of the IdP here. In case of an SP-initiated SLO, the initiating SP generates a digitally signed LogoutRequest SAML message and returns it to the end-user's browser. The IdP's SLO endpoint is appended with the LogoutReqest. The endpoint URL is a dedicated URL that expects to receive SLO messages from the SP. This is the URL that you should specify against Logout URL. When configuring OneLogin as the IdP, specify the SAML Single Logout URL that OneLogin provides as the Logout URL in Figure 266. When configuring Azure AD as the IdP on the other hand, specify the Logout URL displayed in here.
- Then, configure the IdP Certificate. When registering eG Enterprise as an SP with the target IdP, the IdP will issue a trusted X.509 certificate for the eG manager. Copy the contents of that certificate and paste it here. If Azure AD is being configured as the IdP for the eG manager, then you first need to download the certificate by clicking on the Download link against Certificate (Base64) in . Once the certificate is successfully downloaded, open the certificate in a text editor, copy its contents, and paste it in the IdP Certificate text area of Figure 266.
- Next, indicate whether/not you want to set the IdP being configured as the default IdP during login. To set it as the default IdP, turn on the Set as default IdP for login? flag by choosing the Yes option. To not set it as the default IdP, turn off the Set as default IdP for login? flag by choosing the No option.
- Finally, click the Update button in Figure 266 to save the configuration.
Configuring eG Users to Use SAML for Authenticating their Logins
The next step in the SAML-enablement process is to configure individual eG Enterprise users to use SAML for authenticating their logins. For this, do the following:
- Login to the eG admin interface.
- Follow the User Management -> Add User menu sequence.
-
When adding a user, choose the User role. Then, set SAML as the User type (see Figure 267).
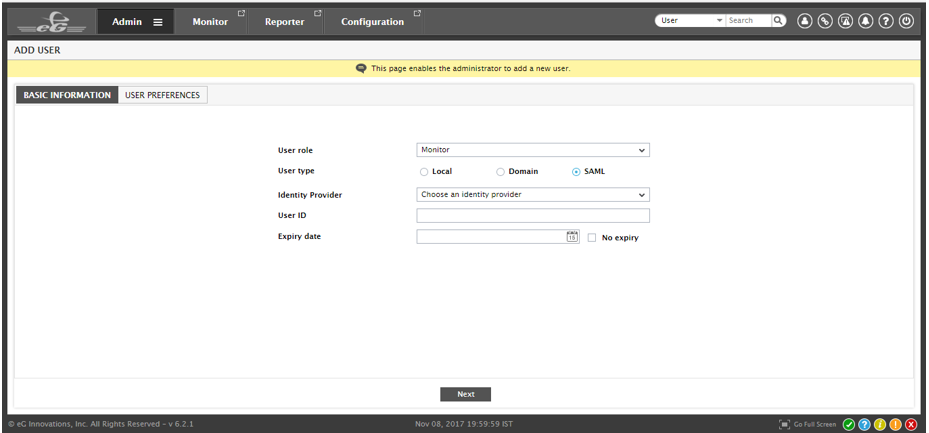
- Once SAML is chosen as the User type, you will be required to choose the Identity Provider that eG Enterprise should integrate with for SAML authentication.
- After selecting the IdP, provide the User ID. Note that you will not have to provide a password for that user in eG Enterprise. This is because, the login password will be created in and maintained by the IdP.
- Click the Next button to configure the user's alerting preferences, privileges, and monitoring scope.
- Finally, click the Add button to add the user.