SNMP Utility
eG Enterprise uses SNMP to monitor the performance of network devices. If any test mapped to such a device fails to report all/a few metrics, administrators may want to rapidly diagnose the reason for the same and fix it, so as to ensure the uninterrupted monitoring of the target. To facilitate this, eG Enterprise provides an SNMP Utility. With the help of this utility, administrators can have the eG external agent poll the SNMP MIB of the target device on-the-fly and fetch the output for any configured OID. This can be the OID of the failed measure, or that of any measure reported by a failed test. If the OID does not return a valid output, then the administrators can quickly conclude that incorrect test configuration or persistent network issues are probably hampering the monitoring of the device. By changing the test configuration and by resolving the network issues, administrators ensure the continuous monitoring of the device. To know how to use the SNMP Utility, follow the steps given below:
- Login to the eG administrative interface.
- In the Admin tile menu, follow the Miscellaneous -> SNMP Utility menu sequence.
-
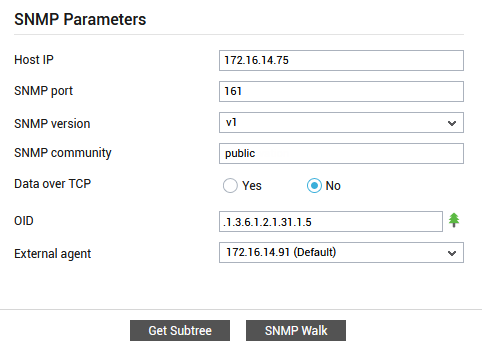
Figure 1 will then appear.
-
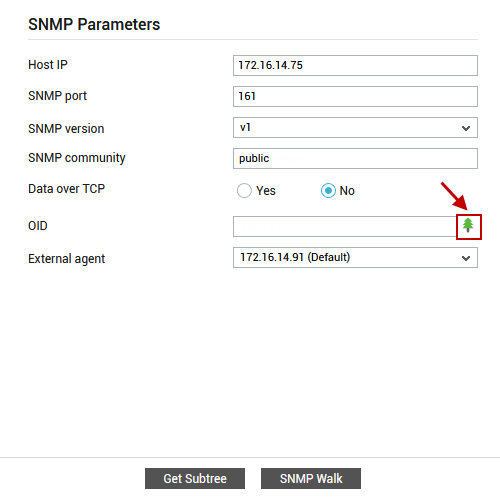
Now, specify the following parameters in Figure 1.
-
Host IP - The IP address of the component that is to be monitored.
-
SNMP port - The port at which the monitored target exposes its SNMP MIB; the default is 161.
-
SNMP version - By default, the eG agent supports SNMP version 1. Accordingly, the default selection in the SNMPversion list is v1. However, if a different SNMP framework is in use in your environment, say SNMP v2 or v3, then select the corresponding option from this list.
-
SNMP community - The SNMP community name that the eG agent uses to communicate with the target component. This parameter is specific to SNMP v1 and v2 only. Therefore, if the SNMP version chosen is v3, then this parameter will not appear.
-
If you select v3 as SNMP version, then the following parameters will appear additionally:
-
Context - An SNMP context is a collection of management information accessible by an SNMP entity. An item of management information may exist in more than one context and an SNMP entity potentially has access to many contexts. A context is identified by the SNMPEngineID value of the entity hosting the management information (also called a contextEngineID) and a context name that identifies the specific context (also called a contextName). If the Username provided is associated with a context name, then the eG agent will be able to poll the MIB and collect metrics only if it is configured with the context name as well. In such cases therefore, specify the context name of the Username in the Context text box. By default, this parameter is set to none.
-
Username - SNMP version 3 (SNMPv3) is an extensible SNMP Framework which supplements the SNMPv2 Framework, by additionally supporting message security, access control, and remote SNMP configuration capabilities. To extract performance statistics from the MIB using the highly secure SNMP v3 protocol, the eG agent has to be configured with the required access privileges – in other words, the eG agent should connect to the MIB using the credentials of a user with access permissions to MIB. Therefore, specify the name of such a user against this parameter.
-
Auth password - Specify the password that corresponds to the above-mentioned Username.
-
Confirm auth password - Confirm the AuthPass by retyping it here.
-
Auth type - From the AuthType list box, choose the authentication algorithm using which SNMP v3 converts the specified Username and password into a 32-bit format to ensure security of SNMP transactions. You can choose between the following options:
- MD5 – Message Digest Algorithm
- SHA – Secure Hash Algorithm
-
Encryption enabled - By default, the eG agent does not encrypt SNMP requests. Accordingly, the this flag is set to No by default. To ensure that SNMP requests sent by the eG agent are encrypted, select the Yes option.
-
Encryption type - If this Encryption enabled is set to Yes, then you will have to mention the encryption type by selecting an option from the Encryption type list. SNMP v3 supports the following encryption types:
- DES – Data Encryption Standard
- AES – Advanced Encryption Standard
-
Encryption password - Specify the encryption password here.
-
Confirm encryption password - Confirm the encryption password by retyping it here.
-
-
Data over TCP - By default, in an IT environment, all data transmission occurs over UDP. Some environments however, may be specifically configured to offload a fraction of the data traffic – for instance, certain types of data traffic or traffic pertaining to specific components – to other protocols like TCP, so as to prevent UDP overloads. In such environments, you can instruct the eG agent to conduct the SNMP data traffic related to the monitored target over TCP (and not UDP). For this, set this flag to Yes. By default, this flag is set to No.
-
OID - Provide OID of an object of your interest in this text box. You can also choose OID of any object from MIB file of the target component instead of specifying it manually. The first step towards this is to upload the MIB of the target component to the eG manager; the MIB file typically, contain the OID-object name mappings. To upload the MIB file, do the following:
-
Click on the
 icon beside the OID text box. This will bring Figure 2.
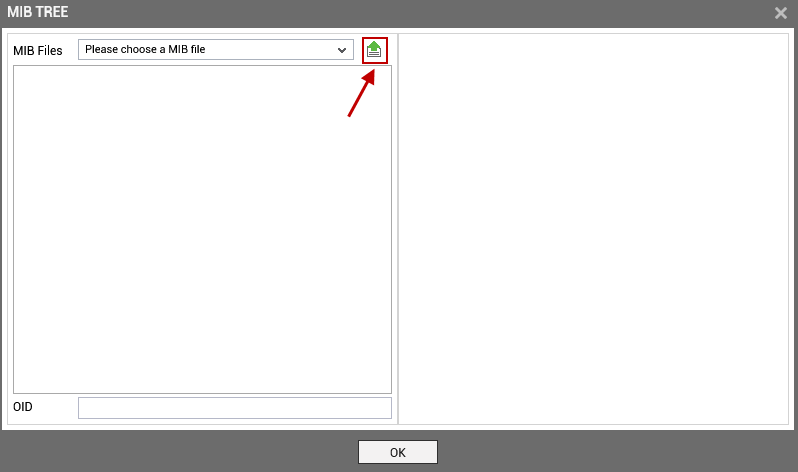
-
If the MIB file of the target component have already been uploaded to the manager, then choose the file from the MIB Files list. If not, clicking on the
 button in Figure 2, will invoke a popup window (see Figure 3) where you can specify the full path to the MIB file to be uploaded or use Browse button for quickly locating the MIB file.
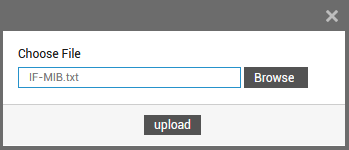
- Then, click the Upload button in Figure 3.
-
Next, select the MIB file that you uploaded from the MIB Files list. Then, drill-down the MIB tree structure to locate the object whose OID is required for monitoring (see ).
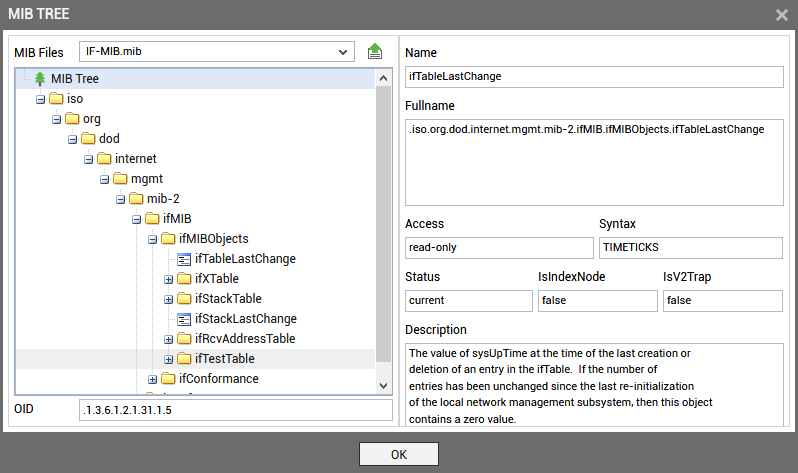
Figure 4 : Locating the OID in the MIB tree
When you select the object in the MIB tree, the corresponding OID will be displayed in the OID field in the left panel of the MIB Tree window. In the right panel, you can find the details such as name, accessibility, syntax, description, status, etc. of the chosen object.
-
Finally, click the OK button to retrieve the OID.
-
The extracted OID will be populated in the OID text box (see Figure 5).
-
- External agent - Select the eG external agent that will monitor the target component from this list.
-
-
Once you have configured all the parameters, click the Get Subtree button to view the subtree output for the chosen OID (see Figure 6).
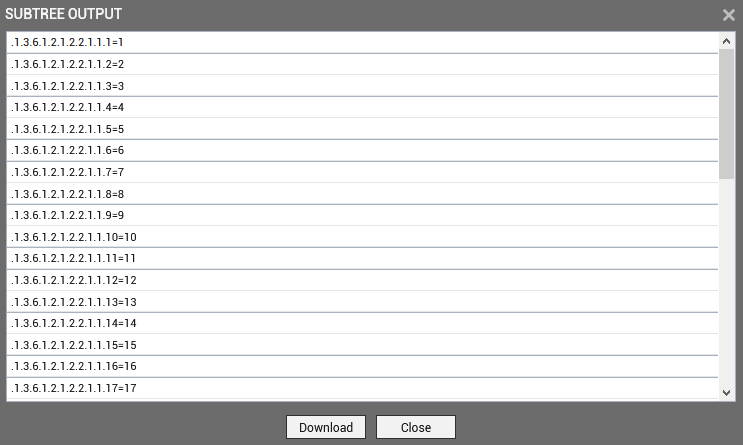
You can download the Subtree output by clicking on the Download button in Figure 6. This will invoke Figure 7.
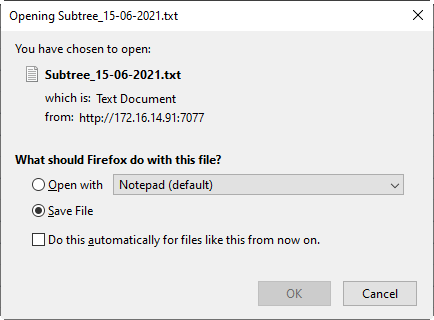
Figure 7 : Downloading Subtree output
In Figure 7, specify what you want to do with the file. If you want to view the file but do not want to save it on your system, then select the Open option. If you want to save the file, select Save File option. The file will be saved in the default download location.
-
Then, click on the SNMP Walk button to view SNMPWALK output (see Figure 6) for the chosen OID.
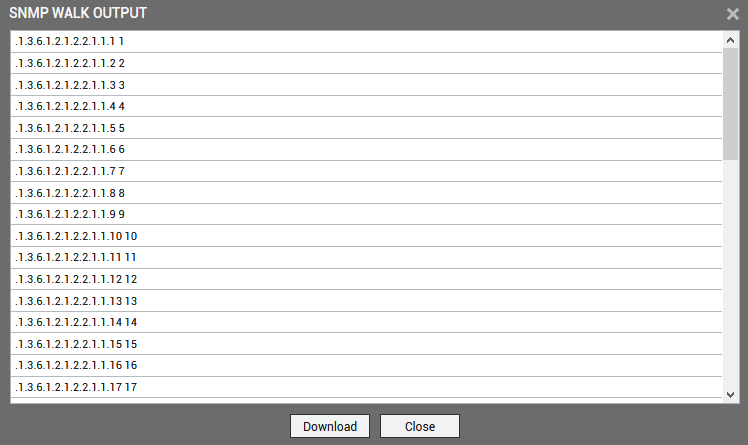
You can download the SNMPWALK output to your system by clicking on the Download button in Figure 6.
Note:
-
You will not be able to generate SNMP Subtree and SNMPWALK output if the parameters you specified in the SNMP Utility page do not match with the SNMP configuration of the component that are being monitored. In such cases, a message prompt stating "No Data Found" will appear.
-
You will not able to generate the SNMPWALK output for the component that is being monitored using an eG agent installed on a Linux host.