Two-Step Verification
eG Enterprise supports two-factor authentication - a.k.a two-step verification - for validating user logons to the eG management console. This requires the user to validate with a unique code in addition to user name and password.
Using two-step verification, eG Enterprise:
- Discourages attacks that involve user impersonation to gain access to sensitive data;
- Ensures secure access to the eG Enterprise system, without putting the user network and sensitive information at risk;
- Boosts user productivity and instills user confidence in the eG Enterprise system, by dispelling their fears of data breach
How to Configure Two-Step Verification Support for eG Enterprise?
To achieve this, follow the steps below:
- Login to the eG management console as user admin.
- Follow the Admin -> Settings -> Manager menu sequence in the eG admin interface.
-
In the tree-structure in the left panel of the page that appears, you will find an Account Security node. Expand this node and click the 2-step Verification sub-node within. Upon clicking, the right panel of the page will display the options depicted by Figure 1.
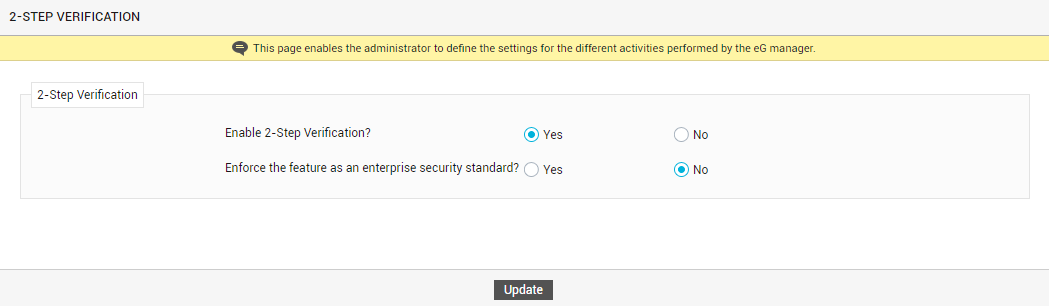
- To enable 2-step verification, set the Enable 2-Step Verification flag in Figure 1 to Yes.
- An administrator can enforce 2-step verification as an enterprise-wide standard, which will be irrevocably applied to all users (existing and new) registered with the eG Enterprise system. To achieve this, set the Enforce the feature as an enterprise security standard flag in Figure 1 to Yes. Alternatively, the administrator can allow users the freedom to choose between enabling 2-step verification and not. For this, set the Enforce the feature as an enterprise security standard flag in Figure 1 to No.
-
If you had set the Enforce the feature as an enterprise security standard flag to Yes, then the following steps will apply:
-
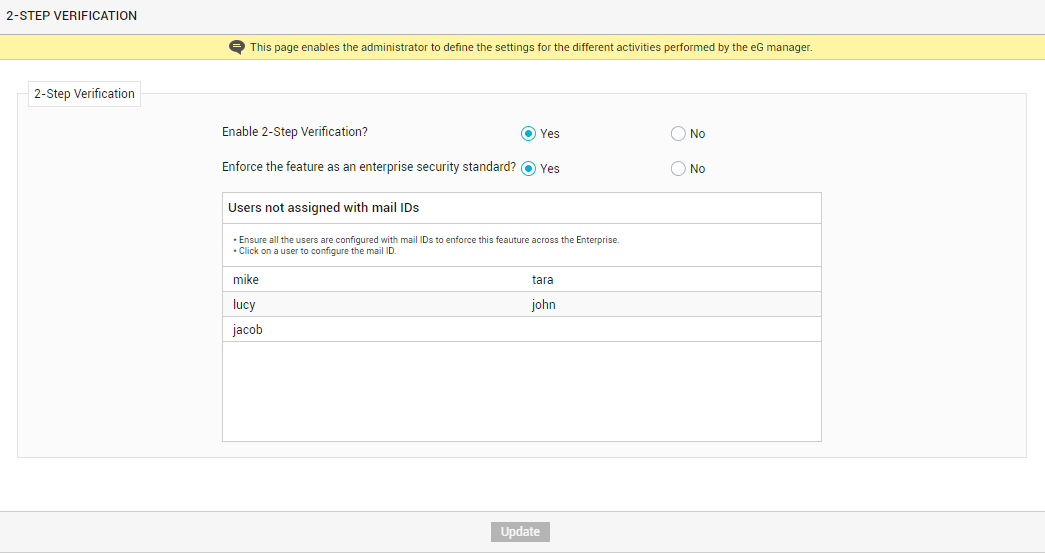
The key requirement of standardization is that all registered users should be configured with email IDs. This is because, the verification code or the secret key required to obtain the verification code is communicated to users via email. Without the verification code, the second step of the two-step verification process cannot be completed. This is why, if one/more users do not have an email ID configured for themselves in the eG Enterprise system, then the names of such users will be displayed (see Figure 2).
-
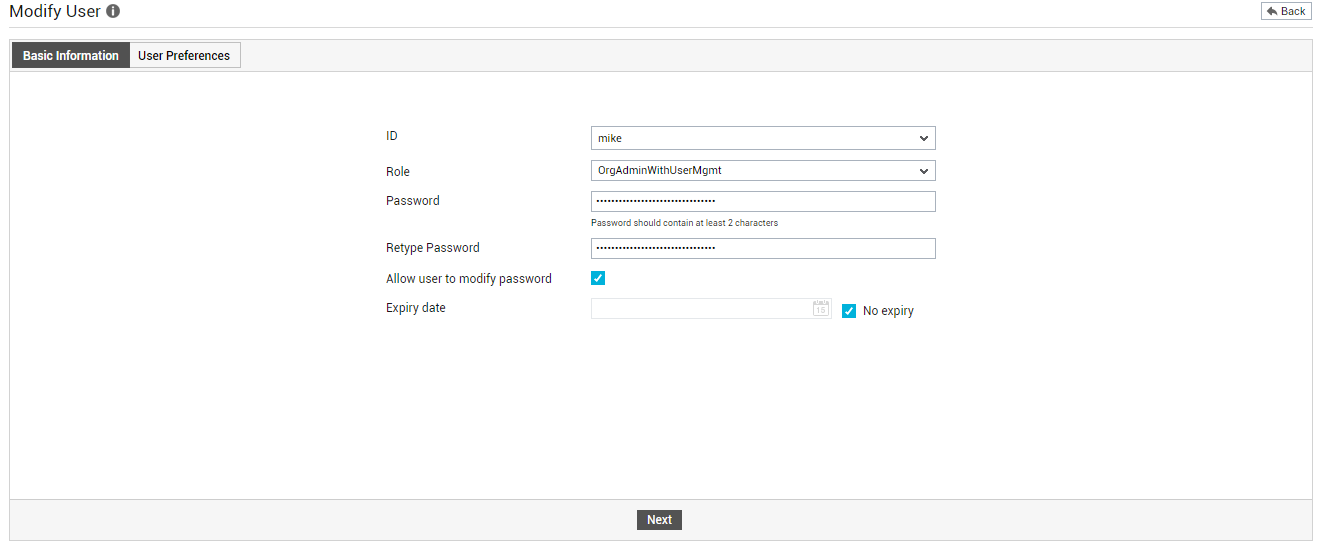
You will be able to proceed with the standardization only after all the users listed in Figure 2 are configured with email IDs. Therefore, to configure an email ID for a user, click on the user name in Figure 2. This will allow you to edit that user's profile in eG. When the Modify User page appears (see Figure 3), click the Next button to switch to the next page of the user's profile.
-
Scroll down the page that appears next until the Mail/SMS Settings section (see Figure 4) comes into view. In the To text box of the Mail/SMS Settings section, provide a valid email ID for the user. Finally, click the Update button in Figure 4 to save the changes.

-
This way, you will have to configure an email ID for every user listed in Figure 2.
Note:
A user who is assigned the Admin role - e.g., the default admin user of the eG Enterprise system - can edit the profile of any other user registered with the eG Enterprise system, except that of an Organization or a Supermonitor. This means that an Admin user cannot configure email IDs for an Organization or a Supermonitor, using the procedure discussed above. A user will have to explicitly login to the eG Enterprise system as an Organization and as a Supermonitor to configure email IDs for these accounts.
-
Once all users are configured with email IDs, a One-Time Password (OTP) flag will appear (see Figure 5).
The second step of the 2-step verification process requires that the user supply a verification code / OTP (One-time Password) at the login prompt to validate the login. The administrator can configure eG Enterprise to auto-generate this verification code/OTP and automatically email the same to the user at the time of login. To send OTP via email to users, set the One-Time Password flag in Figure 5 to Receive via email. Alternatively, users can generate the OTP using the Google Authenticator app on their mobile phones/desktops. To enable the use of Google Authenticator, set the One-Time Password flag to Generate via Google Authenticator.
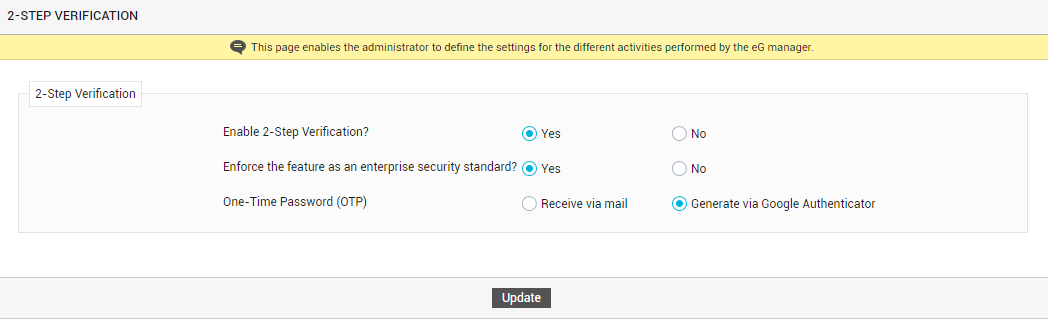
Figure 5 : Configuring how to generate and receive One-time password (OTP)
Note:
-
By default, the One-Time Password flag setting automatically applies to all users registered with the eG Enterprise system. In other words, if this flag is set to Receive via email, then all eG users will receive their OTP/verification code only via email. Likewise, if this flag is set to Generated via Google Authenticator, then all eG users will only be able to use the OTP/code that Google Authenticator generates for logging into the eG web console.
If required, individual users can override this flag setting by editing their respective user profiles in eG. For instance, where email delivery of OTP is the enterprise standard, a single user may prefer to use Google Authenticator instead. Such a user can override the enterprise standard by editing his/her profile in eG. For this, the user should do the following:
- The user should first connect to the eG web console using a browser.
- In the login page, the user should provide valid login credentials - i.e., a valid user name and password.
- The user will now be prompted for a verification code/OTP. Here, the user should supply the OTP/code they receive via the mode that is the enterprise standard. In the case of our example, the user should use the OTP/code received via email.
- Upon logging in, the user should click on the User
 icon on the tool bar of the console to edit his/her profile.
 -
The user should then scroll down the user profile to view the 2-Step Verification section.
-
Here, the user should set the One-Time Password (OTP) flag to the mode of his/her choice. In the case of our example, the user should set it to Generate via Google Authenticator.
-
If the OTP/code is set to be generated via Google Authenticator, then the users should perform the following configurations to ensure that Google Authenticator generates the OTP/code they need to login.
- The Google Authenticator should first be downloaded and installed on the user's mobile phone/desktop.
-
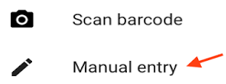
Then, the user should open the Google Authenticator app (on the mobile phone/desktop) and add a new entry by clicking the '+' symbol indicated by Figure 6 below.

-
When Figure 7 appears, the user has to pick the Manual entry option.
-
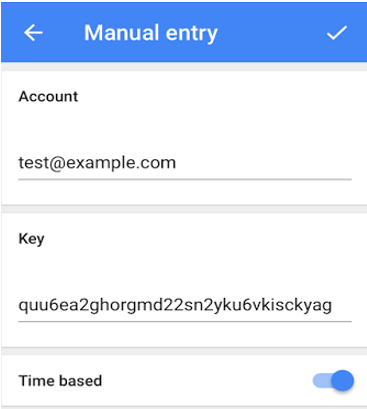
In the mean time, eG Enterprise auto-generates a 'secret key' for the user and sends it to the email ID configured in that user's profile in eG. When Figure 8 appears, the user should first enter a valid email address under Account, then copy the secret key from the email, and paste it in the Key text box in Figure 8.
-
Once this is done, the user will see a time-based one-time password (TOTP) being generated and displayed on screen. This is a 6-digit code, which will change every 30 seconds. At the time of logging into the eG web console, the user should check the Google Authenticator app for the TOTP. When prompted for a verification code, the user should provide the TOTP that is valid at that time. Once the correct TOTP is specified, the user will be allowed access to the eG web console.
-
- Finally, click the Save button in Figure 5.
-
-
If the Enforce the feature as an enterprise security standard flag is set to No (see Figure 2), it means that the administrator is allowing the individual users to decide what is right for them - whether to secure their logins to eG Enterprise using 2-step verification? or not to? Once this is done, the administrator can click the Update button to save the changes.
Note:
In this case, if a user later decides that they want the security blanket offered by 2-step verification, then they can enable this feature by editing their profile in eG. To achieve this, the user has to do the following:
- The user should first login to the eG web console.
- Upon logging in, the user should click on the User icon on the tool bar of the console to edit his/her profile.
-
The user should then scroll down the user profile to view the 2-Step Verification section (see Figure 9).
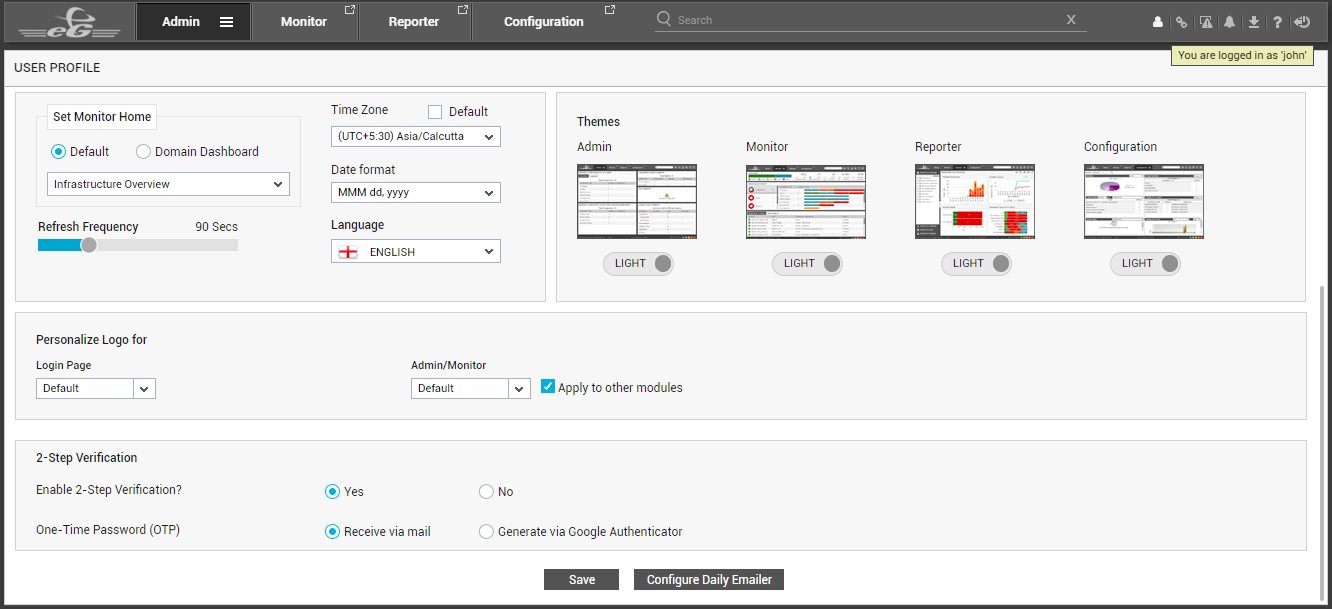
Figure 9 : A user enabling 2-step verification by editing his/her profile
-
Here, the user should set the Enable 2-Step Verification flag to Yes. Then, using the One-Time Password (OTP) flag, the user should indicate how they want the OTP/verification code to be generated and sent to them - via email? or via Google Authenticator? If this flag is set Receive via email, then the user should make sure that his/her profile is configured with an email ID. If this flag is set to Generated via Google Authenticator, then the user has to ensure the following:
- An email ID has to be configured in the user's profile in the eG Enterprise system;
-
The Google Authenticator app has to be installed on the user's mobile phone/desktop, and should be configured to generate the OTP/verification code. The steps for configuring the Google Authenticator are discussed in page 1above.
How Does Two-Step Verification Work?
Where two-step verification is enabled, the eG Enterprise login process will begin with you having to provide a valid user name and password. Once your login credentials are validated, the second step of the verification will be initiated. As part of this step, you will be prompted for an OTP/verification code.
As already explained, based on how 2-step verification is configured in your environment, you will receive an OTP/code either by email or via Google Authenticator.
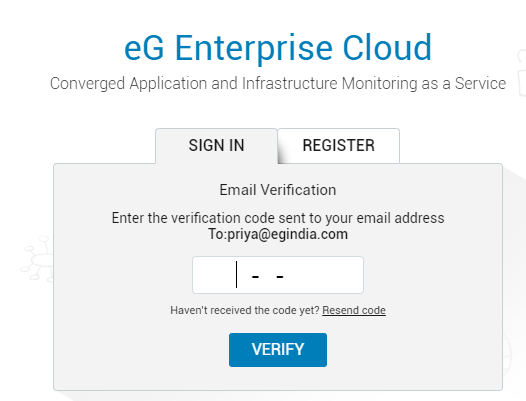
If you should be receiving the OTP/code by email, then do the following:
- Check your mailbox to see if you have received the 6-digit OTP/code. Make sure that you check the same mailbox that has been configured in your eG Enterprise user profile.
- Once you receive an email with the OTP/verification code, copy the code from the email, and paste it at the prompt (see Figure 12). Then, click the Verify button to check the correctness of the OTP/code.
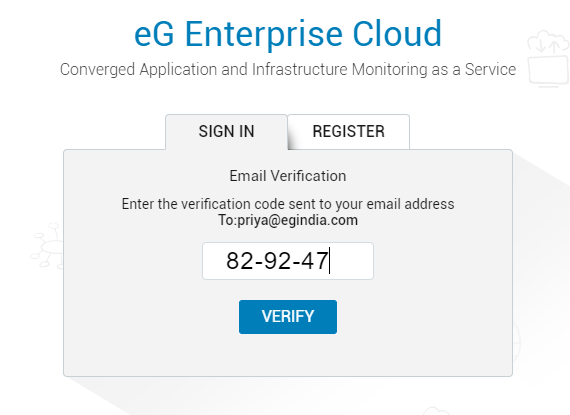
Figure 10 : Specifying the 6-digit OTP/code received via email at the prompt
- Typically, when eG Enterprise generates an OTP and sends it by email, it stores the OTP in memory. When you click Verify, eG Enterprise automatically compares the OTP entered at the prompt with the OTP in memory, checks whether they are the same, and if they are, allows you to login to the eG web console. On the other hand, if the OTP entered is not the same as the OTP in memory, your login will fail.
-
An OTP mismatch can occur if the OTP sent by email has expired. By default, an OTP sent by email will be valid for a period of 2 minutes from the time it is generated. Beyond this default period, eG Enterprise will delete the OTP from memory - i.e., the validity of the OTP will expire. If you attempt to login using an OTP that was generated more than 2 minutes ago, your login will fail. To avoid such login failures, you can increase the validity period of OTPs sent by email. For this, do the following:
- Login to the eG manager host.
- Edit the eg_mfa.ini file in the <EG_MANAGER_INSTALL_DIR>\manager\config directory (on Windows; on Unix, this will be the /opt/egurkha/manager/config directory).
- In the [2FA_SETTINGS] section of the file, you will find an OTP_EXPIRES_AFTER parameter, which is set to 2 (minutes) by default. To increase the validity period of OTPs sent by email, increase the value of this parameter.
-
Then, save the file.
-
If you do not receive any email with an OTP/verification code, then you can request eG Enterprise to resend the OTP by clicking the Resend code link that appears in the Email Verification window (see Figure 11).
-
By default, you can request for the code to be resent for a maximum of 3 times. If you do not receive the code by email even after 3 resend requests, you will automatically return to the first step of the 2-step verification, where you will have to enter the login credentials again.
To avoid this, you can choose to wait a little while longer for the OTP/code. This can be achieved by increasing the maximum number of code resend requests you can send. For this, do the following:
- Login to the eG manager host.
- Edit the eg_mfa.ini file in the <EG_MANAGER_INSTALL_DIR>\manager\config directory (on Windows; on Unix, this will be the /opt/egurkha/manager/config directory).
- In the [2FA_SETTINGS] section of the file, you will find an OTP_MAX_RESEND_ATTEMPTS parameter, which is set to 3 by default. To increase the number of resend requests that you can send, increase the value of this parameter.
-
Then, save the file.
On the other hand, if as per your configuration, you should be receiving the OTP/code via Google Authenticator, then do the following:
- Check the Google Authenticator app on your mobile/desktop to see if a time-based OTP (TOTP) is displayed therein.
-
This OTP will be valid for only 30 seconds, beyond which it will expire and a new OTP will take its place. At the verification prompt, enter the OTP/code that is visible in the Google Authenticator app at the time of login, and click the Verify button to check its correctness (see Figure 12).
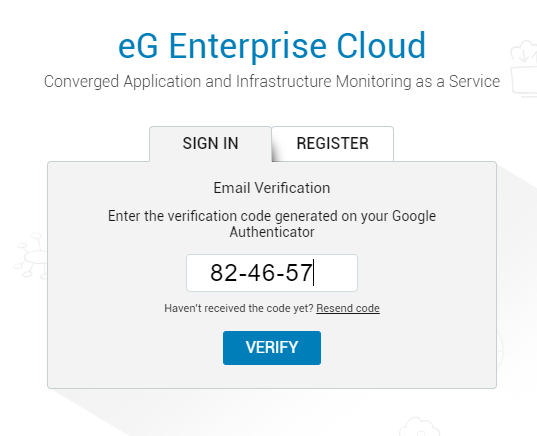
Figure 12 : Specifying the 6-digit OTP/code received via Google Authenticator
- If the OTP/code you enter at the prompt matches with the OTP displayed in the Google Authenticator app, your login will succeed. On the other hand, if the OTP/code you enter does not match with the OTP displayed in the Google Authenticator app, your login will fail. In this case, you will return to the first step of the 2-step verification process.