How to Monitor Citrix Delivery Controller 7 Using eG Enterprise?
eG Enterprise adopts an agent-based approach to monitor the Citrix Delivery Controller v7. This approach requires that the eG agent be installed on any DDC in a DDC farm. This agent should then be configured to periodically execute tests to collect a wide variety of performance statistics pertaining to that DDC/farm. To enable the eG agent to collect metrics, a set of pre-requisites should be set in place. These requirements have been explained in the following section.
Pre-requisites for monitoring the Citrix Delivery Controller 7.x
Typically, to monitor a Citrix Delivery Controller 7.x (and above), every test that the eG agent runs on the controller should be configured with the credentials of a user with the following privileges:
- The All scope and read-only privileges
- The Allow log on locally security privilege on the Delivery Controller host
- The Interactive Logon permission
To assign the aforesaid privileges to a user, do the following:
-
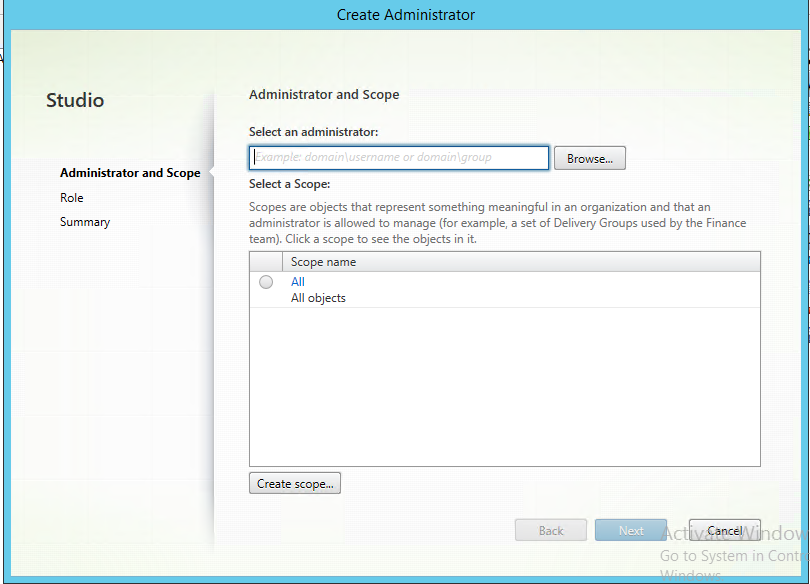
Login to the Citrix Studio console and select the Administrators node in the Configuration tree structure in the left panel of the console (see Figure 1).

-
To assign the monitoring rights to a user, click on the Create Administrator option under the Administrators menu in the Actions panel of the console. This will open the Administrator and Scope page in the Create Administrator window (see Figure 2).
-
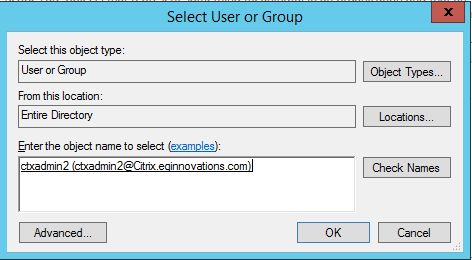
In the Administrator and Scope page that opens, click on the Browse button. This will invoke Figure 3, using which you can select the user from the domain. Once you selected the user, click OK button in Figure 3.
-
This will lead you to the Administrator and Scope page as shown in Figure 4, where the chosen user will be displayed. Now, select All as the scope for the chosen user, and then click Next button in Figure 4 to proceed.

-
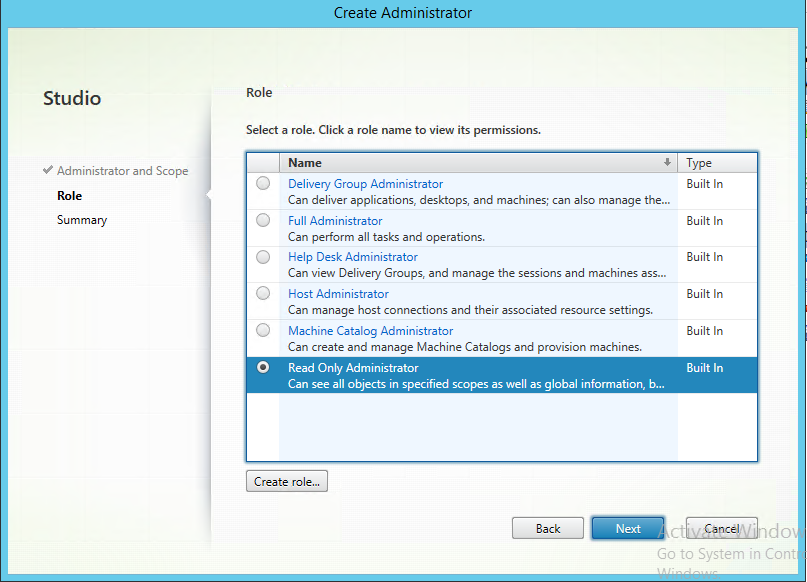
Then, the Role page of the Create Administrator window appears (see Figure 5 ). In this page, select the Read Only Administrator role for the chosen user.
-
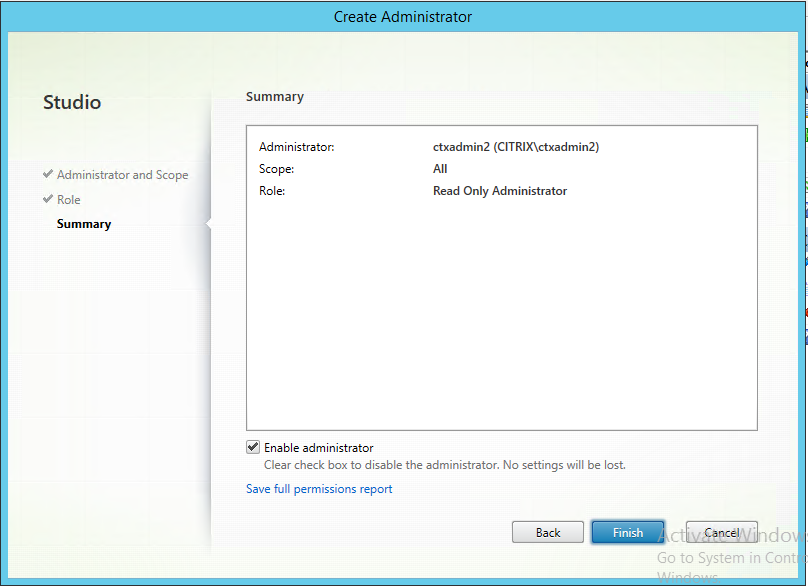
Upon clicking the Next button in the Role page, the Summary page will appear, as shown in Figure 6. This will display the summary of your settings for the chosen user.
- Finally, click the Finish button.
-
Next, proceed to assign the Allow log on locally security privilege for the same user on the Delivery Controller host. To achieve this, do the following;
- Go to the Control Panel in the host.
- From the list of control panel items, click the Administrative Tools to view the set of tools available for system administrators and advanced users.
- Upon selecting the Local Security Policy tool in the Administrative Tools location, the Local Security Policy settings console will appear.
- Next, navigate to the User Rights Assignment node in the Local Policies tree in the left panel of the settings console. This will display the security policies corresponding to the user rights in the right panel.
- Now, select the Allow log on locally policy to assign the security privilege to the user (see Figure 7).
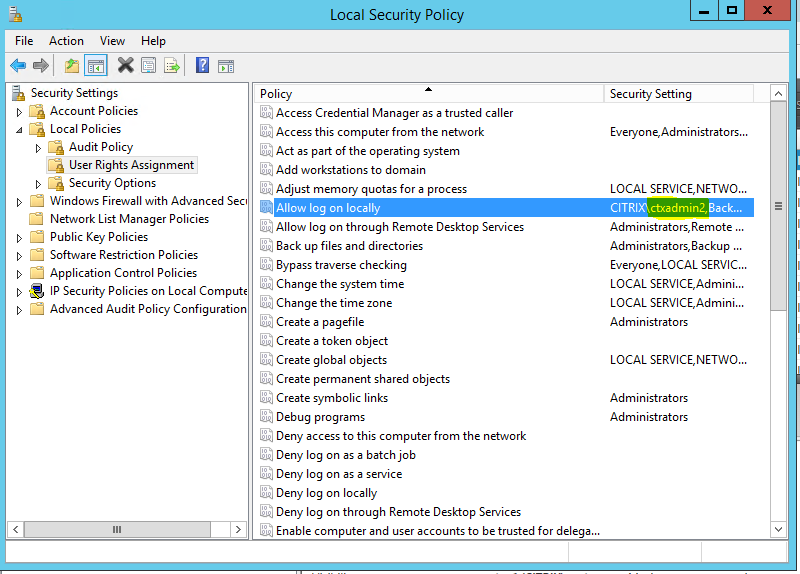
Figure 7 : Setting the Allow log on locally policy to the user
- The eGurkhaAgent service should run using the Local system account.
Once the above-said pre-requisites are fulfilled, manage the Citrix Delivery Controller component using eG administrative interface. The procedure for achieving this is explained in the following section.
Managing the Citrix Delivery Controller 7.x
eG Enterprise can automatically discover the Citrix Delivery Controller v7 components in the environment and also let you to manually add the Citrix Delivery Controller v7 components using the eG administrative component. To achieve this, follow the steps given below:
- Log into the eG administrative interface.
-
eG Enterprise cannot automatically discover the Citrix Delivery Controller 7.x. You need to manually add the server using the COMPONENTS page (see Figure 8) that appears when the Infrastructure -> Components -> Add/Modify menu sequence is followed. Remember that components manually added are managed automatically.
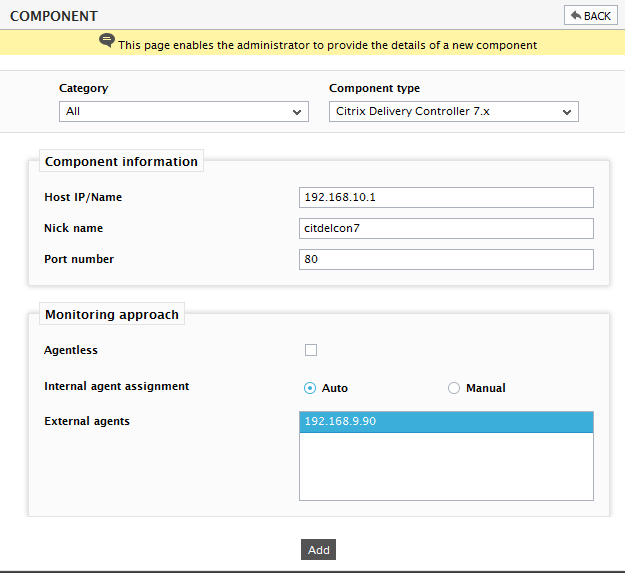
- Specify the Host IP and the Nick name of the Citrix Delivery Controller 7.x server in Figure 8. Then click the Add button to register the changes.
-
When you attempt to sign out, a list of unconfigured tests appears (see Figure 9).

Figure 9 : List of tests to be configured for the Citrix Delivery Controller 7.x
- Click on the Brokering Machines test to configure it. To know how to configure the test, click here.
- Once you configured the Brokering Machines test, try to signout of the eG administrative interface. Now, you will be prompted to configure the Citrix XML Access test. Click on the test to configure it. To know how to configure the test, click here.
- Finally, signout of the eG administrative interface.