Xen VM Snapshots Test
Citrix Hypervisor provides a convenient snapshotting mechanism that can take a snapshot of a VM storage and metadata at a given time. Where necessary, IO is temporarily halted while the snapshot is being taken to ensure that a selfconsistent disk image can be captured. Snapshot operations result in a snapshot VM that is similar to a template. The VM snapshot contains all the storage information and VM configuration, including attached VIFs, allowing them to be exported and restored for backup purposes.
Though snapshot files are small in size initially, they will grow as writes are made to the VM’s disk files. If the number and size of the snapshot files grow significantly over time, they might end up eroding considerable storage space, thereby choking VM operations. To conserve space, administrators need to continuously track snapshot growth per VM, identify ‘heavy-weight’ snapshots that may not be of use any longer, and purge them. The Xen VM Snapshots test helps administrators achieve the same. While the measures reported by the test capture the snapshot file count per VM and the total size of the snapshot files of a VM, the detailed diagnosis reveals the size of each snapshot, thus enabling administrators to quickly spot those snapshot files that are too large in size.
Target of the test : A Citrix Hypervisor host
Agent deploying the test : An internal/remote agent
Outputs of the test : One set of results for each VM on the target hypervisor host
| Parameter | Description |
|---|---|
|
Test period |
How often should the test be executed. |
|
Host |
The host for which the test is to be configured. |
| Port |
The port at which the specified host listens. By default, this is NULL. |
|
Xen User, Xen Password and Confirm Password |
To enable the eG agent to connect to the XenServer API for collecting statistics of interest, this test should login to the target hypervisor as a root user. Provide the name of the root user in the Xen User text box. Root user privileges are mandatory when monitoring a XenServer 5.5 (or below). However, if you are monitoring XenServer 5.6 (or above) and you prefer not to expose the credentials of the root user, then, you have the option of configuring a user with pool-admin privileges as the Xen User. If you do not want to expose the credentials of a root/pool-admin user, then you can configure the tests with the credentials of a Xen User with Read-only privileges to the XenServer. However, if this is done, then the Xen Uptime test will not run, and the Xen CPU and Xen Memory tests will not be able to report metrics for the control domain descriptor. To avoid such an outcome, do the following before attempting to configure the eG tests with a Xen User who has Read-only privileges to the Citrix Hypervisor:
Once this is done, you can configure the eG tests with the credentials of a Xen User with Read-only privileges. The password of the specified Xen User needs to be mentioned in the Xen Password text box. Then, confirm the Xen Password by retyping it in the Confirm Password text box. |
| SSL |
By default, the Citrix Hypervisor is not SSL-enabled. This indicates that by default, the eG agent communicates with the target hypervisor using HTTP. Accordingly, the SSL flag is set to No by default. If you configure the target hypervisor to use SSL, then make sure that the SSL flag is set to Yes, so that the eG agent communicates with the target hypervisor using HTTPS. Note that a default SSL certificate comes bundled with every Citrix Hypervisor installation. If you want the eG agent to use this default certificate for communicating with an SSL-enabled Citrix Hypervisor, then no additional configuration is required. However, if you do not want to use the default certificate, then you can generate a self-signed certificate for use by the target hypervisor. In such a case, you need to explicitly follow the broad steps given below to enable the eG agent to communicate with the target hypervisor via HTTPS:
For a detailed discussion on each of these steps, refer to the Troubleshooting section of this document. |
|
Exclude VMs |
Administrators of some virtualized environments may not want to monitor some of their less-critical VMs - for instance, VM templates - both from 'outside' and from 'inside'. The eG agent in this case can be configured to completely exclude such VMs from its monitoring purview. To achieve this, provide a comma-separated list of VMs to be excluded from monitoring in the EXCLUDE VMS text box. Instead of VMs, VM name patterns can also be provided here in a comma-separated list. For example, your EXCLUDE VMS specification can be: *xp,*lin*,win*,vista. Here, the * (asterisk) is used to denote leading and trailing spaces (as the case may be). By default, this parameter is set to none indicating that the eG agent obtains the inside and outside views of all VMs on a virtual host by default. By providing a comma-separated list of VMs/VM name patterns in the EXCLUDE VMS text box, you can make sure the eG agent stops collecting 'inside' and 'outside' view metrics for a configured set of VMs. |
|
Webport |
By default, in most virtualized environments, the target hypervisor listens on port 80 (if not SSL-enabled) or on port 443 (if SSL-enabled). This implies that while monitoring an SSL-enabled Citrix hypervisor, the eG agent, by default, connects to port 443 of the server to pull out metrics, and while monitoring a non-SSL-enabled Citrix hypervisor, the eG agent connects to port 80. Accordingly, the webport parameter is set to 80 or 443 depending upon the status of the ssl flag. In some environments however, the default ports 80 or 443 might not apply. In such a case, against the webport parameter, you can specify the exact port at which the target hypervisor in your environment listens so that the eG agent communicates with that port. |
|
Agelimit |
By default, 15 days is set as agelimit. This implies that the test will report all those snapshots that are more than 15 days old as Old snapshots. If required, you can change the agelimit. |
|
sizelimit |
By default, 10000 KB is set as the sizelimit. This implies that the test will report all those snapshots that have a size more than 10000 KB as Large snapshots. If required, you can change the sizelimit. |
|
Show top |
In the same way, you can specify any non-zero value against show top to view only that many top |
|
DD Frequency |
Refers to the frequency with which detailed diagnosis measures are to be generated for this test. The default is 1:1. This indicates that, by default, detailed measures will be generated every time this test runs, and also every time the test detects a problem. You can modify this frequency, if you so desire. Also, if you intend to disable the detailed diagnosis capability for this test, you can do so by specifying none against DD FREQUENCY. |
|
Detailed Diagnosis |
|
Measurements made by the test
| Measurement | Description | Measurement Unit | Interpretation |
|---|---|---|---|
|
Number of snapshots: |
Indicates the number of snapshot files of this VM that are currently available. |
Number |
A number of snapshots of a VM provides administrators with multiple restore points. On the flipside though, a high number of snapshots can also be considered a waste of valuable disk space, especially if many of the snapshots hold less critical, but heavy-weight changes/writes to the disk. To accurately identify those snapshots that are consuming disk space excessively, and to learn when they were created, who their parents are, and their current consistent file system state, use the detailed diagnosis of this measure. |
|
Aged snapshots count: |
Indicates the number of snapshots that are of an age over the configured AGELIMIT. |
Number |
Use the detailed diagnosis of this measure to identify the old snapshots, so that you can figure out whether they deserve to be retained or not. While many snapshots provide essential restore points for VMs, many others hold less critical information. The 'less useful' snapshots can be eliminated to save disk space. |
|
Large snapshots count: |
Indicates the number of snapshots that are of a size more than the configured SIZELIMIT. |
Number |
Though small in size initially, snapshots can grow with time, but can never grow beyond the original disk file size. If a marked increase is noticed in the value of this measure over time, it could indicate that a number of snapshots are rapidly growing in size. To know which snapshots are growing beyond the size limit set, use the detailed diagnosis of this measure. |
To accurately identify those snapshots that are consuming disk space excessively, and to learn when they were created, who their parents are, and their current consistent file system state, use the detailed diagnosis of the Number of snapshots measure.
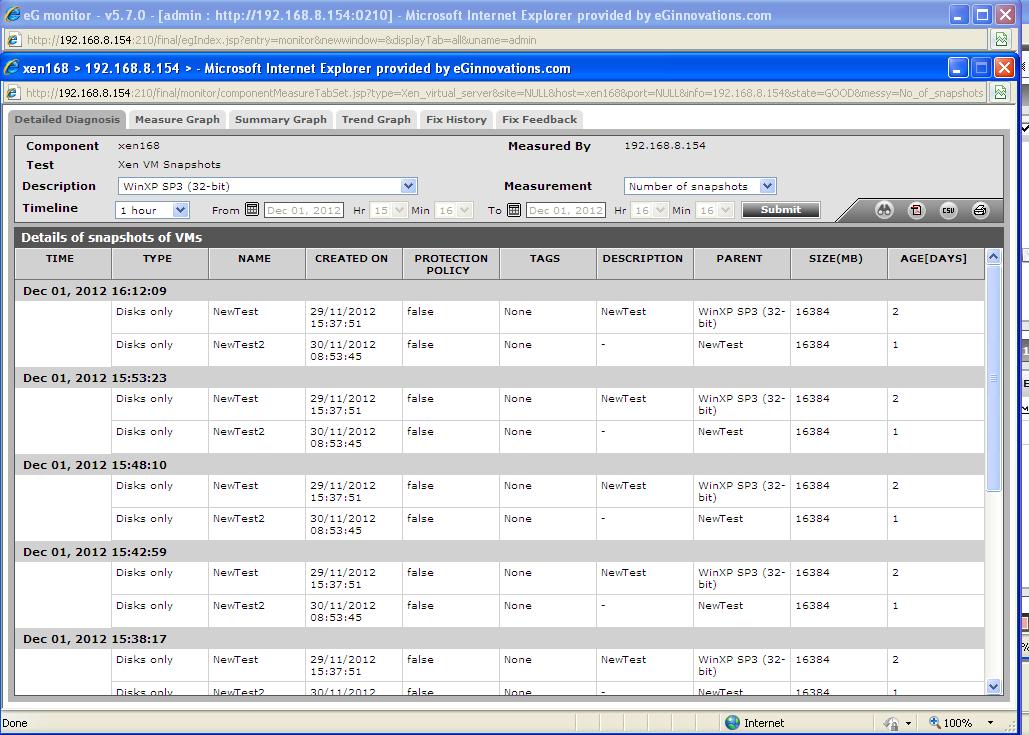
Figure 1 : The detailed diagnosis of the Number of snapshots measure