How to Monitor Citrix SD-WAN Using eG Enterprise?
eG Enterprise monitors the Citrix SD-WAN appliance using an eG remote agent that is deployed on a remote Windows host in the environment. This agent is capable of monitoring the performance of the SD-WAN by connecting to the appliance via SSH. To enable this connection, you need to specify the valid credentials of a user who can access the target appliance via SSH port while adding the target appliance for monitoring using eG admin interface. The steps for managing the target appliance are provided in the following section.
Managing Citrix SD-WAN
The Citrix SD-WAN appliance cannot be automatically discovered by eG Enterprise. This implies that you will have to manually add the target appliance into the eG Enterprise system to manage it. Remember that the eG Enterprise automatically manages the components that are added manually. Follow the steps below to achieve the same:
- Login to the eG admin interface.
- Follow the Components -> Add/Modify menu sequence in the Infrastructure tile of the Admin menu.
-
In the Components page that appears, select Citrix SD-WAN from the Component type drop-down and then click the Add New Component button. This will invoke the Add Component page as shown in Figure 1.
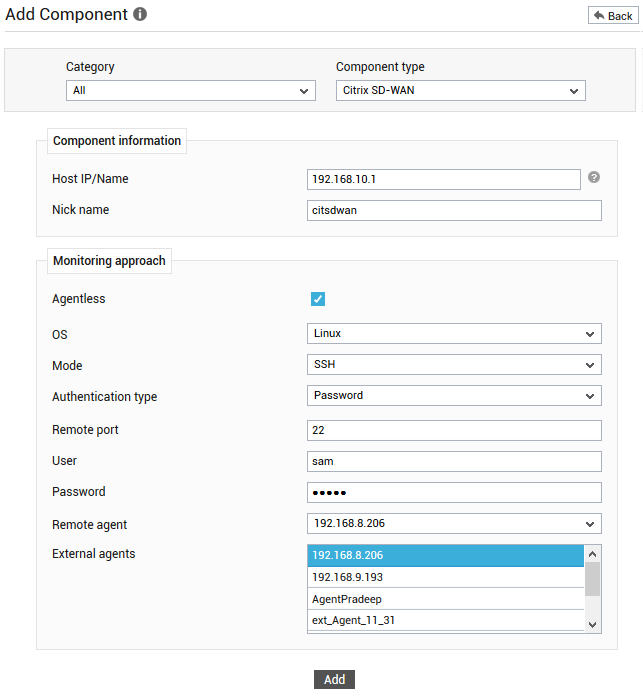
- Specify the Host IP/Name and the Nick name of the Citrix SD-WAN component in Figure 1. Since the target appliance is monitored in an agentless manner, the Agentless check box will be checked, by default.
- Then, select Linux as the OS and SSH as the Mode. The Authentication Type will be Password by default.
- The SSH Port text box will be specified with the default SSH port value 22.
- Next, provide the credentials of a user who can access the target appliance via the SSH Port, in the User and Password text boxes.
- Select the eG agent that will be monitoring the target appliance from the Remote Agent drop down list.
- Choose an external agent for the appliance by picking an option from the External agents list box.
- Then, click the Add button to register the changes.
- Next, click the Signout button at the right, top corner of the eG admin interface to sign out. Now, you will be prompted to configure Network Interfaces test. To know how to configure this test, refer to Monitoring Cisco Router document.
- Finally, signout of the eG admin interface.