Using Powershell Scripts to Fulfill Requirements for Monitoring Exchange Online
To ensure that pre-requisites 5, 6, and 7 discussed in Pre-requisites for Monitoring Exchange Online are fulfilled without a glitch, eG Enterprise provides proprietary PowerShell scripts. By running these scripts, you can have these requirements automatically fulfilled. This way, you can eliminate the effort, time, and the likelihood of errors in getting Office 365 monitoring up and running. These scripts and their purposes are discussed in the table below:
|
Script name |
Purpose |
|
O365_Step2_ModulesDwnldnInstall.ps1 |
Automatically installs the modules/packages required for monitoring Exchange Online |
|
O365SetRolesAndpermissions.ps1 |
|
These scripts are bundled with the eG agent and are available in the <EG_AGENT_INSTALL_DIR>\lib directory on the eG agent host.
If you run the O365_Step2_ModulesDwnldnInstall.ps1 from the above location, Figure 1 will appear.
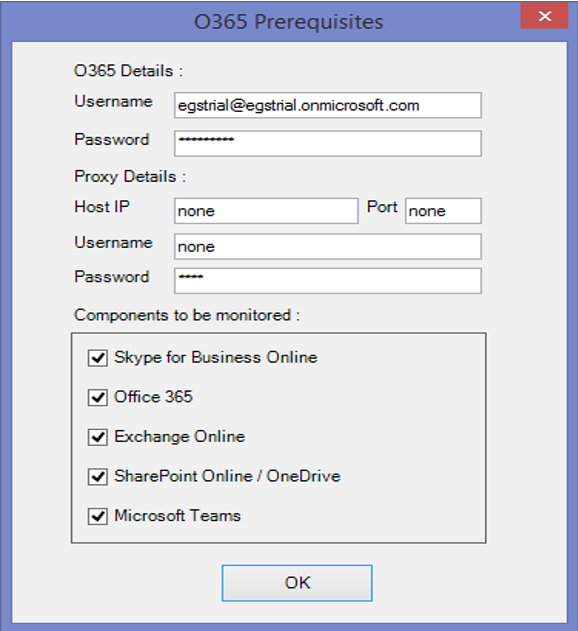
Figure 1 : Selecting the components for which modules/packages should be automatically downloaded and installed
Specify the following in Figure 1:
- First, enter the Username and Password of the global administrator. This is because, the eG agent requires global administrator privileges to connect to Office 365 and verify whether the required modules/packages have been successfully installed or not.
- If the eG agent will be communicating with Office 365 via a Proxy server, then configure the Host IP and Port number of the Proxy server. If a proxy server is not used for eG agent - Office 365 communications, then let the default Host IP and Port remain.
- If the Proxy server requires authentication, then provide a valid Username and Password for the Proxy user. If no authentication is required, then let the defaults remain.
- Then, select the Office 365 components you want to monitor by selecting the relevant check boxes in the Components to be monitored section (see Figure 1). The script will automatically download and install the modules/packages that are required for monitoring the chosen components alone. To install the packages required for monitoring Exchange Online, select the Exchange Online check box.
-
Then, click the OK button. If the Exchange Online check box is selected in the Components to be monitored section, then the following modules/packages will be automatically downloaded and installed on the agent host:
- A 64-bit version of the Microsoft Online Services Sign-in Assistant for IT Professionals RTW;
- A 64-bit version of the Microsoft Azure Active Directory Module for Windows PowerShell;
If you run the O365SetRolesAndpermissions.ps1 script from the <EG_AGENT_INSTALL_DIR>\lib directory, then the dialog box shown by Figure 2 will appear:
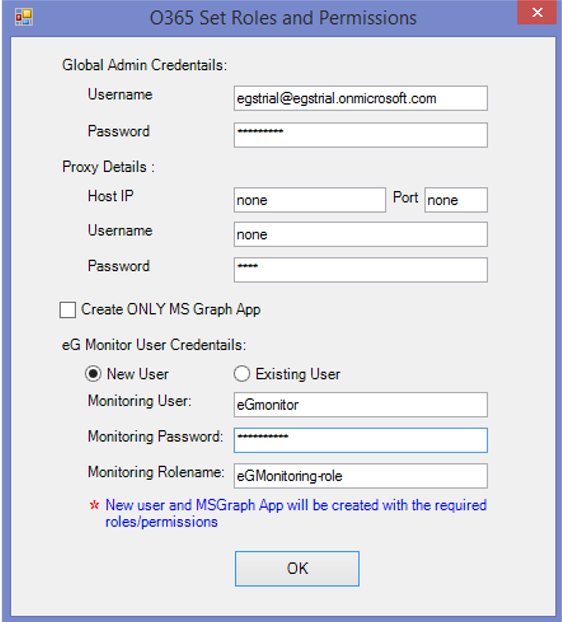
Figure 2 : Automatically creating a new user with the required permissions
Specify the following in Figure 2:
- First, enter the Username and Password of the global administrator. This is because, only a global administrator is authorized to create new users/apps and set their permissions.
- If the eG agent will be communicating with Office 365 via a Proxy server, then configure the Host IP and Port number of the Proxy server. If a proxy server is not used for eG agent - Office 365 communications, then let the default Host IP and Port remain.
- If the Proxy server requires authentication, then provide a valid Username and Password for the Proxy user. If no authentication is required, then let the defaults remain.
- If you want the script to automatically create a new user and assign the required permissions to that user, select the New User option in Figure 2. Then, give a unique name to the new Monitoring User and assign a Monitoring Password to that user. By default, the script automatically creates a role named eGMonitoring-role in Office 365, and assigns that role to the new user. This is why, the eGMonitoring-role is displayed by default in the Monitoring Rolename text box. You can change the role name if required.
-
On the other hand, if you want to use an existing Office 365 user for monitoring purposes, select the Existing User option (see Figure 3). Then, specify the name of the existing Monitoring User and the Monitoring Password of that user. By default, the script automatically creates a role named eGMonitoring-role in Office 365, and assigns that role to the specified existing user. This is why, the eGMonitoring-role is displayed by default in the Monitoring Rolename text box. You can change the role name if required.
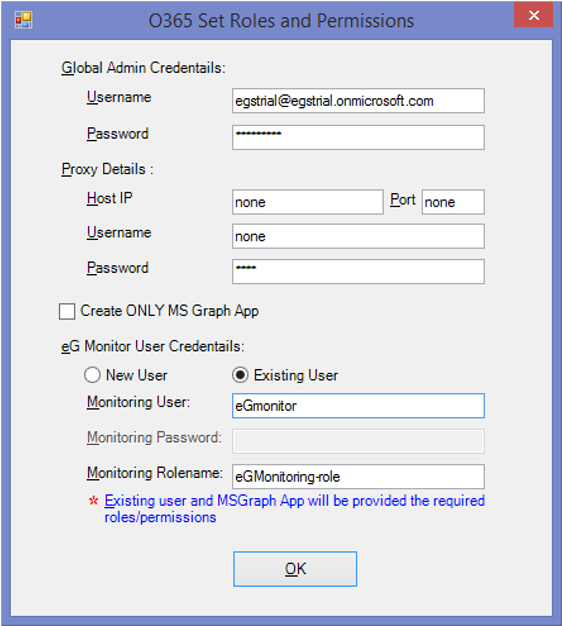
-
Finally, click the OK button in Figure 3. Doing so, will result in the following:
- If you have chosen to create a new user, then a new user with the given Monitoring User name and Monitoring Password will be automatically created in Office 365. Likewise, a role with the given Monitoring Rolename will be automatically created and assigned to the new user. The script ensures that this role is configured with the Global reader, View-Only Audit Logs, View-Only Recipients, Mail Recipients, and Mail Import Export permissions required for monitoring Exchange Online. In this case, make sure you configure the OFFICE 365 USER and OFFICE 365 PASSWORD parameters of eG tests with the Monitoring User name and Monitoring Password of the new user.
- If you have chosen to use an existing user, then a role with the given Monitoring Rolename will be automatically created in Office 365. When creating the role, the script automatically configures the role with the Global reader, View-Only Audit Logs, View-Only Recipients, Mail Recipients, and Mail Import Export permissions required for monitoring Exchange Online. The script also automatically assigns this role to the specified existing user. In this case, make sure you configure the OFFICE 365 USER and OFFICE 365 PASSWORD parameters of eG tests with the Monitoring User name and Monitoring Password of the existing user.
-
A Microsoft Graph app will be automatically installed on Microsoft Azure Active Directory with all the required permissions.
-
If you already have an Office 365 user with the Global reader, View-Only Audit Logs, View-Only Recipients, Mail Recipients, and Mail Import Export permissions, then you may not want to use the script to create such a user or grant the required permissions to an existing user. In such a case, you can configure the script to only install the Microsoft Graph app and set its permissions. To achieve this, simply select the Create ONLY MS Graph App option, as depicted by Figure 4. Then, click the OK button.
