Downloading and Deploying eG Agents
Upon signing into the eG web console, a tenant is welcomed by simple steps for getting started with operating the console. Follow the steps detailed below to know how to use the console for downloading, installing, and configuring the eG agents for monitoring the infrastructure:
-
First, click the Get Started Now link in Figure 1.
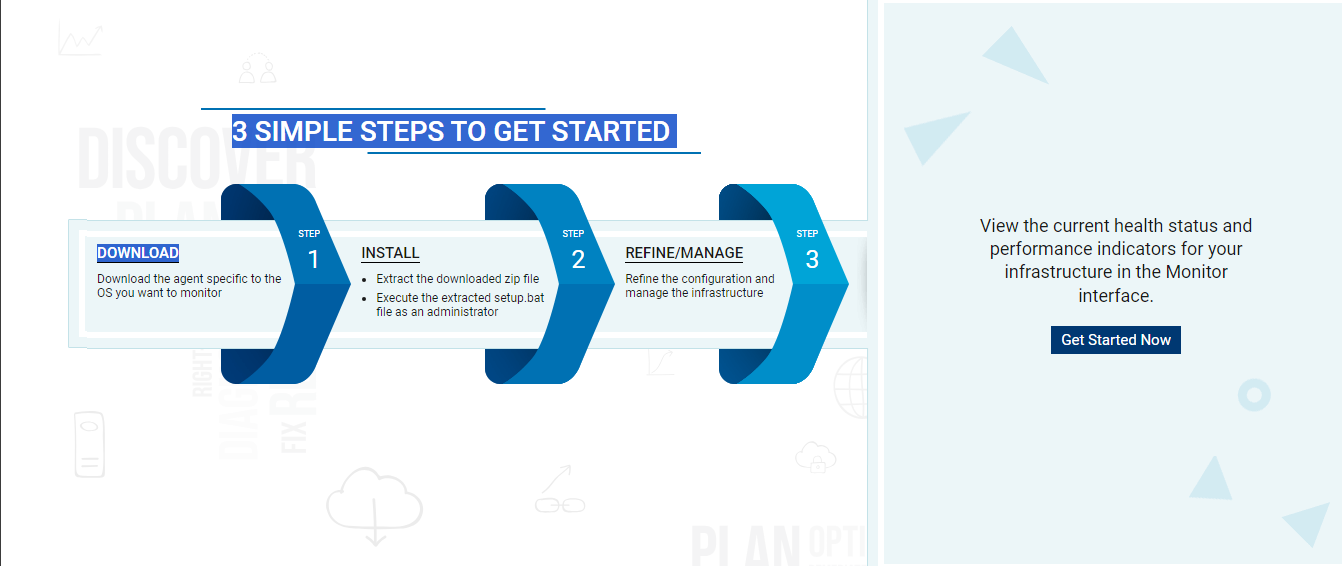
Figure 6 : Getting started with eG Enterprise
-
In the page that appears next, click on the
 icon in the left panel to open Figure 7. Here, click on the option that represents the component / infrastructure group that you want to monitor. For instance, say, you want to monitor the Citrix infrastructure. For this, click on the Citrix option in Figure 3.
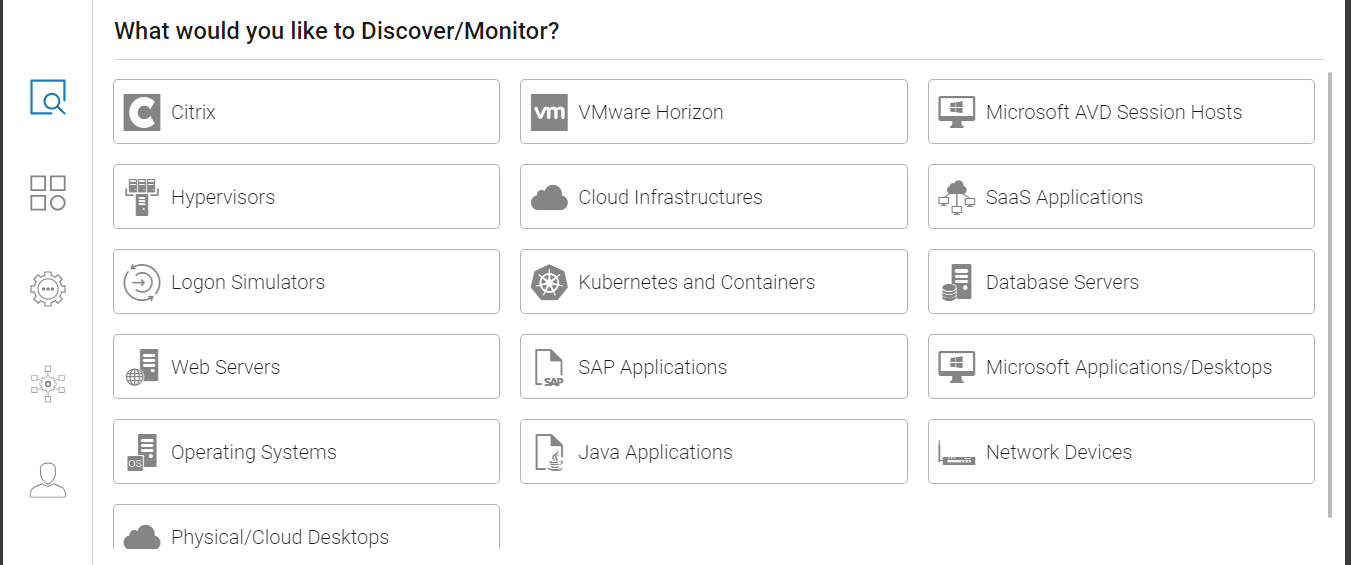
-
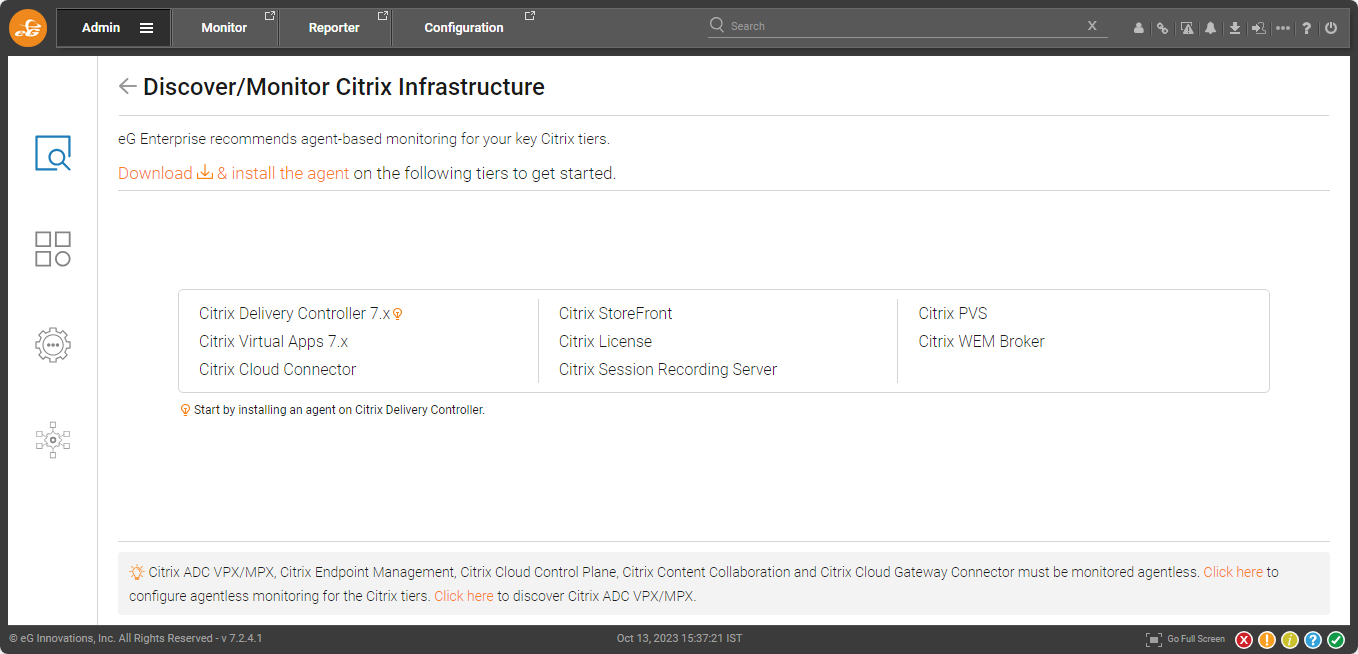
Figure 8 will then appear. The tiers that you can monitor in a Citrix infrastructure will be listed. To download and install eG agents on any of the listed tiers, click on Download and install the eG agent link in Figure 8.
-
Figure 9 will then appear prompting you to confirm if the eG monitors need to communicate with the eG manager via a proxy server. Click Yes to confirm the use of a proxy server, and No if you do not want to use a proxy server. Then, click the Submit button.
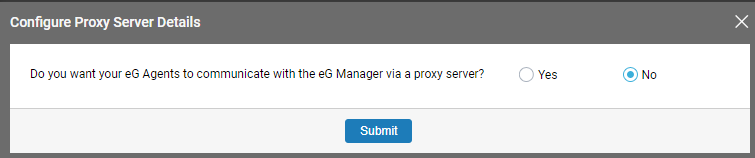
Figure 9 : Choosing how the eG agents should communicate with the eG manager
-
If you select Yes, then you will be prompted to provide the details of the proxy server. Please refer to the eG Installation Guide to know more. On the other hand, if you select No, then Figure 10 will appear.
-
Figure 10 provides you with the following options for installing the eG agents:
-
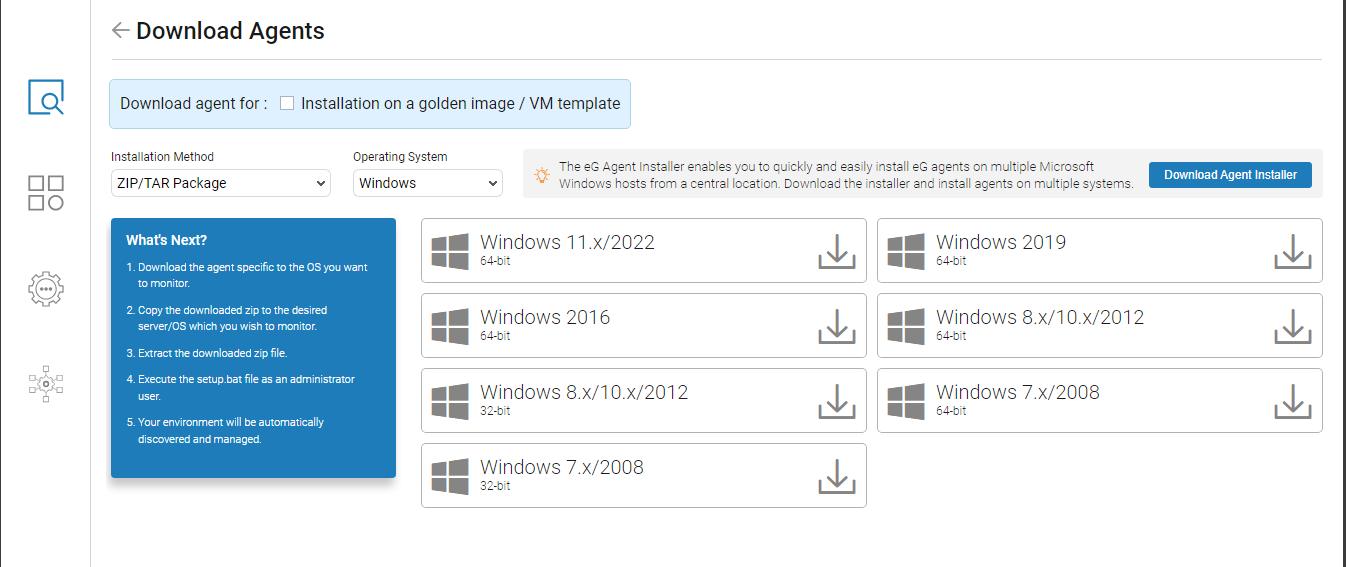
Using the ZIP/TAR file package: Download the ZIP/TAR file that includes the eG agent installable from the eG manager to your local host. Then, unzip/untar the downloaded file, and run the installation script/executable (as the case may be) within to install the eG agent. For this, select ZIP/TAR Package from the Installation Method drop-down, pick the platform of your choice from the Operating System list, and then click on the package that matches the OS of the host on which you want the agent installed. Remember to repeat this procedure for every host on which you want to deploy an eG agent.
Note:
For agent packages to be listed in , the administrator should first make sure that the agent packages that correspond to the tenant's environment are uploaded to the eG manager. For that, the administrator should do the following:
- Copy the downloaded packages to the <EG_MANAGER_INSTALL_DIR>\agents\Universal\Latest folder.
-
Using the command line: Execute the PowerShell script (for Windows) / Curl command (for Linux) that eG Enterprise provides, from the Windows PowerShell / Linux Shell prompt (as the case may be) of the target host. The script/command will automatically instal and start the eG agent on that host. Also, the agent will be automatically configured to report to the cloud manager.
To install an eG agent on a Windows host using the PowerShell script, do the following:
-
In Figure 11, set Command Line as the Installation Method.
-
Then, pick Windows as the Operating System.
-
Next, pick the Windows version and bit-rate from the Environment drop-down. The PowerShell script that corresponds to your specification will then be displayed, as depicted by Figure 11.

Figure 11 : Installing an eG agent on a Windows host using the PowerShell script provided by eG
-
Click on the Copy button below the script to copy the script to the clipboard.
-
Next, open the PowerShell prompt on the target host, paste the script therein, and run it as an administrator.
-
The script, upon execution, will automatically install, start, and configure the eG agent. Later, the eG agent so installed, will automatically discover the environment and auto-manage the discovered components.
-
Repeat the steps above on each Windows host to install the eG agent on it.
Note:
Before attempting to use the Command line option for agent installation on a Windows host, make sure that PowerShell v5,0 (or above) exists on the target host.
To install the eG agent on Linux using the eG-provided Curl command, do the following:
-
In Figure 11, set Command Line as the Installation Method.
-
Then, pick Linux as the Operating System.
-
Next, pick the Linux version and bit-rate from the Environment drop-down. The Curl command that corresponds to your specification will then be displayed, as depicted by Figure 12.
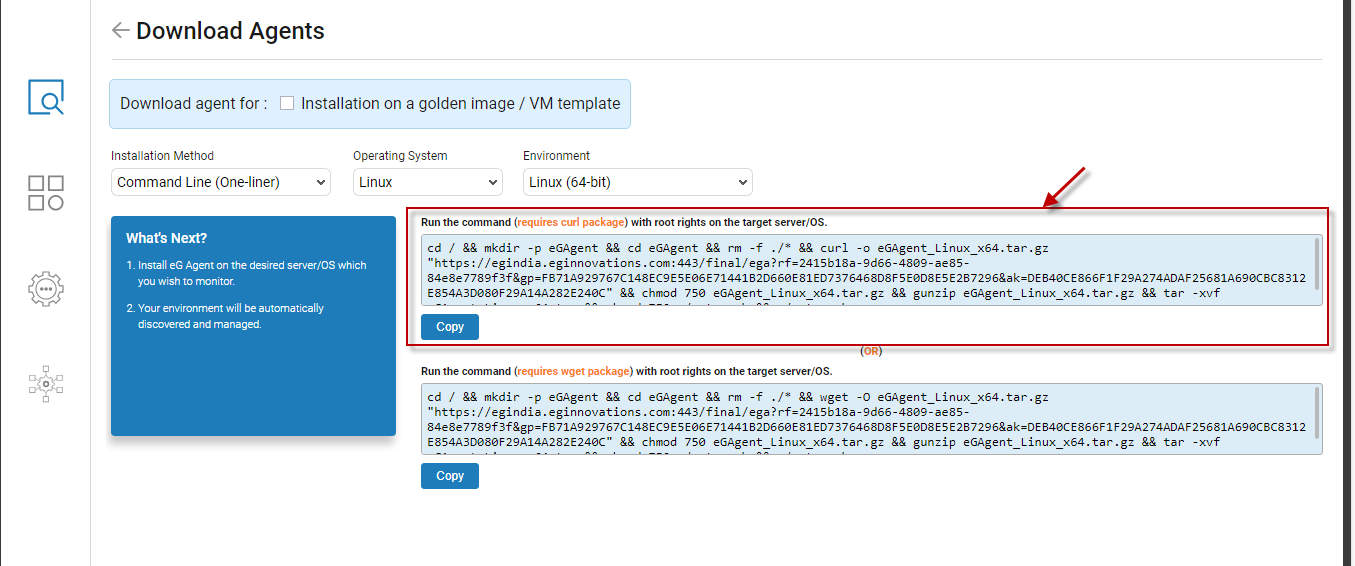
Figure 12 : Installing the eG agent on a Linux host by running a Curl command on the target host
-
Click on the Copy button below the command to copy it to the clipboard.
-
Next, open the Shell prompt on the target host, paste the command therein, and run it with root user privileges.
-
The command, upon execution, will automatically install and start the eG agent on the target host, and will also auto-configure the eG agent to report to the cloud manager. Later, the eG agent so installed, will also automatically discover the environment and auto-manage the discovered components.
-
Repeat the steps above on each Linux host to install the eG agent on it.
Note:
Before attempting to use the Command line option for agent installation on a Linux host, make sure that curl package exists on the target host
-
-
Using the Agent Installer: You can download, install, and use eG's proprietary Agent Installer to automatically install eG agents on multiple Windows hosts from a centralized interface. To download and deploy the installer on a target host, you can use one of the following ways:
- Using the Download Agent Installer button: This button will appear in the Download Agents page. This button will appear only if the Installation Method is set to ZIP/TAR File and the Operating System is set to Windows. If you click on the Download Agent Installer button, a zip file named eG_Agent_Installer will get downloaded to the location you specify. Unzip the file and run the eG_Agent_Installer application as an administrator. Once the installer launches, you can use it to push eG agents to the remote Windows hosts.
- Using the command line: Execute the PowerShell script (for Windows) / command (for Linux) that eG Enterprise provides, from the Windows PowerShell / Linux Shell prompt (as the case may be) of the target host. The script/command will automatically install the eG agent installer on that host.
To install an eG agent installer on a Windows host using the PowerShell script, do the following:
In Figure 13, set Command Line as the Installation Method.
Then, pick Windows as the Operating System.
Next, pick the Windows version and bit-rate from the Environment drop-down. The PowerShell script that corresponds to your specification will then be displayed, as depicted by Figure 13.
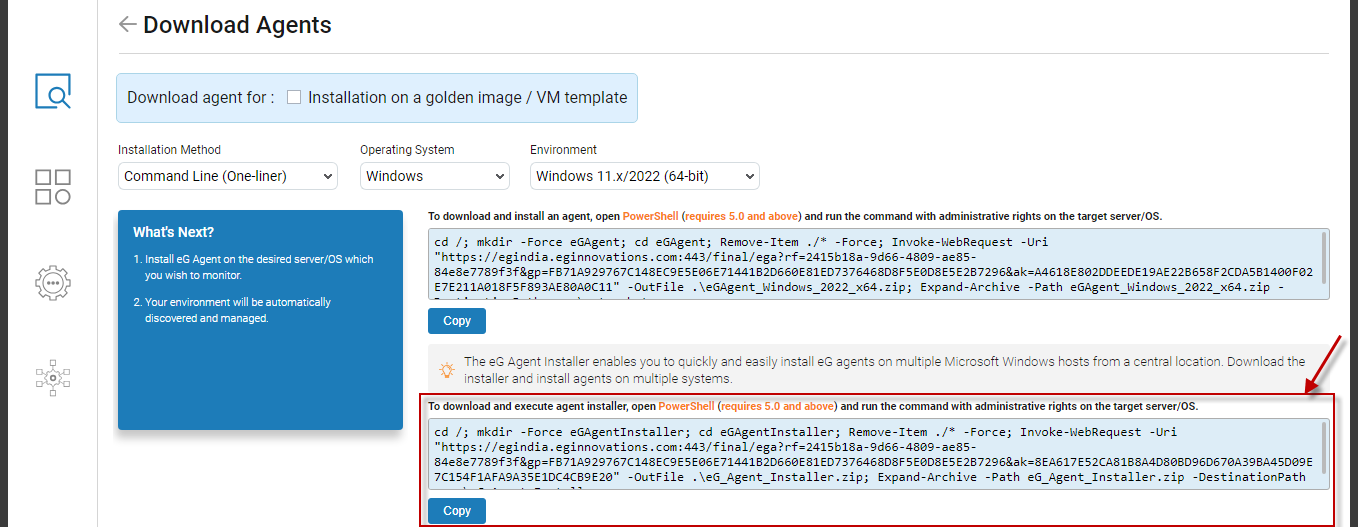
Figure 13 : Installing an eG agent installer on a Windows host using the PowerShell script provided by eG
Click on the Copy button below the script to copy the script to the clipboard.
Next, open the PowerShell prompt on the target host, paste the script therein, and run it as an administrator.
The script, upon execution, will automatically install and start the eG agent installer. You can then use the installer to push agents to multiple Windows hosts.
Note:
Before attempting to use the Command line option for deploying the agent installer on a Windows host, make sure that PowerShell v5,0 (or above) exists on the target host.
To install the eG agent installer on Linux using the eG-provided command, do the following:
In Figure 14, set Command Line as the Installation Method.
- Then, pick Linux as the Operating System.
Next, pick the Linux version and bit-rate from the Environment drop-down. The command that corresponds to your specification will then be displayed, as depicted by Figure 14.
Figure 14 : Installing the eG agent installer on a Linux host by running a command on the target host
Click on the Copy button below the command to copy it to the clipboard.
Next, open the Shell prompt on the target host, paste the command therein, and run it with root user privileges.
The command, upon execution, will automatically install the eG agent installer on the target host.
Note:
Before attempting to use the Command line option for deploying the agent installer on a Linux host, make sure that wget package exists on the target host.
-
Finally, proceed to push eG agents to multiple Windows hosts using the agent installer.
-