Configuring Snmptrapd on Windows
In Windows environments too, the Snmptrapd package comes bundled with the eG agent package. To setup Snmptrapd on Windows, do the following:
- Install the eG agent. This will create the snmptrapd directory under the <EG_INSTALL_DIR>\agent directory.
- From the command prompt, switch to the <EG_INSTALL_DIR>\agent \snmptrapd directory, and execute the createSnmpTrapd.bat batch file to register the Snmptrapd as a service in Windows.
-
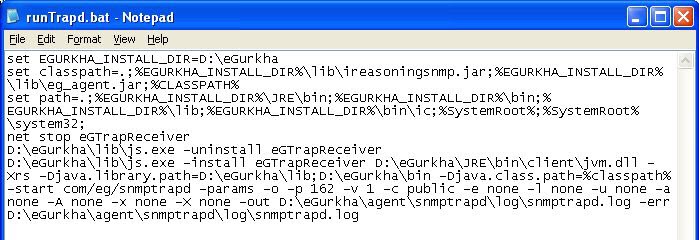
By default, snmptrapd will run on port 162 and will use the community string public. To have the SNMP daemon use a different port, edit the runTrapd.bat file and change the default port number 162 in the -p 162 specification of the file (indicated by Figure 1) to reflect a port of your choice. Similarly, you can change the default –c public specification in the file to reflect the community string that snmptrapd should use in your environment. If more than one community strings are available in your environment, then, you can specify the same as a comma-separated list. For example, if you have two community strings named public and private, then can specify -c public, private in the file to reflect the community strings that the snmptrad should use.
- Finally, start the Snmptrapd process by right-clicking on the eG Trap Receiver in the Services window (Start -> Programs -> Administrative Tools -> Services), and selecting the Start option from its shortcut menu.
Note:
- Ensure that the port number and community string (default: public) specified in the runTrapd.bat file is the same as the SNMP port of the application or network device from which the SNMP traps originate.
- To unregister the Snmptrapd service, run the unregistertrapd.bat file from the <EG_INSTALL_DIR>\agent \snmptrapd directory.
- To change the configuration for the Snmptrapd log file size, modify the traploglength parameter in the eg_counter.ini file in the <EG_INSTALL_DIR>\agent\config directory.
-
To configure the SNMP Trap Receiver with SNMP v3 support, follow the steps discussed below:
- Edit the runTrapd.bat file in the <EG_INSTALL_DIR>\agent \snmptrapd directory.
- Ensure that -v parameter is set to 3 to support SNMP version 3. Also, since SNMP v3 does not support a community string, make sure that the -c parameter is set to none.
-
Then, ensure that valid values are provided for the following parameters in the runTrapd.bat file:
-
To configure the SNMP Trap Receiver with SNMP v3 support, follow the steps discussed below:
- Edit the runTrapd.bat file in the <EG_INSTALL_DIR>\agent \snmptrapd directory.
- Ensure that -v parameter is set to 3 to support SNMP version 3. Also, since SNMP v3 does not support a community string, make sure that the -c parameter is set to none.
-
Then, ensure that valid values are provided for the following parameters in the runTrapd.bat file:
Parameter
Value
-e
Engine ID
-l
Security level; this can be noAuthNoPriv, authNoPriv, or authPriv
-u
Security name or user name; where multiple Security name or user names are available in an environment, you can specify a comma-separated unique Security names or unique user names for e.g., your specification can be: john, smith, elvis.
-a
Authentication protocol; this can be MD5 (for Message Digest Algorithm) or SHA (for Secure Hash Algorithm)
-A
Authentication protocol pass phrase; you can specify a comma-separated list of Authentication protocol pass phrase if a comma-separated list of Authentication protocols were specified
-x
Privacy protocol; this can be des (for Data Encryption Standard
-X
Privacy protocol pass phrase; you can specify a comma-separated list of Privacy protocol pass phrase if a comma-separated list of Privacy protocols were specified
A sample entry has been provided below:
-p 162 -v 3 -c none -e 80.00.08.1c.04.46.64 -l authNoPriv -u Kevin,John -a MD5,SHA -A kvn1234,john@1234 -x DES,AES -X kvn12345,john@2341
- Finally, save the file.
-