Integrating with HP OpenView NNM v9.10
Typically, HPOV NNM v9.10 blocks all SNMP traps. Naturally therefore, the first step towards integrating the eG manager with HPOV NNM v9.10 is to configure the NNM to receive and display the SNMP traps sent by the eG manager. For this, follow the steps given below:
- Login to the NNM host and go to the command prompt.
-
At the command prompt, go to c:\progra~2\HP\HP BTO Software\bin and run the following command:
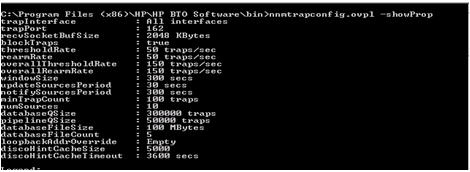
nnmtrapconfig.ovpl -showProp
-
The output depicted by Figure 393 will then appear:
-
From Figure 393, it is evident that the blockTraps property of the NNM is set to true, indicating that the NNM will block all SNMP traps that are sent to it. To 'unblock' the traps, issue the following command at the prompt:
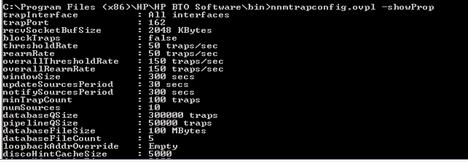
nnmtrapconfig.ovpl -setProp -unblockTraps
-
This will result in the output shown by Figure 394 below.
-
As you can see, the blockTraps property of the NNM is now set to false. Next, go to the NNM web console and follow the Configuration -> Incidents -> Incident Configuration node sequence. Figure 395 will then appear. Make sure that the Discard Unresolved SNMP Traps check box in Figure 395 is unchecked.
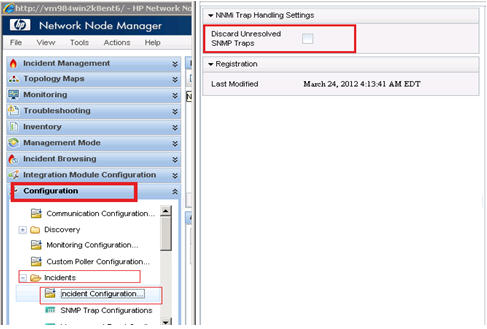
Figure 395 : Deselecting the 'Discard Unresolved SNMP Traps' check box
-
Then, proceed to load the egurkha.mib into NNM, so that the NNM receives all traps sent by the eG manager. For this, run the following command at the prompt:
c:\progra~2\HP\HP BTO Software\bin\nnmloadmib.ovpl <Full_path_to_the_eGMIB>\egurkha.mib
By default, the egurkha.mib will be available in the <EG_MANAGER_INSTALL_DIR>\manager\config directory. In this case therefore, the command will be:
c:\progra~2\HP\HP BTO Software\bin\nnmloadmib.ovpl <EG_INSTALL_DIR>\manager\config\egurkha.mib
-
However, note that unblocking the SNMP traps and loading the egurkha.mib does not guarantee the free movement of eG traps into the NNM system; one/more OIDs may continue to be blocked by the NNM system. To lift such specific blocks, follow the steps discussed below:
-
Run the following command at the prompt:
c:\progra~2\HP\HP BTO Software\bin\nnmincidentcfg.ovpl -loadTraps EGURKHA-MIB
-
Reset NNM's blocked OID cache using the following command:
c:\progra~2\HP\HP BTO Software\bin\nnmtrapconfig.ovpl -resetBlockCache
-
-
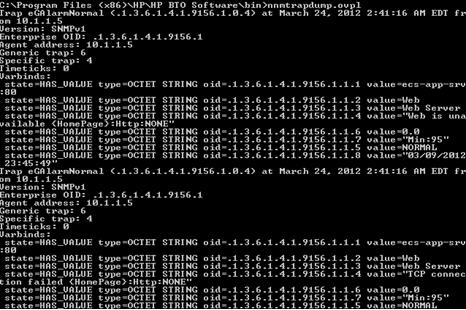
Now, proceed to check whether the NNM system is able to receive eG alarms as traps. For this, switch to the c:\progra~2\HP\HP BTO Software\bin directory at the command prompt, and issue the following command:
nnmtrapdump.ovpl
This will invoke Figure 396, where you can view the SNMP traps that the eG manager sends to the NNM console, along with their OIDs.
-
You can also view the eG alerts in the NNM console, when you follow the Incident Browsing -> All Incidents node sequence (see Figure 397).
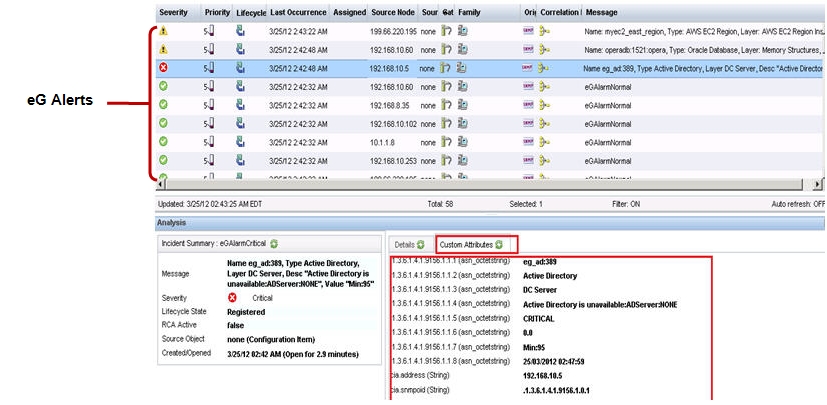
-
If you double-click on an eG alert in the list, an Analysis section will open below (see Figure 397). In the Custom Attributes tab page of the Analysis section, you can find the complete details of the alert clicked on, which includes:
- The problem component name
- The problem component type
- The problem layer
- A brief description of the problem
- The alarm priority (Critical/Major/Minor), and more!
Alongside each such information, the trap OID vide which that information was sent to the NNM console will also be displayed.
-
By default, all eG alerts will be tagged as Normal alerts (i.e., priority/severity of the alerts will be Normal), when they are received and displayed in the NNM console for the very first time. You will have to manually map the priority of each alert in the eG manager with its corresponding state in the NNM console for the NNM console to accurately indicate the alarm priority. For this, do the following:
- Follow the Incident Browsing -> All Incidents node sequence in the NNM console.
- Once the eG alerts appear in the right panel, right-click on an alert, and select the Open Incident Configuration option from the shortcut menu that appears (see Figure 398).
- An SNMP Trap Configuration window will then appear, where the details of SNMP trap that corresponds to the chosen eG alert will be displayed (see Figure 398).
- From the Severity drop-down in the SNMP Trap Configuration window, select the alarm severity in the NNM console that maps to the priority of that alert in the eG manager. Then, click on the Save and Close option to save the configuration changes.
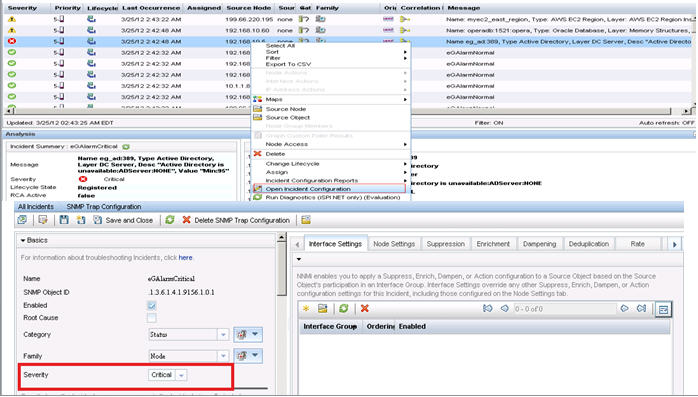
Figure 398 : Mapping the priority of an eG alert with its corresponding severity level in the NNM console