
Configuring Java Business Transaction Monitoring on JBoss EAP
eG Enterprise' Java Business Transaction Monitor (BTM) tracks individual transactions to JBoss EAP in real-time, captures the time taken by each transaction, traces the journey of each transaction and the path it takes, and accurately pinpoints where and why a transaction slowed down.
By default, the eG BTM capability is disabled on JBoss EAP. To enable this capability, you first need to determine the operating mode of the target server.
Typically, JBoss EAP operates in one of the following modes:
- Standalone server operating mode for managing discrete instances
-
Managed domain operating mode for managing groups of instances from a single control point
To know in which mode the JBoss EAP server you want to monitor is operating, login to the JBoss Management Console and click the Runtime option in its main menu. When Figure 1 appears, take a look at the options displayed in the left panel of Figure 1.
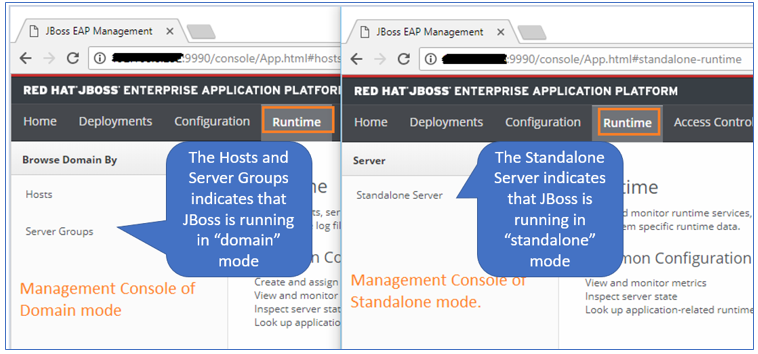
Figure 20 : How to determine the operating mode of JBoss EAP
If you see Hosts and Server Groups displayed therein, it indicates that the target JBoss EAP server is running in the domain mode. If you see Standalone Server there instead, it implies that the target server is running in the standalone mode.
Now, proceed to BTM-enable the server.
To BTM-enable a JBoss EAP server operating on a Windows host, follow the steps detailed below.
- Manage the JBoss EAP server using the eG administrative interface. When managing, make a note of the Nick name and Port number that you provide.
- If multiple JBoss EAP server instances are operating on a single host, and you want to BTM-enable all the instances, then you will have to manage each instance as a separate JBoss EAP server using the eG administrative interface. When doing so, make a note of the Nick name and Port number using which you managed each instance.
-
In the <EG_AGENT_INSTALL_DIR>\lib\btm directory, you will find the following files:
- eg_btm.jar
- btmLogging.props
- btmOther.props
- exclude.props
- Next, create a new directory under the <eg_agent_install_dir>\lib\btm. Take care to name this directory in the following format: <Managed_Component_NickName>_<Managed_Component_Port>. For instance, if you have managed the JBoss EAP server using the nick name JBoss1 and the port number 9990, the new directory under the btm directory should be named as JBoss1_9990.
- If you have managed multiple JBoss EAP server instances running on a single host, then you will have to create multiple sub-directories under the btm directory- one each for every instance. Each of these sub-directories should be named after the Nick name and Port number using which the corresponding instance has been managed in eG.
-
Once the new directory is created, copy the following files from the btm directory to the new directory. If multiple directories have been created as described in step 5 above, then the following files should be copied to all directories:
- btmLogging.props
- btmOther.props
- exclude.props
-
Next, edit the btmOther.props file. You will find the following lines in the file:
#~~~~~~~~~~~~~~~~~~~~~~~~~~~~~~~~~~~~~~~~~~~~~~~~~~~~~~~~~~~~~~~~~~~
# Below property is BTM Server Socket Port, through which eG Agent Communicates
# Restart is required, if any changes in this property
# Default port is "13931"
#~~~~~~~~~~~~~~~~~~~~~~~~~~~~~~~~~~~~~~~~~~~~~~~~~~~~~~~~~~~~~~~~~~~
#
BTM_Port=13931
#
By default, the BTM Port parameter is set to 13931. If you want to enable eG Java BTM on a different port, then specify the same here. In this case, when configuring the Java Business Transactions test or the Key Java Business Transactions test for the JBoss EAP server, make sure you configure the btm port parameter of the test with this port number.
Note:
When BTM-enabling multiple instances on the same server, make sure you configure a different BTM Port for each instance.
Also, by default, the Designated_Agent parameter will be empty; do not disturb this default setting. In this case therefore, the eG Java BTM will treat the host from which the very first 'measure request' comes in as the Designated_Agent.
#~~~~~~~~~~~~~~~~~~~~~~~~~~~~~~~~~~~~~~~~~~~~~~~~~~~~~~~~~~~~~~~~~~~
# Below property is used to specify IP address of eG Agent which collectes BTM Data.
# Default is None
#~~~~~~~~~~~~~~~~~~~~~~~~~~~~~~~~~~~~~~~~~~~~~~~~~~~~~~~~~~~~~~~~~~~
#
Designated_Agent=
#
Note:
In case a specific Designated_Agent is not provided, and the eG Java BTM treats the host from which the very first 'measure request' comes in as the Designated_Agent, then if such a Designated_Agent is stopped or uninstalled for any reason, the eG Java BTM will wait for a maximum of 10 measure periods for that 'deemed' Designated_Agent to request for metrics. If no requests come in for 10 consecutive measure periods, then the eG Java BTM will begin responding to 'measure requests' coming in from any other eG agent.
-
Then, you need to configure the JBoss EAP server with the path to the eg_btm.jar and .props files. To achieve this, in case of a server operating in the standalone mode, you need to edit the standalone.bat file in the <EAP_HOME>\bin directory of the JBoss EAP server. In case of a server operating in the domain mode, edit the host.xml file in the <EAP_HOME>\domain\configuration directory on the targeet server.
-
Then, in the file, enter the following lines, as depicted by Figure 21.
-javaagent:<EG_AGENT_INSTALL_DIR>\lib\btm\eg_btm.jar
-DEG_PROPS_HOME=<<PATH OF THE LOCAL FOLDER CONTAINING THE .PROPS FILES>>
For instance, if the .props files had been copied to the <EG_AGENT_INSTALL_DIR>\lib\btm\JBoss1_9990 directory, the above specification will be:
-javaagent:<EG_AGENT_INSTALL_DIR>\lib\btm\eg_btm.jar
-DEG_PROPS_HOME=<EG_AGENT_INSTALL_DIR>\lib\btm\JBoss1_9990
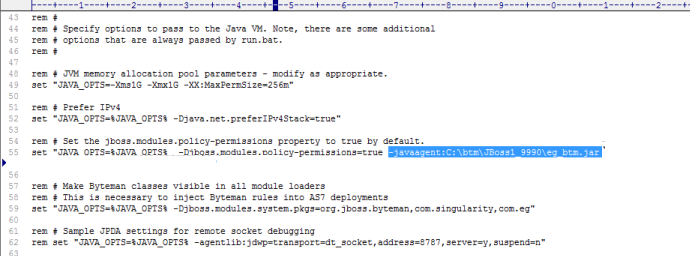
Figure 21 : Editing the start-up script to BTM-enable a JBoss EAP server that is monitored in an agent-based manner
-
Next, if the JBoss server is running in domain mode, open the domain.xml file in <EAP_HOME>\domain\configuration directory. If the JBoss server is running in standalone mode, open the standalone.conf file in the JBoss_Home\bin directory.

Figure 22 : Editing the domain.xml file or standalone.conf file
-
Append ",com.eg" to the following line in the file, as depicted by Figure 22:
set "JAVA_OPTS=%JAVA_OPTS% -Djboss.modules.system.pkgs="org.jboss.byteman"
- Finally, save the file. and restart the JBoss EAP server.
If a JBoss EAP server is running on Unix, then follow the steps below to BTM-enable that server:
- Follow steps 1 - 7 above. While doing so, note that the jar and .props files will be available in the /opt/egurkha/lib/btm directory on the eG agent host.
-
Then, you need to configure the JBoss EAP server with the path to the eg_btm.jar and .props files. To achieve this, in case of a standalone EAP server, you need to edit the <EAP_HOME>/bin /standalone.sh file of the JBoss EAP server. In case of a server operating in the domain mode, edit the host.xml file in the <EAP_HOME>/domain/configuration directory.
-
Then, in the file, enter the following lines, as depicted by Figure 23.
JAVA_OPTS="$JAVA_OPTS -javaagent:<<PATH TO the eg_btm.jar>> -DEG_PROPS_HOME=<<PATH TO LOCAL FOLDER CONTAINING THE
.PROPS FILES>>"
For instance, if the .props files had been copied to the /opt/egurkha/lib/btm/JBoss1_9990 directory, the above specification will be:
JAVA_OPTS="$JAVA_OPTS -javaagent:/opt/egurkha/lib/btm/eg_btm.jar -DEG_PROPS_HOME=/opt/egurkha/lib/btm/JBoss1_9990"
-new.png)
Figure 23 : Editing the start-up script to BTM-enable a JBoss EAP server on Unix that is monitored in an agent-based manner
-
In Unix environments, if the eG agent is deployed on the same host as the JBoss EAP server, then both the agent and the server will be running using different user privileges. In this situation, by default, the eG Java BTM logs will not be created. In order to create the same, insert the following entry after the -DEG_PROPS_HOME specification, but before the closing quotes.
-DEG_LOG_HOME=<<LogFile_Path>>
Before providing this specification, make sure you create a folder for BTM logs - say, eGBTMLogs - in any directory to which the target application server has access. Then, against, -DEG_LOG_HOME, provide the full path to the eGBTMLogs directory. Where multiple instances on the same server are to be BTM-enabled, you can use the same directory for writing log files of all instances.
For example, to create log files in the /App001/eGBTMLogs directory, the complete specification will be as follows:
JAVA_OPTS="$JAVA_OPTS -javaagent:/opt/egurkha/lib/btm/eg_btm.jar -DEG_PROPS_HOME=/opt/egurkha/lib/btm/JBoss1_9990 -DEG_LOG_HOME=/App001/eGBTMLogs"
- Then, save the file.
-
Next, if the JBoss server is running in domain mode, open the domain.xml file in JBoss_Home/domain/configuration directory. If the JBoss server is running in standalone mode, open the standalone.conf file in the JBoss_Home/bin directory.
Figure 24 : Editing the domain.xml file or standalone.conf file
-
Append ",com.eg" to the following line in the file, as depicted by Figure 22:
set "JAVA_OPTS=%JAVA_OPTS% -Djboss.modules.system.pkgs="org.jboss.byteman"
-
Finally, save the file and restart the JBoss EAP server instance.
