Custom Business Transaction Naming
A default transaction naming algorithm is built into the Java Business Transactions test and the Java Key Business Transactions test. These tests therefore automatically name the monitored transactions based on this algorithm.
However, optionally, you can configure custom transaction naming rules and apply them to specific transaction URLs/URL patterns, to lend more flexibility to the naming process. For instance, you can apply a naming rule to only IMPS fund transfers that were made from a retail banking web site. Often, this is done to obtain more granular insights into the performance of key transaction types. This in turn can facilitate accurate problem identification, and thus ease troubleshooting. For instance, say you want to precisely pinpoint the bank/beneficiary to which IMPS fund transfers are consistently slow. For this, you need to be able to track the IMPS fund transfers made to every IFSC code or beneficiary name registered with the banking site. Assume that the banking web site in question is structured in such a way that the beneficiary name and IFSC code are captured into request parameter keys that are passed to the URL at runtime. In this case, the URL segment-based default naming policy will not help, as it will not be able to pull the dynamic request parameter values from the URL. If you choose to go with the default policy , eG Java BTM will only report aggregate metrics for all IMPS transfers made via the banking site, regardless of the IFSC code or beneficiary name. In such a situation, it would make sense to create a custom transaction naming rule, which can read the values of request parameters in a URL and report those values as transaction names; this way, you will have a transaction named after every unique IFSC code/beneficiary name.
Using the Business Transaction Naming Rules parameter of the Java Business Transactions test, you can configure naming rules that can help build transaction names using request parameter key values, URL segments, or a combination thereof. For this, do the following:
-
Click on the
 icon alongside the Business Transaction Naming Rules parameter. A list of naming rules that pre-exist (if any) will then appear. To create a new rule, click on the Add New Rule button here (see Figure 1).
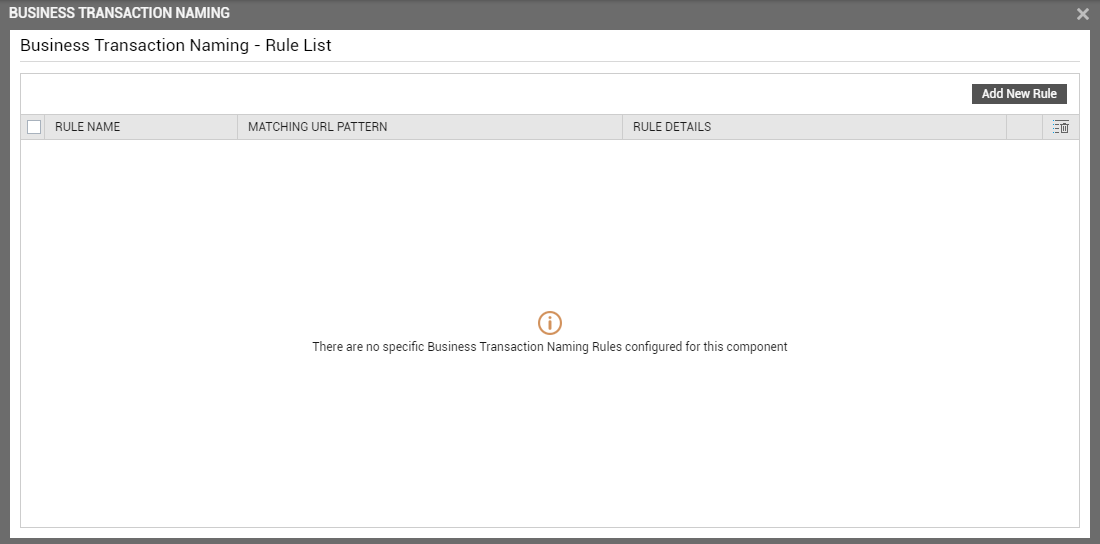
-
Figure 2 will then appear. Use Figure 2 to build a new business transaction naming rule. Let us take an illustrated example to explain how this works. In our example, we will be defining a naming rule for transactions to the IMPS fund transfers web page of a retail banking web site. As per this naming rule, the name of each transaction to this web page should include:
-
URL Segment 2
-
URL Segment 3
-
IFSC code of the beneficiary
The format of the resultant transaction names will therefore be: <URL_Segment_2>/<URL_Segment_3>/<IFSC_Code>. Based on this naming rule, the Java Business Transactions test will report metrics for each unique IFSC code to which an IMPS transfer was made.
-
-
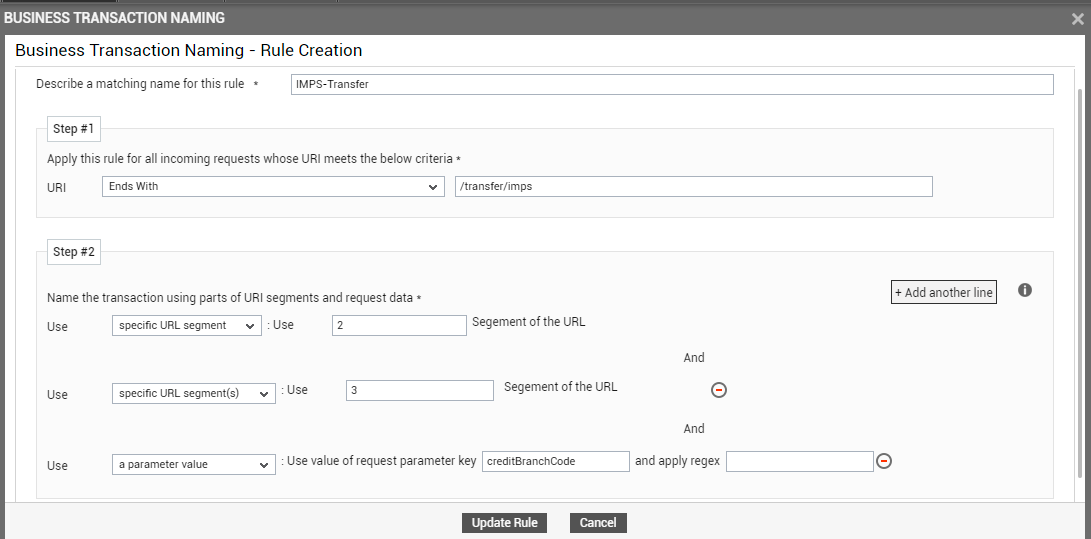
The first step to building this naming rule is to assign a unique name to the rule. Specify such a name in the Describe a matching name for this rule text box in Figure 2.
-
Then, proceed to indicate to which URLs the new rule should be applied. For this specification, use the URI drop-down list, along with the adjacent text box. From the URI list, you can select one of the following options:
-
Equals: If you select this option, and specify a URL in the adjacent text box, then the naming rule being defined will apply to that URL alone.
-
Starts with: Select this option if you want the naming rule to be applied to all URLs that start with the string specified in the adjacent text box.
-
Ends with: Choose this option if you want the naming rule to be applied to all URLs that end with the string specified in the adjacent text box.
-
Contains: Pick this option if you want the naming rule to be applied to all URLs that contain the string mentioned in the adjacent text box.
In the case of our example, we want the naming rule to be applied to all transactions URLs to the IMPS transfer web page of the banking web site. Since such transactions end with /transfer/imps, select the Ends with option from the URI drop-down list, and specify /transfer/imps in the adjoining text box.
-
-
Next, proceed to configure the format of the transaction name. As mentioned already, the transaction names in our example should contain 3 components: URL Segment 1, URL Segment 2, and the value of the request parameter that returns the IFSC code. To build such a name, you need to start by indicating what should be the first component of that name. For that, select an option from the first Use drop-down list you see in the section titled Step #2 (see Figure 2). This list includes the following options:
-
first few URI segment(s): Choose this option if you want the transaction name to include the first few URL segments. Then, specify the number of segments that should be included in the transaction name against the Use text box.
-
specific URL segment: Select this option if you want the transaction name to include a specific URL segment alone. Then, specify the segment number that you want to be part of the transaction name against the Use text box that follows.
-
a parameter value: Select this option if you want the transaction name to include the value of a request parameter that is passed to the URL. Then, specify the exact parameter key against the Use value of request parameter key text box. Also, if you are only interested in fetching specific values of this parameter key and not all of them, then you can specify a regex - i.e., a regular expression pattern - to search for those values.
In the case of our example, the first component of the transaction name is URL Segment 2. To indicate this, select the specific URL segment option from the first Use drop-down list you see in Figure 2. Then, specify the number 2 in the Use text box that follows.
-
-
Next, proceed to configure the second component of your transaction name. For that, click on Add another line button in Figure 2. This will add one more Use specification, where you can specify what constitutes the second component. In the case of our example, the URL segment 3 should follow segment 2, in the transaction name. To configure this, select the specific URL segment option from the second Use drop-down list in Figure 2. In the adjoining Use text box, then specify the number 3.
-
Since our transaction name has a third component, click on the Add another line button to add one more Use specification. As the third component of the transaction name in our example is the value of a request parameter key, select a parameter value option from the third Use drop-down list. As stated already, the transaction names in our example should include the IFSC codes of all beneficiary bank accounts. In our example, this value is returned by the request parameter key, creditBranchCode. To confirm the key name, login to the retail banking web site and initiate an IMPS fund transfer.
If this is a GET request, then the IFSC code to which the funds are to be transferred will appear as part of the transaction URL itself, in the address bar of the browser. The parameter key against which this IFSC code is displayed in the address bar should then be specified in the Use value of request parameter key text box.
On the other hand, if the fund transfer request is a POST request, then as soon as the transfer is initiated, click the F12 key on your keyboard to invoke the Developer Tools console. Click on the Network tab page of the console to view all the resources that were loaded on to the IMPS fund transfer web page, soon after a fund transfer is triggered (see Figure 3). In the list of resources, click on the HTML page / servlet that is invoked by the fund transfer. In the case of the illustration below, it is the impstransferinterim.htm. The right panel of the tab page will then list the request headers, response headers, and form data in the chosen HTML page. Scroll down the right panel to view the Form Data. The form data will be listed as key:value pairs. Note down the parameter key that stores the beneficiary bank's IFSC code; in the case of Figure 3 below, it is the creditBranchCode key.
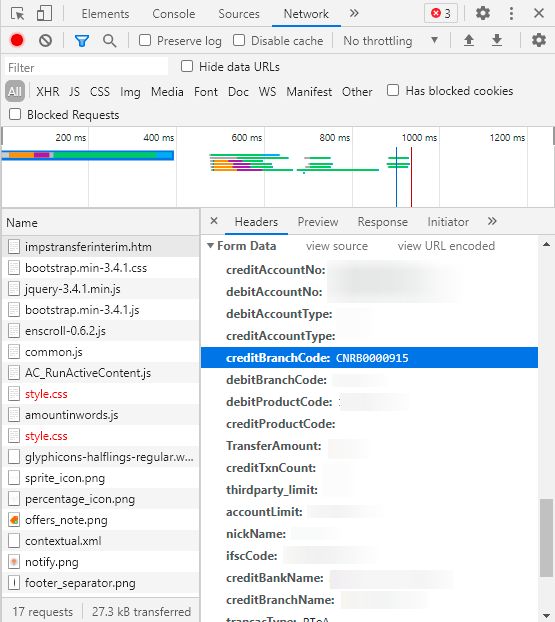
Figure 3 : The Developer Tools console displaying the parameter key that stores the IFSC code
Therefore, specify creditBranchCode against the Use value of request parameter key text box in Figure 2.
-
Our example seeks to report metrics for all unique IFSC codes, and not specific codes. Therefore, we do not need to specify a search pattern against regex. However, let's say that you want to track IMPS fund transfers to Citibank accounts alone. The IFSC code for all Citibank accounts begin with the string CITI. In this case therefore, you can specify CITI* against regexin Figure 2, so that eG Java BTM tracks only those transactions with IFSC codes that begin with CITI.
-
At any given point in time, you can remove one/more components from your transaction name format, by clicking the encircled '-' button corresponding to that specification.
-
Finally, click the Update Rule button to save the new rule.
-
Figure 4 will then appear displaying the naming rule that was just created. To modify the rule, click the
 icon corresponding to it. To delete the rule, click the
  icon corresponding to it.
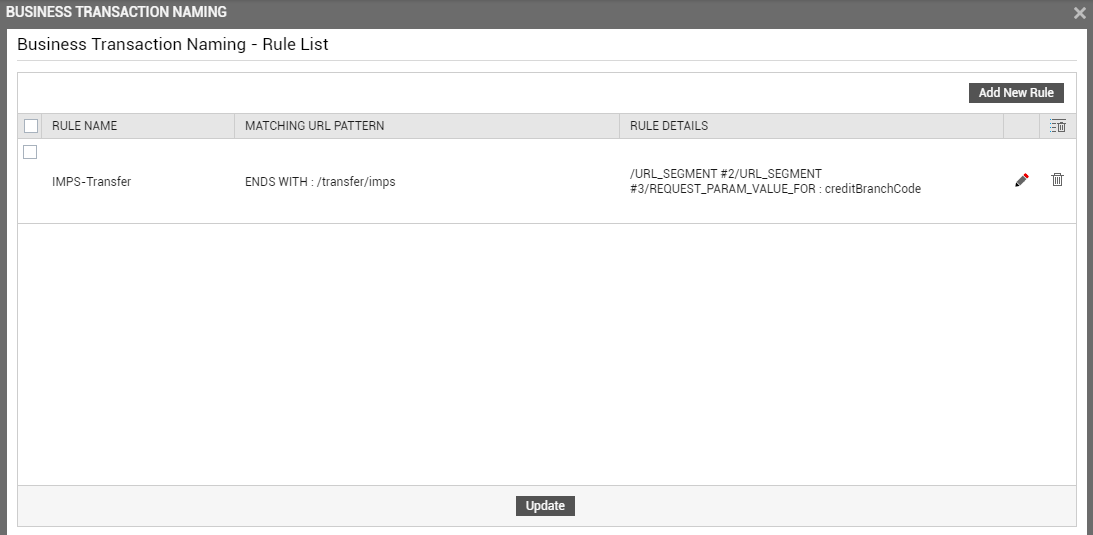
-
If you do not wish to make any changes to the rule, click the Update button to set it as the value of the Business Transaction Naming Rules parameter of the Java Business Transactions test.
-
Similarly, you can create multiple transaction naming rules and apply them to different URLs/URL patterns.