Installing eG Java BTM on GlassFish
The steps for deploying the eG Java BTM on a GlassFish server will differ based on how the GlassFish server is configured - i.e., as a standalone server or as part of a cluster - and based on how the GlassFish server is monitored - i.e., in an agent-based or agentless manner.
BTM-Enabling a GlassFish Server Monitored in an Agent-based Manner
If the GlassFish server is a stand-alone server that is to be monitored in an agent-based manner, then follow the steps below to BTM-enable the server:
- Login to the GlassFish server.
- Open a browser on the server, connect to the eG manager, and login to the eG admin interface.
- Manage the GlassFish server as a separate component using the eG administrative interface. When managing, make sure the Agentless flag is unchecked to indicate that the server is being monitored in an agent-based manner.
-
Next, follow the Agents -> BTM Profiler Download menu sequence in the eG admin interface. Figure 1 will then appear, listing the Java application servers managed in the environment. Locate the GlassFish server that you managed recently in that list, and click the Copy JVM icon (
 ) corresponding to it (see Figure 1).
Figure 1 : Clicking the Copy JVM icon corresponding to the GlassFish server that is monitored in an agent-based manner
-
Figure 2 will then appear. Copy the JVM option displayed in Figure 2 to the clip board or any text editor.
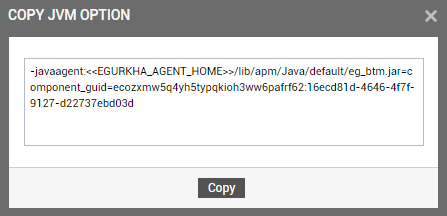
Figure 2 : Copying the JVM option for BTM-enabling a GlassFish server managed in a agent-based manner
-
Next, login to the GlassFish Administration console. Click the Application Servers option in the left panel of the console. From the options listed in the right panel, select JVM Settings first, and then JVM Options, as depicted by Figure 3.
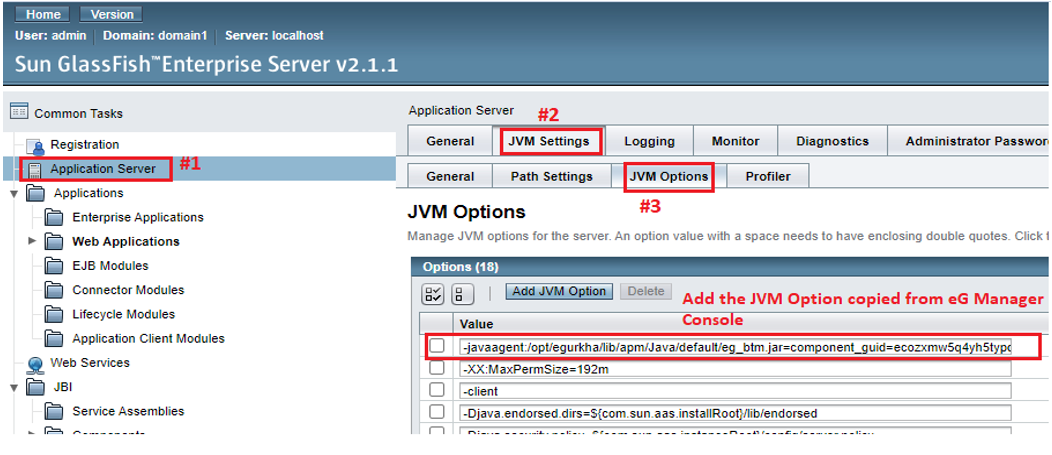
Figure 3 : Configuring JVM Options for the GlassFish server managed in an agent-based manner
- In the Value text area in the right panel of Figure 3, insert the JVM option you had copied to the clip board or text editor in step 6. Apply and save the changes.
-
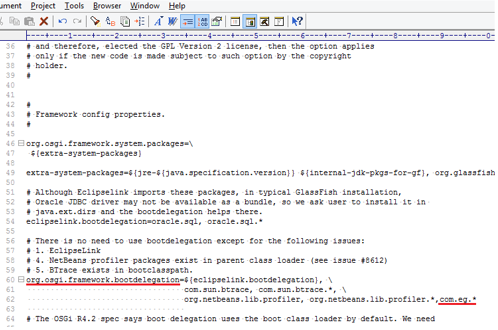
Next, if the GlassFish server being BTM-enabled is of v3.x (or above), then add the package com.eg in the boot delegation framework. If GlassFish v3.1.1 is being monitored, and the Equinox OSGI container is used, then edit the <<GLASSFISH_INSTALL_DIR>>\glassfish\osgi\equinox\configuration\config.ini file to add the package “com.eg.*". Similarly, if GlassFish v3.1.1 is being monitored, and the Felix OSGI container is used, then edit the <<GLASSFISH_INSTALL_DIR>>\glassfish\osgi\felix\conf\config.properties file to add the "com.eg.*". Figure 4 depicts how to add this package to the config file.
- On the other hand, if the GlassFish server v3.1.2 is being monitored, you need to add the com.eg package in <<GLASSFISH_INSTALL_DIR>>\config\osgi.properties file.
- Save the files.
- Restart the server.
A GlassFish cluster is where one or more instances of the GlassFish server run. All the instances in a cluster will use the same configuration (JVM). This means that to BTM-enable all the server instances running within a cluster, you only need to enable BTM at the cluster configuration level. To achieve this, follow the steps below:
- Login to the eG admin interface.
- Manage each server instance in a cluster as a a separate component using the eG administrative interface. When managing, make sure the Agentless flag is unchecked to indicate that every server instance is being monitored in an agent-based manner. .
-
Next, follow the Agents -> BTM Profiler Download menu sequence in the eG admin interface. Figure 5 will then appear, listing the Java application servers managed in the environment. Locate any of the GlassFish server instances that you managed recently in that list, and click the Download icon corresponding to it (see Figure 5).
Figure 5 : Clicking the Download icon corresponding to a managed GlassFish server instance in a cluster
-
Next, log into the GlassFish server instance that you want to BTM-enable. Create a new directory named "egbtm" under <GLASSFISH_HOME>\glassfish\nodes\<node>\<instance> on that server instance and extract the downloaded contents into the newly created egbtm directory.
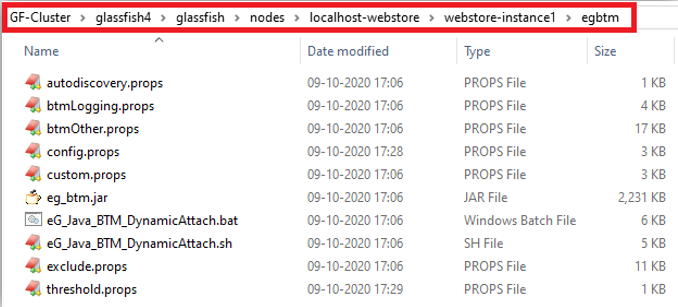
Figure 6 : Copying the downloaded contents to the egbtm directory of every server instance
- Repeat steps 3 and 4 for every GlassFish server instance in a cluster that you want to BTM-enable.
-
Next, log into the GlassFish administration console. When Figure 7 appears, expand the node representing the cluster name in the tree-structure in the left panel, and select the JVM Settings sub-node within.
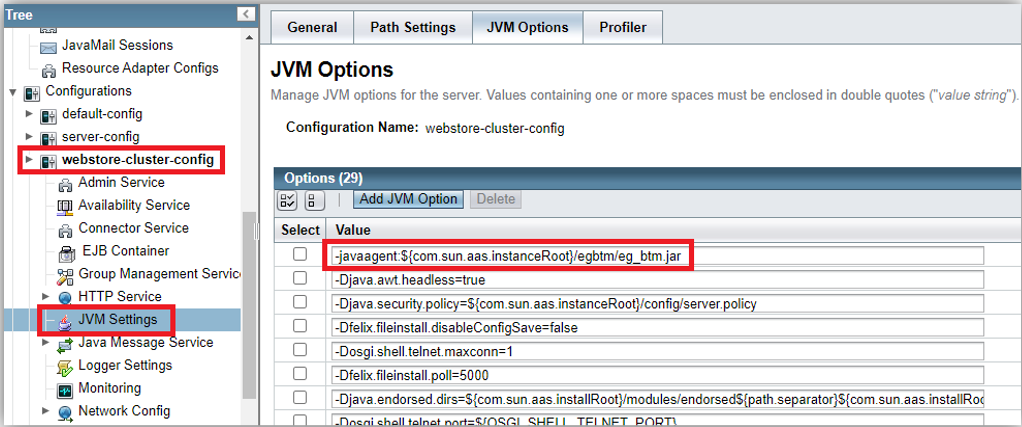
Figure 7 : Configuring Java Options at the cluster configuration level
-
Then, click on the JVM Options tab page in the right panel. In the Value text area in the JVM Options page, insert the following entry:
-javaagent:${com.sun.aas.instanceRoot}/egbtm/eg_btm.jar
- Since this is configured at the cluster-level, it automatically applies to all the server instances in the cluster. This means that you do not have to repeat this specification for every server instance, separately.
- Apply and save the changes.
- Next, if the GlassFish server being BTM-enabled is of v3.x (or above), then add the package com.eg in the boot delegation framework. If GlassFish v3.1.1 is being monitored, and the Equinox OSGI container is used, then edit the <<GLASSFISH_INSTALL_DIR>>\glassfish\osgi\equinox\configuration\config.ini file to add the package “com.eg.*". Similarly, if GlassFish v3.1.1 is being monitored, and the Felix OSGI container is used, then edit the <<GLASSFISH_INSTALL_DIR>>\glassfish\osgi\felix\conf\config.properties file to add the "com.eg.*".
- On the other hand, if the GlassFish server v3.1.2 is being monitored, you need to add the com.eg package in <<GLASSFISH_INSTALL_DIR>>\config\osgi.properties file.
- Save the files.
-
Restart the server.
BTM-Enabling a GlassFish Server Monitored in an Agentless Manner
If the GlassFish server is to be monitored in an agentless manner, then follow the steps below to BTM-enable the server:
- Login to the eG admin interface. Manage the GlassFish server and configure it to be monitored in an Agentless manner. If multiple instances of GlassFish are to be BTM-enabled, then manage each server instance as a separate GlassFish component in the eG admin interface. Make a note of the Nick name and Port number you assign to each such component.
- Login to the system hosting the GlassFish server. Then, create an "btm" directory, anywhere on the server - say, C:\btm.
-
If you have managed multiple GlassFish server instances running on a single host, then you will have to create multiple sub-directories under the btm directory- one each for every instance. Each of these sub-directories should be named after the Nick name and Port number using which the corresponding instance has been managed in eG.
- Once the new sub-directory is created, open a browser on the GlassFish server, connect to the eG manager, and login to the eG admin interface again.
- Follow the Agents -> BTM Profiler Download menu sequence in the eG admin interface.
-
Figure 8 will appear listing the servers that can be instrumented for APM by eG. In this list, locate the GlassFish server that you want to BTM-enable. Once you locate the server, click the Download icon corresponding to that server to download the APM Profiler Agent to that server. If multiple GlassFish server instances on a single host are managed, then you will have to download the APM Profiler Agent separately for each of the managed instances.

Figure 8 : Downloading the APM Profiler Agent for the GlassFish server
- Upon clicking the Download icon in Figure 8, a zip file named javaagent_<Nick_name_of_GlassFish_server>_<Port_number_of_GlassFish_server will get downloaded. For instance, if you have managed the GlassFish server using the nickname 'GlassFish1' and the port number '4848', then the name of the zip file will be javaagent_GlassFish1_4848. Where multiple GlassFish server instances have been managed, you will be downloading multiple zip files - one each for every instance. The names of these zip files will automatically carry the nick name and port number you assigned to the corresponding server instance.
- Copy the downloaded zip file(s) to the corresponding sub-directory(ies) of the btm directory (see steps 5 and 6 above). For example, the zip file named javaagent_GlassFish1_4848, should be copied to the C:\btm\GlassFish1_4848 directory .
- Extract the contents of each zip file into the same sub-directory to which that zip file was copied.
-
Figure 9 depicts the extracted contents of the zip file.
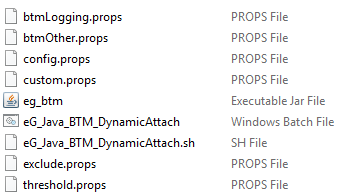
- From Figure 9, it is evident that the zip file contains an eg_btm.jar file and a few property files, namely - btmOther.props, btmLogging.props, config.props, custom.props, exclude.props, and threshold.props files.
-
Then, you need to configure the GlassFish server with the path to the eg_btm.jar file. To achieve this, you can use one of the following two ways:
- Through the GlassFish Administration console
- By editing the start-up script of the GlassFish server instance
-
If you choose to use the GlassFish Administration console, then first, login to the console. Then, follow the steps detailed below:
-
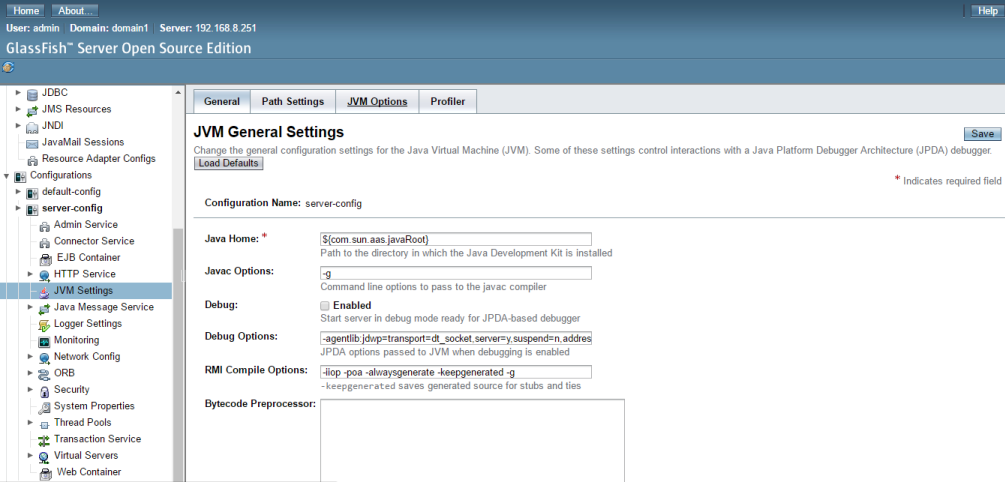
When Figure 10 appears, click on the server-config node in the tree-structure in the left panel.
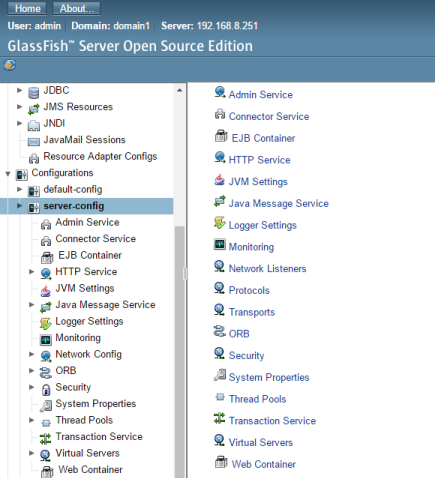
Figure 10 : Clicking on the server-config node
-
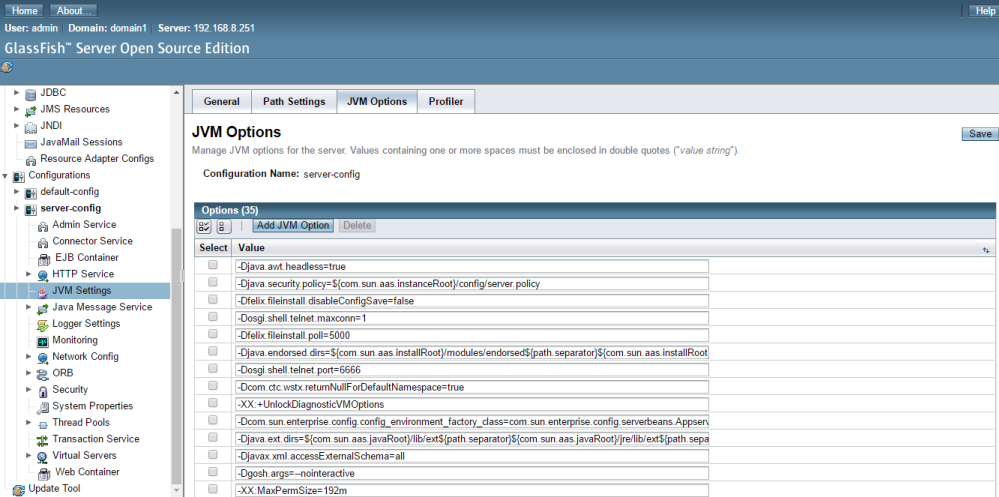
From the options listed in the right panel of Figure 10, select the JVM Settings option. Figure 11 will then appear. Select the JVM Options tab page in Figure 11.
-
Figure 12 will then appear. You now need to add a JVM option. For this, click on the Add JVM Option button in Figure 12.
-
An empty row will then be inserted, as depicted by Figure 13.
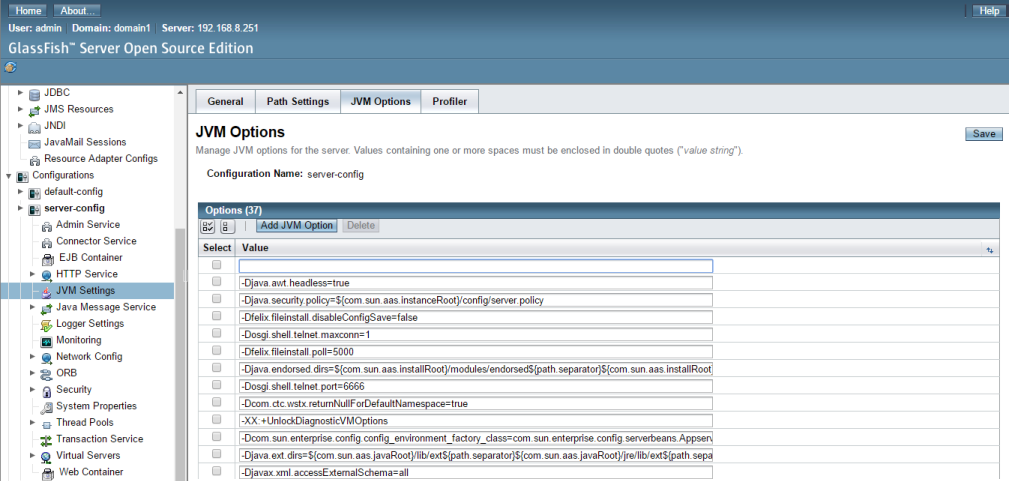
Figure 13 : Two empty rows inserted in the JVM Options tab page
- Specify the following line in the empty row, as indicated by Figure 14:
- Finally, save the changes.
- Where multiple instances of GlassFish are monitored, make sure you perform all the sub-steps of step 13 for each server instance, separately.
-javaagent:<Path_to_eg_btm.jar_file>
For instance, if the eg_btm.jar file is extracted into the C:\btm\GlassFish1_4848 directory, the above specification will be:
-javaagentC:\btm\GlassFish1_4848\eg_btm.jar
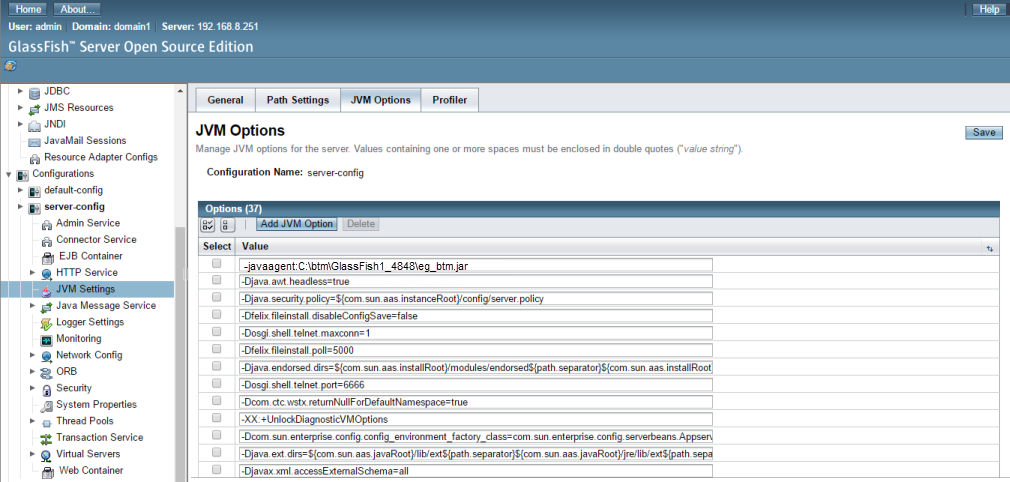
Figure 14 : Specifying the Java arguments for BTM-enabling the GlassFish server
-
-
-
On the other hand, if you want to BTM-enable the GlassFish server by editing the start-up script of the GlassFish server instance, then follow the steps below:
-
Open the start-up script and enter the following line in it, as depicted by Figure 15.
<jvm-options>-javaagent:<<Path_to_eg_btm.jar_file>></jvm-options>
For instance, if the eg_btm.jar file and .props files areis extracted into the C:\btm\GlassFish1_4848 directory, the above specification will be:
<jvm-options>-javaagent:C:\btm\GlassFish1_4848\eg_btm.jar</jvm-options>
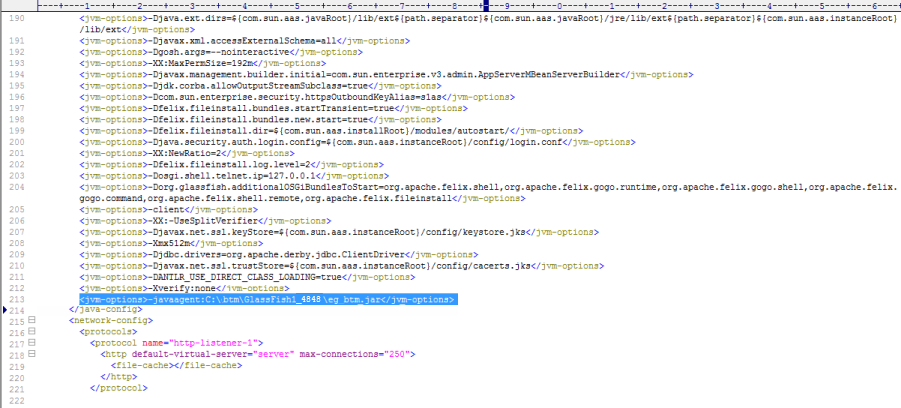
Figure 15 : Editing the start-up script of the GlassFish server instance to BTM-enable the instance
- Then, save the file.
- Where multiple instances of GlassFish are monitored, make sure you perform the sub-steps of step 14 for each GlassFish server instance.
-
- Next, if the GlassFish server being BTM-enabled is of v3.x (or above), then add the package com.eg in the boot delegation framework. If GlassFish v3.1.1 is being monitored, and the Equinox OSGI container is used, then edit the <<GLASSFISH_INSTALL_DIR>>\glassfish\osgi\equinox\configuration\config.ini file to add the package “com.eg.*". Similarly, if GlassFish v3.1.1 is being monitored, and the Felix OSGI container is used, then edit the <<GLASSFISH_INSTALL_DIR>>\glassfish\osgi\felix\conf\config.properties file to add the "com.eg.*".
- On the other hand, if the GlassFish server v3.1.2 is being monitored, you need to add the com.eg package in <<GLASSFISH_INSTALL_DIR>>\config\osgi.properties file.
- Save the files.
-
Restart the server.
Verifying the Successful Deployment of eG BTM on a GlassFish Server
Once the –javaagent JVM option is added and server is restarted, check for the presence of “[eG BTM]” and “BTM is ENABLED” in application server’s standard output, as indicated by Figure 16. If the text highlighted by Figure 16 is present, it means that the –javaagent entry is taken and BTM is successfully enabled.
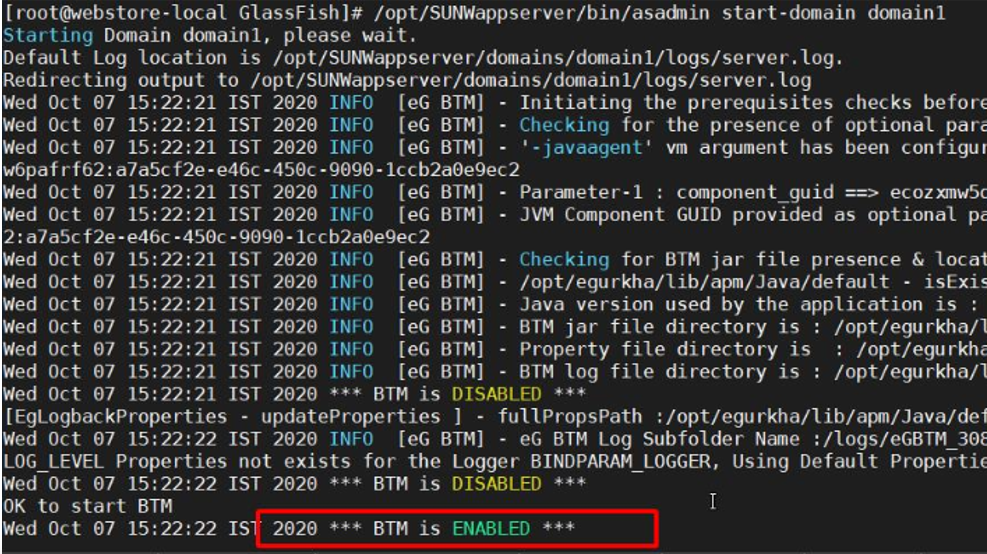
Figure 16 : Verifying the successful deployment of eG BTM on a GlassFish server