Installing eG Java BTM on an IBM WebSphere Liberty Server
The steps for deploying the eG Java BTM on an IBM WebSphere Liberty server will differ based how that server is monitored - in an agent-based manner or in an agentless manner.
Installing eG Java BTM on an IBM WebSphere Liberty Server Monitored in an Agent-based Manner
Follow the steps below to install and configure the Java BTM on IBM WebSphere Liberty Server that is monitored in an agent-based manner:
- Login to the server.
- Open a browser on the server, connect to the eG manager, and login to the eG admin interface.
- Manage the IBM WebSphere Liberty server as a separate component using the eG administrative interface.
-
Next, follow the Agents -> BTM Profiler Download menu sequence in the eG admin interface. Figure 77 will then appear, listing the Java application servers managed in the environment. Locate the IBM WebSphere Liberty server that you managed recently in that list, and click the Copy JVM icon (
 ) corresponding to it (see Figure 77).
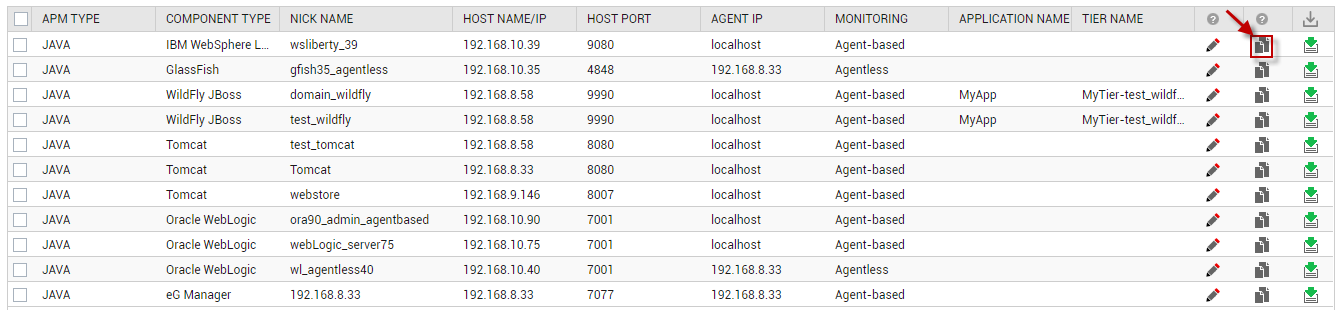
Figure 77 : Identifying the IBM WebSphere Liberty server to be BTM-enabled
-
Figure 78 will then appear. Copy the JVM option displayed in Figure 78 to the clip board or any text editor.
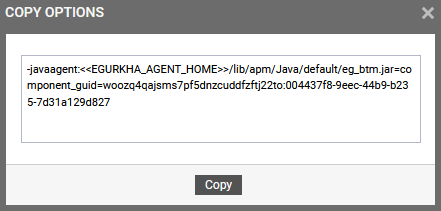
Figure 78 : Copying the JVM option for BTM-enabling an IBM WebSphere Liberty server
- Next, create a text file named jvm.options in the <WebSphere_Liberty_Home>\wlp\usr\servers\<server name> folder. Here, server name is the name of the server on which you wish to enable BTM.
-
Then, edit the file, and insert the code block you copied at step 5 above to that file, as indicated by Figure 79. When doing so, make sure you replace the <<EGURKHA_AGENT_HOME>> tag in the entry with the actual install directory of the eG agent deployed on the WebSphere Liberty server.

Figure 79 : Editing the jvm.options file and inserting the copied JVM options into it
- Then, save the file.
- Finally, stop and start the server.
Installing eG Java BTM on an IBM WebSphere Liberty Server Monitored in an Agentless Manner
To BTM-enable a WebSphere Liberty server, which is monitored in an agentless manner, follow the steps below:
- Login to the WebSphere Liberty server.
- Open a browser on the server, connect to the eG manager, and login to the eG admin interface.
- Manage the WebSphere Liberty server as a separate component using the eG administrative interface. When managing, make sure that the Agentless flag is enabled.
- Next, log out of the eG admin interface. Then, create a btm directory anywhere on the WebSphere Liberty server - say, C:\btm. Under this directory, create a sub-folder. Make sure that you name this sub-folder in the following format: <Managed_Component_NickName>_<Managed_Component_Port>. For instance, if you have managed the WebSphere Liberty server using the nick name Liberty1 and the port number 9080, the new directory under the btm directory should be named as Liberty1_9080.
- Once the new sub-directory is created, open a browser on the WebSphere Liberty server, connect to the eG manager, and login to the eG admin interface again.
- Follow the Agents -> BTM Profiler Download menu sequence in the eG admin interface.
-
Figure 80 will appear listing the servers that can be instrumented for APM by eG. In this list, locate the WebSphere Liberty server that you want to BTM-enable. Once you locate the server, click the Download icon corresponding to that server to download the APM Profiler Agent to that server.
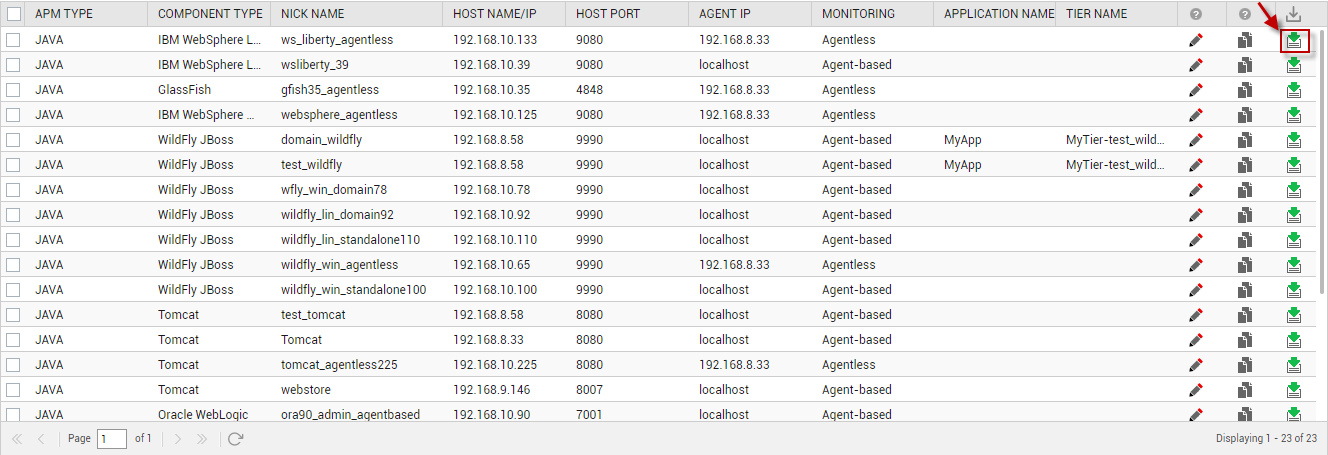
Figure 80 : Downloading the APM Profiler Agent for the WebSphere Liberty server
- Upon clicking the Download icon in Figure 80, a zip file named javaagent_<Nick_name_of_Liberty_server>_<Port_number_of_Liberty_server will get downloaded. For instance, if you have managed the server using the nickname 'Liberty1' and the port number '9080', then the name of the zip file will be javaagent_Liberty1_9080.
- Copy the downloaded zip file to the sub-directory you created in the btm directory at step 4 above. For example, the zip file named javaagent_Liberty1_9080, should be copied to the C:\btm\Liberty1_9080 directory .
- Extract the contents of the zip file into the same sub-directory to which that zip file was copied.
-
Figure 81 depicts the extracted contents of the zip file.
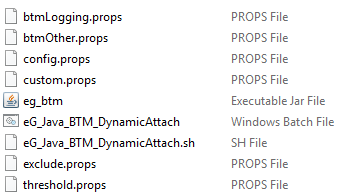
- From Figure 81, it is evident that the zip file contains an eg_btm.jar file and a few property files, namely - btmOther.props, btmLogging.props, config.props, custom.props, exclude.props, and threshold.props files.
-
Then, you need to configure the WebSphere Liberty server with the path to the eg_btm.jar file. For this, first create a text file named jvm.options on the server.
-
Then, edit the file , and insert the following line into that file.
-javaagent:<<PATH TO THE eg_btm.jar FILE>>
For instance, if the eg_btm.jar file had been copied to the C:\btm\Liberty1_9080 directory, the above specification will be:
-javaagent:C:\btm\Liberty1_9080\eg_btm.jar
- Then, save the file.
- Finally, stop and start the server.
Verifying the Successful Installation of the eG Java BTM on the IBM WebSphere Liberty Server
To verify whether/not the target WebSphere Liberty server has been successfully BTM-enabled, follow the steps below:
-
Once the –javaagent JVM option is added and server is restarted, open the application server’s standard output log file. Typically, this is the console.log file, which you will find in the E:\Servers\Liberty\wlp-webProfile8-20.0.0.6\wlp\usr\servers\myserver\logs directory.
-
Check for the presence of strings “[eG BTM]” and “BTM is ENABLED” in the application server’s standard output. If you find these text strings in the log file ( as shown by Figure 82), it means that the –javaagent entry is taken and BTM is successfully enabled.
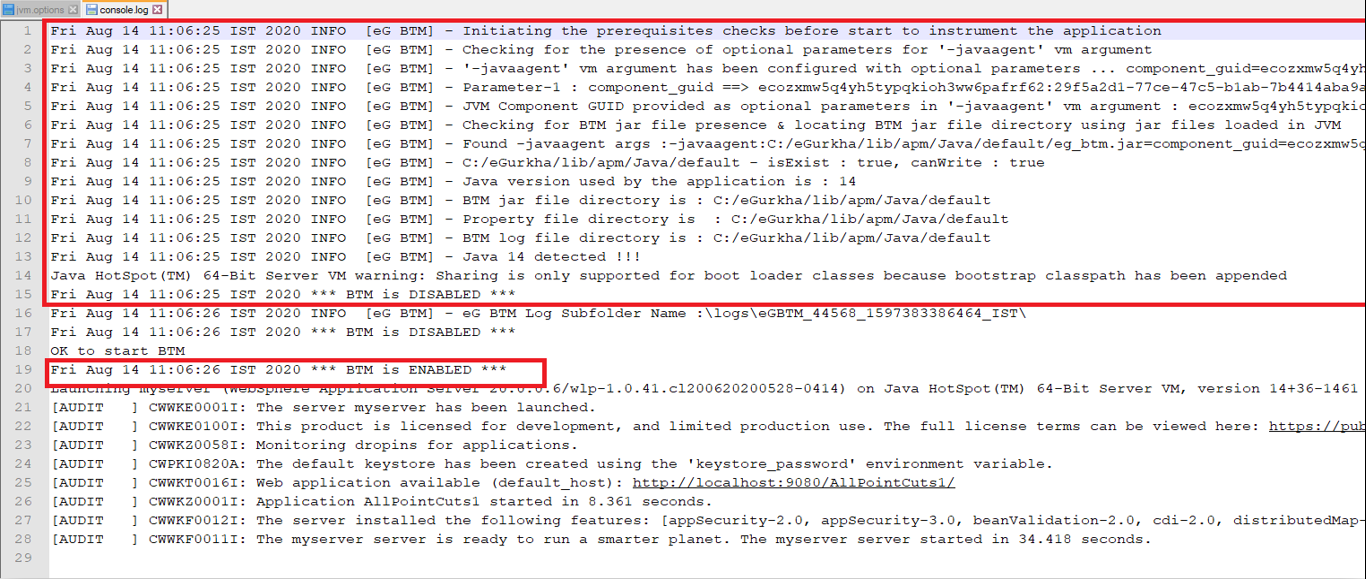
Figure 82 : Verifying whether/not the IBM WebSphere Liberty server has been successfully BTM-enabled