How to Monitor Macintosh OS Using eG Enterprise?
eG Enterprise, by default, monitors the Macintosh OS in an ‘agentless’ manner – i.e., using an eG remote agent, which is typically deployed on an external host and not on the monitored host. Macintosh OS supports the SNMP Host Resources MIB. Therefore, if SNMP is enabled on Macintosh OS, then an eG remote agent can execute tests on Macintosh OS to extract critical statistics pertaining to the performance of the operating system.
The broad steps for monitoring the Macintosh OS using eG Enterprise are as follows:
-
Manage the macOS component using the eG administrative interface;
-
Configuring the tests for the managed macOS component;
-
View the real-time state and metrics of the managed macOS component in the eG monitoring console
Managing the Macintosh OS
The eG Enterprise cannot automatically discover the macOS. This implies that you need to manually add the component for monitoring. Remember that the eG Enterprise automatically manages the components that are added manually. To manage a macOS component, do the following:
-
Log into the eG administrative interface.
-
Click on the Add Component button in the right corner of the Components at a Glance page that appeared or follow the Infrastructure -> Components -> Add/Modify menu sequence.
-
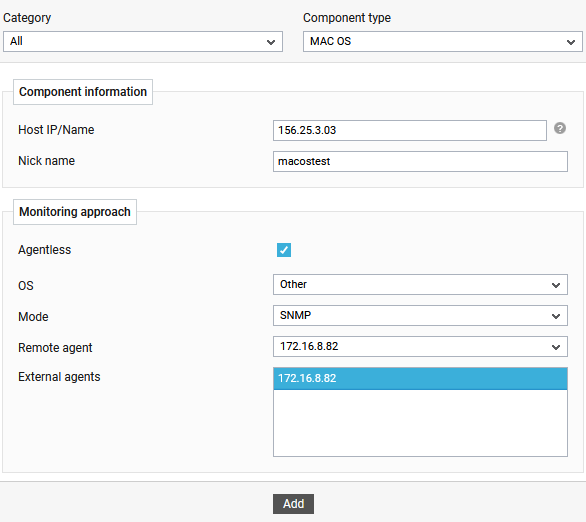
In the COMPONENT page that appears next, select MAC OS as the Component type. Then, click the Add New Component button. This will invoke Figure 1.

-
macOS is by default monitored in an agentless manner. Accordingly, the Agentless flag in Figure 1 is set to Yes by default. To perform agentless monitoring of the macOS, select Other as the os and SNMP as the Mode in Figure 1.
-
Then, select a Remote agent and click the Add button to add the server.
Configuring the tests
Once the macOS is added, proceed to configure tests for the server. For that, do the following:
-
Follow the Infrastructure -> Components -> Add/Modify menu sequence in the eG admin interface.
-
In the page that appears next, select MAC OS as the Component type. The MAC OS that you recently added will then be listed therein. To configure tests for that server, click on the
 icon corresponding to it (see Figure 2).
Figure 2 : Clicking on the Configure Tests icon corresponding to managed Macintosh OS
-
Figure 3 then appears where the list of unconfigured tests will be listed in the UNCONFIGURED TESTS list box.

-
Click on any of the tests in Figure 3 to configure it.
-
Click the Update button to update the test configuration. This will automatically configure all the other unconfigured tests for the macOS component.
