Azure NetApp Files Capacity Pools Test
The Azure NetApp Files service is an enterprise-class, high-performance, metered file storage service. Azure NetApp Files supports any workload type and is highly available by default.
At the top of the storage hierarchy of this file service is the NetApp account. A NetApp account serves as an administrative grouping of the constituent capacity pools. A capacity pool is measured by its provisioned capacity. Each capacity pool can belong to only one NetApp account. However, you can have multiple capacity pools within a NetApp account. A capacity pool contains one/more volumes. A volume is measured by logical capacity consumption and is scalable.
Service levels and QoS types are attributes of a capacity pool. Service levels are defined and differentiated by the allowed maximum throughput for a volume in the capacity pool based on the quota that is assigned to the volume. The QoS type of a capacity pool can be auto (default) or manual. In an auto QoS capacity pool, throughput is assigned automatically to the volumes in the pool, proportional to the size quota assigned to the volumes. In a manual QoS capacity pool, you can assign the capacity and throughput for a volume independently. The total throughput of all volumes created with a manual QoS capacity pool is limited by the total throughput of the pool. It is determined by the combination of the pool size and the service-level throughput.
Based on the workload and processing requirements, administrators may have to switch between QoS types and service levels, and/or adjust volume size quota to achieve higher throughput. If these settings are not fine-tuned in time, there may be a mismatch between provisioned capacity and actual requirements. Because of this, performance of the Azure Files Service will degrade, causing storage contentions or latencies. To avoid this, administrators must learn the size and throughput that has been provisioned to each capacity pool, measure how much is actually consumed by the volumes per pool, and identify pools that may require additional capacity. This is where the Azure NetApp Files Capacity Pools test helps!
For each capacity pool in a NetApp account, this test reports the capacity provisioned to that pool and how much is consumed by the volumes in the pool. This way, the test alerts administrators to a potential storage space crunch in a pool. The test also compares the throughput allocated to a pool with the real-time throughput consumption, and thus sheds light on any gap between the demand for and supply of throughput. Moreover, the test also reveals the service level configured for each pool. Using these insights, administrators can figure out which service level, QoS type, and capacity combination will help maximize the throughput and overall performance of their capacity pools.
Target of the Test: A Microsoft Azure Subscription
Agent deploying the test: A remote agent
Output of the test:One set of results for every capacity pool created in each NetApp account configured for the target Azure subscription
| Parameters | Description |
|---|---|
|
Test Period |
How often should the test be executed. |
|
Host |
The host for which the test is to be configured. |
|
Subscription ID |
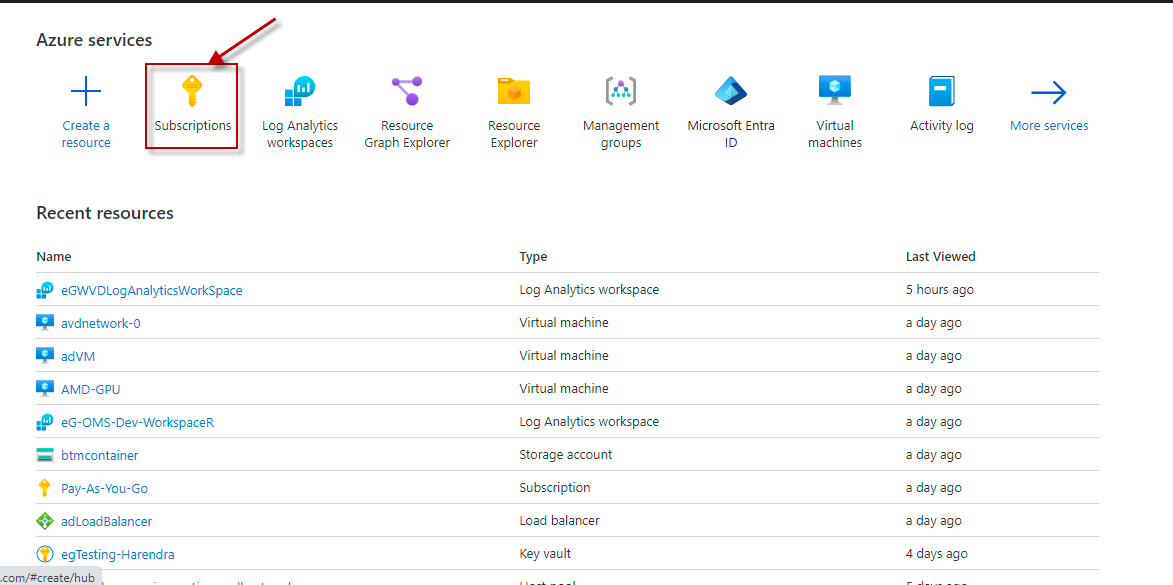
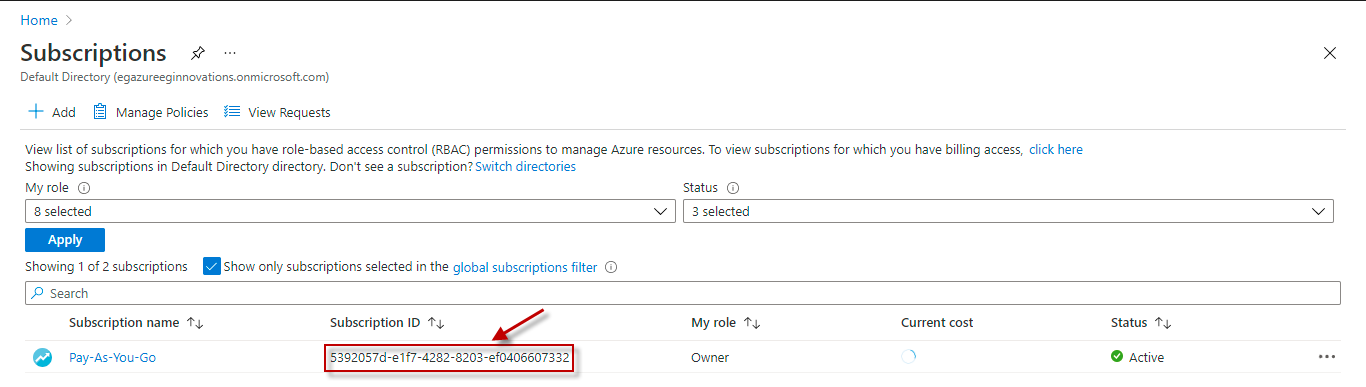
This field will be automatically populated if you have chosen to automatically fulfill the pre-requisites for monitoring the Microsoft Azure Subscription. Specify the GUID which uniquely identifies the Microsoft Azure Subscription to be monitored in this text box
|
|
Tenant ID |
This field will be automatically populated if you have chosen to automatically fulfill the pre-requisites for monitoring the Microsoft Azure Subscription. Specify the Directory ID of the Azure Entra ID tenant to which the target subscription belongs in this text box |
|
Client ID, Client Password, and Confirm Password |
To connect to the target subscription, the eG agent requires an Access token in the form of an Application ID and the client secret value. For this purpose, you should register a new application with the Microsoft Entra tenant. To know how to create such an application and determine its Application ID and client secret, refer to Configuring the eG Agent to Monitor a Microsoft Azure Subscription Using Azure ARM REST API. Specify the Application ID of the created Application in the Client ID text box and the client secret value in the Client Password text box |
|
Proxy Host and Proxy Port |
In some environments, all communication with the Azure cloud be routed through a proxy server. In such environments, you should make sure that the eG agent connects to the cloud via the proxy server and collects metrics. To enable metrics collection via a proxy, specify the IP address of the proxy server and the port at which the server listens against the Proxy Host and Proxy Port parameters. By default, these parameters are set to none, indicating that the eG agent is not configured to communicate via a proxy, by default. |
|
Proxy Username, Proxy Password and Confirm Password |
If the proxy server requires authentication, then, specify a valid proxy user name and password in the Proxy Username and Proxy Password parameters, respectively. Then, confirm the password by retyping it in the Confirm Password text box. |
|
DD Frequency |
Refers to the frequency with which detailed diagnosis measures are to be generated for this test. The default is 1:1. This indicates that, by default, detailed measures will be generated every time this test runs, and also every time the test detects a problem. You can modify this frequency, if you so desire. Also, if you intend to disable the detailed diagnosis capability for this test, you can do so by specifying none against DD frequency. |
|
Detailed Diagnosis |
To make diagnosis more efficient and accurate, the eG Enterprise embeds an optional detailed diagnostic capability. With this capability, the eG agents can be configured to run detailed, more elaborate tests as and when specific problems are detected. To enable the detailed diagnosis capability of this test for a particular server, choose the On option. To disable the capability, click on the Off option. The option to selectively enable/disable the detailed diagnosis capability will be available only if the following conditions are fulfilled:
|
| Measurement | Description | Measurement Unit | Interpretation | ||||||||||||
|---|---|---|---|---|---|---|---|---|---|---|---|---|---|---|---|
|
Capacity |
Indicates the capacity provisioned to this pool. |
TB |
|
||||||||||||
|
Service level |
Indicates the current service level of this pool. |
|
The values reported by this measure and its numeric equivalents are mentioned in the table below:
Note: By default, this measure reports the Measure Values listed in the table above to indicate the current service level of each pool. The graph of this measure however, represents the service level of a pool using the numeric equivalents only. |
||||||||||||
|
Pool allocated to volume size |
Indicates the total of volume quota in this capacity pool. |
GB |
This is the sum of the provisioned size quotas of all the volumes in a given pool. |
||||||||||||
|
Percentage pool allocation |
Indicates the percentage of the provisioned capacity of this pool that has been allocated to volumes. |
Percent |
The value of this measure is computed using the following formula: (Pool allocated to volume size / Capacity) * 100 If the value of this measure is close to 100%, it implies that almost all of the provisioned capacity has been allocated to volumes. |
||||||||||||
|
Pool consumed size |
Indicates the amount of logical space in this pool that is used by all its volumes. |
GB |
If the value of this measure is close to the value of the Capacity measure of a pool; it means that the volumes are fast-eroding the space in the pool. To avoid a storage space contention, you can resize the capacity pool as needed. |
||||||||||||
|
Percentage pool consumed |
Indicates the percentage of provisioned capacity in this pool that is consumed by all volumes in the pool. |
Percent |
A value close to 100% is a cause for concern, as it implies that the pool capacity is being over-utilized, because of which the pool will soon run out of storage space. To avoid a storage space contention, you can resize the capacity pool as needed. |
||||||||||||
|
Total snapshot size for the pool |
Indicates the sum of the snapshot size for all volumes in this pool. |
GB |
An Azure NetApp Files snapshot is a point-in-time file system (volume) image. It is ideal to serve as an online backup. You can use a snapshot to create a new volume (clone), restore a file, or revert a volume. If volumes are found to be using up much of the storage capacity of the underlying capacity pool, then you can use this measure to determine whether/not snapshots are hogging the space in the volumes. Removing unwanted snapshots can help free up storage space in the volumes, and reduce the risk of storage contention. |
||||||||||||
|
Pool allocated throughput |
Indicates the sum of the throughput of all the volumes belonging to this pool |
Kbps |
|
||||||||||||
|
Pool consumed throughput |
Indicates the total throughput consumed by the volumes in this pool. |
Kbps |
If the value of this measure is equal or close to the value of the Pool allocated throughput measure, it can be inferred that the volumes in the pool are hungry for throughput and are about to exhaust the provisioned throughput. Without sufficient throughput, volume performance will deteriorate. To avoid this, you may want to consider increasing the throughput limit - i.e., throughput provisioned - of the volumes. The throughput limit for a volume with automatic QoS is determined by a combination of the quota assigned to the volume and the service level selected. For volumes with manual QoS, the throughput limit can be defined individually. In case of volumes with automatic QoS, you will have to increase the volume quota and/or change the service level to up the ceiling on throughput. For example, if an automatic QoS volume in the Premium storage tier has only 500 GiB of data but requires 128 MiB/s of throughput, you can set the quota to 2 TiB so that the throughput level is set accordingly (64 MiB/s per TB * 2 TiB = 128 MiB/s). However, note that adjusting volume quota might require a change in capacity pool size. If you consistently overprovision a volume for achieving a higher throughput, consider using the manual QoS volumes or using a higher service level instead. In the example above, you can achieve the same throughput limit with half the automatic QoS volume quota by using the Ultra storage tier instead (128 MiB/s per TiB * 1 TiB = 128 MiB/s). f you use manual QoS volumes, you do not have to over-provision the volume quota to achieve a higher throughput because the throughput can be assigned to each volume independently. However, you still need to ensure that the capacity pool is pre-provisioned with sufficient throughput for your performance needs. The throughput of a capacity pool is provisioned according to its size and service level. |
||||||||||||
|
Pool consumption throughput |
Indicates the percentage consumption of throughput allocated to this pool. |
Percent |
If the value of this measure is close to 100%, it is a clear indication that the volumes in the pool are hungry for throughput and are about to exhaust the provisioned throughput. Without sufficient throughput, volume performance will deteriorate. To avoid this, you may want to consider increasing the throughput limit - i.e., throughput provisioned - of the volumes. The throughput limit for a volume with automatic QoS is determined by a combination of the quota assigned to the volume and the service level selected. For volumes with manual QoS, the throughput limit can be defined individually. In case of volumes with automatic QoS, you will have to increase the volume quota and/or change the service level to up the ceiling on throughput. For example, if an automatic QoS volume in the Premium storage tier has only 500 GiB of data but requires 128 MiB/s of throughput, you can set the quota to 2 TiB so that the throughput level is set accordingly (64 MiB/s per TB * 2 TiB = 128 MiB/s). However, note that adjusting volume quota might require a change in capacity pool size. If you consistently overprovision a volume for achieving a higher throughput, consider using the manual QoS volumes or using a higher service level instead. In the example above, you can achieve the same throughput limit with half the automatic QoS volume quota by using the Ultra storage tier instead (128 MiB/s per TiB * 1 TiB = 128 MiB/s). f you use manual QoS volumes, you do not have to over-provision the volume quota to achieve a higher throughput because the throughput can be assigned to each volume independently. However, you still need to ensure that the capacity pool is pre-provisioned with sufficient throughput for your performance needs. The throughput of a capacity pool is provisioned according to its size and service level. |
||||||||||||
|
Number of volumes |
Indicates the number of volumes in this capacity pool. |
Number |
|