Azure NetApp Files Volumes Test
The Azure NetApp Files service is an enterprise-class, high-performance, metered file storage service. Azure NetApp Files supports any workload type and is highly available by default.
At the top of the storage hierarchy of this file service is the NetApp account. A NetApp account serves as an administrative grouping of the constituent capacity pools. A capacity pool is measured by its provisioned capacity. A capacity pool contains one/more volumes. A volume is measured by logical capacity consumption and is scalable.
A volume's capacity consumption counts against its pool's provisioned capacity. This means that if one/more volumes in a pool consume storage space excessively, then other volumes in that pool will be forced to contend for the available capacity. This can adversely impact storage performance. To avoid this, administrators should monitor how each volume is using its allocated storage capacity, and promptly identify volumes that may soon outgrow their capacity assignments.
Other than adequate storage capacity, volumes also need sufficient throughput to process their workload. Typically, volumes will use as much throughput as is allowed by the 'throughput limit' assigned to them. How this limit is computed for a volume varies according to the QoS type of its capacity pool. QoS type is an attribute of a capacity pool. The QoS type of a capacity pool can be auto (default) or manual. In an auto QoS capacity pool, throughput is assigned automatically to the volumes in the pool, proportional to the size quota assigned to the volumes. In a manual QoS capacity pool, you can assign the capacity and throughput for a volume independently. The total throughput of all volumes created with a manual QoS capacity pool is limited by the total throughput of the pool. It is determined by the combination of the pool size and the service-level throughput. Service levels are defined and differentiated by the allowed maximum throughput for a volume in the capacity pool based on the quota that is assigned to the volume.
If a volume does not have sufficient throughput, then it will not be able to process its workload quickly, which in turn can lead to serious latencies in I/O processing. To avoid this, administrators should track the IOPS performed on each volume, measure the time taken by every volume to process the IOPS, and rapidly capture those volumes that are experiencing latencies in I/O processing.
Also, for data protection, you can asynchronously replicate data from an Azure NetApp Files volume (source) in one region to another Azure NetApp Files volume (destination) in another region. This capability enables you to failover your critical application in case of a region-wide outage or disaster. If the destination volume is unhealthy, or if the data transfer between the source and destination takes too long, then in the event that disaster strikes, significant data loss may occur. To avoid this, administrators must continuously track the health of the destination volumes and observe data transfers between volumes, promptly capture abnormalities, and rapidly initiate corrective measures.
With the help of the Azure NetApp Files Volumes test, administrators can monitor the capacity and throughput usage of each volume, the replication activity on every volume, and rapidly point to problematic volumes.
For each volume, this test reports the allocated capacity, measures the capacity usage, and accurately pinpoints those volumes that are about to exhaust their allocations. This way, the test leads administrators to those volumes for which the size quota may have to be reset. The test also tracks the read/write operations performed on each volume, and proactively alerts administrators if high latencies are noticed in I/O processing on any volume. In the process, administrators can determine wheter/not the throughput provisioning for volumes need to be adjusted to improve their processing power. Furthermore, the test also scrutinizes the replication activity on every volume, and points to potential problem areas, so that administrators can endeavour to eliminate replication bottlenecks and avoid data loss during disaster recovery.
Target of the Test: A Microsoft Azure Subscription
Agent deploying the test: A remote agent
Output of the test: One set of results for every volume configured for each resource group in the target Azure subscription
| Parameters | Description |
|---|---|
|
Test Period |
How often should the test be executed. |
|
Host |
The host for which the test is to be configured. |
|
Subscription ID |
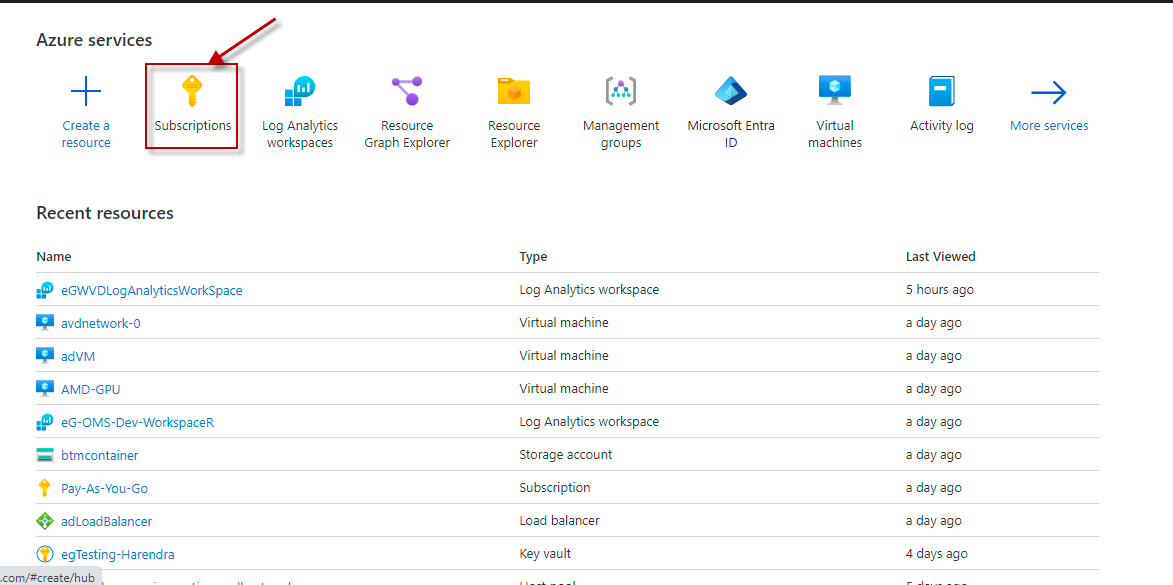
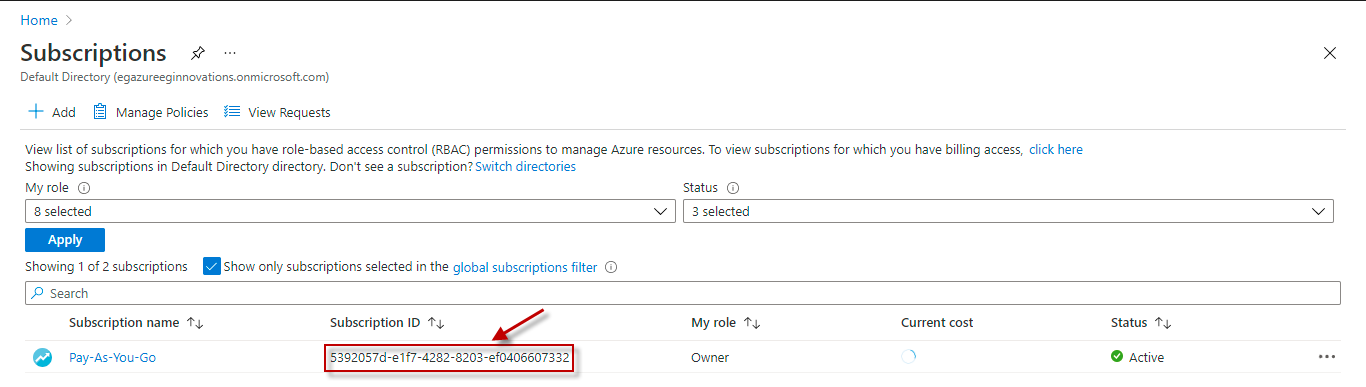
This field will be automatically populated if you have chosen to automatically fulfill the pre-requisites for monitoring the Microsoft Azure Subscription. Specify the GUID which uniquely identifies the Microsoft Azure Subscription to be monitored in this text box
|
|
Tenant ID |
This field will be automatically populated if you have chosen to automatically fulfill the pre-requisites for monitoring the Microsoft Azure Subscription. Specify the Directory ID of the Azure Entra ID tenant to which the target subscription belongs in this text box |
|
Client ID, Client Password, and Confirm Password |
To connect to the target subscription, the eG agent requires an Access token in the form of an Application ID and the client secret value. For this purpose, you should register a new application with the Microsoft Entra tenant. To know how to create such an application and determine its Application ID and client secret, refer to Configuring the eG Agent to Monitor a Microsoft Azure Subscription Using Azure ARM REST API. Specify the Application ID of the created Application in the Client ID text box and the client secret value in the Client Password text box |
|
Proxy Host and Proxy Port |
In some environments, all communication with the Azure cloud be routed through a proxy server. In such environments, you should make sure that the eG agent connects to the cloud via the proxy server and collects metrics. To enable metrics collection via a proxy, specify the IP address of the proxy server and the port at which the server listens against the Proxy Host and Proxy Port parameters. By default, these parameters are set to none, indicating that the eG agent is not configured to communicate via a proxy, by default. |
|
Proxy Username, Proxy Password and Confirm Password |
If the proxy server requires authentication, then, specify a valid proxy user name and password in the Proxy Username and Proxy Password parameters, respectively. Then, confirm the password by retyping it in the Confirm Password text box. |
|
DD Frequency |
|
|
Detailed Diagnosis |
To make diagnosis more efficient and accurate, the eG Enterprise embeds an optional detailed diagnostic capability. With this capability, the eG agents can be configured to run detailed, more elaborate tests as and when specific problems are detected. To enable the detailed diagnosis capability of this test for a particular server, choose the On option. To disable the capability, click on the Off option. The option to selectively enable/disable the detailed diagnosis capability will be available only if the following conditions are fulfilled:
|
| Measurement | Description | Measurement Unit | Interpretation | ||||||||||||
|---|---|---|---|---|---|---|---|---|---|---|---|---|---|---|---|
|
Details of volumes |
Indicates the number of volumes configured for this storage |
Number |
Use the detailed diagnosis of this measure to know the protocol type and mount path of the volume, and the capacity pool to which the volume belongs. |
||||||||||||
|
Quota |
Indicates the set size of the volume. |
GB |
The storage capacity of an Azure NetApp Files volume is limited to the set size (quota) of the volume. |
||||||||||||
|
Service level |
Indicates the current service level of this volume. |
|
The values reported by this measure and its numeric equivalents are mentioned in the table below:
Note: By default, this measure reports the Measure Values listed in the table above to indicate the current service level of each volume. The graph of this measure however, represents the service level of a volume using the numeric equivalents only. |
||||||||||||
|
Percentage volume consumed size |
Indicates the percentage of storage capacity allocated to this volume that is currently in use. |
Percent |
If the value of this measure is close to 100%, it implies that the volume is rapidly consuming the storage space allocated to it, and will soon run out of space. if a volume maxes out on space - i.e., if the volume of this measure is 1pp% - then the volume will receive an “out of space” condition. In such a situation, you may want to resize the volume or capacity pool. |
||||||||||||
|
Volume allocated size |
Indicates the storage space allocated to this volume. |
GB |
|
||||||||||||
|
Volume consumed size |
Indicates the storage space currently consumed by this volume. |
GB |
Ideally, the value of this measure should be low. If the value of this measure is very close to that of the Volume allocaed size measure, its a cause for concern, as it means that the volume is fast running out of space. If the value of this measure is equal to that of the Volume allocated size measure, then the volume will receive an “out of space” condition. In such a situation, you may want to resize the volume or capacity pool. |
||||||||||||
|
Volume snapshot size |
Indicates the space in this volume that is occupied by snapshots. |
GB |
An Azure NetApp Files snapshot is a point-in-time file system (volume) image. It is ideal to serve as an online backup. You can use a snapshot to create a new volume (clone), restore a file, or revert a volume. If a volume is found to be running out of storage space, then you can use this measure to determine whether/not snapshots are hogging space in that volume. Removing unwanted snapshots can help free up storage space in the volume. |
||||||||||||
|
Total latency |
Indicates the average time taken to read from / write to this volume. |
Milliseconds |
A consistent rise in the value of this measure is a cause for concern. It implies that the volume is unable to process read/write requests quickly. To know where the slowness is more pronounced - when reading? or when writing? - compare the Average read latency and Average write latency measures for that volume. A probable cause for high latency is insufficient throughput. To avoid this, you may want to consider increasing the throughput limit - i.e., throughput provisioned - of the volume. The throughput limit for a volume with automatic QoS is determined by a combination of the quota assigned to the volume and the service level selected. For volumes with manual QoS, the throughput limit can be defined individually. In case of volumes with automatic QoS, you will have to increase the volume quota and/or change the service level to up the ceiling on throughput. For example, if an automatic QoS volume in the Premium storage tier has only 500 GiB of data but requires 128 MiB/s of throughput, you can set the quota to 2 TiB so that the throughput level is set accordingly (64 MiB/s per TB * 2 TiB = 128 MiB/s). However, note that adjusting volume quota might require a change in capacity pool size. If you consistently overprovision a volume for achieving a higher throughput, consider using the manual QoS volumes or using a higher service level instead. In the example above, you can achieve the same throughput limit with half the automatic QoS volume quota by using the Ultra storage tier instead (128 MiB/s per TiB * 1 TiB = 128 MiB/s). f you use manual QoS volumes, you do not have to overprovision the volume quota to achieve a higher throughput because the throughput can be assigned to each volume independently. However, you still need to ensure that the capacity pool is pre-provisioned with sufficient throughput for your performance needs. The throughput of a capacity pool is provisioned according to its size and service level. |
||||||||||||
|
Average read latency |
Indicates the average time for reads from this volume. |
Milliseconds |
|
||||||||||||
|
Average write latency |
Indicates the average time for writes to this volume. |
Milliseconds |
|
||||||||||||
|
Total iops |
Indicates the rate at which I/O operations are processed by this volume. |
Operations/sec |
A consistent drop in the value of this measure is a sign of processing bottlenecks in the volume. To know which type of operations were affected more by the processing latency, compare the value of the Read iops and Write iops measures for that volume. |
||||||||||||
|
Read iops |
Indicates the number of reads to this volume per second. |
Operations/sec |
|
||||||||||||
|
Write iops |
Indicates the number of writes to this volume per second. |
Operations/sec |
|
||||||||||||
|
Is volume replication status healthy? |
Indicates the condition of the replication relationship of this volume. |
|
The values reported by this measure and its numeric equivalents are mentioned in the table below:
This measure will report the value Unhealthy if previous replication jobs are not complete. This status is a result of large volumes being transferred with a lower transfer window (for example, a ten-minute transfer time for a large volume). Note: By default, this measure reports the Measure Values listed in the table above to indicate the current health of the replication relationship of the volume. The graph of this measure however, is represented using the numeric equivalents only. |
||||||||||||
|
Is volume replication transferring? |
Indicates the replication status of this volume. |
|
The values reported by this measure and its numeric equivalents are mentioned in the table below:
If the value of the Is volume replication status healthy measure is Unhealthy, and the value of this measure is Transferring, it could imply that previous replication jobs are not complete. This status is a result of large volumes being transferred with a lower transfer window (for example, a ten-minute transfer time for a large volume). Note: By default, this measure reports the Measure Values listed in the table above to indicate the whether/not the replication of each volume is transferring. The graph of this measure however, represents the service level of a volume using the numeric equivalents only. |
||||||||||||
|
Volume replication lag time |
Indicates the average time taken to replicate this volume. |
Seconds |
A high value for this measure means replication is taking a long time. |
||||||||||||
|
Volume replication last transfer duration |
Indicates the time it took for the last transfer from/to this volume to complete. |
Seconds |
If the value of this measure is high, it means that the last transfer took a long time. If the Volume replication lag time is unusually high, then you may want to check the value of this measure to know if this is owing to the last transfer. |
||||||||||||
|
Volume replication last transfer size |
Indicates the total number of bytes transferred as part of the last transfer from/to this volume. |
Bytes |
If the Volume replication last transfer duration is abnormally high, then look up the value of this measure to determine if the delay is owing to the large size of the last transfer. |
||||||||||||
|
Volume replication progress |
Indicates the total amount of data transferred for the current transfer operation from/to this volume. |
Bytes |
|
||||||||||||
|
Volume replication total transfer |
Indicates the cumulative bytes transferred for the relationship. |
Bytes |
|
Use the detailed diagnosis of the Details of volumes measure to know the protocol type and mount path of the volume, and the capacity pool to which the volume belongs.

Figure 3 : The detailed diagnosis of the Details of volumes measure