How to Monitor Microsoft Exchange Server 2000/2003 Using eG Enterprise
The eG monitor for Exchange makes monitoring and managing Exchange server performance easy and efficient. Using either an agent-based or an agentless approach, administrators can monitor various aspects of the Exchange server's performance including the instantaneous occupancy of the different Exchange server queues, the access patterns of users, and the interaction of the Exchange server with the Active Directory. Before starting to monitor the Exchange server, first you should configure the Exchange Server 2000/2003 to work with eG Manager. The procedure for achieving this has been detailed in the below section.
Configuring an Exchange Server 2000/2003 to work with eG Manager
The XchgMail test, which is executed by an eG external agent, mimics an MS Outlook mail client that sent and receives mails from an Exchange server. Whereas eG Enterprise's Mail test relies on SMTP and POP3/IMAP protocols to communicate with the mail server, the XchgMail test is used for emulating client accesses via the native Microsoft Mail protocol (i.e. in situations where SMTP/POP3/IMAP are not enabled for a mail server). This test takes two main parameters:
- An email ID of the user mailbox that the test uses to send and receive mails
- The Profile that is used by the configured user mailbox
In order to ensure that this test functions, the following conditions are to be fulfilled:
- The eG external agent that is executing the XchgMail test, should be installed on a Windows 2000 (or 2003) server/client in the same domain as the Exchange 2000/2003 server.
- This test uses only a Microsoft Outlook 2003 client for sending/receiving mails from the server. Note that the XchgMail test will not work with Microsoft Outlook Client 2000/2002.
- The Microsoft Outlook 2003 client used by the test should have been installed with the Collaboration Data Objects option enabled; to know how to modify your Outlook installation to enable this option, refer to Section 3.4 of this manual.
- The administrator configuring the test should ensure that the email ID being used in the test, exists on the Exchange 2000/2003 server. If it does not exist, then follow the instructions given below to create a mailbox (these instructions are specific to an Exchange 2000 server) and an email ID that corresponds to it:
-
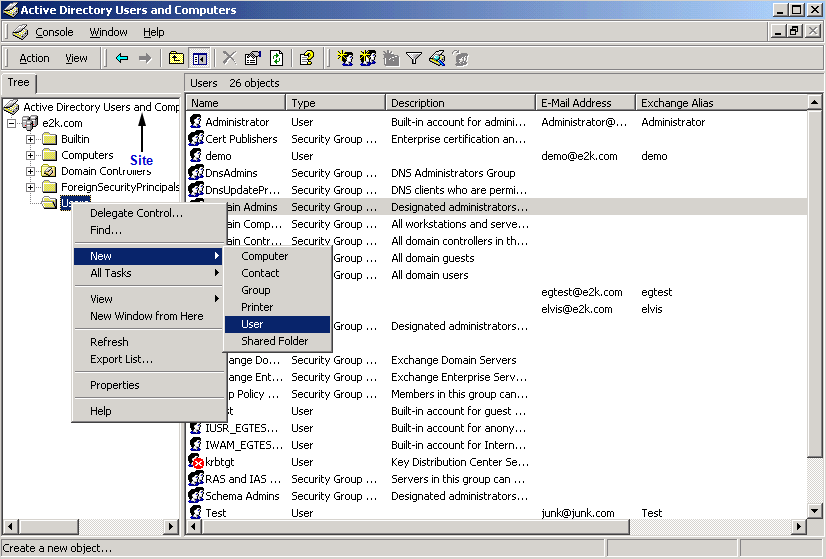
Click the Start button on the task bar of the Windows 2000 server, and follow the menu sequence: Start -> Programs -> Microsoft Exchange -> Active Directory Users and Computers (see Figure 1):

Figure 1 : Opening the Microsoft Exchange Active Directory Users and Computers window
-
The window that appears has a tree structure in its left pane. Expanding the Active Directory Users and Computers node in the left pane will reveal a list of sites on the Exchange server. Expand the site on which the new mailbox is to be created, right-click on the Users folder within, select New from the shortcut menu that appears, and choose the User option from the New menu (see Figure 2).
-
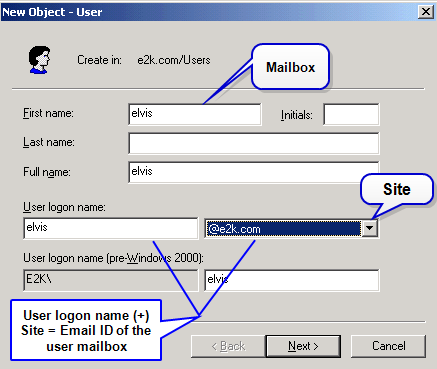
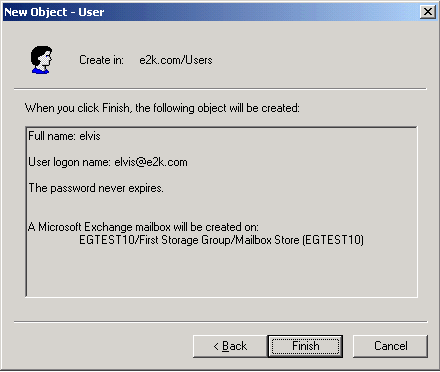
In the New Object – User dialog box that appears (see Figure 3), specify the details of the mailbox being created. After providing the user name, specify a User logon name (the name using which the user logs into the Exchange server), and select the site on which the mailbox is being created from the adjoining list box (here, the site name will be prefixed by an ‘@’ symbol) (see Figure 3). The User logon name and the Site name together forms the Email ID of the user mailbox. For example, in Figure 3 below, the Email ID of the mailbox elvis is elvis@e2k.com. This is the email ID that will have to be specified against the xchgmailboxname parameter.
-
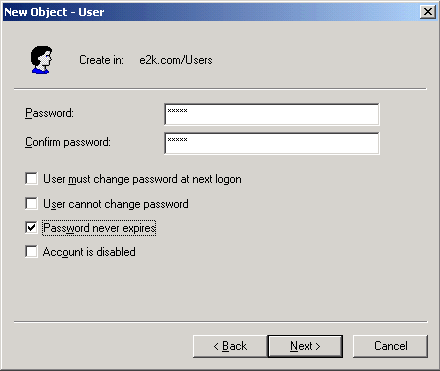
Next, specify the Password for the new user account and confirm it by retyping it in the Confirm Password text box. Then, check the Password never expires check box and click the Next > button to continue (see Figure 4).
-
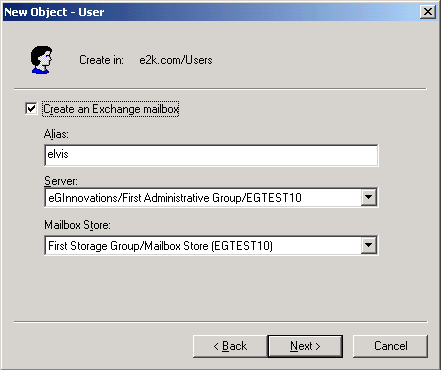
Then, click on the Create an Exchange mailbox check box (see Figure 5) to create a mailbox for the user. Next, provide an alternate name for the mailbox in the Alias text box, and then specify the full path to the Server which hosts the Exchange 2000 server (You can view the full path using the tree structure in the System Manager window that appears when the following menu sequence is followed: Start -> Programs -> Microsoft Exchange -> System Manager). Also, specify the Mailbox Store and click the Next > button to continue.
-
Finally, view a summary of your specifications, and click the Finish button to quit setup (see Figure 6).
- The eGurkhaAgent service should run using the account information of the user whose mailbox has been configured for the XChgMail test.
- By default, the eGurkhaAgent service uses the LocalSystem account for execution. This account however, may not permit an external agent to access the mailbox that has been configured for the XChgMailTest. Hence, the eGurkhaAgent service should be made to run using the login information of the user whose mailbox has been configured for the XChgMail test.
- For example, assume that the administrator has decided to use the Windows 2000 user elvis’s mail box for configuring the XChgMail test. To login to a Windows 2000 server/client, elvis uses the user name elvis and the password elvis. To ensure that the external agent gains access to elvis’s mailbox for monitoring, the above-mentioned login information should be passed to the eGurkhaAgent service. The process to be followed for performing this, has already been discussed.
- MAPI should be configured in the Exchange 2000/2003 server.
-
MAPI is used by an Exchange server (5.5/2000/2003) for internal messaging purposes. The XChgMail test and the MsXMail test require MAPI to be up and running in the Exchange server. While this service is configured in an Exchange server 5.5 by default, it is not the case in an Exchange 2000/2003 server. To configure this service, do the following:
- Open the Active Directory Users and Computers window using the menu sequence: Start -> Programs -> Microsoft Exchange -> Active Directory Users and Computers.
-
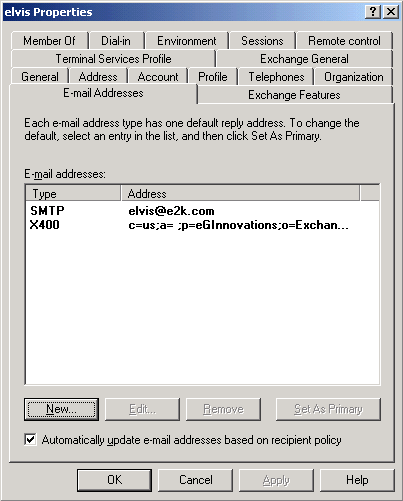
In the tree-structure in the left pane, expand the node representing the site on which a mail box for the eG user has been configured. Click on the Users folder within the site, so that the complete list of mailboxes appears in the right pane. Now, double-click on the eG user’s mailbox. Then, click on the E-mail Addresses tab (see Figure 7) of the Properties dialog box that appears:
-
To add the MAPI email-address to the list of addresses displayed therein, click on the New button in Figure 7. Upon clicking, an E-mail address type list will appear (see Figure 8). Select Microsoft Mail Address from that list and click the OK button (see Figure 8).
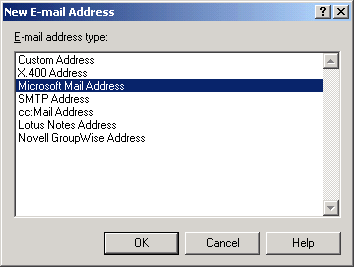
Figure 8 : Selecting Microsoft Mail Address as the address type
-
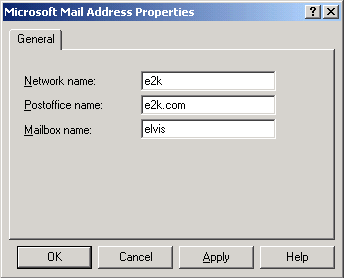
In Figure 8 that appears next, specify the properties of the chosen address type. Enter the name of the organizational unit (see Figure 9) that houses the mailbox, in the Network name text box. Then, in the Postoffice name text box, specify the name of the site (see Figure 9) on which the mailbox has been configured. Finally, the Mailbox name (see Figure 9) is to be specified.
- Next, click on the Apply button, and then the ok button to return to Figure 9. Finally, click on the Apply and ok buttons in Figure 7 to complete the process of creating the MAPI service.
Once you configured the Exchange server to work with the eG manager, proceed to manage the Exchange server using eG administrative interface. The steps for managing the Exchange server have been detailed in Managing the Microsoft Exchange 2000/2003 server.