AWS Route 53 Test
Using Amazon Route 53, one can get a website or web application up and running. One of the key functions of Route53 is that it sends automated requests over the internet to a resource, such as a web server or an email server, to verify that it's reachable, available, and functional. You also can choose to receive notifications when a resource becomes unavailable and choose to route internet traffic away from unhealthy resources.
Here's an overview of how health checking works:
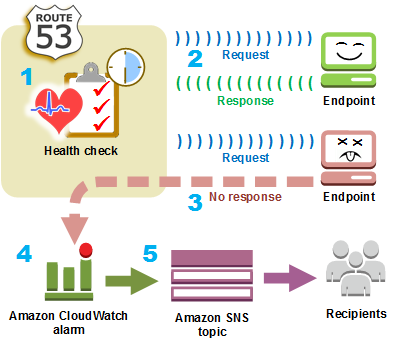
Figure 1 : How Amazon Route53 health checks work
- You create a health check and specify values that define how you want the health check to work.
- Route 53 starts to send requests to the endpoint at the interval that you specified in the health check.
- If the endpoint responds to the requests, Route 53 considers the endpoint to be healthy and takes no action.
- If the endpoint does not respond to a request, Route 53 starts to count the number of consecutive requests that the endpoint does not respond to.
- If the count reaches the value that you specified for the failure threshold, Route 53 considers the endpoint unhealthy.
- If the endpoint starts to respond again before the count reaches the failure threshold, Route 53 resets the count to 0.
If a health check fails, then administrators should be promptly notified of it, so that they can investigate the reasons for the failure and initiate relevant appropriate remedial measures. This is where the AWS Route53 test will be most useful!
This test discovers all the health checks configured for each AWS region and alerts administrators if any health check fails. In order to help administrators determine how often during a given measure period a health check reported abnormalities with an endpoint, the test also reports the percentage of time for which each health check reported that its endpoint is healthy. This introduces administrators to problem-prone areas of their infrastructure.
Target of the test: Amazon Cloud
Agent deploying the test : A remote agent
Outputs of the test : One set of results for each health check ID in each AWS region
First-level descriptor: AWS Region
Second-level descriptor: Health check ID
| Parameter | Description |
|---|---|
|
Test Period |
How often should the test be executed. |
|
Host |
The host for which the test is to be configured. |
|
Access Type |
eG Enterprise monitors the AWS cloud using AWS API. By default, the eG agent accesses the AWS API using a valid AWS account ID, which is assigned a special role that is specifically created for monitoring purposes. Accordingly, the Access Type parameter is set to Role by default. Furthermore, to enable the eG agent to use this default access approach, you will have to configure the eG tests with a valid AWS Account ID to Monitor and the special AWS Role Name you created for monitoring purposes.
Some AWS cloud environments however, may not support the role-based approach Note that the Secret option may not be ideal when monitoring high-security cloud environments. This is because, such environments may issue a security mandate, which would require administrators to change the Access Key and Secret Key, often. Because of the dynamicity of the key-based approach, Amazon recommends the Role-based approach for accessing the AWS API. |
|
AWS Account ID to Monitor |
This parameter appears only when the Access Type parameter is set to Role. Specify the AWS Account ID that the eG agent should use for connecting and making requests to the AWS API. To determine your AWS Account ID, follow the steps below:
|
|
AWS Role Name |
This parameter appears when the Access Type parameter is set to Role. Specify the name of the role that you have specifically created on the AWS cloud for monitoring purposes. The eG agent uses this role and the configured Account ID to connect to the AWS Cloud and pull the required metrics. To know how to create such a role, refer to Creating a New Role. |
|
AWS Access Key, AWS Secret Key, Confirm AWS Access Key, Confirm AWS Secret Key |
These parameters appear only when the Access Type parameter is set to Secret.To monitor an Amazon cloud instance using the Secret approach, the eG agent has to be configured with the access key and secret key of a user with a valid AWS account. For this purpose, we recommend that you create a special user on the AWS cloud, obtain the access and secret keys of this user, and configure this test with these keys. The procedure for this has been detailed in the Obtaining an Access key and Secret key topic. Make sure you reconfirm the access and secret keys you provide here by retyping it in the corresponding Confirm text boxes. |
|
Proxy User Name, Proxy Password, and Confirm Password |
If the proxy server requires authentication, then, specify a valid proxy user name and password in the Proxy User Name and Proxy Password parameters, respectively. Then, confirm the password by retyping it in the Confirm Password text box. By default, these parameters are set to none, indicating that the proxy sever does not require authentication by default. |
|
Proxy User Name and Proxy Password |
If the proxy server requires authentication, then, specify a valid proxy user name and password in the Proxy User Name and Proxy Password parameters, respectively. By default, these parameters are set to none, indicating that the proxy sever does not require authentication by default. |
|
Proxy Domain and Proxy Workstation |
If a Windows NTLM proxy is to be configured for use, then additionally, you will have to configure the Windows domain name and the Windows workstation name required for the same against the Proxy Domain and Proxy Workstation parameters. If the environment does not support a Windows NTLM proxy, set these parameters to none. |
|
Exclude Region |
Here, you can provide a comma-separated list of region names or patterns of region names that you do not want to monitor. For instance, to exclude regions with names that contain 'east' and 'west' from monitoring, your specification should be: *east*,*west* |
|
Default Connection Region |
By default, this test connects to the endpoint URL of the us-east-1 region to collect the required metrics. If the default us-east-1 region is not enabled in the target environment, then, for this test to collect the required metrics, specify the region that is enabled in the target environment. |
|
Measurement |
Description |
Measurement Unit |
Interpretation |
||||||
|---|---|---|---|---|---|---|---|---|---|
|
Status of health check |
Indicates the status of the endpoint of this health check. |
|
If the health check reports that the endpoint is in an healthy state, then the value of this measure is Healthy. If the health check finds that an endpoint is in an abnormal state, the value of this measure Unhealthy. The numeric values that correspond to these measure values are as follows:
Note: By default, the test reports the Measure Values in the table above to indicate the status of a health check. In the graph of this measure however, the status is indicated using numeric equivalents only. |
||||||
|
Health check percentage |
Indicates the percentage of time this health check reported that an endpoint is healthy. |
Percent |
A very low value for this measure is indicative of problem-prone endpoints. |