AWS VPC VPN Test
Amazon VPC (Virtual Private Cloud) lets you provision a logically isolated section of the Amazon Web Services (AWS) cloud where you can launch AWS resources in a virtual network that you define. You have complete control over your virtual networking environment, including selection of your own IP address ranges, creation of subnets, and configuration of route tables and network gateways.
By default, instances that you launch into a virtual private cloud (VPC) cannot communicate with your own network. You can enable access to your network from your VPC by attaching a virtual private gateway to the VPC, creating a custom route table, updating your security group rules, and creating an AWS managed VPN connection. A VPN connection refers to the connection between your VPC and your own network. Each VPN connection has two tunnels, with each tunnel using a unique virtual private gateway public IP address. It is important to configure both tunnels for redundancy. When one tunnel becomes unavailable (for example, down for maintenance), network traffic is automatically routed to the available tunnel for that specific VPN connection.
To ensure continuous communication between the VPC and the network therefore, administrators should track the status (up/down) of both tunnels and make sure that at least one tunnel is up and running at all times. Since a VPN tunnel comes up only when traffic is generated from the customer-side of the VPN connection, administrators must keep an eye on the incoming and outgoing traffic on each tunnel to determine whether the absence of traffic is what caused a tunnel to go down. To quickly detect that a tunnel is down and to rapidly diagnose its root-cause, administrators can use the AWS VPC VPN Test.
For each VPN tunnel configured for the AWS VPC, this test reports the status of that tunnel and the amount of traffic flowing in the tunnel. This way, the test alerts administrators when a tunnel goes down or is idle.
Target of the test: Amazon Cloud
Agent deploying the test : A remote agent
Outputs of the test : One set of results for each VPN tunnel.
| Parameter | Description |
|---|---|
|
Test Period |
How often should the test be executed. |
|
Host |
The host for which the test is to be configured. |
|
Access Type |
eG Enterprise monitors the AWS cloud using AWS API. By default, the eG agent accesses the AWS API using a valid AWS account ID, which is assigned a special role that is specifically created for monitoring purposes. Accordingly, the Access Type parameter is set to Role by default. Furthermore, to enable the eG agent to use this default access approach, you will have to configure the eG tests with a valid AWS Account ID to Monitor and the special AWS Role Name you created for monitoring purposes.
Some AWS cloud environments however, may not support the role-based approach Note that the Secret option may not be ideal when monitoring high-security cloud environments. This is because, such environments may issue a security mandate, which would require administrators to change the Access Key and Secret Key, often. Because of the dynamicity of the key-based approach, Amazon recommends the Role-based approach for accessing the AWS API. |
|
AWS Account ID to Monitor |
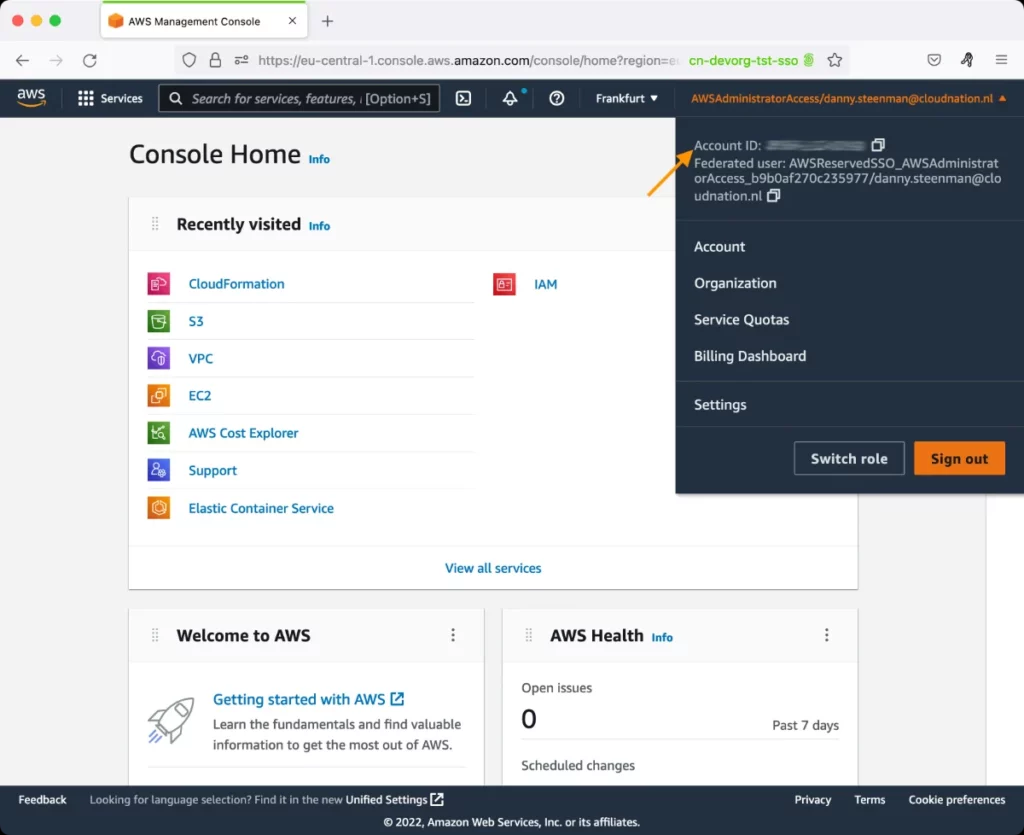
This parameter appears only when the Access Type parameter is set to Role. Specify the AWS Account ID that the eG agent should use for connecting and making requests to the AWS API. To determine your AWS Account ID, follow the steps below:
|
|
AWS Role Name |
This parameter appears when the Access Type parameter is set to Role. Specify the name of the role that you have specifically created on the AWS cloud for monitoring purposes. The eG agent uses this role and the configured Account ID to connect to the AWS Cloud and pull the required metrics. To know how to create such a role, refer to Creating a New Role. |
|
AWS Access Key, AWS Secret Key, Confirm AWS Access Key, Confirm AWS Secret Key |
These parameters appear only when the Access Type parameter is set to Secret.To monitor an Amazon cloud instance using the Secret approach, the eG agent has to be configured with the access key and secret key of a user with a valid AWS account. For this purpose, we recommend that you create a special user on the AWS cloud, obtain the access and secret keys of this user, and configure this test with these keys. The procedure for this has been detailed in the Obtaining an Access key and Secret key topic. Make sure you reconfirm the access and secret keys you provide here by retyping it in the corresponding Confirm text boxes. |
|
Proxy Host and Proxy Port |
In some environments, all communication with the AWS cloud and its regions could be routed through a proxy server. In such environments, you should make sure that the eG agent connects to the cloud via the proxy server and collects metrics. To enable metrics collection via a proxy, specify the IP address of the proxy server and the port at which the server listens against the Proxy Host and Proxy Port parameters. By default, these parameters are set to none , indicating that the eG agent is not configured to communicate via a proxy, by default. |
|
Proxy User Name, Proxy Password, and Confirm Password |
If the proxy server requires authentication, then, specify a valid proxy user name and password in the Proxy User Name and Proxy Password parameters, respectively. Then, confirm the password by retyping it in the Confirm Password text box. By default, these parameters are set to none, indicating that the proxy sever does not require authentication by default. |
|
Proxy Domain and Proxy Workstation |
If a Windows NTLM proxy is to be configured for use, then additionally, you will have to configure the Windows domain name and the Windows workstation name required for the same against the Proxy Domain and Proxy Workstation parameters. If the environment does not support a Windows NTLM proxy, set these parameters to none. |
|
Exclude Region |
Here, you can provide a comma-separated list of region names or patterns of region names that you do not want to monitor. For instance, to exclude regions with names that contain 'east' and 'west' from monitoring, your specification should be: *east*,*west* |
|
Default Connection Region |
By default, this test connects to the endpoint URL of the us-east-1 region to collect the required metrics. If the default us-east-1 region is not enabled in the target environment, then, for this test to collect the required metrics, specify the region that is enabled in the target environment. |
|
VPN Filter Name |
By default, this parameter is set to Vpn Id. In this case, the test will report metrics for each VPN. If required, you can override this default setting by picking the Tunnel Ip Address option from this drop-down. In this case, the test will report metrics for each tunnel in each VPN. |
|
Measurement |
Description |
Measurement Unit |
Interpretation |
||||||
|---|---|---|---|---|---|---|---|---|---|
|
|
By default, this test reports the current state of the tunnels in this VPN. If the VPN Filter Name is set to Tunnel Ip Address, then this measure will report the state of this tunnel. |
|
The values that this measure reports and their corresponding numeric values are listed in the table below:
If both the tunnels in a VPN are down, then this measure will report the value Down for that VPN. If both the tunnels in a VPN are up and running, or if only one of the tunnels is up, then this measure will report the value Up for that VPN. In this case, you can configure the VPN Filter Name parameter of the test to Tunnel Ip Address and determine which tunnel in the VPN is down. Typically, a VPN tunnel comes up when traffic is generated from your side of the VPN connection. The virtual private gateway is not the initiator; your customer gateway must initiate the tunnels. If your VPN connection experiences a period of idle time (usually 10 seconds, depending on your configuration), the tunnel may go down. To prevent this, you can use a network monitoring tool to generate keepalive pings; for example, by using IP SLA. Note: By default, this test uses the Measure Values listed in the table above to indicate the state of a tunnel. In the graph of this measure however, the same is indicated using the numeric equivalents only. |
||||||
|
|
By default, this test indicates the total amount of data received through both the VPN tunnels in this VPN. If the VPN Filter Name is set to Tunnel Ip Address, then this measure will report the amount of data received through this tunnel.
|
KB |
This metric counts the data after decryption. If a VPN tunnel goes down very often, you may want to check if the value of the 'Tunnel incoming data' and 'Tunnel outgoing data' measures is consistently 0 for that tunnel. Lack of traffic on the tunnels is a common reason for VPN tunnels to fail. There is a vendor-specific VPN idle time for policy based VPN connections. If there is no traffic through the VPN tunnel for that duration, the IPsec session can be torn down. For tunnels going down due to idle timeout, be sure there is constant bidirectional traffic between your local network and VPC. Consider setting up a host that sends one ICMP requests every 5 seconds to an instance in the VPC that responds to ICMP. This allows the tunnel to stay up as it continues to respond to the ICMP requests, and makes sure that there are packets being encrypted and decrypted across the tunnel. |
||||||
|
|
By default, this test indicates the total amount of data sent through both the VPN tunnels in this VPN. If the VPN Filter Name is set to Tunnel Ip Address, then this measure will report the amount of data sent through this tunnel.
|
KB |
This metric counts the data after encryption. If a VPN tunnel goes down very often, you may want to check if the value of the 'Tunnel incoming data' and 'Tunnel outgoing data' measures is consistently 0 for that tunnel. Lack of traffic on the tunnels is a common reason for VPN tunnels to fail. There is a vendor-specific VPN idle time for policy based VPN connections. If there is no traffic through the VPN tunnel for that duration, the IPsec session can be torn down. For tunnels going down due to idle timeout, be sure there is constant bidirectional traffic between your local network and VPC. Consider setting up a host that sends one ICMP requests every 5 seconds to an instance in the VPC that responds to ICMP. This allows the tunnel to stay up as it continues to respond to the ICMP requests, and makes sure that there are packets being encrypted and decrypted across the tunnel. |