Creating a New View and Defining its Layout
-
To achieve this click on the
 icon available in the Monitor tab. Then, select the Quick Insight option in the Dashboards tile in the eG monitor interface.
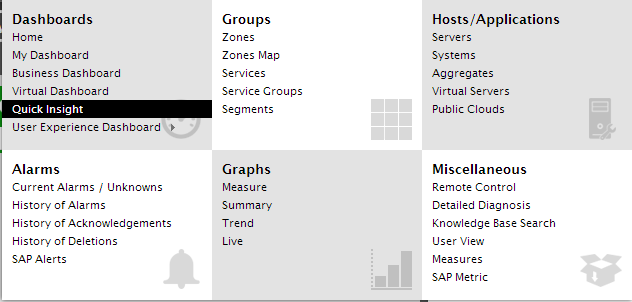
Figure 1 : The Options menu
-
If custom views pre-exist, then upon selecting the Quick Insight option from the Dashboard tile, the eG Enterprise system will display the measures that have been configured for that custom view which has been set as the default view. If only one custom view has been defined so far, the eG Enterprise system will automatically set this view as the default view and display the state and the values of the measures configured for it. On the other hand, if no custom views have been defined yet, then you will be led straight to the configure layout page of Figure 2.
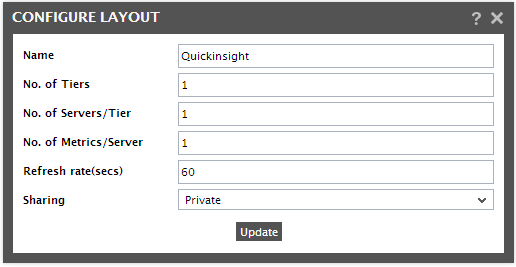
- In Figure 2, provide a Name for the new view.
-
In order to create a new Quick Insight view, you need to specify the following:
- Tiers: A custom view is divided into broad sections known as tiers. A tier can be based on geography or it can match the different infrastructure tiers (for e.g., the database tier, the web server tier), or it can even be a service / segment. While configuring the layout of your view using Figure 2, specify the No. of Tiers that your view should constitute. A maximum of 15 tiers can be configured.
- Servers: Each tier comprises of one or more servers. Typically, the critical servers in the monitored infrastructure are added to a tier. In the No. of Servers/Tier text box of Figure 2, specify the number of servers that you intend adding to a tier. A maximum of 15 servers can be added.
- Metrics: These are the key performance statistics that need to be extracted from every component in a tier. You can configure the number of measures that your layout should support by providing a number in the No. of Metrics/Server text box of Figure 2. Here again, the maximum limit of 15 prevails.
- Refresh rate: Specify the screen refresh time in seconds.
-
Sharing: To facilitate collaboration and knowledge sharing among administrators, eG now allows users the flexibility to share useful quick insight views they create with other users. For sharing a view, you need to first set a share type by selecting the desired option from the Sharing list box in Figure 2. The options are as follows:
- Private: If you set a view as Private, then all other users to the eG Enterprise system will be denied access to that view. Only the creator of the view will be able to access the view.
- Public: If you set the view as Public, then only users with the following rights will have access to that custom view:
- Users with access to all the managed components in the environment
-
User with access to one/more components that are included in the view being shared
Note:
- If a view has been granted Public access, then users with the privilege to monitor only a few components in that view will be able to take a look at only those statistics in the view that pertain to the components in his/her monitoring scope.
- If a view has been allowed Public access, then users whose monitoring scope does not include any of the components in that view will not be allowed access to the view.
- If a view that does not include any components/metrics has been allowed Public access, then such a view will not be available to any other user.
-
Share: On the other hand, if you choose the Share option from the Sharing list, then you can pick and choose the users who need to be granted access to that view. To map users to a view, do the following:
- Select the users to be granted access from the Available Users list box.
- Then, click on Grant to grant the selected users access to the view. Doing so shifts the selection to the Selected Users list.
- To revoke the access permission granted to a user, you can select the user from the Selected Users list, and click the Revoke button.
-
Finally, click on Update to save the changes.
Note:
- A user without access to Quick Insight cannot view any of the views shared with him/her.
- A view can be modified / deleted only by the user who creates it. The shared users on the other hand, can only view the Quick Insight data, and cannot modify/delete the view.
- If a user has been granted Share access to a view, but he/she has the right to monitor only a few components that are included in the view, then such a user will be able to take a look at only those statistics in the shared view that pertain to the components in his/her monitoring scope.
- If a user has been allowed Share access to a view, but he/she does not have the privilege to monitor any component included in the view, then such a view, despite being shared, will not be available to that user.
- If a user has been allowed Share access to a view to which no servers/metrics have been assigned, then such a view will not be available to that user upon login.
-
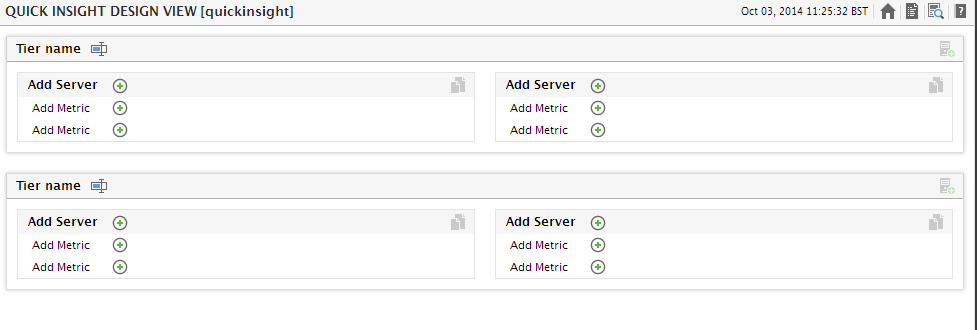
Finally, specify how frequently the configured measures have to be refreshed, in the Refresh Rate text box of Figure 3, and click the update button to save the changes. Upon updating, Figure 3will appear displaying the layout that was just designed (see Figure 4).
-
To view the complete list of custom views, click on the
 icon in the Quick Insight menu at the right top corner of Figure 5. The existing custom views (including the newly configured view) will appear (see Figure 3).
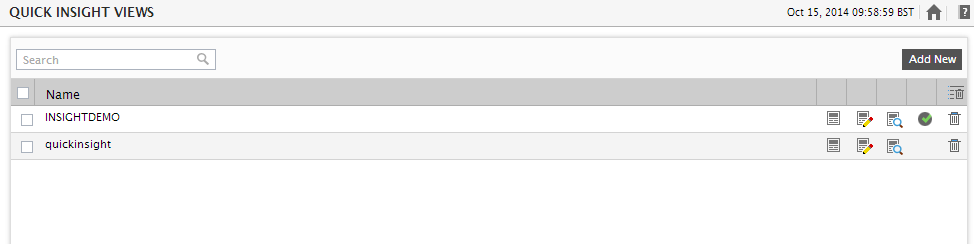
- To add a new view, click the Add New button in Figure 4. To set any of the listed views as the default view, click the
 icon corresponding to the view name in Figure 5. To delete a view, select the check box corresponding to the view name in Figure 5, and click the
  icon. Choose Select all and then click the icon, if all the listed views need to be deleted.
 -
If other users have shared their views with you, then those views will be listed separately in the Views Shared by other Users section as depicted in the Figure 4. Against every shared view, this section also displays the name of the view creator - i.e., the user who originally created the view and shared it with the current user.
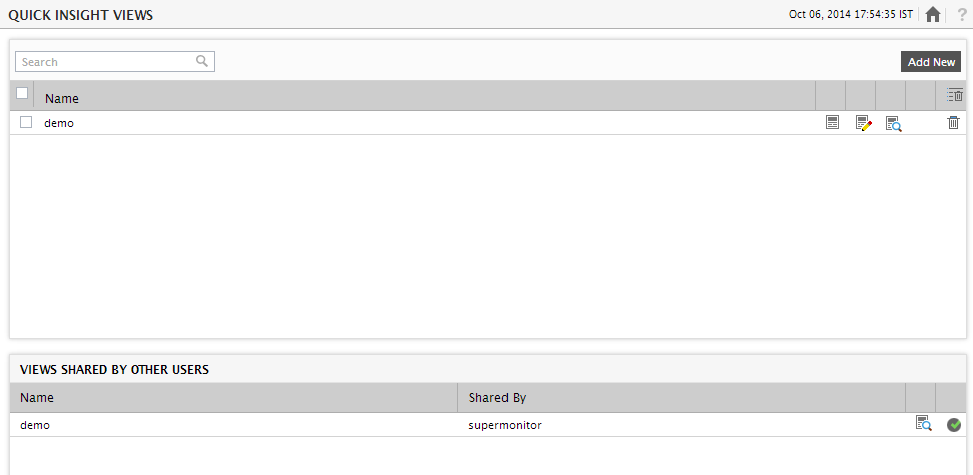
- To configure the tiers/servers/measures to be associated with a view, click on the
 icon against a view in Figure 5. This will lead you back to Figure 5 where such configurations can be performed.
 - To view the state and the values of the measures that have been configured under a view, click the View (
 ) icon against the view name. Figure 6 will then appear.
 -
Clicking on the Layout (
 ) icon against a view, will lead you to Figure 6, using which the layout of the view can be modified.
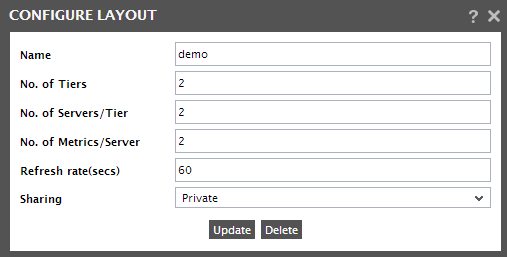
- In the Modify mode, all the layout specifications except the Name of the view, can be modified. Additionally, a Delete button appears in the modify mode (see Figure 6), clicking on which deletes the displayed layout.