Automatically Fulfilling Pre-requisites in a Basic Authentication-Enabled Environment
To ensure that the pre-requisites discussed in Pre-requisites for Monitoring Office 365 Environments where Basic Authentication is Enabled are fulfilled without a glitch, eG Enterprise provides a proprietary PowerShell script. By running this script, you can have these requirements automatically fulfilled. This way, you can eliminate the effort and time involved, and minimize the likelihood of errors in getting Office 365 monitoring up and running.
To run the script, do the following:
-
Login to the eG agent host.
-
Open Windows PowerShell ISE in elevated mode.
-
Run the O365_setup_prerequisites.ps1 script from the <EG_AGENT_INSTALL_DIR>\lib directory.
-
Figure 307 will then appear, where you need to indicate how you want to connect to Office 365 - using basic authentication or modern authentication.
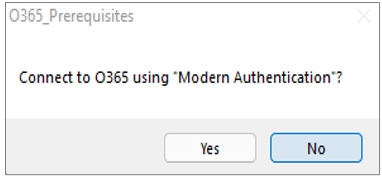
Figure 307 : Choosing between Modern Authentication and Basic Authentication
- To use basic authentication to connect to Office 365, click the No button in Figure 307.
-
You will now be prompted to confirm whether/not you want to install the PowerShell modules/packages required for monitoring, on the eG agent host. Click Yes to confirm.
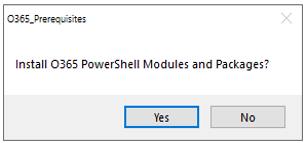
Figure 308 : A messaging prompting you to confirm whether/not PowerShell modules are to be installed on the agent host
-
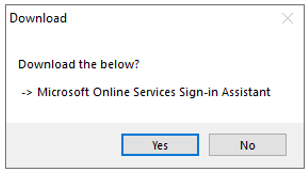
Figure 309 will then appear. Click Yes in Figure 309 to download the Microsoft Online Services Sign-in Assistant.
-
When Figure 310 appears, click Yes to install the downloaded sign-in assistant on the agent host.
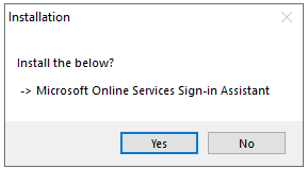
Figure 310 : Choosing to install the downloaded sign-in assistant
-
Clicking Yes in Figure 310 will invoke a wizard that will guide you through the sign-in assistant's installation. Click Next here to move to the next step of the installation.
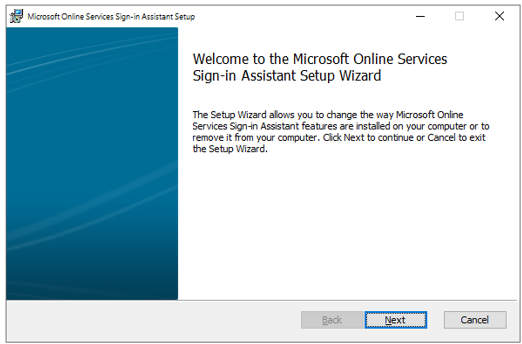
Figure 311 : Welcome screen of the sign-in assistant's installation wizard
-
Then, select the 'I agree...' check box that you see in Figure 312 to agree to the licensing terms and conditions, and click Install to install the sign-in assistant.
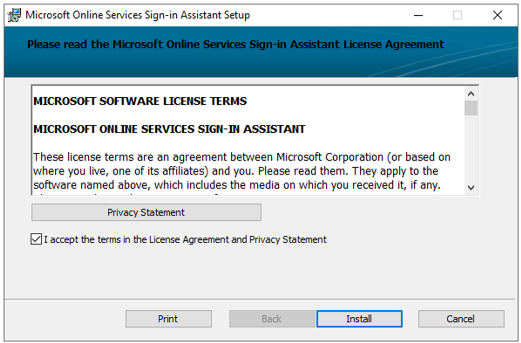
Figure 312 : Agreeing to the sign-in assistant's licensing terms
-
If installation is successful, Figure 313 will appear. Click Finish here to exit the wizard.
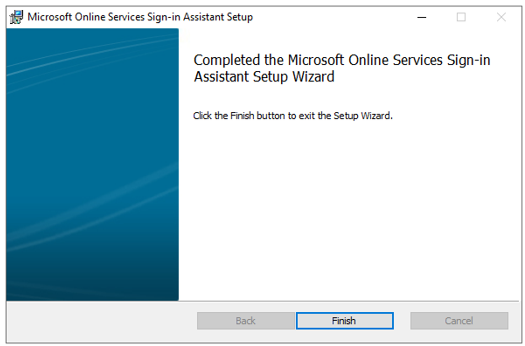
Figure 313 : Exiting the wizard after successful installation of the sign-in assistant
-
Figure 314 will appear now. Using Figure 314, you should choose the O365 products / components that you want the eG agent to monitor. The script will automatically download and install only those packages that are required for monitoring the chosen components. For that, first, in the Username and Password text boxes of Figure 314, specify the credentials of a valid Office 365 user who has access to the Office 365 tenant being monitored. Once the modules/packages are installed on the agent host, the script will connect to the Office 365 portal using these credentials, to verify if the installation is successful.
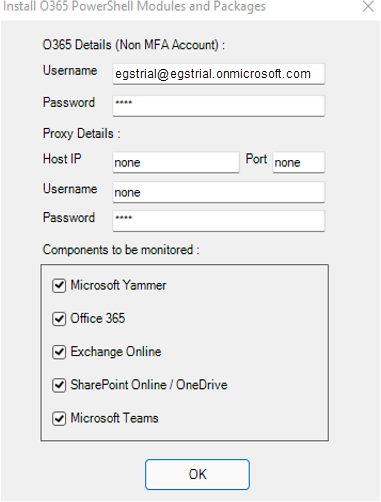
Figure 314 : Configuring the download, installation, and verification of PowerShell modules/packages
-
If all communications between the eG agent host and the Office 365 portal are routed through a proxy server, then provide the details of that server in the Proxy Details section. The Host IP an Port number of the proxy server should be specified. If the proxy requires authentication, then specify the Username and Password of a valid proxy user. On the other hand, if the agent host does not communicate with the Office 365 portal via a proxy server, specify none in all text boxes in the Proxy Details section.
-
Then, choose the O365 produts/components that you want to monitor by selecting the relevant check boxes in the Components to be monitored section.
-
Finally, click the OK button in Figure 314.
-
Figure 315 will then appear. Click Yes here to download the Skype for Business Network Assessment Tool.
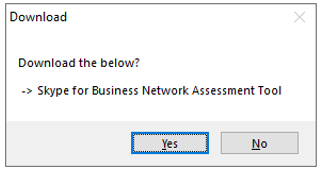
Figure 315 : A message requesting your confirmation to download the Skype for Business Network Assessment Tool
-
When Figure 316 appears, click Yes again to install the downloaded tool.

Figure 316 : Enabling the installation of the downloaded Skype for Business Network Assessment Tool
-
Clicking Yes in Figure 316 will invoke a wizard (see Figure 317), which will help you install the Business Network Assessment Tool. Select the "I agree...' check box in Figure 317 that appears to agree to the licensing terms of the tool. Then, click Install to begin installing the tool.
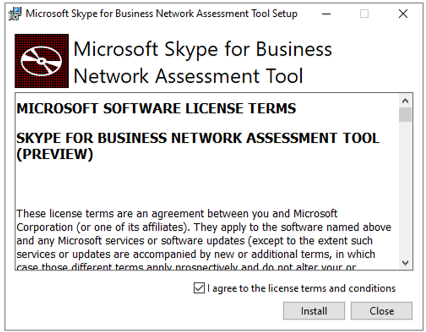
Figure 317 : Installing the Skype for Business Network Assessment Tool
-
Once the tool is installed, Figure 318 will appear, prompting you to confirm whether the roles and permissions required for monitoring O365 can be assigned or not. Click Yes to confirm the same.
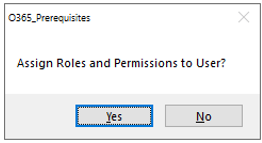
Figure 318 : A message box requesting your confirmation to assign monitoring roles and permissions to an Office 365 user
-
Figure 319 will then appear. To manage Office 365 users and their roles/permissions, the script requires Global Administrator privileges. Therefore, in the Global Admin Credentials section of Figure 319, specify the Username and Password of a Global Admin user.
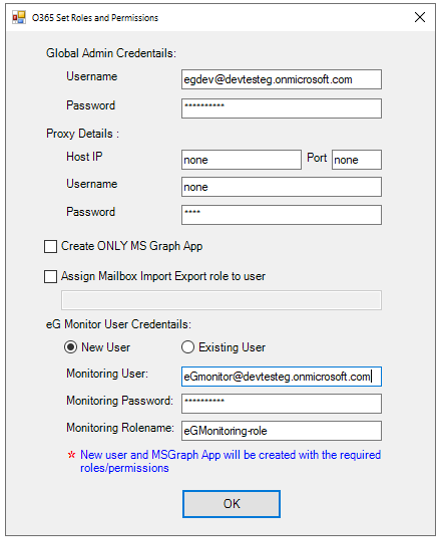
Figure 319 : Assigning roles and permissions to a new Office 365 user
- If the script will be communicating with Office 365 via a Proxy server, then configure the Host IP and Port number of the Proxy server. If a proxy server is not used for eG agent - Office 365 communications, then let the default Host IP and Port remain.
- If the Proxy server requires authentication, then provide a valid Username and Password for the Proxy user. If no authentication is required, then let the defaults remain.
-
If you want the script to automatically create a new user and assign the required permissions to that user, select the New User option in . Then, give a unique name to the new Monitoring User and assign a Monitoring Password to that user.
Note:
Make sure that the Monitoring Password you provide does not include double quotes. If it does, then some tests that the eG agent runs on the Office 365 environment will fail to report metrics.
By default, the script automatically creates a role named eGMonitoring-role in Office 365, and assigns that role to the new user. This is why, the eGMonitoring-role is displayed by default in the Monitoring Rolename text box. You can change the role name if required.
-
On the other hand, if you want to use an existing Office 365 user for monitoring purposes, select the Existing User option (see Figure 320). Then, specify the name of the existing Monitoring User and the Monitoring Password of that user.
Note:
The Monitoring Password you specify should not include double quotes. If it does, then some tests that the eG agent runs on the Office 365 environment will fail to report metrics. To avoid this, make sure that you choose a Monitoring User who has a password that does not contain double quotes.
By default, the script automatically creates a role named eGMonitoring-role in Office 365, and assigns that role to the specified existing user. This is why, the eGMonitoring-role is displayed by default in the Monitoring Rolename text box. You can change the role name if required.
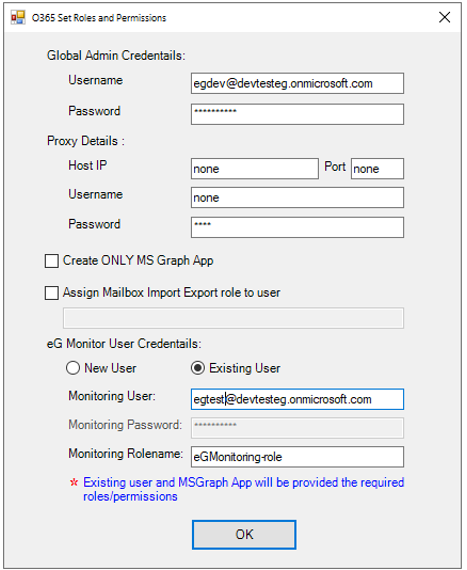
Figure 320 : Assigning roles and permissions to an existing Office 365 user
-
Finally, click the OK button in . Doing so, will result in the following:
- If you have chosen to create a new user, then a new user with the given Monitoring User name and Monitoring Password will be automatically created in Office 365. Likewise, a role with the given Monitoring Rolename will be automatically created and assigned to the new user. The script ensures that this role is configured with the permissions required for monitoring Office 365. In this case, make sure you configure the OFFICE 365 USER and OFFICE 365 PASSWORD parameters of eG tests with the Monitoring User name and Monitoring Password of the new user.
- If you have chosen to use an existing user, then a role with the given Monitoring Rolename will be automatically created in Office 365. When creating the role, the script automatically configures the role with the permissions required for monitoring Office 365. The script also automatically assigns this role to the specified existing user. In this case, make sure you configure the OFFICE 365 USER and OFFICE 365 PASSWORD parameters of eG tests with the Monitoring User name and Monitoring Password of the existing user.
-
A Microsoft Graph app will be automatically registered on Microsoft Azure Active Directory with all the required permissions.
-
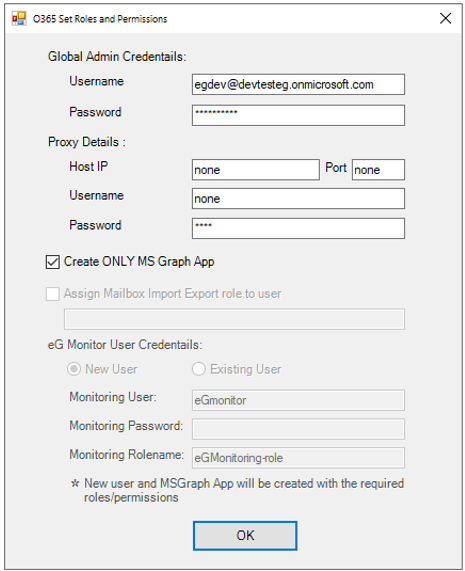
If you already have an Office 365 user with the required permissions, then you may not want to use the script to create such a user or grant the required permissions to an existing user. In such a case, you can configure the script to only install the Microsoft Graph app and set its permissions. To achieve this, simply select the Create ONLY MS Graph App option, as depicted by Figure 307. Then, click the OK button.
-
For monitoring Exchange Online, you need an O365 user with the View-Only Audit Logs, View-Only Recipients, Mail Recipients, and Mailbox Import Export permissions. If you choose to manually create this user, but inadvertently miss assigning the Mailbox Import Export permission to that user, then you can use the O365_setup_prerequisites.ps1 script to right the wrong. When Figure 321 appears, simply select the Assign Mailbox Import Export role to user check box, and then enter the name of the O365 user who should be assigned this role in the text box below. Make sure that you only specify the name of that user who has been manually created for monitoring purposes.

Figure 321 : Assigning the Mailbox Export Import permission to an existing user
-
This script not only registers an MS Graph App on Azure Active Directory automatically, but also auto-creates an MSGraph folder in the <EG_AGENT_INSTALL_DIR>\agent\O365\ directory of the eG agent host. This folder contains a .dat file to which the details for connecting to the MS Graph App are written - these details include: the app name, client ID, and client secret.
-
In environments where hundreds of users connect to Office 365, it is common-place to configure multiple agents to monitor a single Office 365 tenant for the purpose of load-balancing - e.g., you can have one agent that monitors Exchange Online alone for that tenant, and another that monitors SharePoint Online alone. In such environments, it would suffice to run this script on any one agent that monitors the target Office 365 tenant. This is because, user creation and MS Graph App registration are one-time exercises, which need to be performed only once for a target Office 365 tenant, regardless of the number of agents monitoring that tenant. However, in such environments, after running this script on an eG agent host, you should make sure that the MSGraph folder is copied to the <EG_AGENT_INSTALL_DIR>\agent\O365\ directory of every other agent that has been configured to monitor the target Office 365 tenant. If this folder is not copied to the other eG agents as well, then none of these agents will be able to report those metrics for which the MS Graph App is required - i.e., metrics related to service health, Message Center communications, user activity etc..
Note:
If you select the Create ONLY MS Graph App option (see Figure 319, it implies that you already have an Office 365 user with the required permissions and intend to pass the credentials of such a user to the eG tests. In this case, make sure that the user who pre-exists has a password that does not contain double quotes. If it does, then once the user's credentials are passed to the eG tests, some of those tests will fail to report metrics. You are therefore advised to change the password of the user before configuring the eG tests with that user's credentials.