How to BTM-enable a PHP Web Application?
To BTM-enable a PHP web application, follow the steps discussed below:
- Login to the server hosting the PHP web application as a root user.
-
Then, check where SELinux is enabled on the server. Security-Enhanced Linux (SELinux) is a Linux kernel security module that provides a mechanism for supporting access control security policies, including mandatory access controls (MAC). SELinux is a set of kernel modifications and user-space tools that have been added to various Linux distributions.
To check whether SELinux is enabled on the server, run the sestatus command at the prompt as root user. If this command returns the result disabled, it means that SELinux is disabled on the server. On the other hand, if this command returns the result enabled, it implies that SELinux is enabled.
Where SELinux is enabled, the security policies that SELinux prescribes will disable the port (default: 14002) via which the eG PHP profiler pushes data to the eG agent.
This restriction will impact the operations of the eG agent and the profiler. This is why, before installing the profiler, you need to override the access policies of SELinux, so that the aforesaid restriction is removed. To this effect, do the following:
-
Enable the socket connection agent, so that the eG PHP profiler can transmit metrics to the eG agent. For that, run the following command:
setsebool -P httpd_can_network_connect on
-
Restart the PHP web server.
In some cases, the security policies enforced by SELinux may not allow the profiler to write error/warning messages to the PHPProfLogs file that it creates in the /tmp folder. If such a restriction is imposed, the log files may not be able to capture critical issues in the performance of the profiler. So, where the profiler is denied write-access to the /tmp folder, you should make that folder world-writable. For that, do the following:
-
Run the following command at the prompt:
setsebool -P httpd_tmp_write 1
-
Restart the PHP web server.
-
- Next, log back into the PHP web server as a user with rights to run scripts on the server. From the shell prompt, switch to the directory where the eG agent is installed. By default, this will be /opt/egurkha.
- Next, switch to the lib directory within /opt/egurkha.
-
From the lib directory, run the following command to install the eG PHP Profiler:
./eGPHPBTM_Install.sh -e <1/2> -p <Path of php/php-fpm executable> -a <Path of eG agent install directory>
In the command above, the alphabets prefixed by a hyphen (-) represent arguments that the script takes. Each of these arguments should be configured with a valid value. In the command above, the information provided within angular braces(<>) describes the value that you should configure for the corresponding argument. Make sure you configure every argument as per the guidelines provided below:
-
-e: This is a mandatory argument. The value of this argument indicates the mode in which the eG PHP Profiler should be installed - i.e., whether in the mod_php mode or in the php-fpm mode.
-
mod_php: In this mode, the profiler will run as an Apache module. In other words, the PHP interpreter will be 'embedded' inside the Apache process - there will be no external PHP profiler process. This means that Apache and the profiler can communicate better. If the profiler is to be installed in this mode, then set the -e argument in the command to 1.
-
php-fpm: This is PHP's FastCGI implementation. If the profiler is run in this mode, then it will run as a standalone FastCGI server. Apache will connect to the server using Apache's module, usually mod_fcgid or mod_fastcgi. If the profiler is to be installed in this mode, then set the -e argument in the command to 2.
Note that you should install the profiler in the same mode in which the target PHP application is run. In other words, if the PHP application being monitored is run in the mod_php mode, then you should install the profiler in this mode only. In this case therefore, set the -e argument to 1. Similarly, if the PHP application being monitored is running in the php-fpm mode, then the profiler should also be installed in the php-fpm mode. In this case therefore, the -e argument should be set to 2.
To know in which mode the PHP application is running, do the following:
-
Open the terminal.
-
Next, issue the following command:
echo '<?php phpinfo(); ?>' > /var/www/html/phpinfo.php
This command creates a phpinfo.php file in the directory from which the target PHP application loads its files. By default, this is the /var/www/html directory. However, if the application files are loaded from a different directory in your environment, then make sure that you change the command above to create the phpinfo.php file in that directory. Then, the command writes key configuration information (eg., PHP version, mode in which the PHP application runs etc.) related to that application to the phpinfo.php file.
-
Finally, open the browser, and type either of the following in the address bar, if the phpinfo.php file is created in the default directory (i.e., the /var/www/html directory):
http://<URL_of_target_application>/phpinfo.php
(OR)
https://<URL_of_target_application>/phpinfo.php
On the other hand, if the phpinfo.php file was created in a different directory, then type either of the following in the address bar of the browser:
http://<URL_of_target_application>/<Full_Path_to_phpinfo.php>
(OR)
https://<URL_of_target_application>/<Full_Path_to_phpinfo.php>
-
The configuration details of the PHP application will then be displayed. Here, if the Server API is displayed as Apache 2.0 Handler (see Figure 3), then you can conclude that the application is running in the mod_php mode. On the other hand, if the Server API is displayed as FPM/FastCGI (see Figure 4), it means that the application is running in the php-fpm mode.
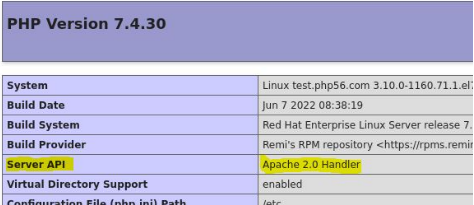
Figure 3 : The Server API if the PHP application is running in the mod_php mode
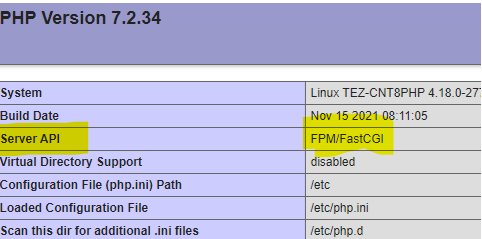
Figure 4 : The Server API if the PHP application is running in the php-fpm mode
-
-
-p: This argument takes the path to the location of the mod_php or php-fpm (as the case may be) executable as its value. This is an optional argument, meaning, by default, you do not have to explicitly configure this argument when running the BTM install script. If no value is provided for this argument, then the install script does the following:
-
If the -e argument is configured with the value 1, then the eG BTM installer will automatically run the mod_php executable from the 'default location' of that executable.
-
If the -e argument is configured with the value 2, then the installer will automatically run the php-fpm executable from its 'default location'.
Under the following circumstances however, you will have to explicitly configure the -p parameter with a valid path:
-
If more than one PHP version is running on the same machine, but the target application is not using the 'default PHP version' - In this case, you need to first determine the version of PHP being used by the monitored application. For this, open the terminal, and run the following command (only if you have not run it before):
echo '<?php phpinfo(); ?>' > /var/www/html/phpinfo.php
Then, open the browser, and type either of the following in the address bar:
http://<URL_of_target_application>/phpinfo.php
(OR)
https://<URL_of_target_application>/phpinfo.php
The resultant page (see Figure 3 or Figure 4) will display the PHP Version of the target application. If this is not the same as the default PHP version, then your location specification has to be changed. To determine the correct location, open the browser, and type either of the following in the address bar:
http://<URL_of_target_application>/phpinfo.php
(OR)
https://<URL_of_target_application>/phpinfo.php
In the resultant page, search for the parameter extension_dir. This value of this parameter is a path specification (see Figure 5).
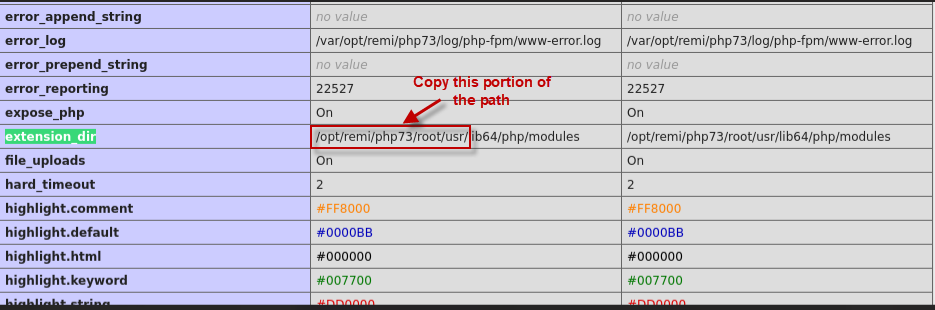
Figure 5 : The phpinfo.php page displaying the location of the php executable
Copy this path from the beginning to /usr/(as indicated by Figure 5). Then, proceed to configure the value of the -p argument as follows:
-p <Path_copied>/bin/php
For instance, from the extension_dir path that you see in Figure 5, you should copy /opt/remi/php73/root/usr/. The -p configuration in this case will be:
-p /opt/remi/php73/root/usr/bin/php
-
If the mod_php or php-fpm executable (as the case may be) resides in a location other than its default location - In this case, issue either of the following commands at the PHP prompt to determine the correct location of the executable:
whereis php, if the target application is running in the mod_php mode
(OR)
whereis php-fpm, if the target application is running in the php-fpm mode
Also, note that where multiple versions of PHP co-exist on a machine, this command will return the location that is applicable to the 'default PHP version' only. Therefore, before passing the path returned by this command as the value of the -p argument, check whether the application is using the default PHP version. You can use the steps discussed in this previous point to figure this out.
-
If the target application is running on an Ubuntu or CentOS operating system - In the case of Ubuntu, the -p argument should be configured with the 'full path' to the executable - i.e., the path should include the name of the executable file also. This is because, in Ubuntu, multiple versions of PHP can reside in the same directory.
For example, your -p specification on Ubuntu can be: /usr/sbin/php-fpm7.2
In the case of CentOS on the other hand, it would suffice to specify the location of the directory that contains the executable.
For example, your -p specification on CentOS can be: /usr/sbin
-
-
-a: This argument takes the full path to the install directory of the eG agent as its value. Typically, profiler logs are written to this path only. This is an optional argument, meaning, by default, you do not have to explicitly configure this argument when running the BTM install script. If no value is provided for this argument, then the profiler will automatically create and write eG PHP Profiler logs in the default install directory of the eG agent - i.e., in the /opt/egurkha directory.
However, if you have installed the eG agent in a different location in your environment, then make sure you explicitly configure the -a argument with the valid path to the install directory.
The command with sample values is provided below:
./eGPHPBTM_Install.sh -e 1 -p opt/php -a opt/eGAgent
-
-
The successful execution of the command indicates the successful installation of the eG PHP Profiler.
Note:
On Ubuntu servers, you will have to additionally perform the following steps to ensure that the eG PHP Profiler reports transaction performance metrics without a glitch:
-
As soon as you see the message confirming the successful installation of the profiler (see Figure 6), check the messages above it to determine where the setup script has created the eG_phpBTM.ini file.

Figure 6 : Message confirming that the profiler has been successfully installed on Ubuntu
-
If the eG_phpBTM.ini file is created in the /etc/php/<PHP_version>/cli/conf.d directory (as indicated by Figure 6), then, you need to copy this file to the /etc/php/<PHP_version>/apache2/conf.d directory. For this, issue the following command:
cp /etc/php/<PHP_version>/cli/conf.d/eG_phpBTM.ini /etc/php/<PHP_version>/apache2/conf.d/
A sample command has been provided below:
cp /etc/php/7.4/cli/conf.d/eG_phpBTM.ini /etc/php/7.4/apache2/conf.d/
-
On the other hand, if Figure 6 reveals that the eG_phpBTM.ini file has been created in the /etc/php/<PHP_version>/apache2/conf.d directory, then simply move on to step 7 of this setup process.
-
-
Finally, restart the PHP web server.