Enabling SAP JMX Support
To enable the eG agent to connect to the SAP WAS server and pull metrics, you need to enable SAP JMX support.
Note:
Ensure that the JDK version of the J2EE Engine VM is 1.5 or above.
For enabling SAP JMX support, you can use either of the approaches listed below:
- Through the System Information web application using a browser
- Using a config tool
Enabling JMX Support Through the System Information Web Application
This approach involves the following steps:
-
Open the default NetWeaver AS JAVA landing page (see Figure 1). Please click on the System Information icon in Figure 1, as indicated.
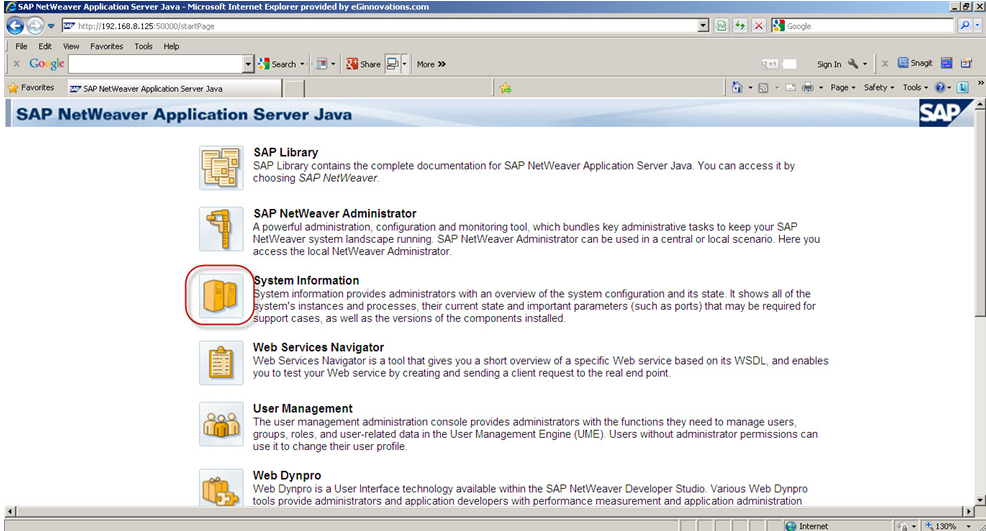
Figure 1 : The SAP NetWeaver Application Server Java landing page
-
A login screen then appears. Login to the system information application using administrator or j2ee_admin credentials. Upon successful login, Figure 2 will appear.
-
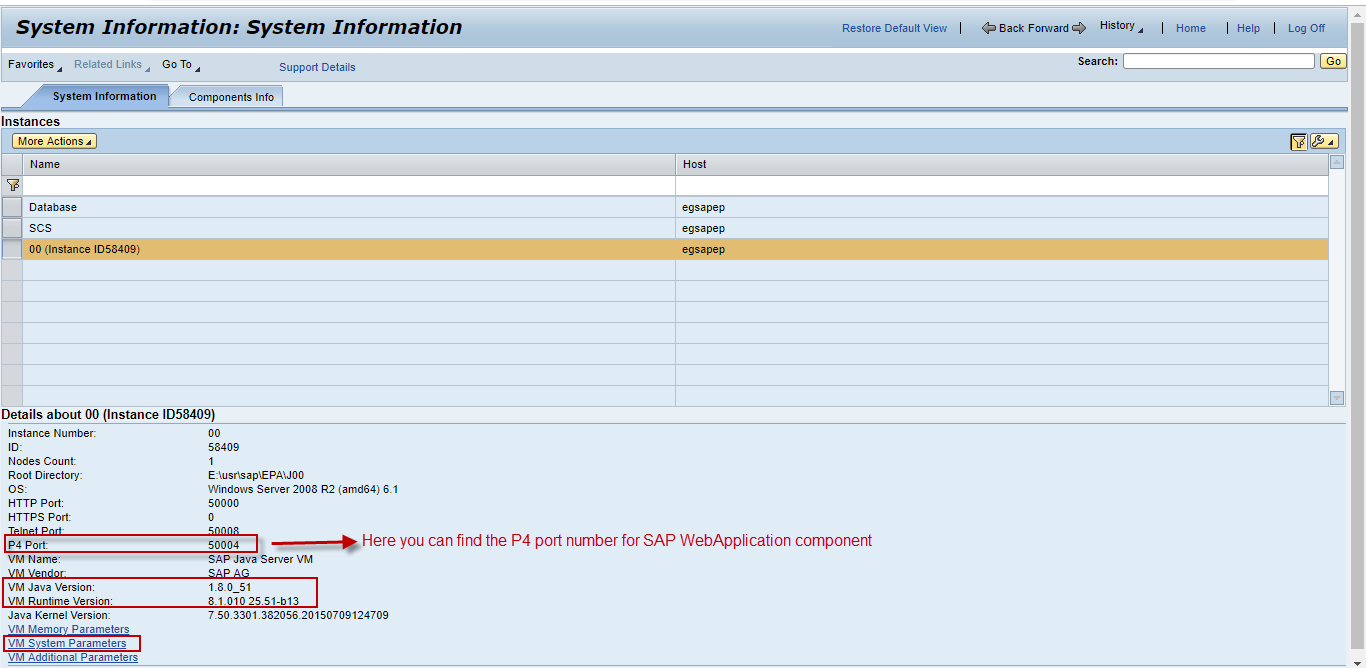
From Figure 2, select the NetWeaver AS JAVA instance - i.e., the J2EE Engine Instance - to be monitored (as indicated). Please verify that the version is at least 1.5 and above by checking the value of the VM Version parameter in the Details about <instance> section. Note down the P4 protocol port from Figure 2. Click on VM System Parameters link in the same section to display/modify VM system parameters for this instance. This will invoke Figure 3.
-
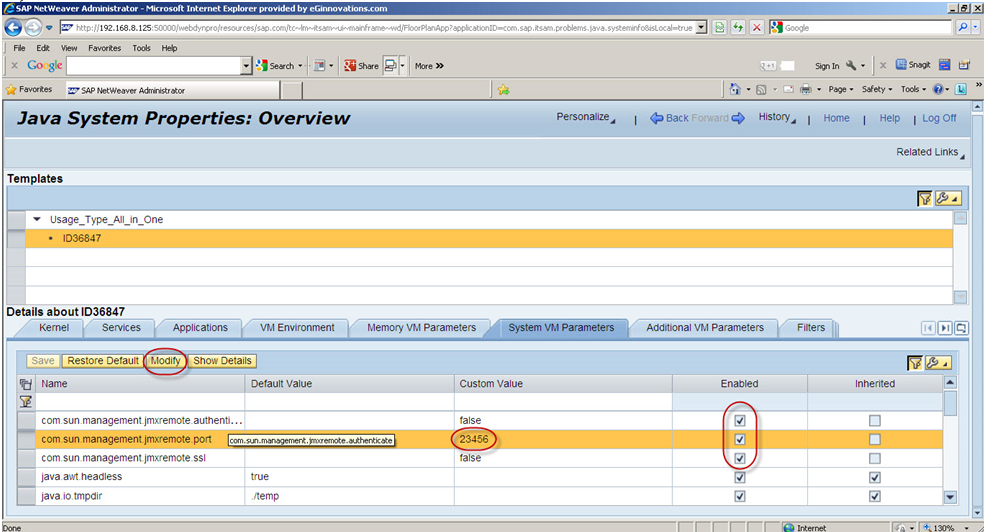
Verify whether the following VM parameters in Figure 3 are Enabled:
com.sun.management.jmxremote.port
com.sun.management.jmxremote.ssl com.sun.management.jmxremote.authenticate
- If not, enable them by selecting the check box in the Enabled column corresponding to each parameter (see Figure 3).
- You may also want to change the Default Value of the com.sun.management.jmxremote.port parameter to an appropriate and available port number. To make this change, select the row containing the com.sun.management.jmxremote.port parameter and click the Modify button indicated by Figure 3.
- After making the port change, scroll down the list of VM parameters in Figure 3 and look for the javax.management.builder.initial parameter. If you find it, then check whether that parameter is Enabled. If it is enabled, then ensure that you disable the parameter by unchecking the Enabled check box corresponding to it.
- Then, click the Save button in Figure 3 to register the changes.
-
Finally, restart the J2EE engine.
Enabling JMX Support Through Config Tool
The Config Tool provides offline configuration of the AS Java. It allows you to modify the properties of all services, managers, and applications on a template and an instance level. It also enables you to manage log configuration, add filters, and edit the JVM parameters.
To enable JMX using the Config tool, do the following:
- Login to the SAP WAS server and open its command prompt.
-
To start the config tool on a Windows installation of the SAP WAS server, follow the steps below:
- Switch to the <SAP_WAS_INSTALL_DIR>\<SYSTEM_NAME>\<INSTANCE_NAME>\j2ee\configtool directory.
-
Run the following command:
configtool.bat
To start the config tool on a Unix/Linux installation of the SAP WAS server, follow the steps below:
- Switch to the <SAP_WAS_INSTALL_DIR>/<SYSTEM_NAME>/<INSTANCE_NAME>\j2ee\configtool directory.
-
Run the following command:
./configtool.sh
-
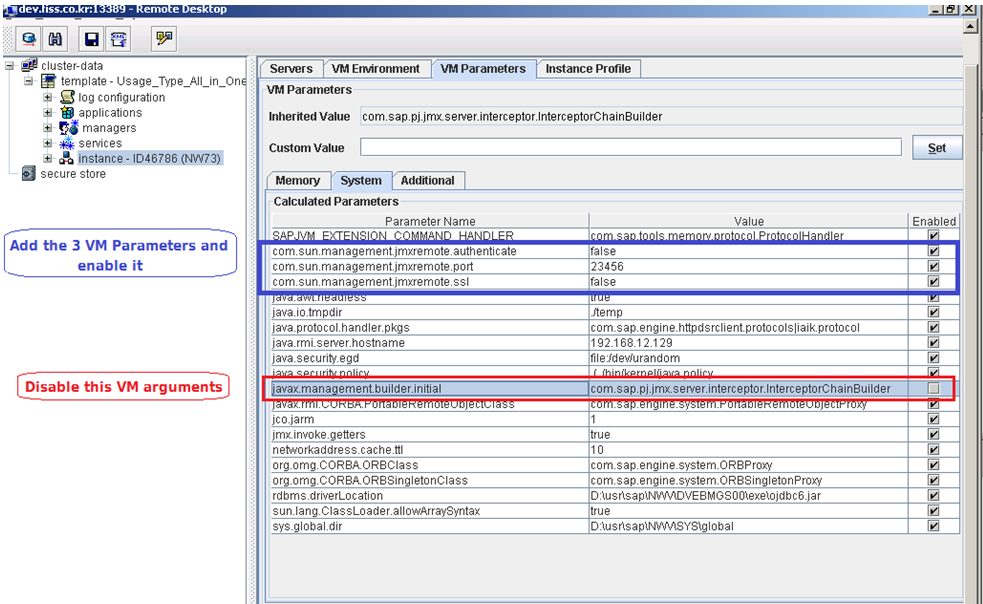
Figure 4 will then appear.
-
Add the following VM options in the corresponding instance, as highlighted by Figure 4.
com.sun.management.jmxremote.port=<<JMX_PORT>>
com.sun.management.jmxremote.ssl=false
com.sun.management.jmxremote.authenticate=false
-
Disable the following VM option, if it exists:
Javax.management.builder.initial=com.sap.pj.jmx.server.interceptor.InterceptorChainBuilder
- Save the changes and close the Config tool.
- Start the SAP WAS server.