How does eG Enterprise Monitor Snowflake?
eG Enterprise monitors Snowflake in an agentless manner. For this purpose, an eG agent is deployed on any remote host and periodically checks the status of critical database operations and proactively reports problems. To enable the eG agent to connect to the Snowflake account that manages the target Snowflake instances and collect metrics, an account identifier that identifies the Snowflake account on Snowflake cloud service should be specified while managing a Snowflake component for monitoring. Additionally, credentials of a user with Account Admin privileges to access the Snowflake account should be specified while configuring the tests using the Specific test Configuration page. The steps for obtaining the account identifier, creating the user and user role and assigning the user role to the user the user have been discussed in the following sections.
Pre-requisites for Monitoring Snowflake
A set of pre-requisites is needed to be fulfilled to configure the Snowflake to work with the eG agent. These requirements are explained in the following sections.
-
Determining the account identifier
Creating a Monitoring User Role
-
Granting global monitoring privileges
-
Creating a monitor user and assigning the user role
Determining Account Identifier
To enable the eG agent to monitor Snowflake, Account Identifier of a Snowflake account is required as it uniquely identifies target Snowflake instances hosted through the Snowflake account being monitored across regions and cloud platforms. The identifier ensures that the eG agent connect to the Snowflake account, query usage and workload and retrieve credit or pipe activity metrics. To determine the account identifier, follow the steps given below:
-
Go to: https://app.snowflake.com
-
Log in to the console as an account admin.
-
In the bottom-left corner, click the profile icon (or initials). This opens a menu with account options (see Figure 1).
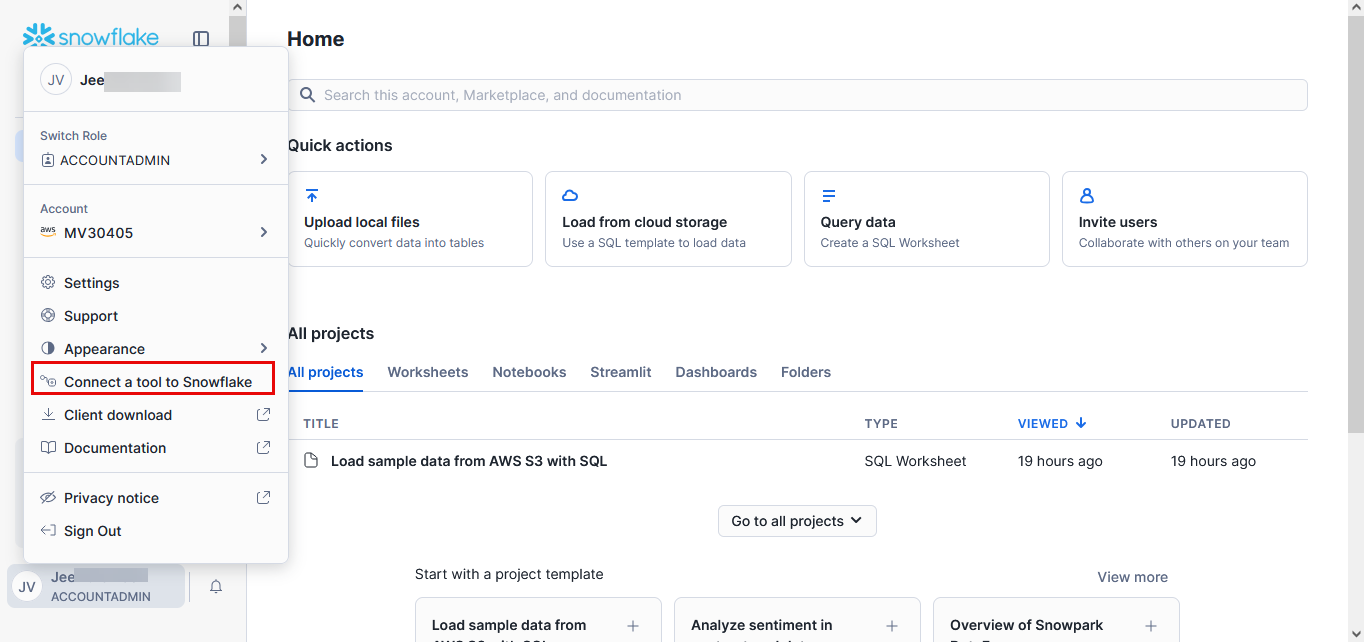
-
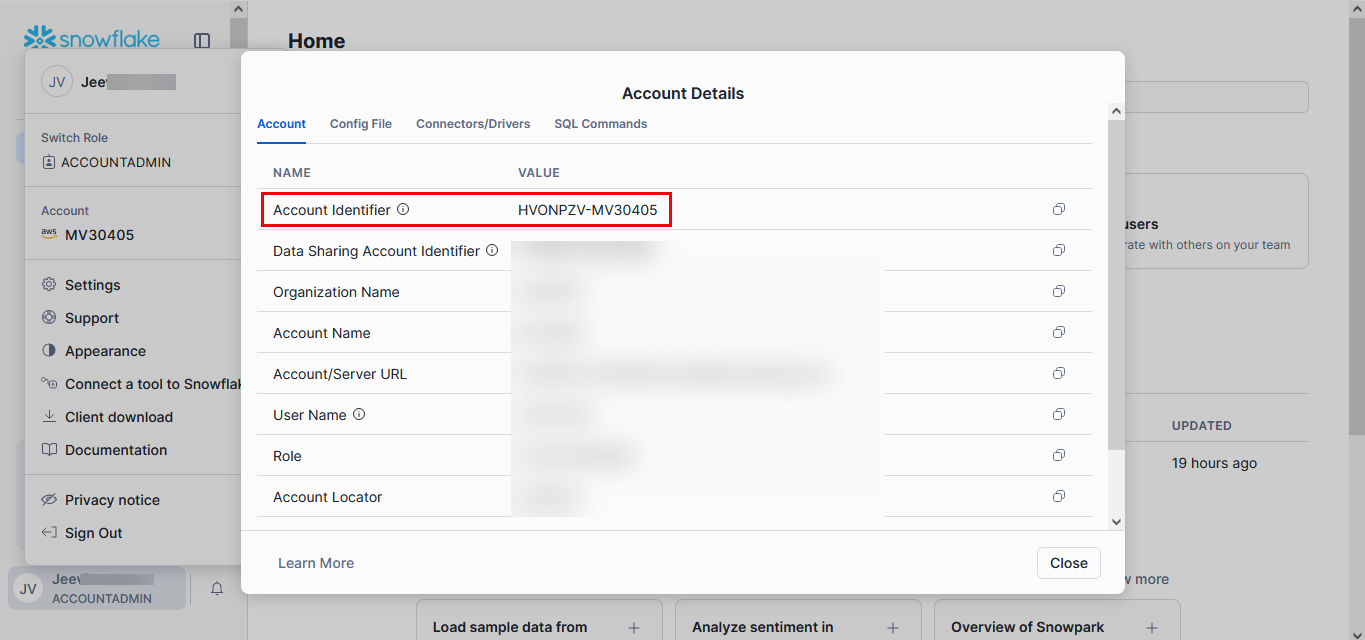
In Figure 1, clicking the Connect a tool to Snowflake option will show the panel with details of the account (Figure 2) wherein you can find the account identifier.
Creating a Monitoring User Role
To monitor a Snowflake instance, you need to manually create a role with monitoring privileges in every database instance in the service account that requires monitoring. To create a new user role for monitoring the Snowflake, run the following command as an Account Admin:
CREATE ROLE <Rolename>;
For example, to create a user named eGMonRole, run the command on the target instance as below:
CREATE ROLE eGMonRole;
Granting Global Monitoring Privileges
For the eG agent to connect to the target Snowflake instance and collect the required metrics, administrators should provide certain privileges to the newly created user role:
GRANT MONITOR USAGE ON ACCOUNT TO ROLE <Userrole>;
In our example, your specification should be:
GRANT MONITOR USAGE ON ACCOUNT TO ROLE eGMonRole;
To enable the Snowflake Warehouse Availability and Snowflake Warehouse Workload tests to run and collect metrics related to the warehouses in the target instance, the user should be vested with the privileges to execute the queries on the warehouses. To grant these privileges, run the following commands as an Account Admin:
GRANT USAGE ON WAREHOUSE <WAREHOUSE_NAME> TO ROLE <User Role>;
GRANT MONITOR ON WAREHOUSE <WAREHOUSE_NAME> TO ROLE <User Role>;
In our example, you specifications should be:
GRANT USAGE ON WAREHOUSE COMPUTE_WAHO TO ROLE egMonRole;
GRANT MONITOR ON WAREHOUSE COMPUTE_WAHO TO ROLE egMonRole;
For the Snowflake Credit Usage by Services test to run and collect metrics on the credit usage by each Snowflake service, the user role should be vested with imported privileges. To grant this privilege to the user role, run the following command as an Account Admin:
GRANT IMPORTED PRIVILEGES ON DATABASE SNOWFLAKE TO ROLE <User Role>;
In our example, you specifications should be:
GRANT IMPORTED PRIVILEGES ON DATABASE SNOWFLAKE TO ROLE egMonRole;
For the Snowflake Credit Usage by Pipes test to run and collect metrics on the credit usage by each Snowflake pipe, the user role (e.g., eg_mon_role) must be granted specific privileges to access and monitor each pipe and its associated objects (database, schema, and pipe). To grant these privileges to the user role, run the following commands as an Account Admin:
To grant access permission to every database that contains a pipe you wish to monitor, run the following command:
GRANT USAGE ON DATABASE <DB_NAME> TO ROLE <User Role>;
In our example, you specifications should be:
GRANT USAGE ON DATABASE snowdb TO ROLE egMonRole;
To grant access permission to every schema that contains a pipe you wish to monitor, run the following command:
GRANT USAGE ON SCHEMA <DB_NAME.SCHEMA_NAME> TO ROLE <User Role>;
In our example, you specifications should be:
GRANT USAGE ON SCHEMA snowdb.snowschema TO ROLE egMonRole;
To access the each pipe that you want to monitor, run the following command:
GRANT MONITOR ON PIPE <DB_NAME.SCHEMA_NAME.PIPE_NAME> TO ROLE <User Role>;
In our example, you specifications should be:
GRANT MONITOR ON PIPE snowdb.snowschema.snowpipe TO ROLE egMonRole;
Creating a User and assigning the User Role
To enable the eG agent to execute eG Agent the queries to collect performance metrics from the target Snowflake instance, a user with certain privileges is required with the respective user credentials. For this purpose, you need to create a special user on the Snowflake instance in the Snowflake server account to be monitored. To create such a user, run the following commands as an Account Admin:
CREATE USER <Username>
PASSWORD = 'Password'
LOGIN_NAME = <Login Username of your interest>
DEFAULT_ROLE = PUBLIC
COMMENT = 'Monitoring user with limited access';
For example, you specifications can be:
CREATE USER egMonUser
PASSWORD = 'StrongPassword123!' -- Replace with a strong, secure password
LOGIN_NAME = egMonUser
DEFAULT_ROLE = PUBLIC
COMMENT = 'Monitoring user with limited access';
Once you created the monitor user (in our example egMonUser), assign the user with the monitoring role (in our example, egMonRole). To do this, run the following command as an Account Admin:
GRANT ROLE <User Role> TO USER <User name>;
In our example, you specifications should be:
GRANT ROLE egMonRole TO USER egMonUser;
Note:
eG Enterprise connects to the Snowflake cloud service using JDBC that supports a Type 4 JDBC driver. The driver must be installed in a 64-bit environment and requires Java 15 (only). To establish the connection, a connection string must be specified in the following format:
jdbc:snowflake://<account_identifier>.snowflakecomputing.com/?<connection_params>
Once the above mentioned pre-requisites are set in place, proceed managing a Snowflake component using the admin interface. To know how to do it, refer to Adding a Snowflake Component.