Configuring the eG manager to Work with AppsMon for Windows
The next step is to configure the eG manager to work with AppsMon for Windows. The eG manager supports a Client Session Simulation component type that has been specifically designed to extract performance metrics from request emulators such as AppsMon for Windows.
To configure the eG manager to work with AppsMon for Windows, do the following:
- Login to the eG administrative interface.
-
Next, add the component to be monitored as a Client Session Simulation component. To do so, follow the menu sequence: Infrastructure -> Components -> Add/Modify. From the Add/Modify Components page that appears, select the Emulated Client option from the Component type list box (Figure 5).

- Then, click on the Add New Componentbutton in Figure 5 to add a new component of type Client Session Simulation.
-
Provide the IP address and host name of the component in Figure 6 that appears. In our example, the component to be monitored is the web server, 192.168.9.194, which hosts the Eurail web site. Therefore, provide 192.168.9.194 against the Host IP/Name text box and specify a nick name for the chosen component type in the Nick name text box. Then, select the external agent that will execute the recorded script, and click the Add button therein to register the changes.
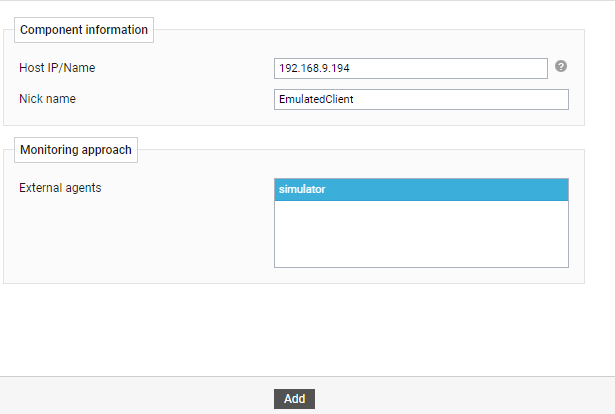
Figure 6 : Adding a component of type Client Session Simulation
Note:
Only those external agents for which the client emulation capability has been enabled will be displayed in the External agents list of Figure 7. Such agents cannot monitor any other component type.
-
Clicking on the Add button in Figure 6 will invoke Figure 7, where the Client Session Simulation component that you just added will be displayed.

Figure 7 : The Client Session Simulation component that was added being displayed
-
To configure tests for this component, click on the
 icon corresponding to that component. Figure 8 will then appear.
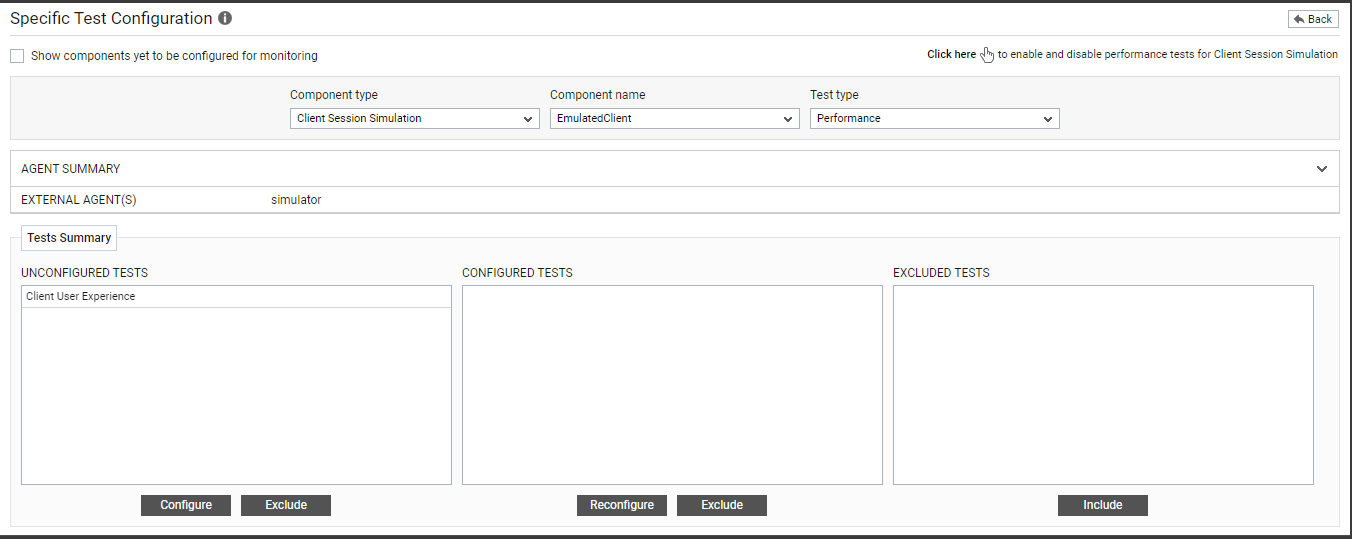
-
The UNCONFIGURED TESTS list box ofFigure 8 displays the Client User Experience test. This test reports the availability and response time of the application being monitored by the AppsMon for Windows tool. To configure this test, click on the test name in the UNCONFIGURED TESTS list box, and click on the Configure button beneath (see Figure 8). Figure 9 will then appear, displaying the parameters of the Client User Experience test.
-
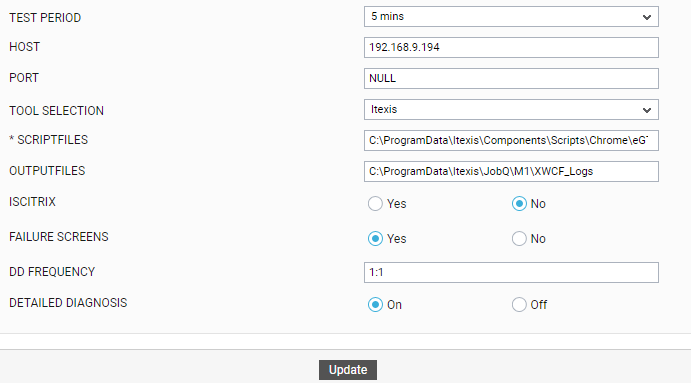
Specify the following in Figure 9:
- Test period – How often should the test be executed
- Host – The host on which the test will execute. In our example, the test will attempt to extract measures from the host, 192.168.9.194.
- Port – The port at which the specified host listens. By default, this is NULL.
- Tool selection – Select the tool using which the client emulation is to be performed from this text box. To use Itexis - AppsMon for Windows, select Itexis option from this list.
-
Scriptfiles – The full path to the script file that is to be played back for emulating a request to, and extracting metrics from the monitored application.
Note:
-
For a single application, multiple scripts can be created. This typically occurs if the user wants to simulate a different sequence of steps to a single application. For instance, in the Eurail web site, two different sequence of steps need to be followed in order to perform the following transactions:
- Checking the rail time
-
Making a reservation
To address this requirement, you need to simulate both the sequences separately and record the steps into different script files.
Then, manage the Eurail web site as a Client Session Simulation component, and associate both the script files with it. Multiple script files can be associated as a comma-separated list.
-
If multiple scripts are configured, then note that eG Enterprise will run these scripts only sequentially - i.e., one after another - and not parallelly. Therefore, you need to take care when configuring the Test Period in this case. The total time that the external agent will take to run all simulations should be considered before configuring the Test Period.
-
Before configuring this test with the path to the script file(s), you need to manually copy the file(s) from the Recording station to the Playback station. The location of the script(s) on the Recording station is: C:\ProgramData\Itexis\Components\Scripts. Make sure that the script(s) is copied to the same location on the Playback station.
-
-
Outputfiles – Enter the full path to the output file that contains the metrics extracted by the specified script file. Here again, multiple output files can be provided as a comma-separated list, but only if multiple script files are also provided.
Note:
- If None is specified here, then the eG system will collect statistics from the default output files associated with each of the specified script files. The default output files will be present in the same location as the respective script files, and will have the same name as the script files. In our example, the value of the Outputfiles parameter can remain as None.
- While specifying multiple output files, ensure that they are provided in the same order as their corresponding script files in the Scriptfiles text box.
- If the Scriptfiles parameter consists of multiple entries and the Outputfiles parameter consists of only one, then eG will automatically associate the first script file entry in the Scriptfiles box with the Outputfiles entry. Measures pertaining to the other script files will therefore not be displayed in the eG monitor interface.
- IsCitrix – If the specified script emulates a request to a Citrix client then, specify Yes here. If not, specify No. Our example does not attempt to extract measures from a Citrix client. Therefore, provide No here.
- Failure Screens - Set this flag to Yes, if you want to view a screenshot of a transaction failure.
- Next, click on the Update button in Figure 9 to complete the configuration.
- Now that Client User Experience test has been configured, the eG Enterprise will playback the specified Scriptfiles according to the chosen Test Period. Whenever the eGTest script is played back, the AppsMon for Windows tool will collect the Availability and Response time metrics for every timer configured in the script, and will store these details in the corresponding Outputfiles. The eG Enterprise will then extract the measures from the Outputfiles and display them in the monitor interface.
- To view the measures in the eG monitor interface, first, SIGNOUT of the eG administrative interface.
- To view the measures in the eG monitor interface, navigate to the layer model of the Client Session Simulation component in the eG monitor interface.