Instrumenting SharePoint
Instrumenting a Single SharePoint Site
To inject the JavaScript into the pages of a single Sharepoint site, do the following:
-
First, add the Sharepoint site as a Real User Monitor component in eG.
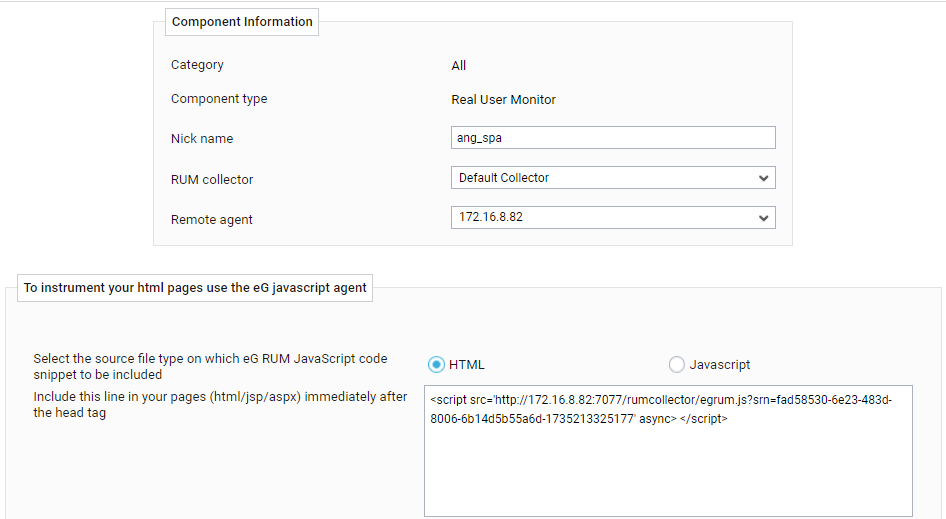
Figure 1 : Adding the Sharepoint site as a Real User Monitor component
- When adding the Real User Monitor component, you will be provided with the Javascript (as indicated by Figure 1 above) that you need to inject into the pages of your site.
- Copy this script to Notepad or any other Editor.
-
Next, login to the Sharepoint site that you want to monitor as administrator.
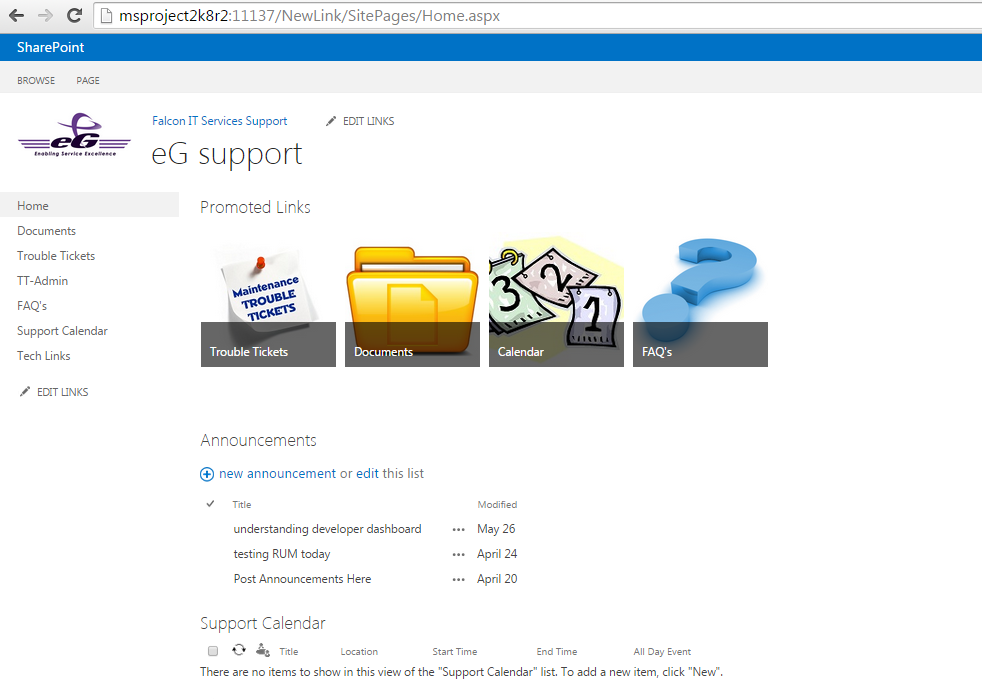
Figure 2 : The Home page of the Sharepoint site to be monitored
-
Then, click on the Settings icon (indicated by Figure 3) at the right, top corner of the Home page to invoke a menu. From this menu, select the Site settings option.
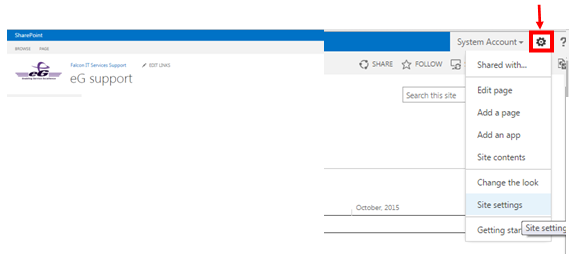
Figure 3 : Selecting the Site settings option from the Home page
-
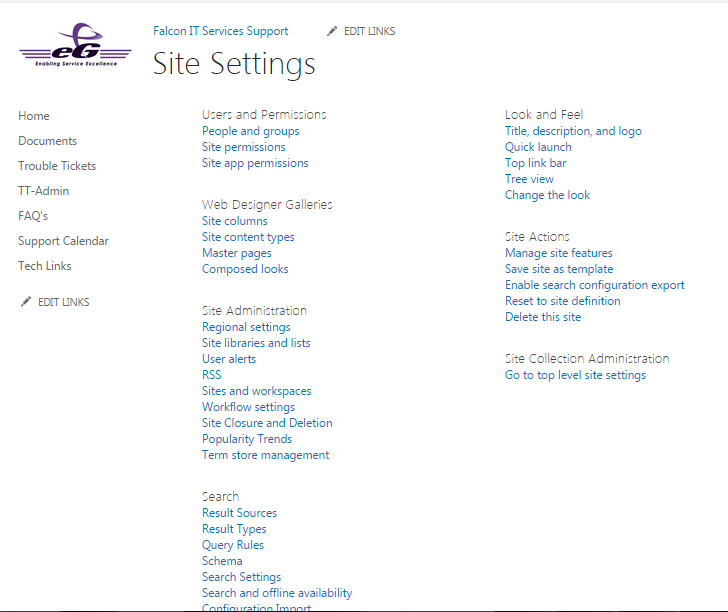
From the Site Settings window (see Figure 4) that then appears, select the Master Pages option in the Web Designer Galleries section.
-
When the Master Page Gallery opens (see Figure 5), look for the seattle.master file (in the case of Sharepoint 2013) or the v4.master file (in the case of Sharepoint 2010), in the gallery. Once you find it, hover your mouse over the file name in the gallery. A down-arrow icon (as indicated by Figure 5), will then become visible alongside. Click on the down-arrow icon.
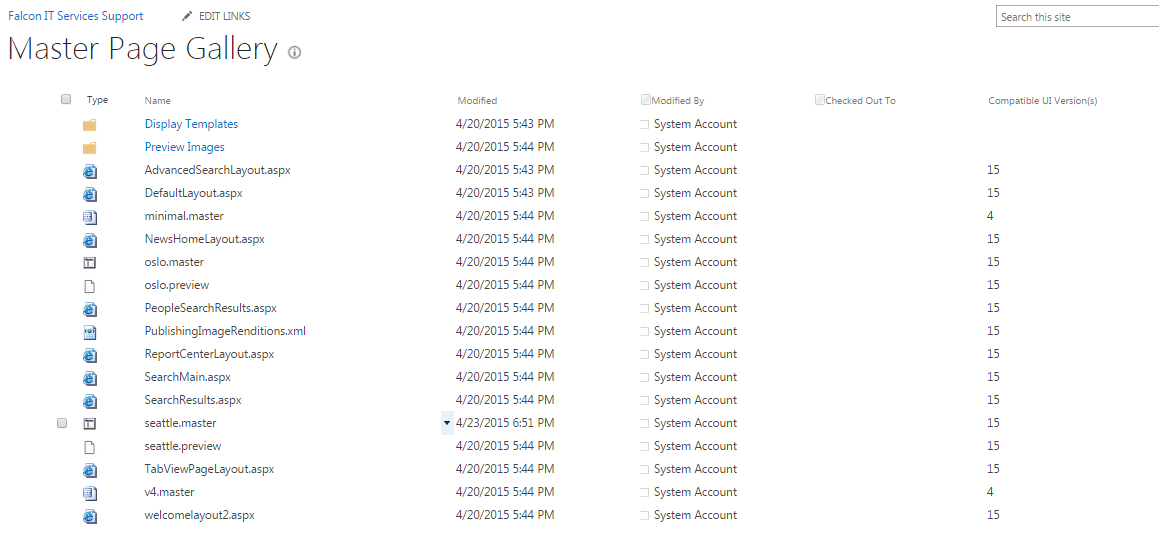
Figure 5 : Locating the seattle.master file on Sharepoint 2013
-
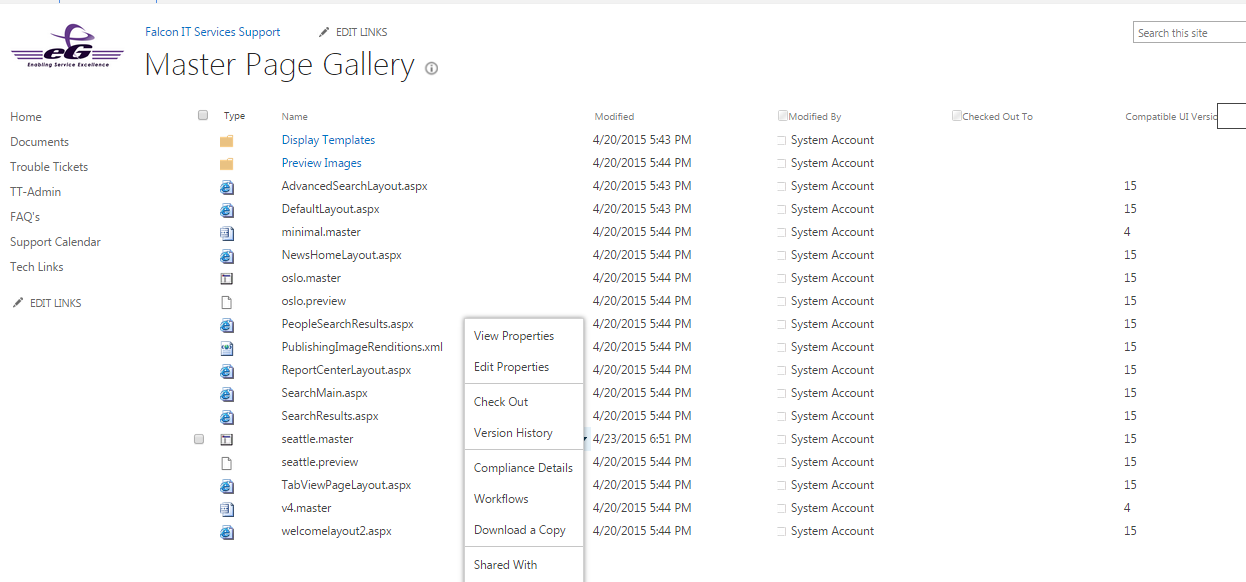
Clicking on the down-arrow will invoke a menu. From this menu, select the Check Out option (see Figure 6).
-
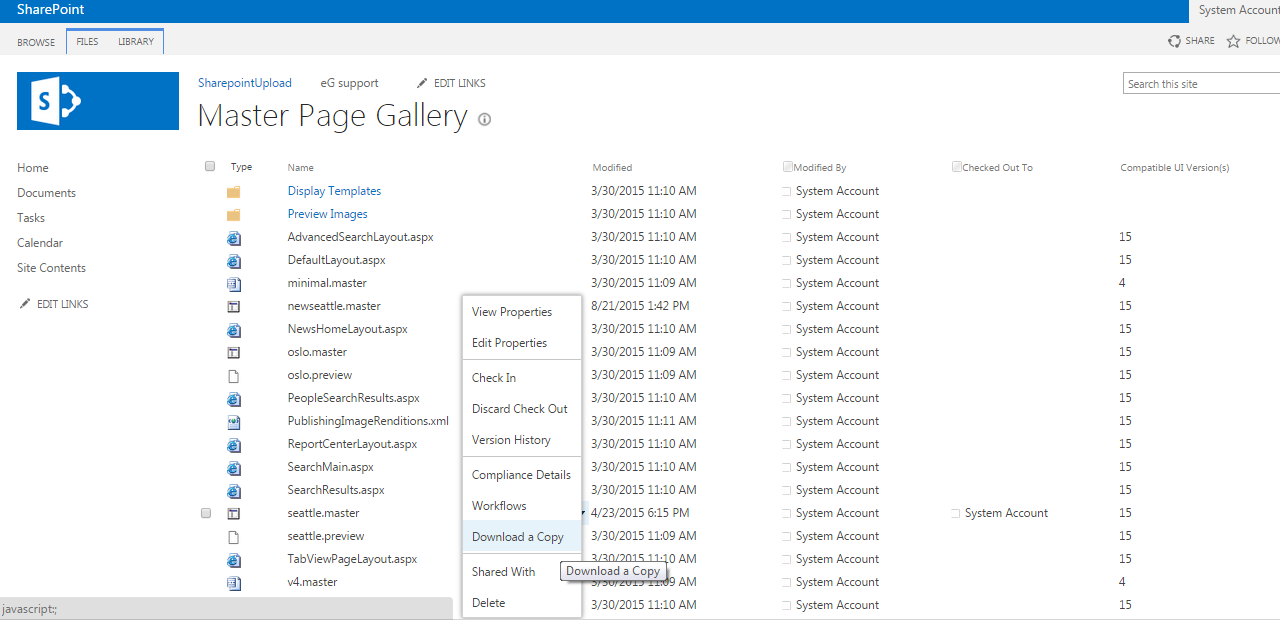
Then, select the Download a Copy option from the same menu (see Figure 7) to download a copy of the master file to any location on the local host.
- Next, open the downloaded copy of the master file in an Editor.
Paste the Javascript code that you had copied to an Editor at step c of this procedure just above the </head> tag of the master file (as indicated by Figure 8).
.png)
Figure 8 : Inserting the Javascript code in the master file
Note:
Make sure that the Javascript code snippet is copied to the master file with utmost diligence. Do not change any other content in the master file when copying the script, as it may lead to undesirable results.
- Save the file.
-
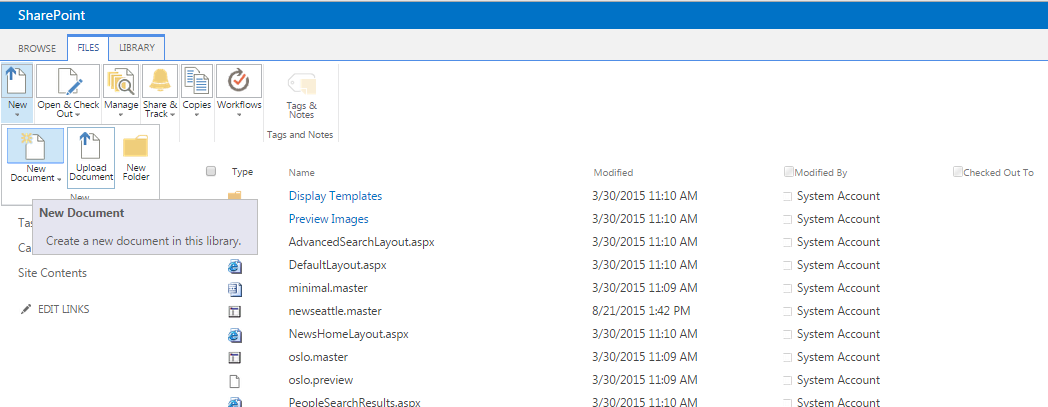
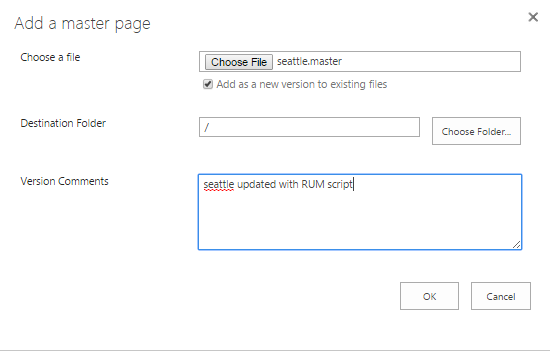
Then, return to the Master Page Gallery of Figure 7. From the menu on top of the gallery, select the Files option. Pick the New menu from the Files menu, and then choose the Upload Document option from it to upload the modified master file.
-
Figure 10 will then appear. Use the Choose File button in Figure 10 to select the master file to be uploaded. Provide appropriate comments in the Version Comments text box, and click the ok button.
-
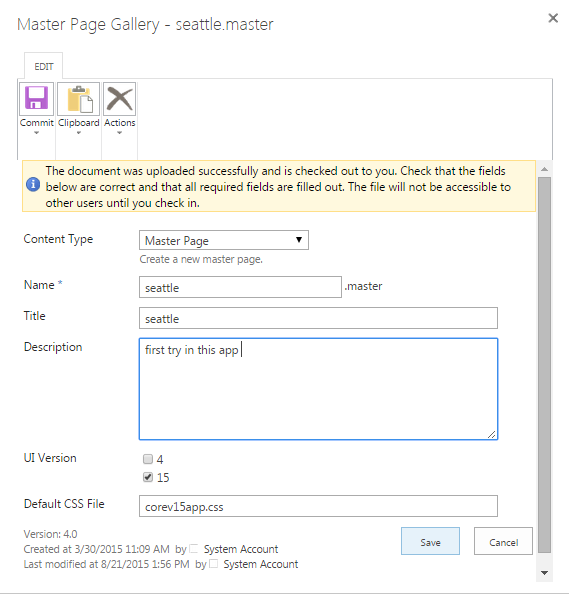
When Figure 11 appears, provide a Description and click the Save button therein.
-
Once back in the Master Page Gallery, make sure that the timestamp displayed against the master file reflects the time at which the file was modified (see Figure 12).
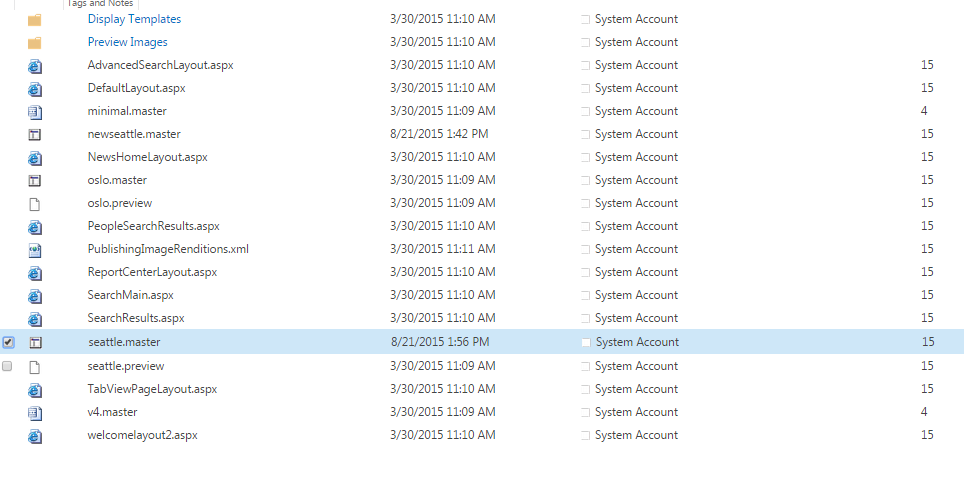
Figure 12 : Confirming that the timestamp of the master file reflects the time of modification
-
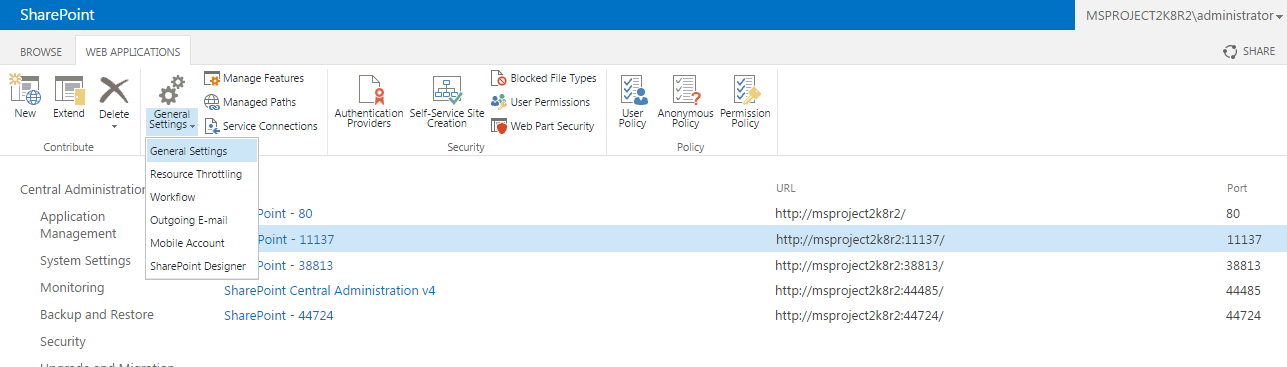
Now, go to Sharepoint’s Central Administration site, and select the Manage web applications option from the Application Management section of the site (see Figure 13).

-
When Figure 14 appears, select the Sharepoint web application into which you have injected the Javascript code snippet.
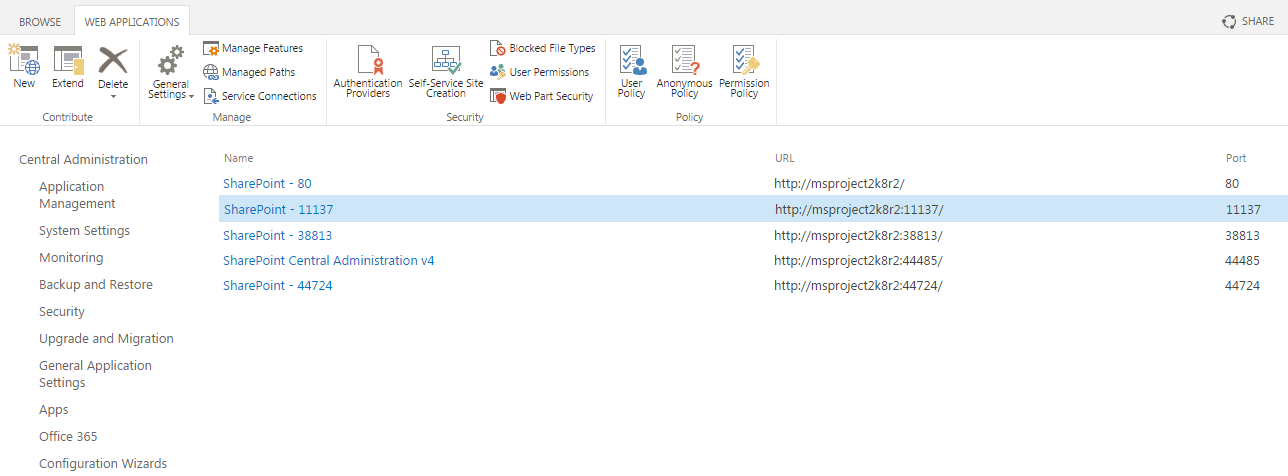
Figure 14 : Selecting the Sharepoint web application to be monitored
-
From the tool bar at the top of Figure 14, click on the General Settings tool and then pick the General Settings option from the menu that appears (see Figure 15).
-
Once Figure 16 appears, scroll down the window until you see the Master Page Setting for Application _Layouts Pages section. In that section, check whether the Application _Layouts pages reference site master pages flag is set to Yes. If not, set it to Yes.
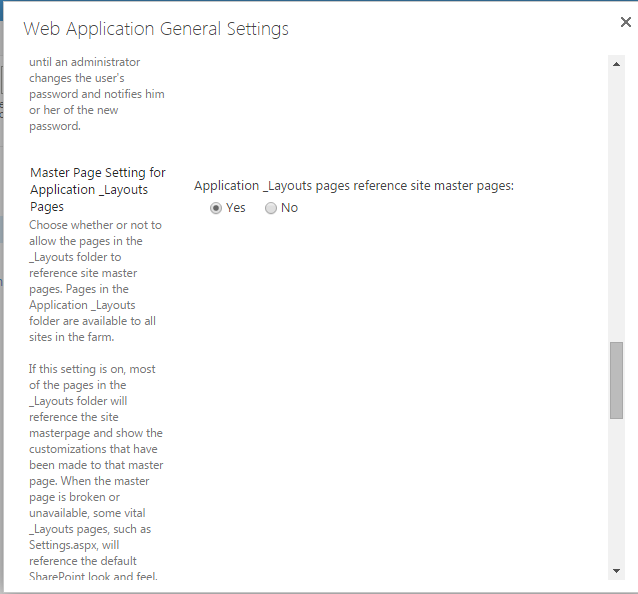
Figure 16 : Setting the ‘Application –Layouts . . .’ flag to Yes
Note:
The illustrated example above takes the case of a web application on Sharepoint 2013 that is to be monitored by eG RUM. When RUM-enabling a web application on Sharepoint 2010, make sure you insert the script in the v4.master file. In other words, ensure that step 7 to step 16 of the procedure is performed on the v4.master file only, in the case of Sharepoint 2010.
Instrumenting Multiple SharePoint Sites At Once
Every SharePoint site has one or more site collections. Each site collection is made up of multiple child subsites. eG Enterprise provides a proprietary PowerShell script using which you can easily RUM-enable multiple subsites under a site collection at one shot. Similarly, you can use the same script to easily disable RUM for multiple subsites as well. Follow the steps below to know how this can be achieved:
-
Login to the eG agent host.
-
Then, login to the eG management console, and manage the target site collection as a Real User Monitor component in eG.
-
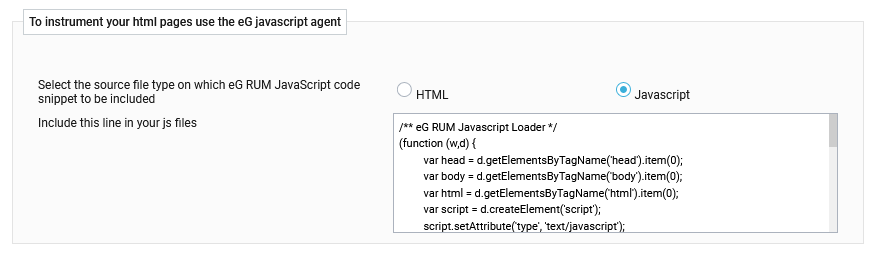
When adding the Real User Monitor component, you will be provided with the Javascript (as indicated by Figure 17) code snippet that you need to inject into the pages of the subsites in your site collection.
-
Copy this script to Notepad or any other Editor (seeFigure 18). Then, save the file as rum_script.js.

-
Then, proceed to run the PowerShell script. For this, first, open the PowerShell command prompt in elevated mode. Then, switch to the <EG_AGENT_INSTALL_DIR>\bin directory (on Windows; on Unix, this should be the /opt/egurkha/bin directory). Issue the following command from this directory:
.\sharepoint_rum_injection.ps1 <Site_Collection_URL> ./<RUM_Script_File> <Injection_Rule>
The parameters that this command takes are described hereunder:
<Site_Collection_URL>: Here, specify the URL of the Sharepoint site collection that you want to RUM-enable.
<RUM_Script_File>: Specify rum_script.js here.
<Injection_Rule>: For injecting the RUM script into one/more sub sites of a site collection, the <Injection_Rule> can be any one of the following:
Injection Rule
Purpose
All
Inject into all sub sites (Child) including site collection (Parent)
NoSubSite
Inject only into site collection (Parent)
AllSubSite
Inject only into all sub sites (Child) under target site collection, but not into site collection (Parent)
IncludeSome:id1#id2....#idn
Inject into sub sites with specified site IDs, and also in site collection (Parent)
ExcludeSome:id1#id2....#idn
Inject into site collection (Parent) and all sub sites (Child) under it, except those sub sites with the specified IDs.
The table below provides sample commands that use each of the Injection Rules mentioned above:
Injection Rule
Purpose
All
.\sharepoint_rum_injection.ps1 https://xyz.sharepoint.com/sites/mytestcoll ./rum_script.js All
NoSubSite
.\sharepoint_rum_injection.ps1 https://xyz.sharepoint.com/sites/mytestcoll ./rum_script.js NoSubSite
AllSubSite
.\sharepoint_rum_injection.ps1 https://xyz.sharepoint.com/sites/mytestcoll ./rum_script.js AllSubSite
IncludeSome:id1#id2....#idn
.\sharepoint_rum_injection.ps1 https://xyz.sharepoint.com/sites/mytestcoll ./rum_script.js IncludeSome:subId1#subid2#subid3
ExcludeSome:id1#id2....#idn
.\sharepoint_rum_injection.ps1 https://xyz.sharepoint.com/sites/mytestcoll ./rum_script.js ExcludeSome:subId1#subid2#subid3
-
Once you issue the command, you will be prompted to provide valid credentials for executing the command. The sharepoint_rum_injection.ps1 script requires Site Administrator privileges for execution. So, provide the credentials of a user with Site Administrator rights to the target site collection, when prompted (see Figure 19).
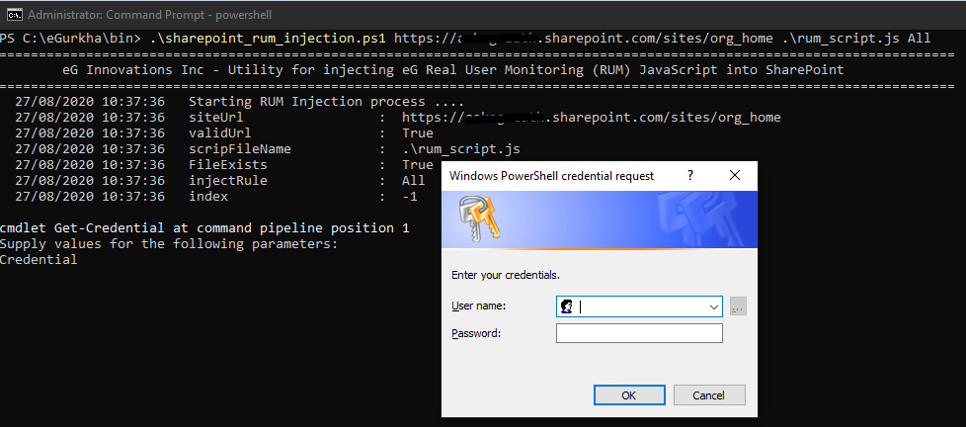
Figure 19 : Providing credentials for executing the sharepoint_rum_injection utility
-
Once valid credentials are provided, the utility will proceed to inject the RUM script in the web pages of all / specified sub sites of the site collection. Upon successful injection, messages indicated by Figure 20 will appear.

Figure 20 : Messages that appear indicating that the RUM script has been successfully injected
-
To confirm whether/not the web pages have been successfully instrumented for RUM, first access any RUM-enabled child site in the target site collection. When the web site opens in the browser, right-click on it, and pick the View Source option (see Figure 21).
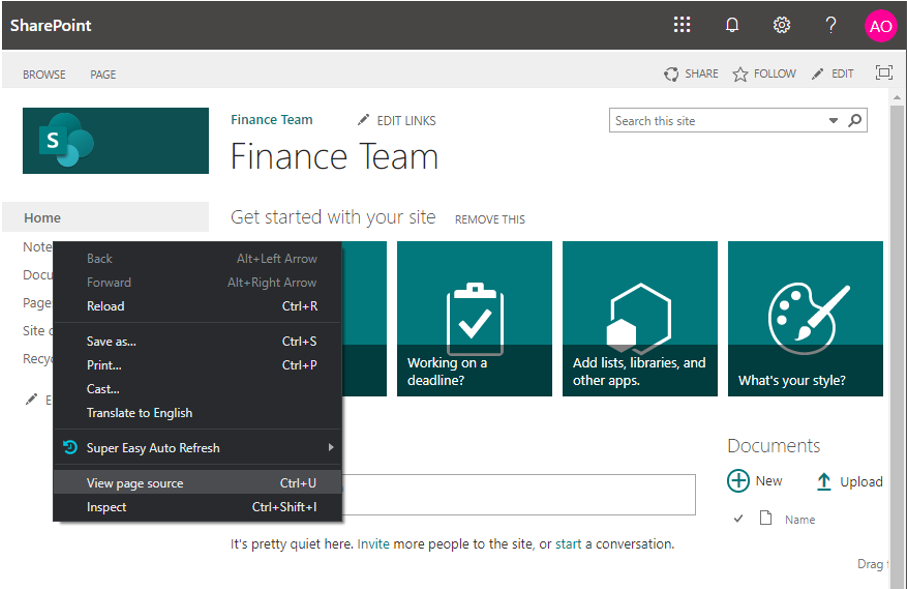
Figure 21 : Accessing the source file of a RUM-enabled web page
-
Figure 22 will then appear. In the source file of Figure 22, look for the RUM code snippet that you saved into the rum_script.js file, at step 4 above. If you find that code snippet in the source, you can conclude that the RUM script has been successfully injected into the web page.
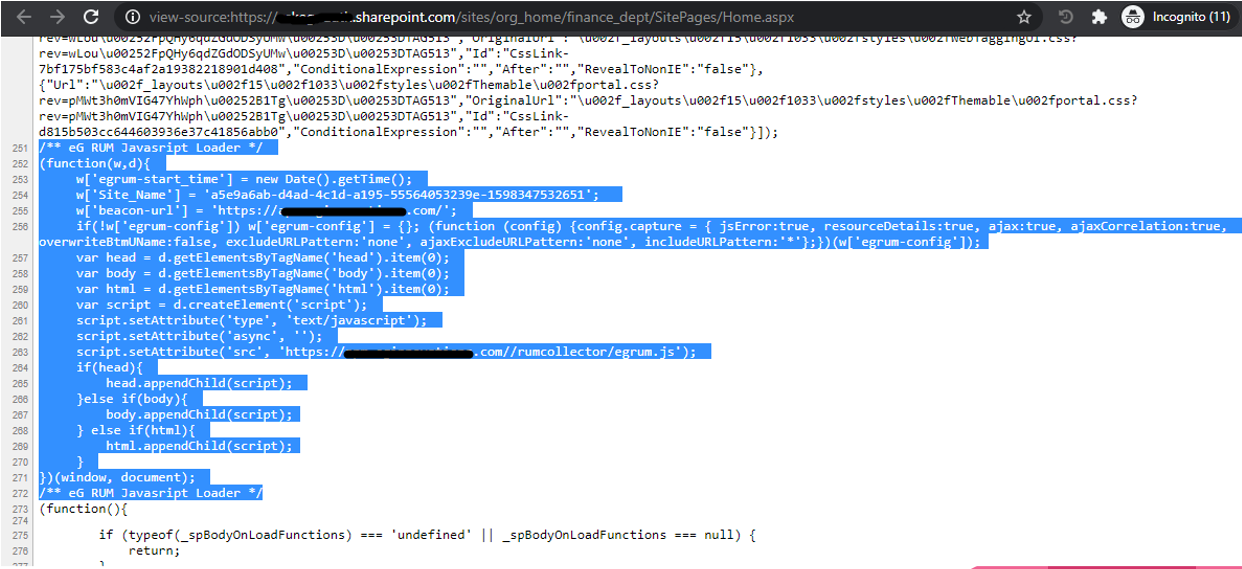
Figure 22 : Verifying whether/not the RUM script has been successfully injected in the target web page
-
Next, check whether the browser has started sending beacons/metrics from the RUM-enabled web page to the eG RUM collector. For this, with the web page open in the browser, invoke Developer Tools. Then, click on the Network tab page (see Figure 23) in the Developer Tools console. If you find a resource with the name 'rdr' displayed therein, as indicated by Figure 23, then it is a clear indication that the browser is successfully transmitting beacons/metrics to the eG RUM collector.
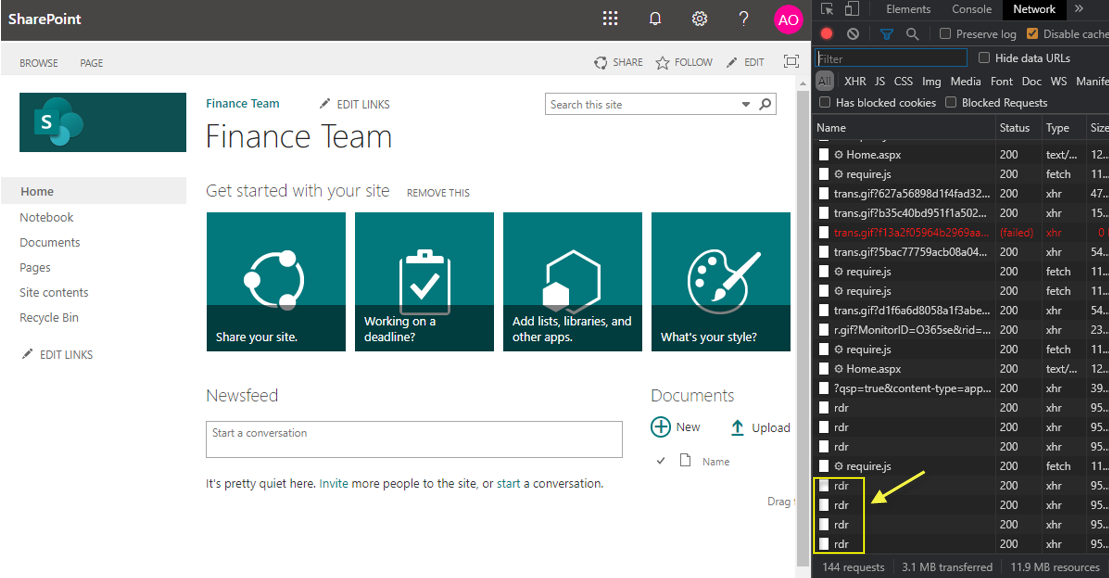
Figure 23 : Checking whether/not the browser is sending metrics to the eG RUM collector
-
At any given point in time, you can choose to disable 'Real User Monitoring' for one/more/all child sites of a site collection, by removing the RUM script injected into their web pages. For this, you can use the sharepoint_rum_injection.ps1 script once again. To run this script, as befiore, open the PowerShell prompt, and switch to the <EG_AGENT_INSTALL_DIR>\bin directory (on Windows; on Unix, this will be the /opt/egurkha/bin directory). Then, issue a command with the following syntax:
.\sharepoint_rum_injection.ps1<Site_Collection_URL> ./<RUM_Script_File> <Rule_for_Removing_RUM_Script>
The parameters that this command takes are described hereunder:
<Site_Collection_URL>: Here, specify the URL of the Sharepoint site collection for which you want to disable RUM.
<RUM_Script_File>: Specify rum_script.js here.
<Injection_Rule>: For removing the RUM script from one/more/all sub sites of a site collection, the <Rule_for_Removing_RUM_Script> can be any one of the following:
Rule
Purpose
Remove
Remove the injected RUM script from all the sites - i,e,, from the parent site collection and all child sub sites under it
Remove:id1#id2....#idn
Remove injected RUM script from the specified sub sites alone
The table below provides sample commands that use each of the removal Rules mentioned above:
Rule
Purpose
Remove
.\sharepoint_rum_injection.ps1 https://xyz.sharepoint.com/sites/mytestcoll ./rum_script.js Remove
Remove:id1#id2....#idn
.\sharepoint_rum_injection.ps1 https://xyz.sharepoint.com/sites/mytestcoll ./rum_script.js Remove:subid1#subid2
-
Once the command is issued, you will be prompted to confirm if you want to proceed with the removal. Type Y here to confirm removal, or N to terminate the command execution (see Figure 24).
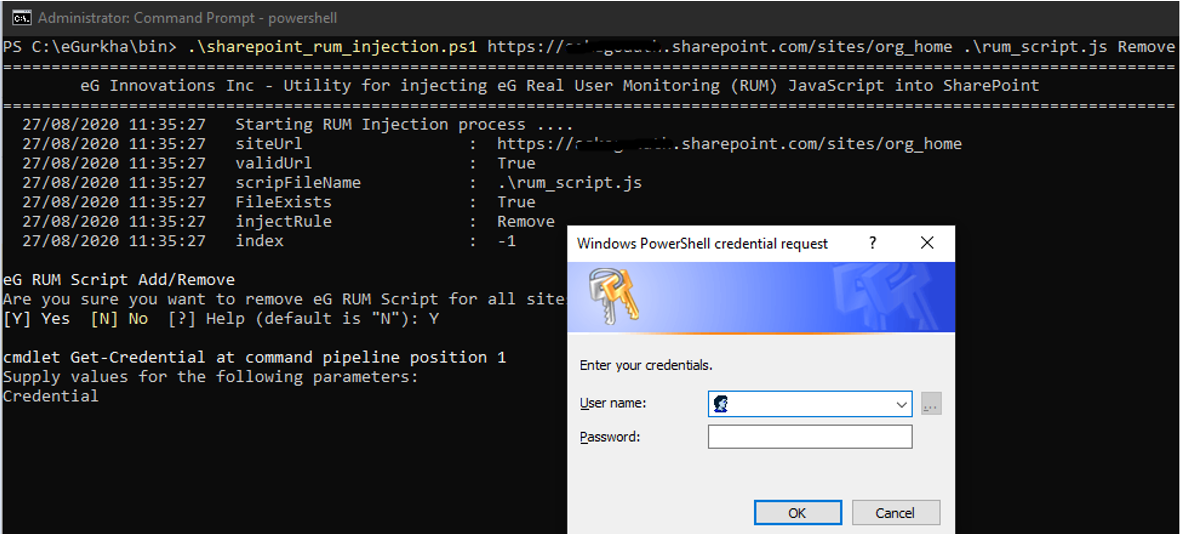
Figure 24 : Issuing the command to remove the RUM script from all/a few sub sites in a site collection
- If you press Y at step 12 above, then you will be prompted to provide valid user credentials to proceed with the removal (see Figure 24). To remove the RUM script from a site, the PowerShell utility requires Site Administrator permissions. Therefore, you will have to provide the credentials of a user with Site Administratorrights to the target site collection in Figure 24.
-
Upon successful execution of the command, the messages depicted by Figure 25 will appear.
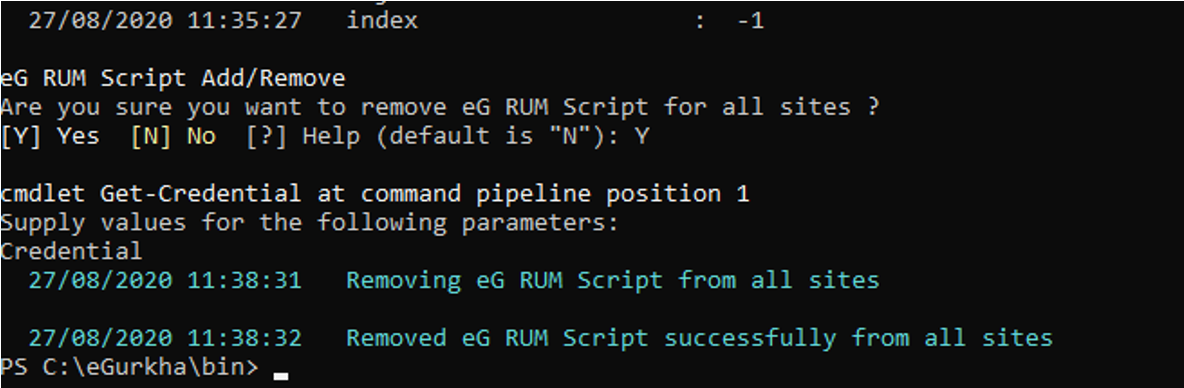
Figure 25 : Messages that appear once the command successfully removes the RUM script from the site collection / specified sub sites