Instrumenting a Web Site or Web Application Using a NetScaler Rewrite Policy
Rewrite refers to the rewriting of some information in the requests or responses handled by the NetScaler appliance. When you enable the rewrite feature, NetScaler can modify the headers and body of HTTP requests and responses.
Where NetScaler is used to load-balance requests to a web application, you can configure a rewrite policy on NetScaler to automatically inject the RUM script into HTTP responses from the target application.
The steps in this regard are as follows:
- The first step is to copy the RUM script to be injected. For this, login to the eG administrative interface and add a Real User Monitor component using the Add/Modify page (Infrastructure -> Components -> Add/Modify).
-
Once the component is added, the RUM script that should be included in the responses will be displayed. Copy this script to a text file. Note that this code snippet is case-sensitive. It is therefore recommended that you copy the code as is to the text file, instead of manually retyping it.
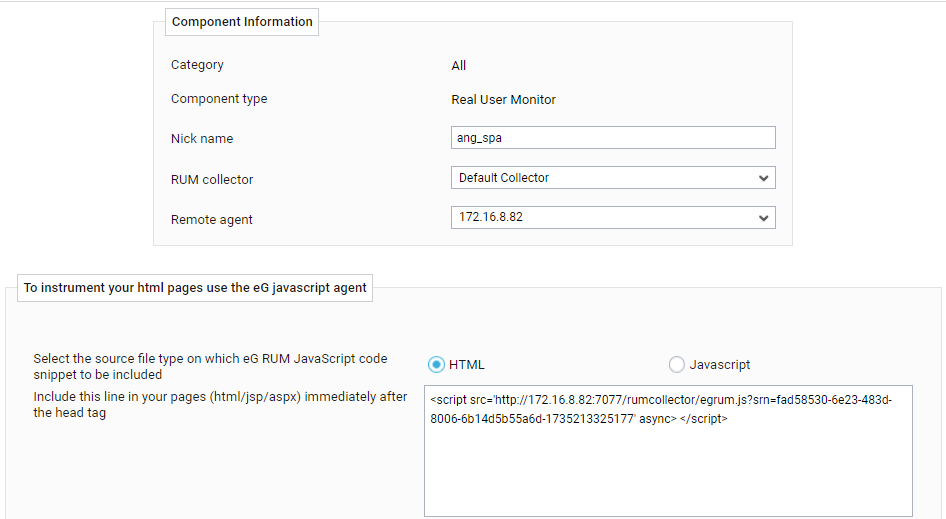
Figure 1 : The RUM script that is to be injected into the HTTP responses
-
A sample RUM script is provided below:
<script src='https://172.16.14.115:7077/rumcollector/egrum.js?srn=195c521a-177d-49a9-96e7-6a31d9d3cd47-1771824278982' async> </script>
-
Edit the RUM script in the manner described below:
-
Enclose
Copy"<script src='https://172.16.14.115:7077/rumcollector/egrum.js?srn=195c521a-177d-49a9-96e7-6a31d9d3cd47-1771824278982' async> </script>"
-
-
Next, enable the Rewrite feature on the NetScaler appliance. For this, follow the steps detailed below:
- Connect to the NetScaler Admin console via a browser.
-
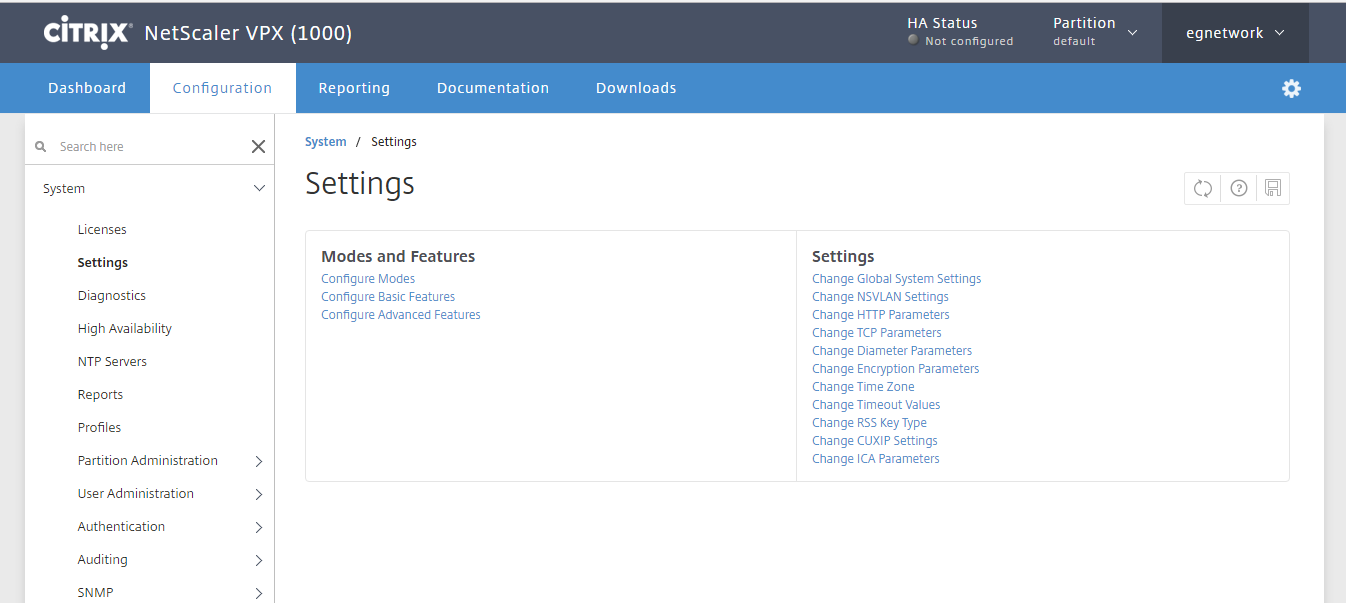
Login to the console. Upon login, the Configuration tab page will open by default. From the System menu in the left panel of the console, select the Settings option. The right panel will then change to display a Settings page (see Figure 2).
-
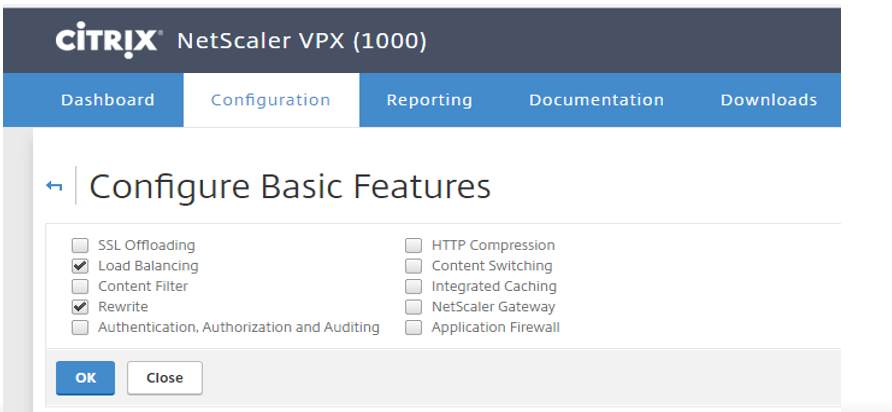
From the Modes and Features menu in the Settings page (see Figure 2), select the Configure Basic Features option. Figure 3 will then appear:
-
Next, enable rewrite by selecting the Rewrite check box, as shown by Figure 3. Click OK in Figure 3 to save the changes. You will now return to Figure 2. Close the System menu in the left panel of Figure 2.
-
Now, proceed to define a rewrite action. This is required to insert the eG RUM code snippet in the body of the HTTP responses sent by the target application. For this, follow the steps below:
-
First expand the AppExpert menu in the left panel of Figure 2. From the AppExpert menu, select the Rewrite sub-menu, and then pick the Actions option. The right panel will then change to display the rewrite actions that pre-exist. To add a new rewrite action, click the Add button in the right panel of Figure 4.
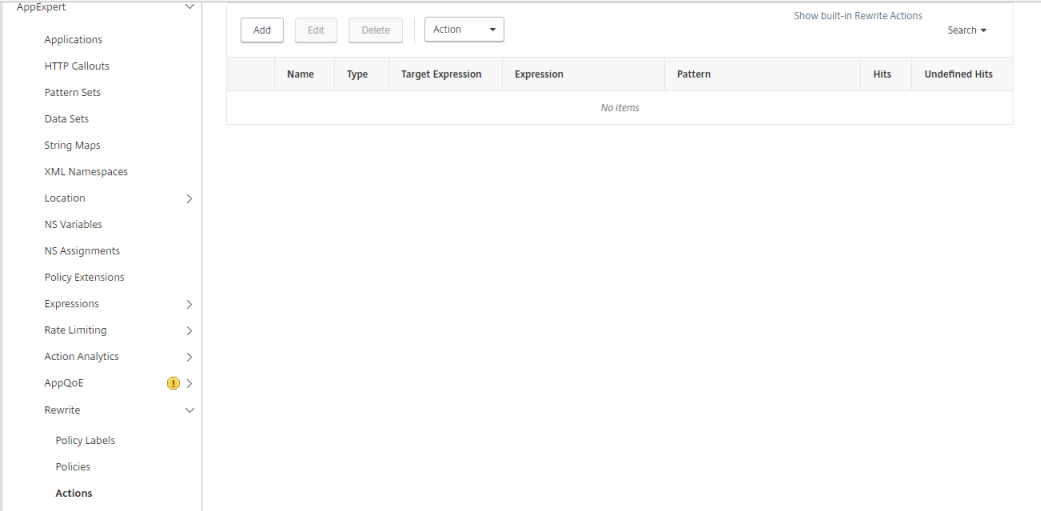
Figure 4 : Clicking on the Add button to add a new rewrite action
-
Figure 5 and Figure 6 will then appear.
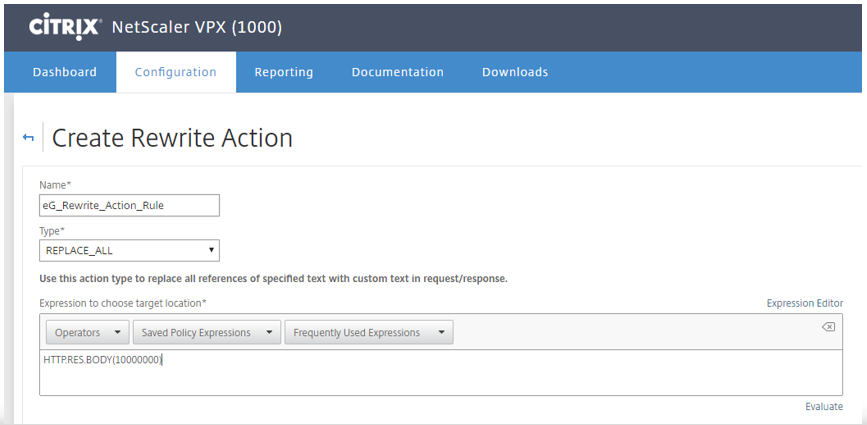
Figure 5 : Adding a rewrite action to replace the body of the HTTP response
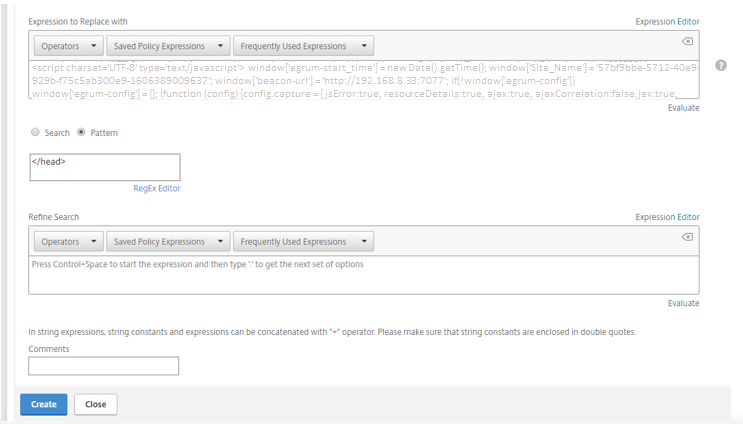
Figure 6 : Replacing the body of the HTTP response with the RUM code snippet (applicable to NetScaler appliances before v12)
-
Using Figure 5 and Figure 6, do the following: .
- Provide a Name for the policy.
- Set Type as REPLACE_ALL. This option will replace all references of a specified text with custom text in request/response.
-
In the Expression to choose target location text area, enter the following:
HTTP.RES.BODY(10000000)
This indicates that changes need to be made to the body of the HTTP response.
-
Then, in the Expression to Replace with text area, enter what needs to go into the body of the HTTP response. In our case, the RUM code snippet should go into the body of the HTTP response. The contents of this text area should be in the following format:
<RUM code snippet></head>
where, the RUM code snippet is the text file that you saved in at step 4 above.
-
If you are using a NetScaler appliance that is of a version prior to v12, then select the Pattern option and type </head> in the text area below (see Figure 6). On the other hand, if you are using a NetScaler appliance that is of a v12 (or above), then select the Search option, pick Text from the drop-down list below, and type </head> in the text area (see Figure 7).
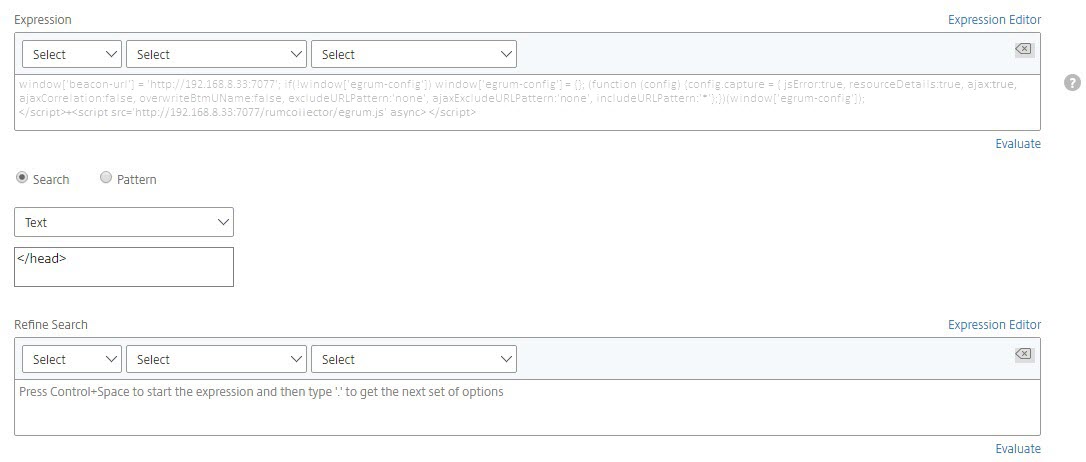
Figure 7 : Replacing the body of the HTTP response with the RUM code snippet (applicable to NetScaler appliances of v12 and above)
-
Finally, click the Create button to create the new rewrite action.
-
-
Then, proceed to create a rewrite policy. A rewrite policy consists of a rule and action. The rule determines the traffic on which rewrite is applied and the action determines the action to be taken by the NetScaler. Using the rewrite policy, we will be instructing NetScaler to not insert the RUM code snippet in the responses, if the content-type of the HTTP responses is not text/html. To achieve this, follow the steps discussed hereunder:
-
From the AppExpert menu in the left panel of Figure 3, select the Rewrite sub-menu, and choose the Policies option. The right panel will then change to display the Rewrite Policies page (see Figure 8). Click the Add button in the right panel to add a new rewrite policy.
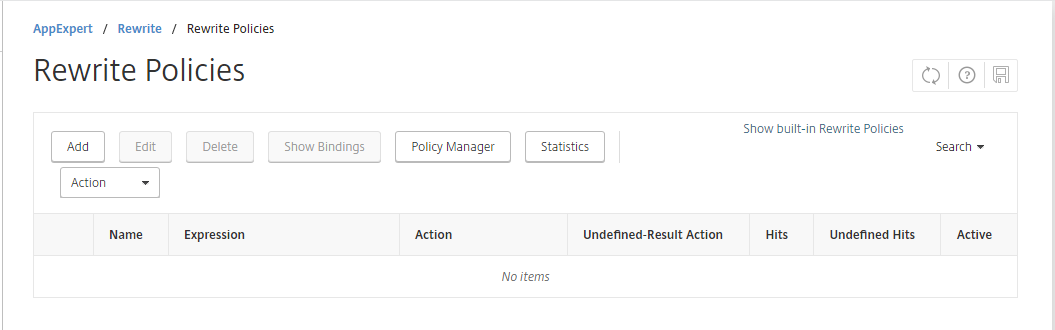
Figure 8 : Clicking the Add button to add a new rewrite policy
-
Figure 9 will then appear.

-
In Figure 9, specify the following:
- Provide a Name to the new rewrite policy.
- Select the rewrite Action to which this new policy applies. Here, you will have to select the name of the rewrite action we created at step 6 above.
- From the Underlined-Result Action drop-down, pick NOREWRITE.
-
Then, in the Expression text area, enter the following:
HTTP.RES.HEADER("Content-Type").CONTAINS("text/html")
-
Finally, click Create to create the new rewrite policy.
-
-
After creating a rewrite policy, you must bind it to put it into effect. You can bind your policy to Global if you want to apply it to all traffic that passes through your NetScaler, or you can bind your policy to a specific virtual server or bind point to direct only that virtual server or bind point’s incoming traffic to that policy. If an incoming request matches a rewrite policy, the action associated with that policy is carried out.
Let us bind our policy to Global, so that it applies to all traffic. For that, follow the steps below:
-
From the AppExpert menu in the left panel of Figure 3, select the Rewrite menu, and then select the Policies option within. The right panel will then change to display Figure 8. Click on the Policy Manager button in Figure 8. Figure 10 will then appear.
-
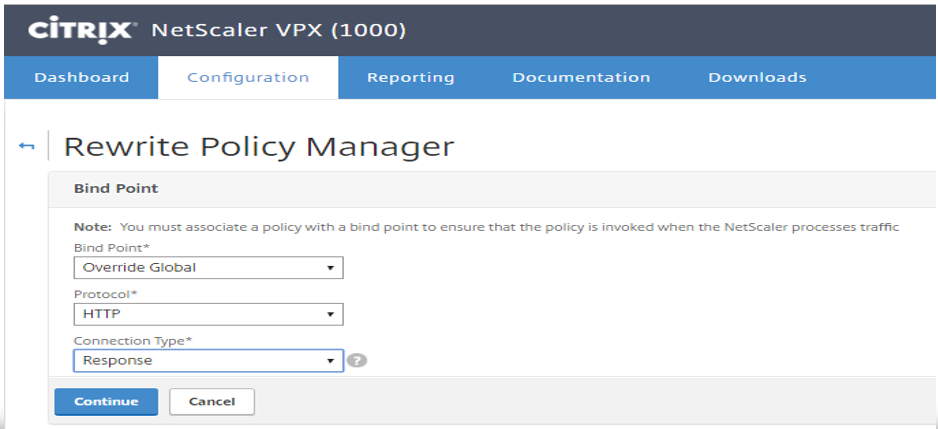
Specify the following in Figure 10:
- Select Override Global as the Bind Point.
- Select HTTP as the Protocol.
- Choose Response as the Connection Type.
-
Then, click Continue.
-
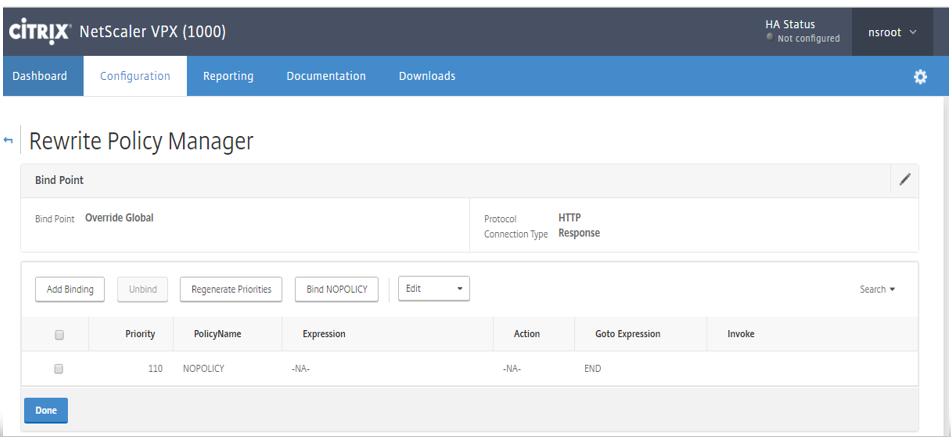
Figure 11 will then appear.
-
Click on the Add Binding button in Figure 11. Figure 12 will then appear.
-
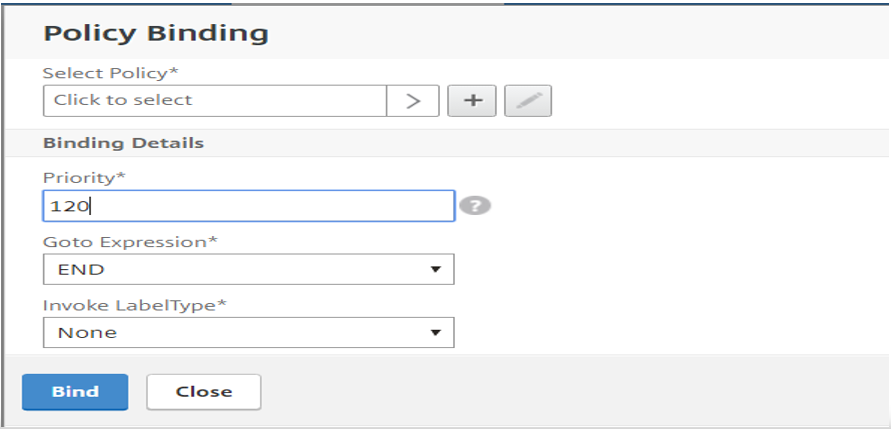
Specify the following in Figure 12:
- From the Select Policy drop-down, select the rewrite policy rule you created at step 7 above.
- Set Priority as 120 , Goto Expression as END, and Invoke LabelType as None.
-
Click on the Bind button in Figure 12 to add the binding.
-
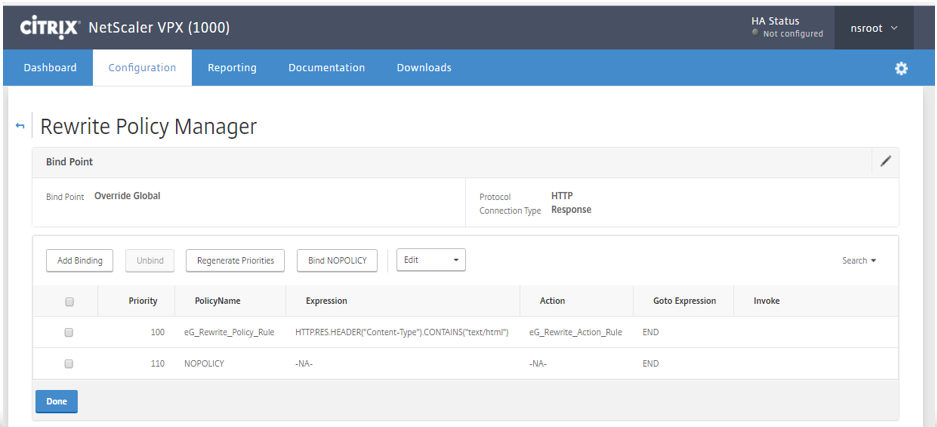
Figure 13 will then appear displaying the details of the rewrite policy rule created at step 7. Click on the Done button in Figure 13.
-