Procedure for discovering the domains of the Security Groups
eG Enterprise provides you with a wide range of reports using which you can effectively monitor the target environment. One among the reports that eG offers is the Sessions by Users report which can be generated for each user of Security Group within a domain. To generate such a report, you would be required to follow the procedure as mentioned below:
-
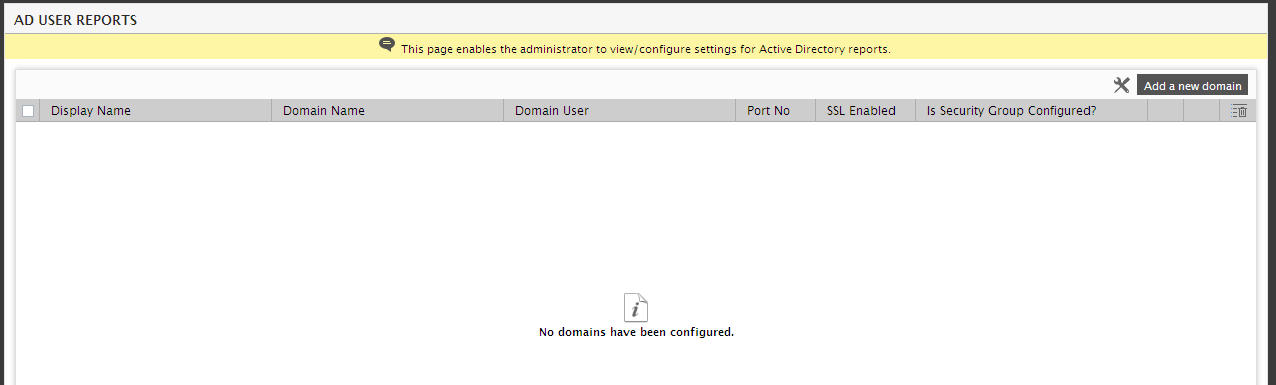
Follow the menu sequence: Settings -> Reporter -> AD User Reports in the eG administrative interface. Figure 1 will then appear.
-
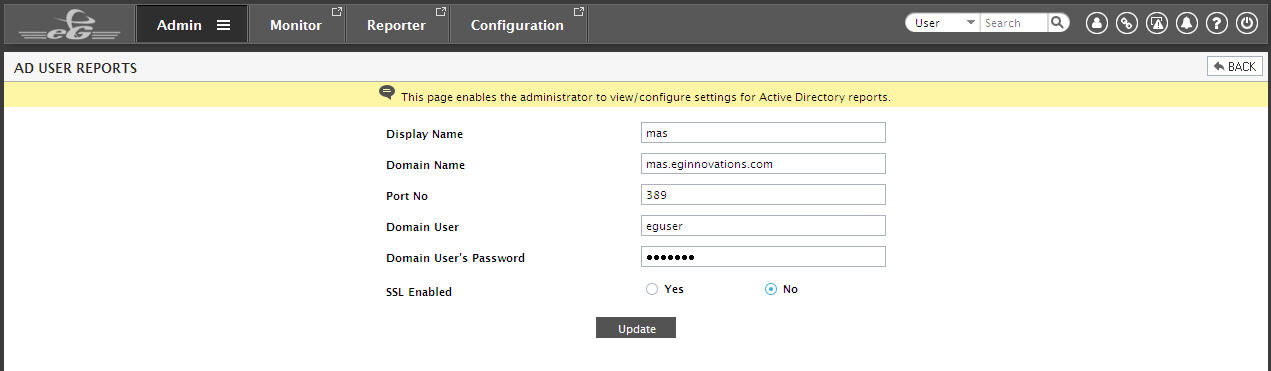
Clicking the Add a new domain button in Figure 1 will lead you to Figure 2 where you will be required to configure the domain of the active directory groups that need to be discovered.
-
Specify the following in Figure 2:
- First, provide a Display Name for the domain.
- Next, specify the fully qualified Domain name.
- Specify the port at which the domain operates in the Port No text box.
- To connect to the Active Directory server and access the domain user information stored within, the eG manager requires a domain user’s privileges. To facilitate this connection, provide a valid domain user’s name and password against Domain User and Domain User’s Password.
- Then, indicate whether the Active Directory server is SSL-enabled or not, by setting the SSL Enabled flag to Yes or No, as the case may be. If the SSL Enabled flag is set to Yes, then you will have to follow the procedure discussed in the Appendix of the eG User manual to ensure that the eG manager is able to communicate with the AD server over SSL.
-
Once the Update button is clicked, the domain will be added in the AD USER REPORTS page as shown in Figure 3.

Figure 3 : Domains configured for generating the Sessions by Users report
-
In order to select the Security groups for which the Sessions by Users report is to be generated, click on the
 icon in Figure 3. Figure 4 will then appear.
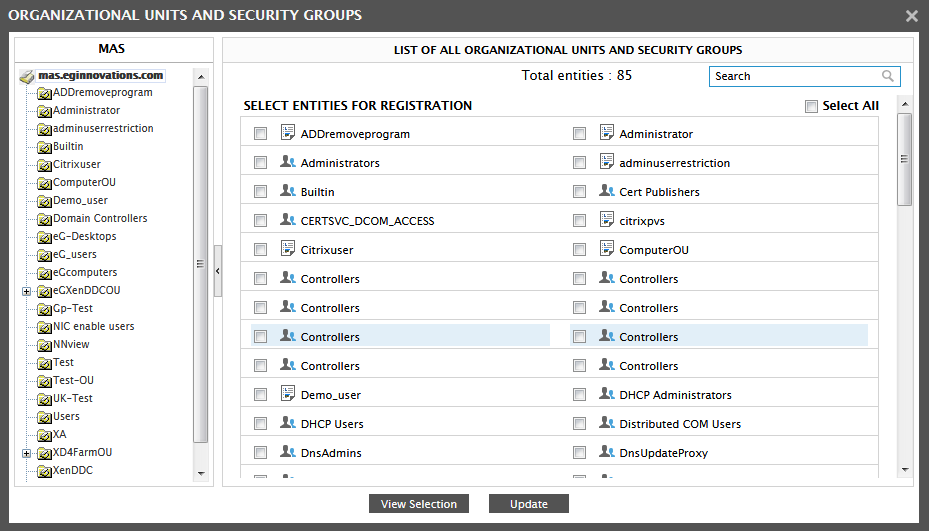
Figure 4 : Choosing the Security groups for which the Sessions by Users report is to be generated
- By default, all the Security groups and the Organizational Units to which the Security Groups belong to will be listed in the right panel of Figure 4. If you wish to view the Security groups/Organizational Unit of a chosen Organizational Unit within a domain, then click on the Organizational unit that is available in the left panel of Figure 4. Select the Security groups/Organizational units for which the report is to be generated and click the Update button. If you wish to select all the entities i.e., Organizational Units and Security groups, then you can click the check box preceding the Select All option in Figure 4.
-
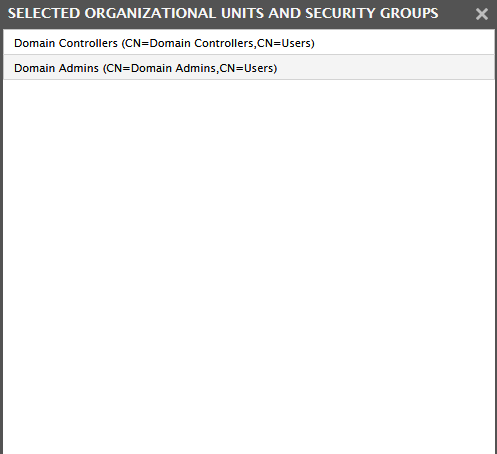
If you wish to view the Security groups that were selected, then, click the View Selection button as shown in Figure 4. Figure 5 will appear listing all the selected Security groups. To search for a particular Security group, use the Search text box of Figure 4.
-
Once, the Security groups are selected and updated, click the
 icon to view the configured Security groups. Figure 6 will then appear.
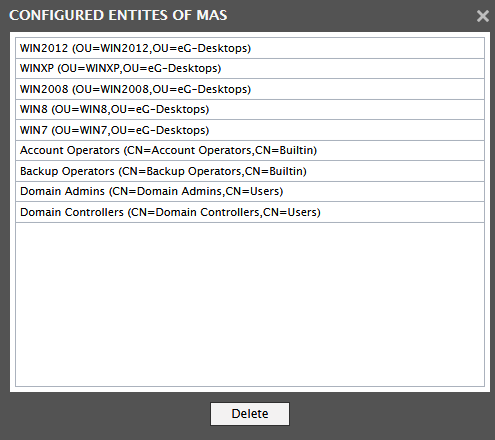
- To modify the Domain, click on the
 icon (see Figure 3).
 - In order to delete a domain or if you do not wish to discover the Security groups of a particular domain, then you can delete the domain by selecting the domain and clicking the
 icon.
icon. -
Clicking on the
 icon will lead you to Figure 7 using which you can define certain settings for the discovery of the Security groups.
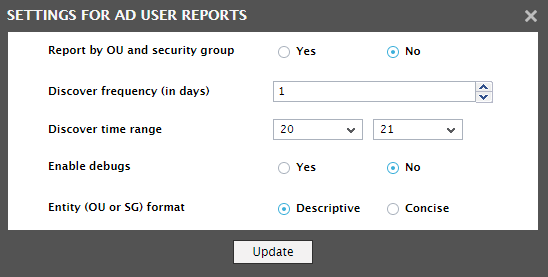
Figure 7 : Specifying the Settings for discovering the Security groups
-
Figure 7 helps you define the following settings for discovering the Security groups:
- If you wish to generate the report based on active directory groups, then set the Report by OU and security group flag to Yes. By default, this flag will be set to No.
- The Security groups can either be discovered on a daily/weekly basis. From the Discover frequency (in days) drop-down list, select 1 for a daily discovery or 7 for a weekly discovery. If you wish to discover the Security groups once in the number of days of your choice, you can do so by selecting a number ranging from 1 to 7 from this list.
- If the frequency with which the active directory groups have to be discovered is specified, then the time of starting the discovery process also needs to be specified. To do so, select the time duration against the Discovertime range list. If you want to start the discovery process between 8 PM and 9 PM, then select 20 from the first list and 21 from the second list. By default, the values specified in these lists are 20 and 21 respectively.
- If you wish to generate logs using which you can troubleshoot issues in the future, then, select Yes against the Enable debugs flag. By default, this flag is set to No.
- If you do not wish to view the hierarchy of the entities chosen in Figure 5 and Figure 6, then you can choose the Concise option against the Entity (OU or SG) format in Figure 7. By default, Descriptive option is chosen against the Entity (OU or SG) format.
- Clicking the Update button will register the changes and help you generate the Sessions by Users report accordingly.
- The Sessions by Users report can now be generated for the users with each of the chosen Security groups.