Processes Test
Application processes can be identified based on specific regular expression patterns. For example, web server processes can be identified by the pattern *httpd*, while DNS server processes can be specified by the pattern *named* where * denotes zero or more characters. For each such pattern, the process test reports a variety of CPU and memory statistics.
Target of the test : Any application server
Agent deploying the test : An internal agent
Outputs of the test : One set of results per process pattern specified
|
| Measurement | Description | Measurement Unit | Interpretation |
|---|---|---|---|
|
Processes running: |
Number of instances of a process(es) currently executing on a host. |
Number |
This value indicates if too many or too few processes corresponding to an application are executing on the host. |
|
CPU utilization: |
Percentage of CPU used by executing process(es) corresponding to the pattern specified. |
Percent |
A very high value could indicate that processes corresponding to the specified pattern are consuming excessive CPU resources. |
|
Memory utilization: |
For one or more processes corresponding to a specified set of patterns, this value represents the ratio of the resident set size of the processes to the physical memory of the host system, expressed as a percentage. |
Percent |
A sudden increase in memory utilization for a process(es) may be indicative of memory leaks in the application. |
Note:
- The default configurations of the Processes test are applicable for JRun server 4.0. However, if you are monitoring a JRun server 3.0, you would have to modify the default configurations.
- In JRun server 3.0, 2 processes are associated with the admin and default servers. They are, "jrun.exe" and "javaw.exe" respectively in Windows and "jrun" and "javaw" in Unix.
- Similarly, the JRun Server 4.0 has two default processes, one running for the admin server and the other for the default server. These processes are, namely, "jrun.exe" in Windows and "jrun" in Unix. When you add a new server instance, these processes get created automatically with the same names as mentioned above.
-
Special characters that are not allowed as part of your manual pattern specifications are as follows:
- ` (Grave Accent)
- | (Vertical bar)
- < (less than)
- > (greater than)
- ~ (tilda)
- @ (at)
- # (hash)
- % (Percent)
Note:
- Administrators can extend the built-in auto-correction capabilities to address probable issues with the other measures of the Processes test, by writing their own corrective scripts for the same. The custom-defined script can be associated with the Processes test in the same manner discussed above.
- The name of the custom-defined script should be of the following format: InternalTestName_InternalMeasureName. For example, a script that is written to correct problems with the CPU utilization measure (of the Processes test) should be named as "ProcessTest_Cpu_util”, where ProcessTest is the internal name of the Processes test, and Cpu_util is the internal name for the CPU utilization measure. To know the internal names of tests and measures, use any of the eg_lang*.ini file in the <EG_INSTALL_DIR>\manager\config directory. The script extensions will differ according to the operating system on which it will execute. The extensions supported by Windows environments are: .bat, .exe, .com, and .cmd. Scripts to be executed on Unix environments do not require any extension. The most commonly used extension is .sh.
- At any given point of time, only one script can be specified in the CORRECTIVESCRIPT text box.
- As already stated, the sample script for Processes test will be available for every operating system. If the script is uploaded to the eG manager once for an operating system, it will automatically apply to all the agents executing on the same operating system. For example, say that an environment comprises of 3 agents, all executing on Windows 2000 environments. While configuring the Processes test for one of the agents, if the administrator uploads the sample script, then he/she will not have to repeat the process for the other 2 agents.
- Once the eG agent downloads a corrective script from the eG manager, any changes made to the script in the manager side will not be reflected in the agent side, immediately. This is because, the eG agent checks the manager for the existence of an updated version of the corrective script, only once a day. If an update is available, the agent downloads the same and overwrites the script that pre-exists.
Note:
The Processes test of LDAP servers takes an additional parameter named ispassive. If the value chosen against this parameter is Yes, then the LDAP server under consideration is a passive server in an LDAP cluster. No alerts will be generated if the server is not running. Measures will be reported as “Not applicable” by the agent if the server is not up.
Auto-configuring the Process Patterns to be Monitored
To save the time and effort involved in manual process specification, eG Enterprise offers an easy-to-use auto-configure option in the form of a  button that is available next to the PROCESS text box.
To auto-configure the processes to be monitored, do the following:
-
Click on the
 icon next to the process text box in the Processes test configuration page (see Figure 127).
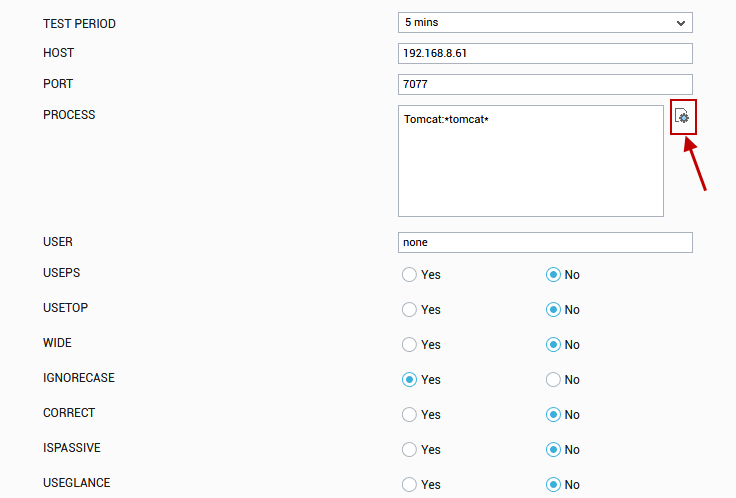
Figure 127 : Configuring the Processes test
Note:
The
 icon will appear only if the following conditions are fulfilled:
- The Processes test must be executed in an agent-based manner.
- The eG agent executing the test should be of version 5.2 or above.
- In case the eG manager in question is part of a redundant manager setup, then the agent executing the test must be reporting metrics to the primary manager only.
-
When the
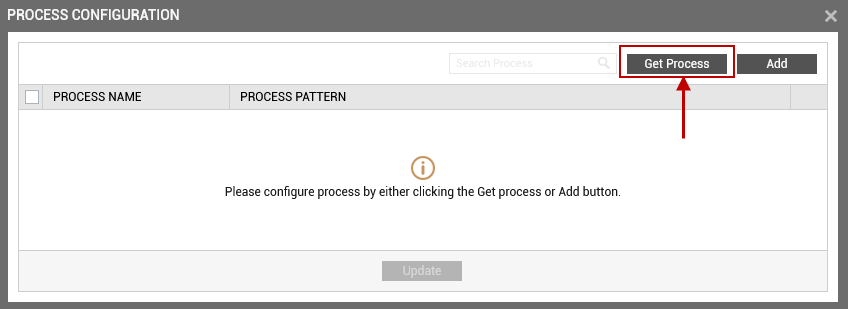
 icon is clicked, a process configuration page will appear (see Figure 128).
-
Upon clicking the Get Processes button in the process configuration page (see Figure 128), a pop up window with a list of processes that are running on the host will be displayed (see Figure 129).
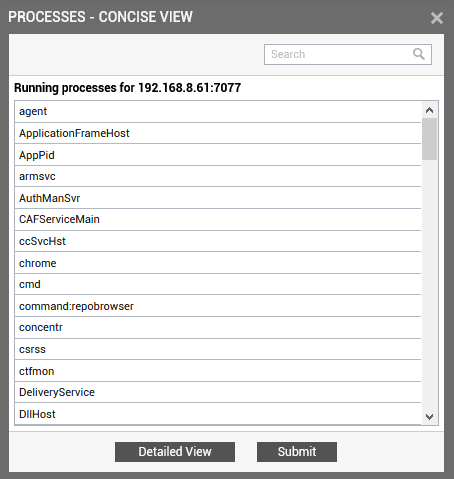
Figure 129 : List of auto-discovered processes
Note:
The processes that are already configured for monitoring will not be listed in Figure 129.
-
By default, Figure 129 provides a 'concise' view of the process list - i.e., only the process names will be listed in the pop-up window, and not the detailed description of the processes. You can click on the Detailed View button in the pop up window to switch to the detailed view (see Figure 130).
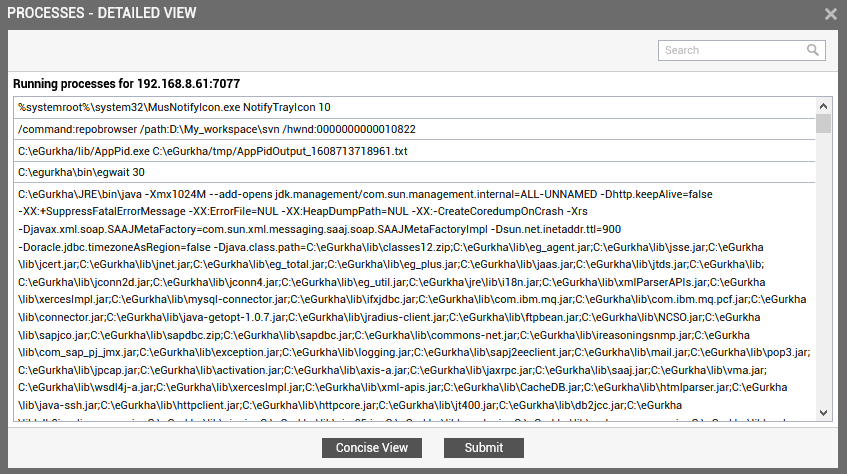
- As you can see, in the detailed view, the complete process path and process arguments accompany each auto-discovered process.
-
Regardless of the view you are in, select the process or list of processes that require monitoring and click the Submit button in the pop-up window. Note that you can select processes from both the views. If there are too many processes running in the host to choose from, you can narrow your search further by using the Search text box. Specify the whole/part of the process name to search for in this text box, and click the icon next to it.
Note:
The Processes test includes a wide flag that is set to Yes by default. In this case, your process specification can include the process path and arguments (if any). Therefore, if the wide flag is set to Yes, then, the eG agent will report metrics for the process(es) that are selected in both the concise manner and detailed manner. If the WIDE flag is set to No, the eG agent will collect metrics only for the process(es) that are selected in a concise manner.
-
Clicking the Submit button in the pop-up will automatically populate the name and pattern of the chosen process in the Process Name and Process Pattern columns available in the process configuration page (see Figure 131).
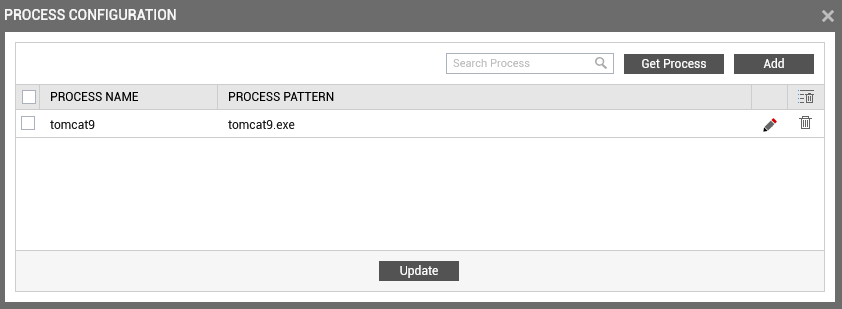
Figure 131 : One/Multiple auto-discovered processes configured for monitoring
-
You can add more name:pattern pairs in the process configuration page by clicking on the Add button present at the right corner of the page. To remove a specification that pre-exists, just click on the
 icon that corresponds to it. You can also modify contents of the Process Name and Process Pattern columns by clicking on the
  icon that corresponds to it.
 Note:
Duplicate processes will appear in the list of processes pop-up, provided the process description is different - for instance, if a 'cmd.exe' process and a 'cmd.bat' process execute on the same host, then both processes will be listed as 'cmd' in the 'concise' view of the process list. If such duplicate processes are chosen for monitoring, then, each process will appear as a separate Process Name and Process Pattern pair in the process configuration page. To proceed, the user must enter a different name for each process using the
 icon, so that every distinct pattern can be identified in a unique manner.
 - If you want to clear all the processes that you have added for monitoring, select all the processes by simply clicking the check button provided in the header row and click on the
 icon at the right-corner of the table. This action will remove all the processes in single click. If you want to remove some of the processes, then select only those processes by checking the check buttons that correspond to them and click on the
  icon. This will remove the chosen processes alone.