Automated Installation of eG Agents in an Enterprise Deployment
As you know, in an Enterprise deployment, the eG manager is internal to the organization. All the managed IT assets of the organization will be accessible from the eG manager. To automate agent installation in this case therefore, you need to do the following:
- Login to the eG administrative interface of the eG manager;
- Push the eG agents from the manager to the target hosts;
Before you attempt to push agents from the manager, make sure that the following pre-requisites are in place:
-
Ensure that eG manager you want to use for pushing agents is running on a Windows operating system only;
-
The 'agent push installer' is available as a zip file named eG_Agent_x64.zip. Download this installer from the eG package download site to the <EG_MANAGER_INSTALL_DIR>\manager\agents\Installer folder.
-
Make sure that the target agent hosts are:
-
Windows hosts that are attached / not attached to any domain;
-
Linux hosts that are not attached to any domain
-
-
The target agent host should be reachable from the manager;
-
To push agents to a Windows host attached to a domain, the domain in question should first be integrated with the eG manager. To know how to create a domain using the eG admin interface, refer to the procedure detailed in the Adding/Modifying/Deleting a Domain topic under Administering eG Enterprise.
-
Before you attempt to push agents to Windows hosts (attached to / not attached to a domain), make sure that the following requirements are fulfilled:
-
File and print sharing should be enabled on the target system;
-
ADMIN$ share should be enabled on the target system;
-
The following services should be up and running on the target:
Service Name Service Display Name WMI service winmgmt Remote Procedure Call RpcSs RPC Endpoint Mapper RpcEptMapper -
The following ports should be opened for communication between the manager and the target system:
Protocol Port Service Name TCP 135 RPC UDP 137 NetBios Name Resolution UDP 138 NetBiod Datagram Service UDP 139 NetBios Session Service TCP 445 SMB TCP 49152 to 65535 RPC dynamic ports -
If the target Windows host is not attached to a domain, then before pushing an eG agent to that host, make sure that a Password Profile exists in eG containing the user name and password of a valid user of that host. Refer to Administering eG Enterprise to know how to create a Password Profile.
-
-
Before pushing agents to Linux hosts (not attached to domains), the following requirements should be fulfilled:
-
You need to create a password profile in eG with “root” as the user. This profile will be used for all target Linux machines. Refer to Administering eG Enterprise to know how to create a Password Profile.
-
Port 22 should be open for communication from the manager to the target system
-
-
The eG agent installers (provided as Zip files for Windows and tar.gz files for Linux) should be available in the following location on the eG manager host: : <EG_MANAGER_INSTALL_DIR>\manager\agents\Universal\Latest\
Once the aforesaid pre-requisites are fulfilled, proceed to push agents from the manager to the target hosts. The 'agent push' procedure varies slightly for targets in a domain and targets outside it. Each of these procedures are discussed separately below.
Automated Agent Installation on Systems in a Domain
To achieve this, follow the steps detailed below:
-
Login to the eG administrative interface.
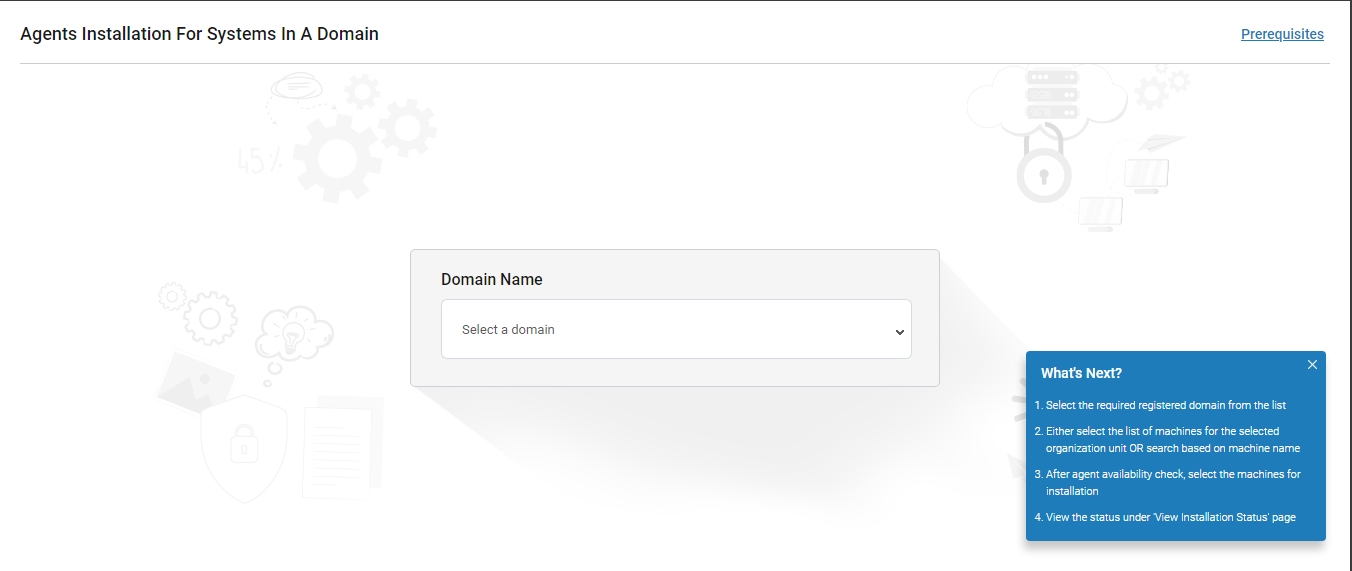
- Follow the Admin -> Agents -> Installation -> Systems in a domain menu sequence.
-
Figure 1 will then appear. Select a Domain Name from Figure 1. This should be the domain that contains the systems where agents are to be installed. Typically, the Domain Name drop-down will be populated with all AD domains that the eG manager integrates with.
-
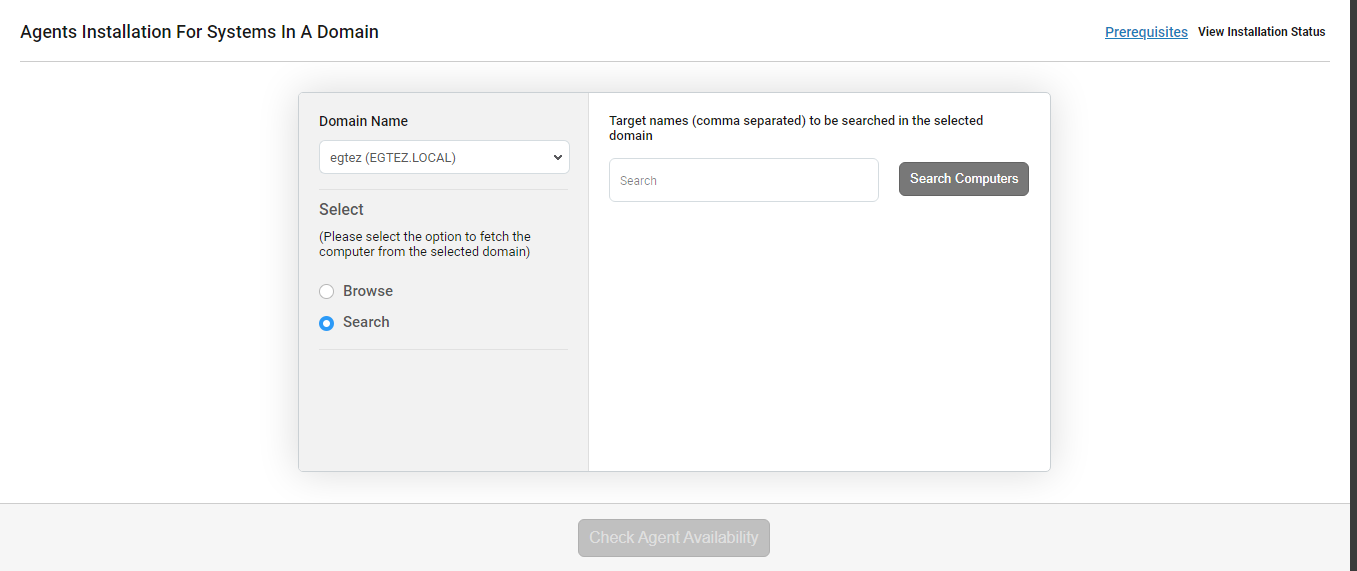
Figure 2 will then appear. Here, you need to indicate on which computers in the chosen domain you want agents installed. You can either Search the entire domain (you have chosen) for the target hosts, or you can browse specific Organizational Units (OUs) within the chosen domain for the computers of interest to you.
-
If you choose the Search option under Select in Figure 2, then proceed as follows:
-
In the Target names (comma separated) to be searched in the selected domain text box, provide either a single or a comma-separated list of computers you want to push agents to. You can also use wild card patterns to ease your search. For instance, if you want to install agents on all computers with names starting with 'Win10-', your specification can be: Win10-*.
-
The List of Computers list box (see Figure 3) will then be populated with all the computers that match your search specification.
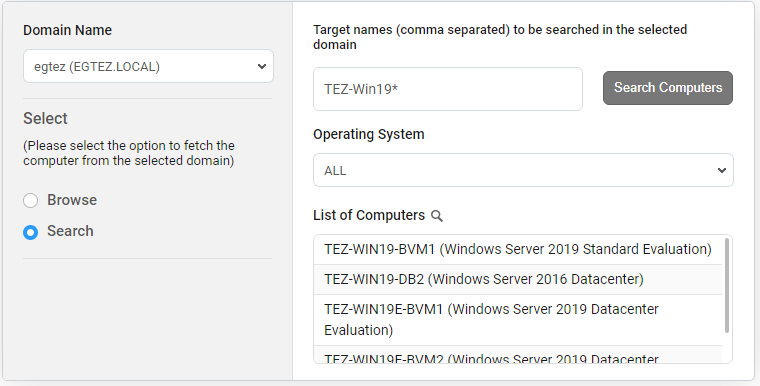
Figure 3 : Viewing the list of computers that match the given search specification
-
If you want, you can filter your search even further by specifying the operating system of your computers. For that, select an option from the Operating System drop-down (see Figure 4). In this case, the List of Computers list box will display those computers that not only match your search specification, but which also run the Operating System you choose. If, due to any reason, eG Enterprise is unable to discover the operating system of one/more hosts in the chosen domain, then such hosts will be grouped under [Computers not having OS data]. If you are unable to find the Operating System you are looking for in this drop-down, then you may want to select the [Computers not having OS data] option to locate the computer(s) of interest to you.
.png)
Figure 4 : Filtering by specifying the Operating System of the targets
-
Next, from the List of Computers list box, select all the computers on which you want agents installed (see Figure 5). Then, click the Check Agent Availability button therein.
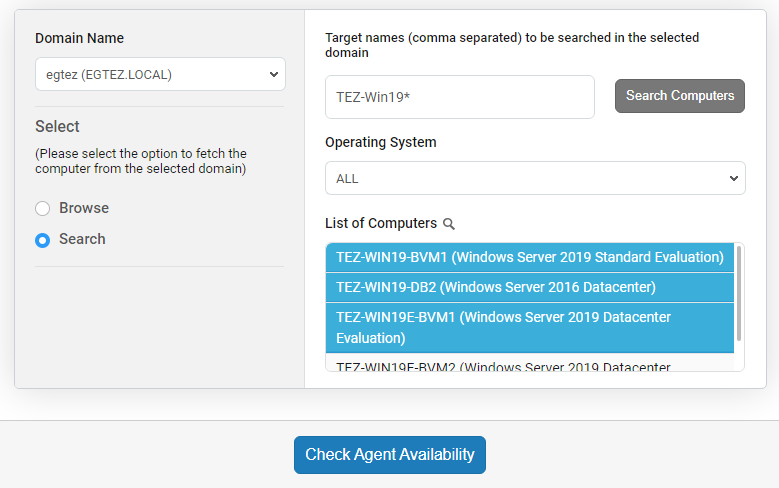
Figure 5 : Selecting the computers to which agents are to be pushed
-
Figure 6 will then appear. A quick look at Figure 6 will reveal if an eG agent pre-exists on any of the computers you chose at step (d) above. If an eG agent has already been installed on any/all of the hosts, you may want to change your computer selection. In this case, go back to Figure 5 by clicking on the <- button that prefixes the page title, Agents Availability Status. On the other hand, if you want to go ahead and deploy agents on one/more of the computers on which no agent has been installed so far, then select the computers you want to push agents to from the 'Select target hosts for installation.... ' list box in Figure 6, and click the Install Agent button.
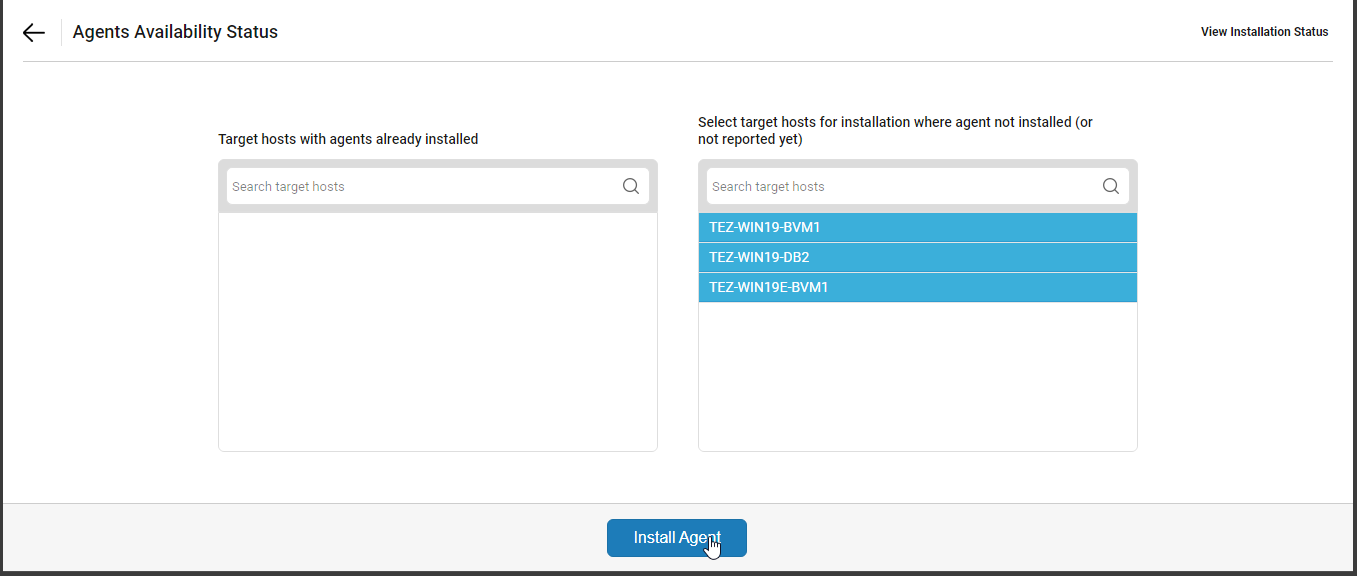
Figure 6 : Selecting the computers to which agents are to be pushed
Note:
Once agent installation begins, the eG manager will automatically begin pushing agents to the target hosts in the chosen domain. To achieve this, the eG manager will first attempt to connect to the individual hosts using the domain user credentials. These credentials are typically passed when integrating the eG manager with that AD domain. For more details, refer to the Adding/Modifying/Deleting a Domain topic under Administering eG Enterprise.
-
Figure 7 will then appear, using which you can track the progress of the installation.

-
Once agent installation ends, the INSTALLATION STATUS column of Figure 7 will change to display whether the installation attempt succeeded / failed (as depicted by Figure 8).
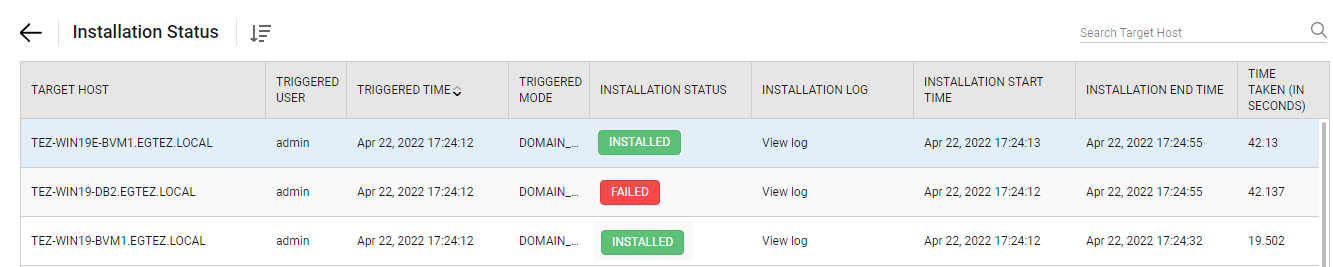
Figure 8 : Viewing the current status of the agent installation on the chosen computers
-
If the agent installation fails on any target, you can quickly look up the log file to know why it failed. For this, click on View log against the corresponding target. Figure 9 will then appear, clearly revealing why the failure occurred.
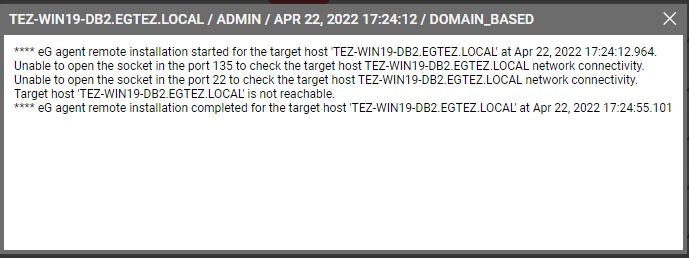
Figure 9 : Viewing the agent installation log file to troubleshoot installation failures
-
With the help of Figure 8, you can also determine when the installation began on a target, when it ended, and how long it took. By comparing the values of the TIME TAKEN column in Figure 8, you can quickly identify hosts on which the installation has succeeded, but has taken much longer than normal. You may want to look up the installation log file on such hosts to diagnose the reason for the delay.
-
-
If you choose the Browse option under Select in Figure 2, then proceed as follows:
-
From the Organizational Unit drop-down in Figure 10, select the OU to which the target systems belong.
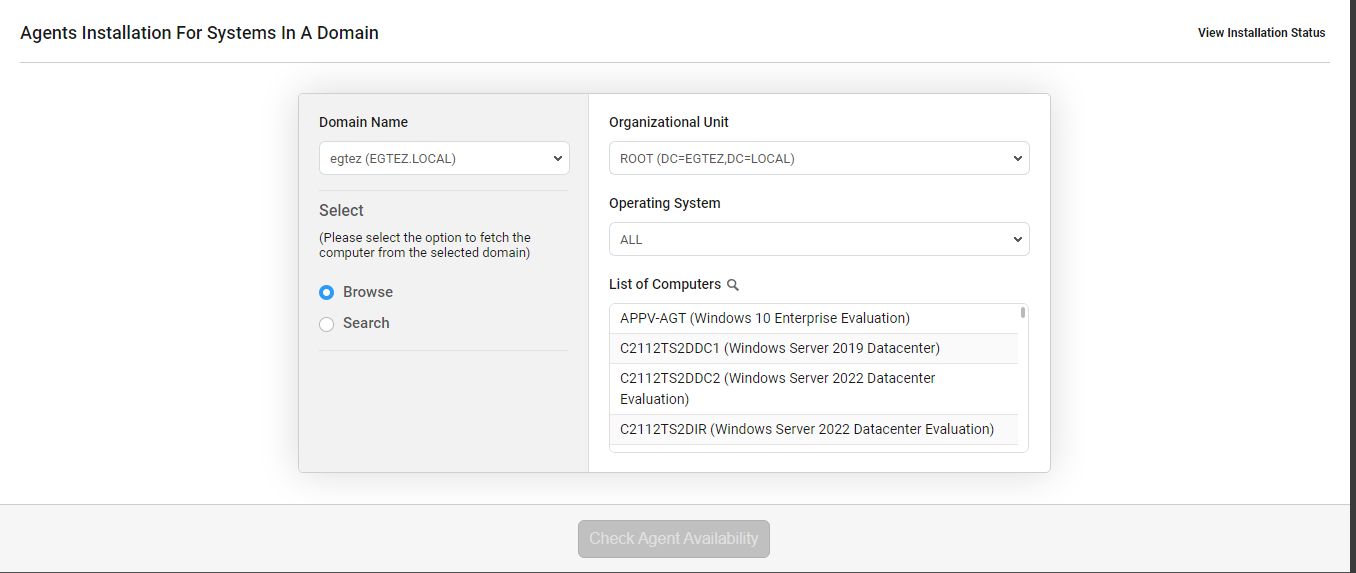
Figure 10 : Selecting the Organizational Unit containing the target hosts
-
The List of Computers list box will then be automatically populated with all the computers that belong to the chosen OU (see Figure 10). If you want, you can filter this list of computers on the basis of their Operating System. For this, select an option from the Operating System drop-down. If this is done, then the List of Computers list box will display those computers in the chosen OU that run on the Windows platform that you choose from the Operating System drop-down. Then, from the List of Computers list box, select one/more targets to which agents are to be pushed (see Figure 11).
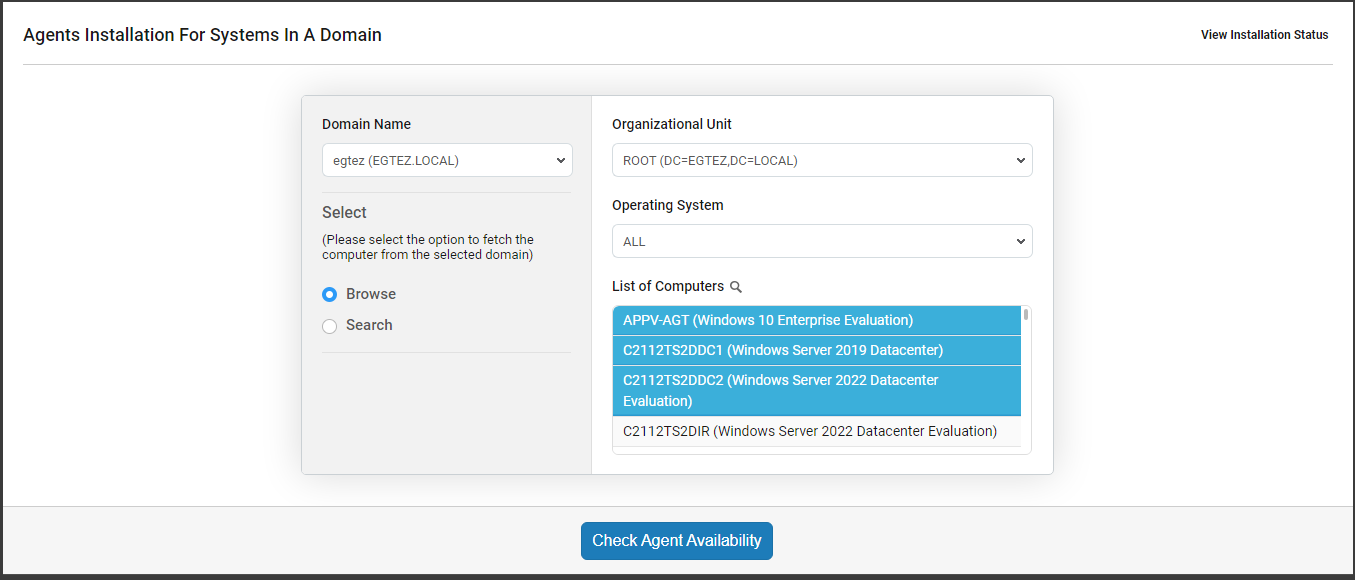
Figure 11 : Selecting the computers in the chosen OU to which agents are to be pushed.
If eG is unable to discover the operating system of any of the hosts in an OU, then such hosts will be classified as [Computers not having OS data]. Select this option from the Operating System drop-down, if the OS you are not able to find the OS you are looking for in that drop-down. In this case, all computers for which OS is not known, will be displayed in the List of Computers list box. Select the computers to which agents need to be pushed.
-
To begin agent installation on the selected targets, click the Check Agent Availability button in Figure 11.
-
Then, proceed as indicated by step (e) to step (i) above.
-
Automated Agent Installation on Systems Not in a Domain
To achieve this, follow the steps detailed below:
-
Login to the eG administrative interface.
- Follow the Admin -> Agents -> Installation -> Systems not in a domain menu sequence.
-
Figure 14 will then appear. In the IP Address text box, enter the IP address of the target system on which an agent is to be installed. To install the eG agent on multiple targets, provide a comma-separated list of IP addresses here.
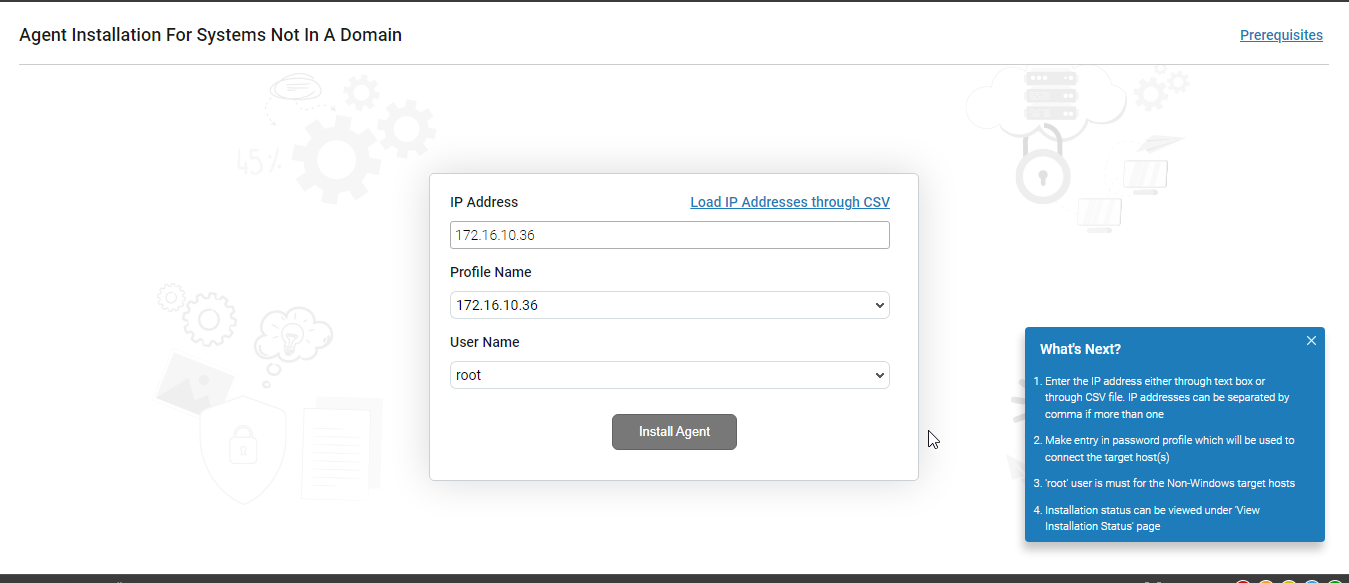
Figure 12 : Specifying the IP address of the target host
Alternatively, you can create a CSV file on the eG manager host, where you can specify the IP addresses of all the target hosts. You can then upload this file to the eG manager. For this, click the Load IP Addresses through CSV link in Figure 14. Figure 13 will then appear. Click on the Upload File button in Figure 13 to browse the eG manager host for the CSV file and upload it.
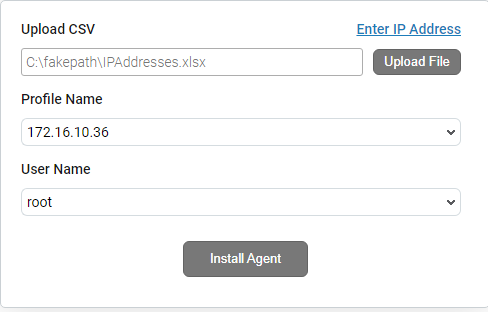
Figure 13 : Uploading a CSV file containing IP addresses to the eG manager
- After you specify the IP address(es) or path to the CSV file (as the case may be), from the Profile Name drop-down (see Figure 14 and Figure 13), pick the Password Profile that you created in eG, which contains the credentials for connecting to the target host(s). In case of Linux hosts not attached to a domain, select the Password Profile that contains 'root' as a user name.
- The User Name drop-down (see Figure 14 and Figure 13) will then be populated with all user names configured in the chosen Profile Name. From this drop-down, select the user name using which the eG manager should connect to the target host(s). In case of Linux hosts, make sure you select 'root' from the User Name drop-down.
- Finally, click the Install Agent button (see Figure 14 and Figure 13).
-
Figure 14 will then appear, reporting the status of the installation.

Figure 14 : The status of agent deployment on systems not in domain
-
If the agent installation fails on any target, you can troubleshoot the failure by quickly looking up the installation log file. For this, click on View log corresponding to the host on which the agent deployment failed. Figure 15 will appear.
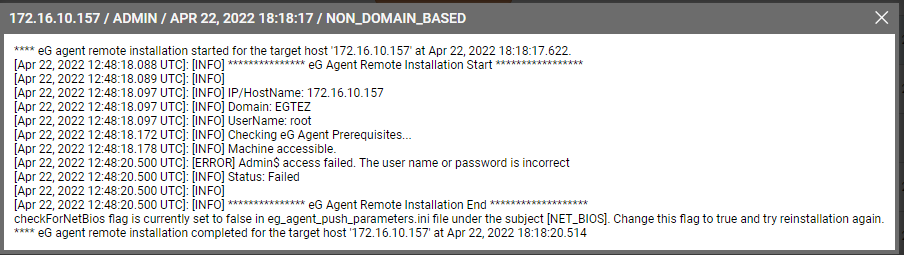
Figure 15 : Viewing the installation log file of a system not in domain to troubleshoot the installation failure
-
With the help of Figure 14, you can also determine when the installation began on a target, when it ended, and how long it took. By comparing the values of the TIME TAKEN column in Figure 14, you can quickly identify hosts on which the installation has succeeded, but has taken much longer than normal. You may want to look up the installation log file on such hosts to diagnose the reason for the delay.