Installing an eG Agent on AIX
There are two approaches to installing an eG agent on AIX:
- The eG agent software for AIX is available as a zipped tar file and an iAgent script. You can download the zip file and iAgent script from the eG web site, and manually run the iAgent script on the target AIX host to install the eG agent. This approach is ideal if you want to deploy AIX agents for a single organization - i.e., for the Enterprise deployment of eG.
- The eG agent software for AIX is provided as a packaged application. You can download the agent package for AIX from the eG manager console, extract the contents of the package to any folder in the target host, and silently run a setup script on that host to install and configure the agent at one shot - i.e., to install the agent and also to configure agent-manager communication. If you are deploying eG Enterprise for SaaS, then it is mandatory that your tenants use this approach to install and configure the eG agents in their environment.
Both these approaches are discussed in this section.
Installing AIX Agents for an Enterprise Deployment of the eG Manager
An Enterprise deployment of the eG manager is typically used to monitor only a single organization's IT infrastructure. In this case, it is recommended that the following procedure be used to install eG agents on AIX hosts:
-
The standard eG agent software for AIX is provided as a zipped tar file named eGagent_aix.tar.gz. An accompanying script, iAgent_aix, drives the installation process for the eG agent. You can download the zip file and installation script from the eG web site.
If you want to install an eG agent of version 7.2.10 (or above), then login to the target AIX host, and download the zipped file and installation script from the URL, https://www.eginnovations.com/releases/v<version_number>/AIX. For instance, https://www.eginnovations.com/releases/v7210/AIX.
Likewise, if you want to install an eG agent of a version below v7.2.10, then download the zipped file and installation script from the URL, https://www.eginnovations.com/eval<version_number>/AIX. For instance, https://www.eginnovations.com/eval754/AIX.
-
After downloading, extract the contents of the zipped file. For that, open the Shell prompt, go to the directory that holds the downloaded files, and run the following commands one after another:
chmod 750 eGAgent_AIX.tar.gz
gunzip eGAgent_AIX.tar.gz
-
The zipped file, once unzipped, will extract a tar file named eGAgent_AIX.tar. Untar this file by executing the following command at the prompt:
tar -xvf eGAgent_AIX.tar
-
Then, once the file is successfully untarred, proceed to execute the iAgent_aix script, with the eGAgent_AIX.tar file located in the same directory as the script file .
Note:
- The agent installation must be performed from a super-user account.
- The name of the super-user should not exceed 8 characters. If it does, then the iAgent_aix script will prompt you to run the script using a different super-user account.
-
Next, specify the user account to be used for executing the eG agent. First enter the name of the eG user. The default value taken is “egurkha”.
This script will install the eG agent. The eG agent must be installed and executed by a separate user. If you have installed the eG manager on the same system, you must use the same user and the same installation directory for the manager and the agent.
Enter the name of the eG user [egurkha]:
Note:
If the agent is being installed on the same system as the manager, the eG user configured for the agent should be the same as that used for the manager.
-
Then, enter the group with which the eG user is to be associated. The default value taken is “egurkha”. The installation will attempt to create the user account if it does not exist on the system. If you specify an existing user name, then this group prompt will not appear.
Enter the group to which the eG user is to be associated [egurkha]:
-
Next enter the path to the directory in which the eG agent will reside. The default base directory for the eG agent is /opt. A subdirectory named egurkha will be created under the base directory. If the base directory is not /opt, a symbolic link will be created from the egurkha subdirectory of the base directory to /opt/egurkha.
Enter the directory in which the eG agent should be installed [/opt]:
-
The install process will now request the user to confirm installation of the auto-restart feature. This feature will enable the agent to start automatically every time the system hosting the agent reboots. Now, press y to install the auto-restart feature, or n to proceed without installing the same.
Would you like the eG agent to auto-restart on system boot-up? y/n [n] :
-
If the agent is installed on the same system as the manager some common files need not be reinstalled.
The following files are already installed on the system and are being used by another package: Do you want to install these conflicting files [y,n,?,q] n
- As in the case of the eG manager, the agent package contains components that need to be installed with the set-uid permissions set. These components must be installed for the agent to function properly. Following this step, the eG agent components are extracted and stored.
-
Finally, the following message will be displayed depicting the success of the installation.
The eG agent has been successfully installed! Please login as <eG user name> and run the script /opt/egurkha/bin/setup_agent to configure the agent.
If you install an eG agent using the procedure discussed above, then you will have to run a setup procedure later to configure agent-manager communication. To know how setup the eG agent, refer to the Configuring the eG Agent on Unix topic.
Installing AIX Agents for a SaaS Deployment of the eG Manager
As stated earlier, where eG Enterprise needs to support multiple tenants - eg., MSP environments with multiple customers, enterprises with multiple departments/domains - the individual tenants should use only this approach to deploy the eG agent on the AIX hosts in their specific environments.
A key pre-requisite of this approach is that the eG manager should already be deployed and running.
To enable a tenant to install eG agents, the administrator should first make sure that the agent packages that correspond to the tenant's environment are accessible to the tenant from the eG manager console. For that, the administrator should do the following:
- Login to the system hosting the eG manager.
- To install an eG agent of version 7.2.10 (or above), open a browser, and connect to the URL: https://www.eginnovations.com/releases/v<version_number>/AgentPackages. To install an eG agent of a version below v7.2.10, then open a browser, and connect to the URL: https://www.eginnovations.com/releases/eval<version_number>/AgentPackages
- In this location, you will find a set of zip files. Each zip file is an agent package that corresponds to every operating system on which an eG agent can be installed.
-
Download the agent packages / zip files that correspond to the hosts in your tenant's environment, to any folder on the eG manager host. The AIX agent package will be listed therein as AIX.tar.gz.
- Copy the downloaded packages to the /opt/egurkha/agents/Universal/Latest folder on the eG manager.
The tenant can now proceed to install the eG agent using the procedure discussed hereunder:
- Using a browser, connect to the URL of the eG management console.
- Login to the eG management console using the credentials you used (corporate email ID and password) to register with eG Enterprise for SaaS.
-
Click the
 icon in the top, right corner of the page that appears to download eG agents.
 -
Doing so will invoke Figure 1, where you need to indicate if the eG agent you are downloading should communicate with the eG manager via a proxy server. If not, then pick the No option. If a proxy server is to be used for agent-manager communication, then select the Yes option.
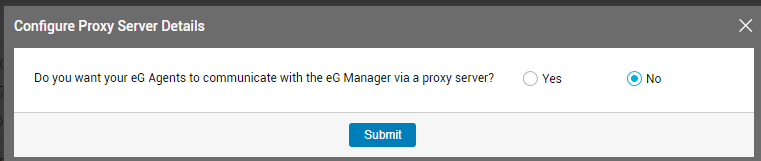
Figure 1 : Indicating whether/not the eG agent being downloaded should communicate with the eG manager
-
If the Yes option is chosen in Figure 1, then Figure 2 will appear. Here, you need to provide the details of the proxy server used for agent-manager communication.
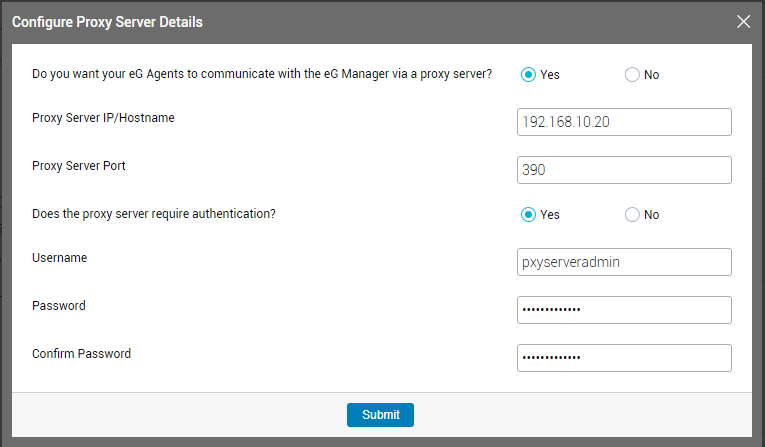
Figure 2 : Configuring agent-manager communication via a proxy server
-
Specify the following in Figure 2:
- Proxy Server IP/Hostname: Mention the IP address/hostname of the proxy server used for agent-manager communication.
- Proxy Server Port: Specify the port number at which the proxy server listens.
- Does the proxy server require authentication?: Indicate whether/not the proxy server requires authentication. Select the No option if authentication is required, and Yes if it is.
- Username, Password, and Confirm Password: If the proxy server requires authentication, then provide the credentials of a valid proxy server user against the Username and Password text boxes. Confirm the password by retyping it in the Confirm Password text box.
Finally, click the Submit button to confirm the proxy server specifications and proceed with the downloading of the eG agent.
-
Figure 3 will appear. By default, Figure 3 lists the 'internal agent packages' that have been uploaded to the eG manager - i.e., agent packages to be used for monitoring components in an agent-based manner. If you want to deploy a remote agent, click the agentless monitoring link in Figure 3. Likewise, to deploy an external agent, click the external monitoring link in the page.

Figure 3 : eG's internal agent packages available for download from the eG manager console
Note:
Though the eG management console lists the packages meant for agent-less, agent-based, and external monitoring in separate pages, the procedure to download and install these packages remains the same across monitoring approaches.
-
To download an agent package for AIX, click on the package named AIX in Figure 3. Figure 4 will then appear.

Figure 4 : Choosing an Installation Method for AIX agent installation
- Figure 4 allows you the flexibility to choose an Installation Method. An agent can be installed using any of the following methods:
Using a downloaded ZIP/TAR file package
Using the Command line
The Installation Method you choose will determine the course of the installation process. The sub-sections below will discuss each of these methods in detail.
Using ZIP/TAR Package for Agent Installation
To use this option, follow the steps below:
-
Login to the eG management console as a user with administrative rights.
-
Navigate to Figure 4 as described in the previous section, and set Installation Method as Downloadable Package.
-
Then, click on the AIX package that you will see in Figure 4. This will trigger the download process.
-
Once the process completes, you will find that a zipped file named eGAgent_AIX.tar.gz will be downloaded to the said location.
-
If you want to install the eG agent on the same AIX host to which the packages have been downloaded, then login to that AIX host as a root user. On the other hand, if you want to install the eG agent on a host different from the one on which the package has been downloaded, then first copy the agent package to any location on the target AIX host. Then, login to that host as a root user.
-
Then, from the Shell prompt of the target AIX host, run the following commands one and after another:
chmod 750 eGAgent_AIX.tar.gz
gunzip eGAgent_AIX.tar.gz
tar -xvf eGAgent_AIX.tar
chmod 750 ./setup.sh
-
Upon successful execution of the commands above, the contents of the zipped file are extracted. Consequently, the following files become available in the extract location:
-
A tar file: This is the standard eG agent software for AIX hosts, and is named eGAgent_AIX.tar.
-
An iAgent script: The iAgent_aix script drives the installation process for the eG agent.
-
setup.sh: This is the shell script that drives the silent installation of the eG agent. Running setup invokes the iAgent script and silently installs the agent on the target host.
-
eg_uaid: In a multi-tenant setup, once a tenant - eg., a user representing a customer / a department / a domain - registers with eG Enterprise to use its monitoring services, eG automatically generates a unique UAID and assigns the same to that tenant. If that tenant later logs into the eG management console using the registered credentials (email ID and password) and downloads the agents, each agent so downloaded is automatically tagged with that UAID. The downloaded agents, once installed and configured, will automatically start discovering applications on their respective hosts. eG Enterprise auto-manages the discovered applications and auto-assigns them to the user who has the same UAID as the eG agent that discovered these applications. The eg_uaid file contains the UAID of the tenant who downloaded agent packages from the eG management console; this is the same UAID that will be assigned to each agent installed by that tenant.
-
-
Next, to install the eG agent on an AIX host silently, from the Shell prompt, switch to the folder to which the files have been extracted. Then, run the setup.sh script by issuing the following command:
./setup.sh
-
Running setup will automatically install an eG agent on the target AIX host, and will also automatically configure agent-manager communication. This eG agent will automatically report metrics to the eG manager from which the agent package was downloaded. Also, the hostname of such an agent is automatically set as its nick name.
In a multi-tenant setup, a hostname may not be unique across tenant environments. To avoid nick name duplication, eG Enterprise automatically employs the following algorithm when assigning nick names:
- At the time of setting the hostname of an agent host as its nick name, eG first checks if that hostname has already been assigned to any existing agent.
- If it finds that the hostname has already been taken, then it will attempt to assign the FQDN - the fully qualified domain name - of the agent host as the nick name.
- In the process, if eG finds that the FQDN is also in use, then it will break-down the FQDN into smaller strings, and try to assign each of these strings, one after another, to the agent.
- If all these FQDN strings have already been assigned to other agents, then the eG agent will suffix the hostname of the agent host with the number 0, and try to assign this as the nick name of the eG agent. For instance, if the hostname of the eG agent host is winpc, then the nick name assigned to that agent will be winpc0.
-
If this nick name is also taken, then eG will increment the number 0, which suffixes the hostname, by 1, and will try to assign the resultant string to the eG agent,. This way, eG will keep incrementing the number suffix until an unused string is found. Such a string will finally be assigned to the agent as its nick name.
Note:
- In a SaaS deployment, if a tenant manually adds components to be monitored by an eG agent, then you should only assign that agent's nick name to each of the components it monitors.
-
In a SaaS deployment, if you are downloading an agent for installation on an imaging system (e.g. for Citrix Provisioning services), or on a snapshot (for Citrix Machine Creation Services), or on a VM template for virtual servers, then, make sure you first enable the Installation on a golden image / VM template flag in Figure 3 and then proceed with the downloading. If this is done, then after the agent so downloaded is installed, setup will stop that agent. Also, setup will auto-delete the eg_nick.ini file of that agent, so that no nick name is assigned to that agent.
On the other hand, if you download and install an agent on an imaging system / snapshot / VM template WITHOUT ENABLING the Installation on a golden image / VM template flag in Figure 3, then the installation will automatically start the agent and assign the hostname of the system as the nick name automatically. In such a case, you need to do the following:
- On the snapshot / golden image / master VM, open the eg_nick.ini file in the <EG_AGENT_INSTALL_DIR>\agent\config directory.
- Check to see if the Nick parameter in that file is set to any value. If this parameter has no value, it implies that no nick name was set for the eG agent on that snapshot / golden image / master VM. On the other hand, if the Nick parameter has a value, it indicates that a nick name was set for the eG agent. In this case, make sure that you delete the eg_nick.ini file on the snapshot / golden image / master VM before you proceed further.
- Likewise, delete the contents of the /opt/egurkha/agent/data folder and the /opt/egurkha/agent/logs folder are deleted.
- Also, stop the eG agent.
Using the Command Line to Install an eG Agent
For this, you can either execute the curl command or wget command that eG Enterprise provides from the AIX Shell prompt of the target host. These commands will automatically install and start the eG agent on that host. Also, the agent will be automatically configured to report to the cloud manager.
To install the eG agent on AIX using the eG-provided Curl command, do the following:
-
In Figure 4, set Command Line as the Installation Method.
-
Then, pick AIX as the Operating System.
-
The Curl command that corresponds to your specification will then be displayed, as depicted by Figure 5.
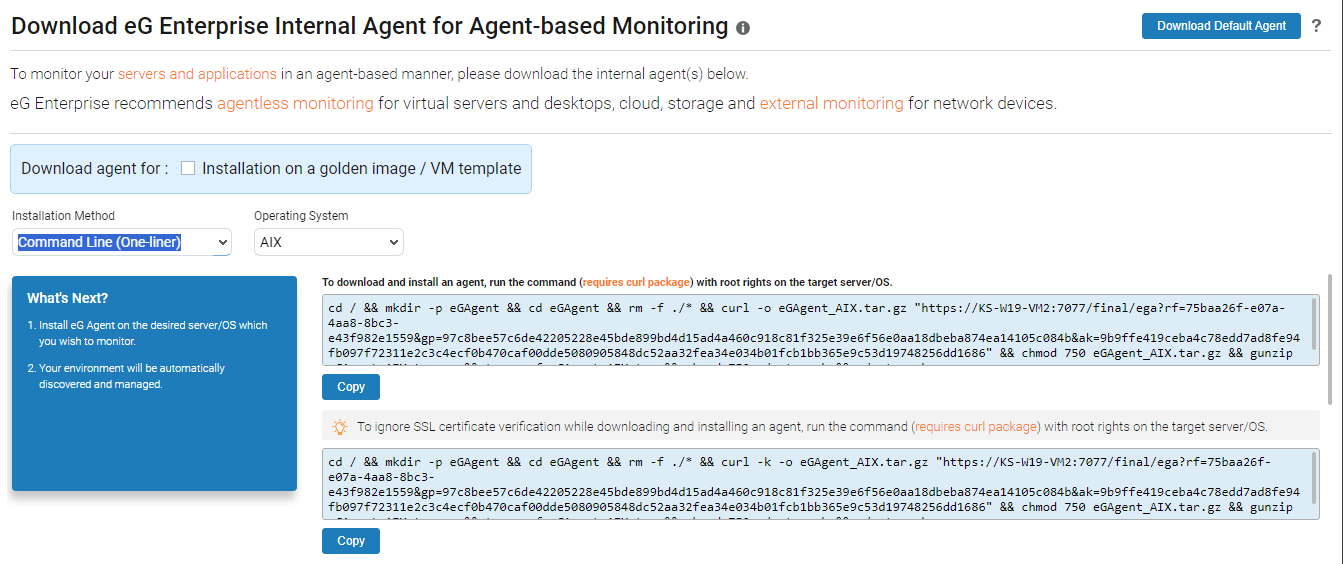
Figure 5 : Installing the eG agent on an AIX host by running a Curl command on the target host
-
Click on the Copy button below the command to copy it to the clipboard.
-
Next, open the Shell prompt on the target host, paste the command therein, and run it with root user privileges.
-
The command, upon execution, will automatically install and start the eG agent on the target host, and will also auto-configure the eG agent to report to the cloud manager. Later, the eG agent so installed, will also automatically discover the environment and auto-manage the discovered components.
-
Repeat the steps above on each AIX host to install the eG agent on it.
Note:
Before attempting to use the curl command for agent installation on an AIX host, make sure that curl package exists on the target host.
To install the eG agent on AIX using the eG-provided wget command, do the following:
-
In Figure 4, set Command Line as the Installation Method.
-
Then, pick AIX as the Operating System.
-
Scroll down the command section below until you see the wget command (as highlighted in Figure 5).
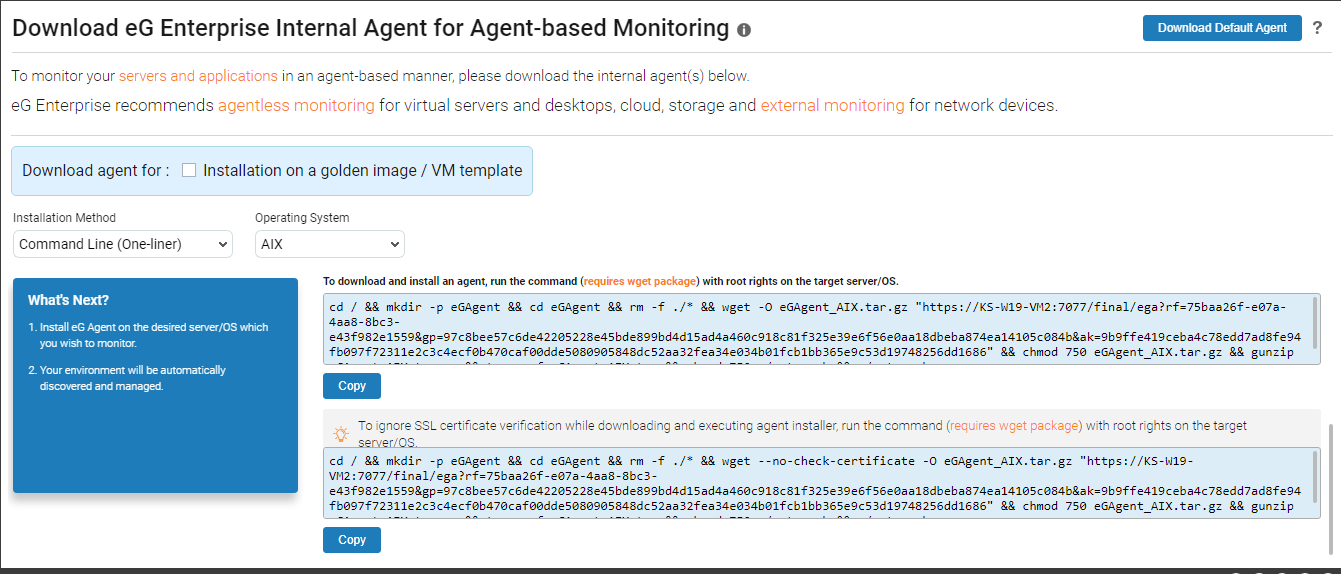
Figure 6 : Installing the eG agent on an AIX host by running a wget command on the target host
-
Click on the Copy button below the command to copy it to the clipboard.
-
Next, open the Shell prompt on the target host, paste the command therein, and run it with root user privileges.
-
The command, upon execution, will automatically install and start the eG agent on the target host, and will also auto-configure the eG agent to report to the cloud manager. Later, the eG agent so installed, will also automatically discover the environment and auto-manage the discovered components.
-
Repeat the steps above on each AIX host to install the eG agent on it.
Note:
Before attempting to use the wget command for agent installation on an AIX host, make sure that wget package exists on the target host.