Pre-requisites for Configuring an eG Database on an Azure SQL Database Instance
Before even commencing the configuration process of the eG manager using an Azure SQL managed instance, ensure that the following are in place:
-
First, determine the host name / IP address and port number of the SQL managed instance that should host the eG database. This is required because, when setting up the eG manager, you need to specify the Database Server Name / IP and the Database Server Port for the eG manager to communicate with. To figure this out, follow the steps detailed below:
-
Login to the Azure portal.
-
Type whole/part of the phrase, 'SQL Managed Instances', in the search text box. Once SQL Managed Instances appears in the search results, select it (see Figure 1).
-
Then, pick the SQL managed instance that hosts the eG database. From the left panel of the page that then appears, select the Connection strings option. Figure 2 will then appear.
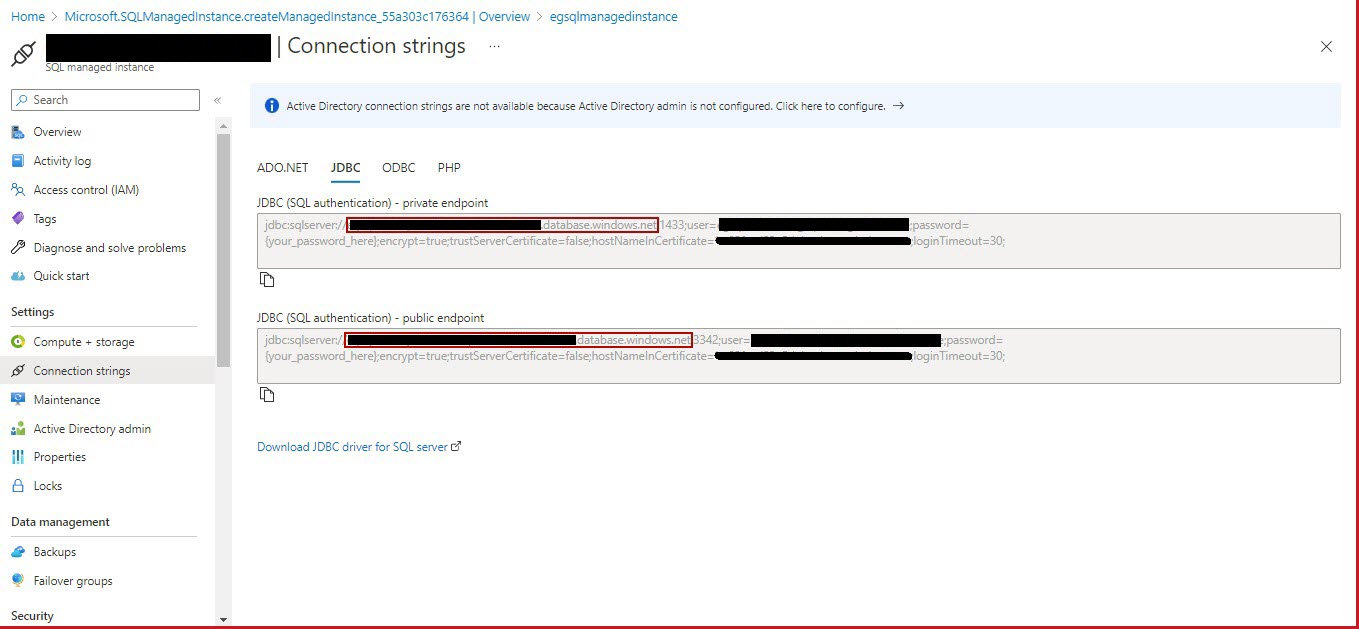
Figure 2 : Determining the host name of the SQL managed instance
-
Then, click on the JDBC tab page in the right panel.
-
If an eG manager on the cloud is to communicate with the Azure SQL managed instance, then check the connection string in the JDBC (SQL authentication) - private endpoint section. The text string that appears after jdbcsqlserver:// and before : (colon) in the connection string (as highlighted in Figure 2) is the host name of the managed instance. Specify this host name as the Database Server Name/IP when configuring a database backend for the eG manager.
-
On the other hand, if an on-premises eG manager has to communicate with the Azure SQL managed instance, then, check the connection string in the JDBC (SQL authentication) - public endpoint section. The text string that appears after jdbcsqlserver:// and before : (colon) in the connection string (as highlighted in Figure 2) is the host name of the managed instance. Specify this host name against Database Server name/IP.
-
The port number of the managed instance should also be determined in a similar manner. If an eG manager on the cloud is to communicate with the Azure SQL managed instance, then check the connection string in the JDBC (SQL authentication) - private endpoint section. The number that appears between the first and second : (colons) in the connection string (as highlighted in Figure 3) is the port number of the managed instance. Specify this port number against Database Server Port when configuring a database backend for the eG manager.
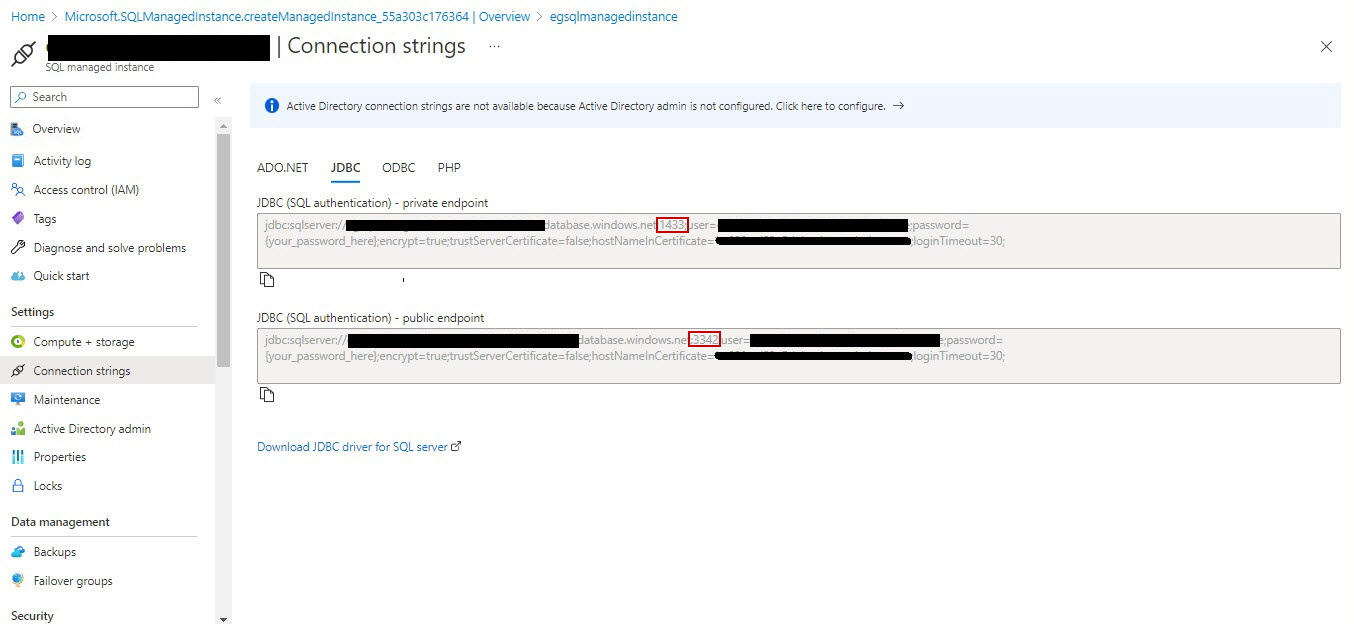
Figure 3 : Determining the port number of the SQL managed instance
-
On the other hand, if an on-premises eG manager has to communicate with the Azure SQL managed instance, then, check the connection string in the JDBC (SQL authentication) - public endpoint section. The number that appears between the first and second : (colons) in the connection string (as highlighted in Figure 3) is the port number of the managed instance. Specify this port number against Database Server Port when configuring a database backend for the eG manager.
-
-
Depending upon where your eG manager is installed, you should enable/disable the Public Endpoint capability for the managed instance. This capability allows an endpoint to connect to the Managed Instance from the Internet without using VPN. To elaborate, if an on-premises eG manager has to communicate with the Managed Instance on the cloud, then Public Endpoint has to be enabled. On the other hand, if the eG manager is also on the cloud, then Public Endpoint should be disabled.
To enable/disable the Public Endpoint capability, do the following:
-
Login to the Azure portal.
-
Type whole/part of the phrase, 'SQL Managed Instances', in the search text box. Once SQL Managed Instances appears in the search results, select it (see Figure 1).
-
Pick the SQL managed instance that you want to use as the eG backend.
-
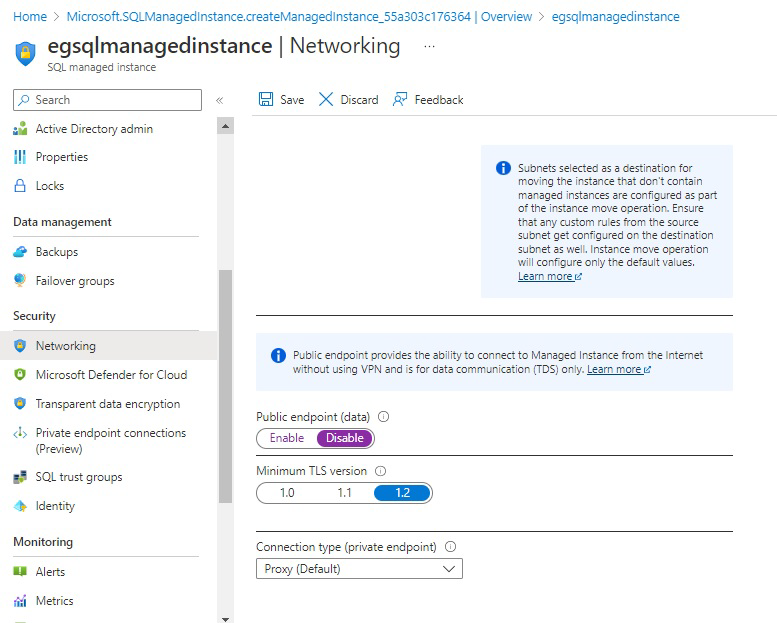
Then, from the list of options in the left panel, select Networking.
-
Figure 4 will then appear.
-
Toggle the Public endpoint (data) flag in the right panel of Figure 4 to enable/disable the public endpoint capability. For instance, select the Enable option to enable the capability - i.e., to enable an on-premises eG manager to communicate with the managed instance. Likewise, select the Disable option to disable the capability - i.e., to enable the eG manager on the cloud to communicate with the managed instance.
Note:
If a Private endpoint connection is enabled, then make sure that a private endpoint is explicitly configured on Azure to facilitate the manager - database communication.
-
Finally, click the Save button to save the changes.
-
-
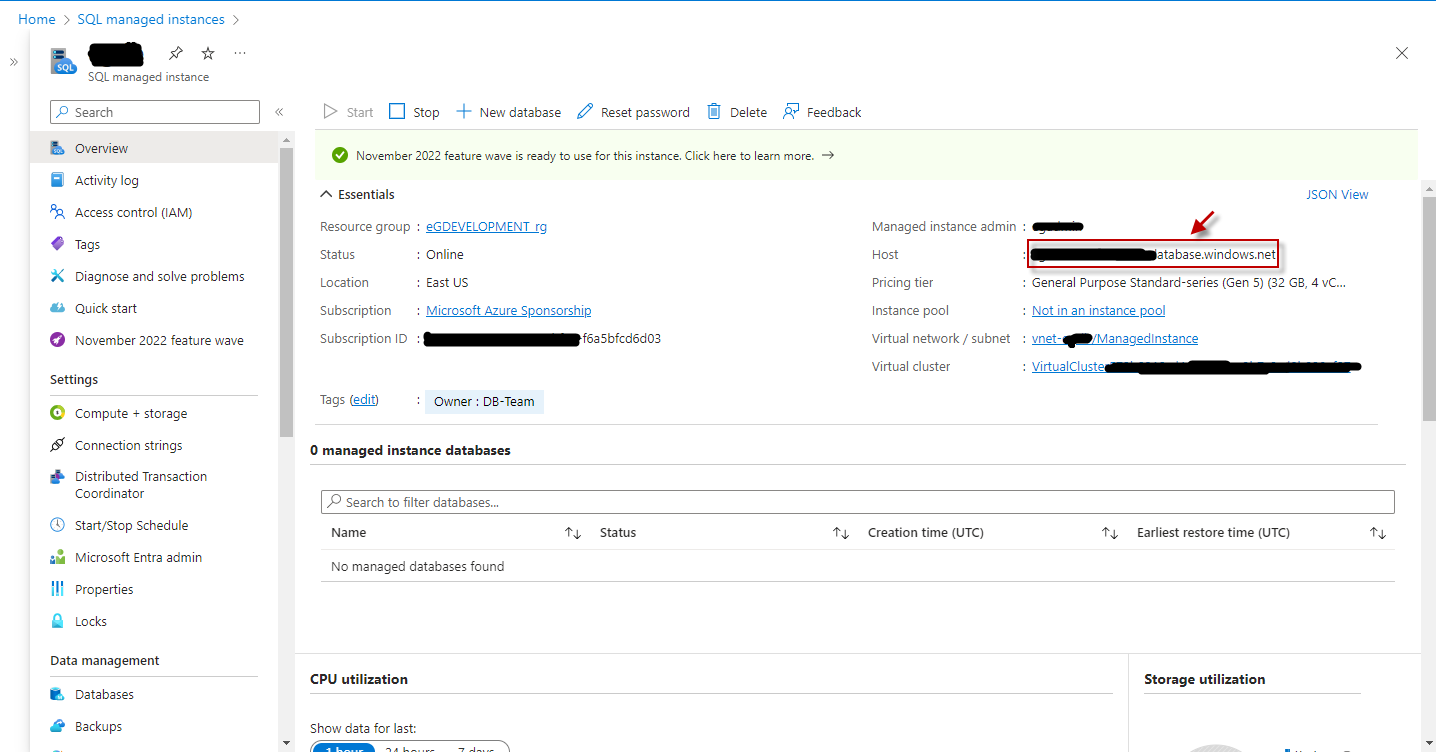
Regardless of where the eG manager is installed (whether on-premises or on the Azure cloud), you need to make sure that the firewall is configured to allow communication between the eG manager and the managed instance. For that, do the following:
-
Login to the Azure portal.
-
Type whole/part of the phrase, 'SQL Managed Instances', in the search text box. Once SQL Managed Instances appears in the search results, select it (see Figure 1).
-
Then, pick the SQL managed instance that hosts the eG database.
-
Figure 5 will then appear displaying an Overview of the properties of the chosen managed instance.
-
Now, click on the Virtual network / subnet of the managed instance, which will be displayed in the right panel of Figure 5.
-
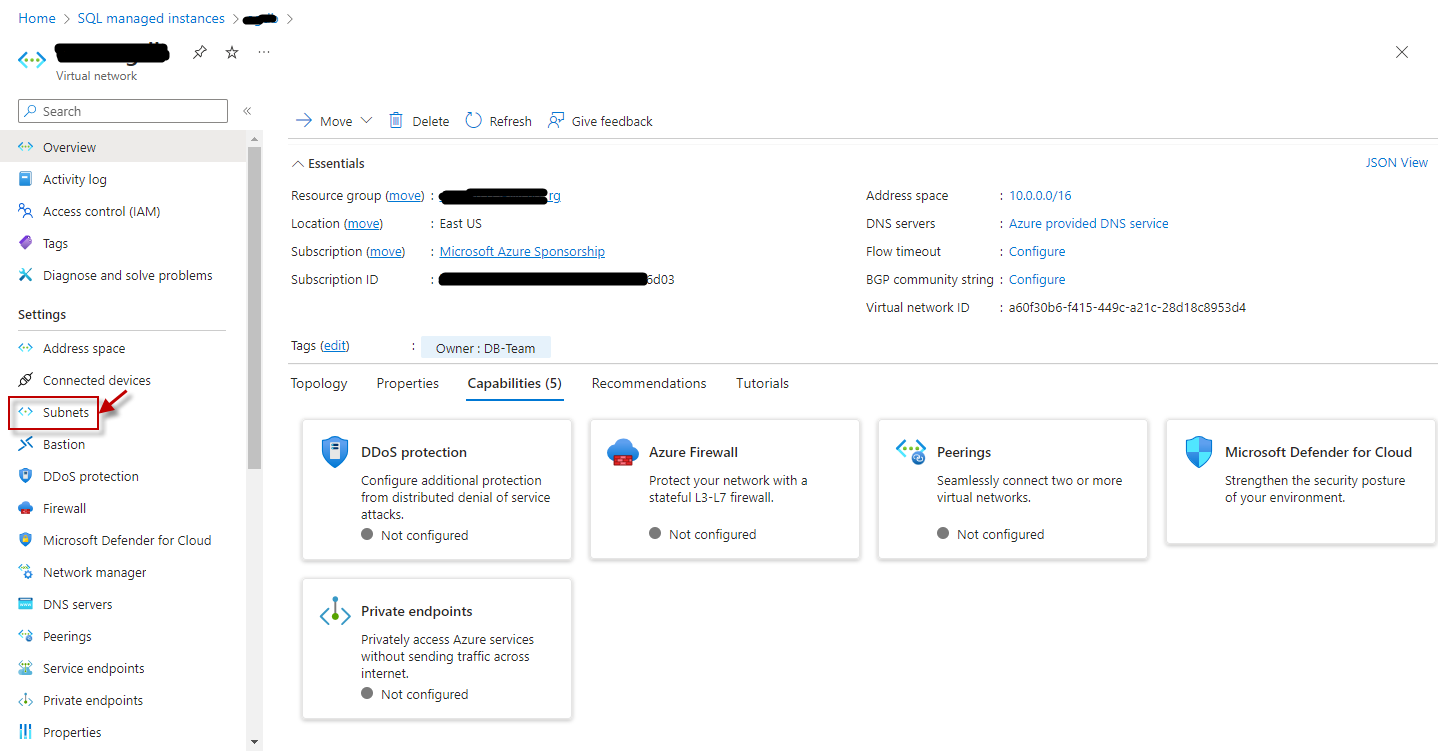
This will open Figure 6. Click on the Subnets option in the left panel of Figure 6.
-
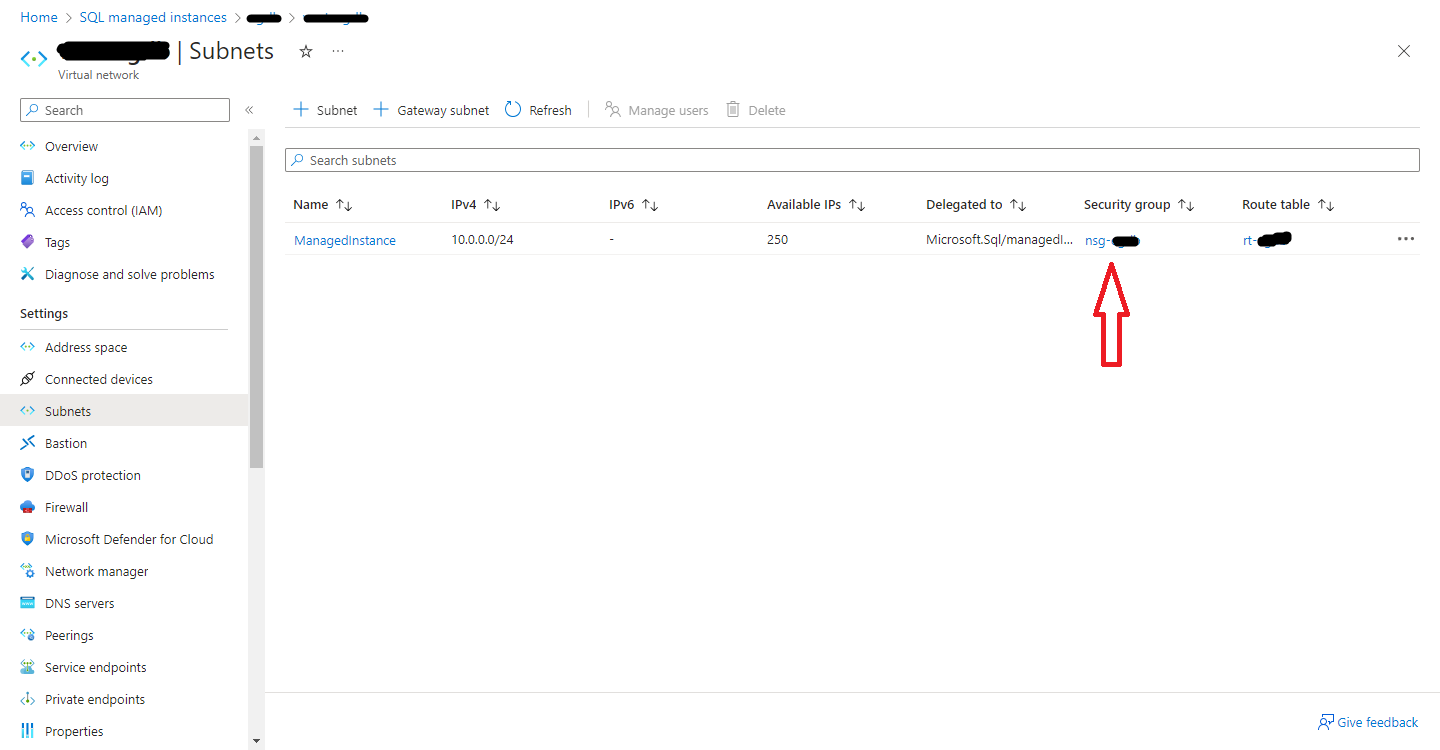
This will open Figure 7, where the subnets under the managed instance will be listed.
-
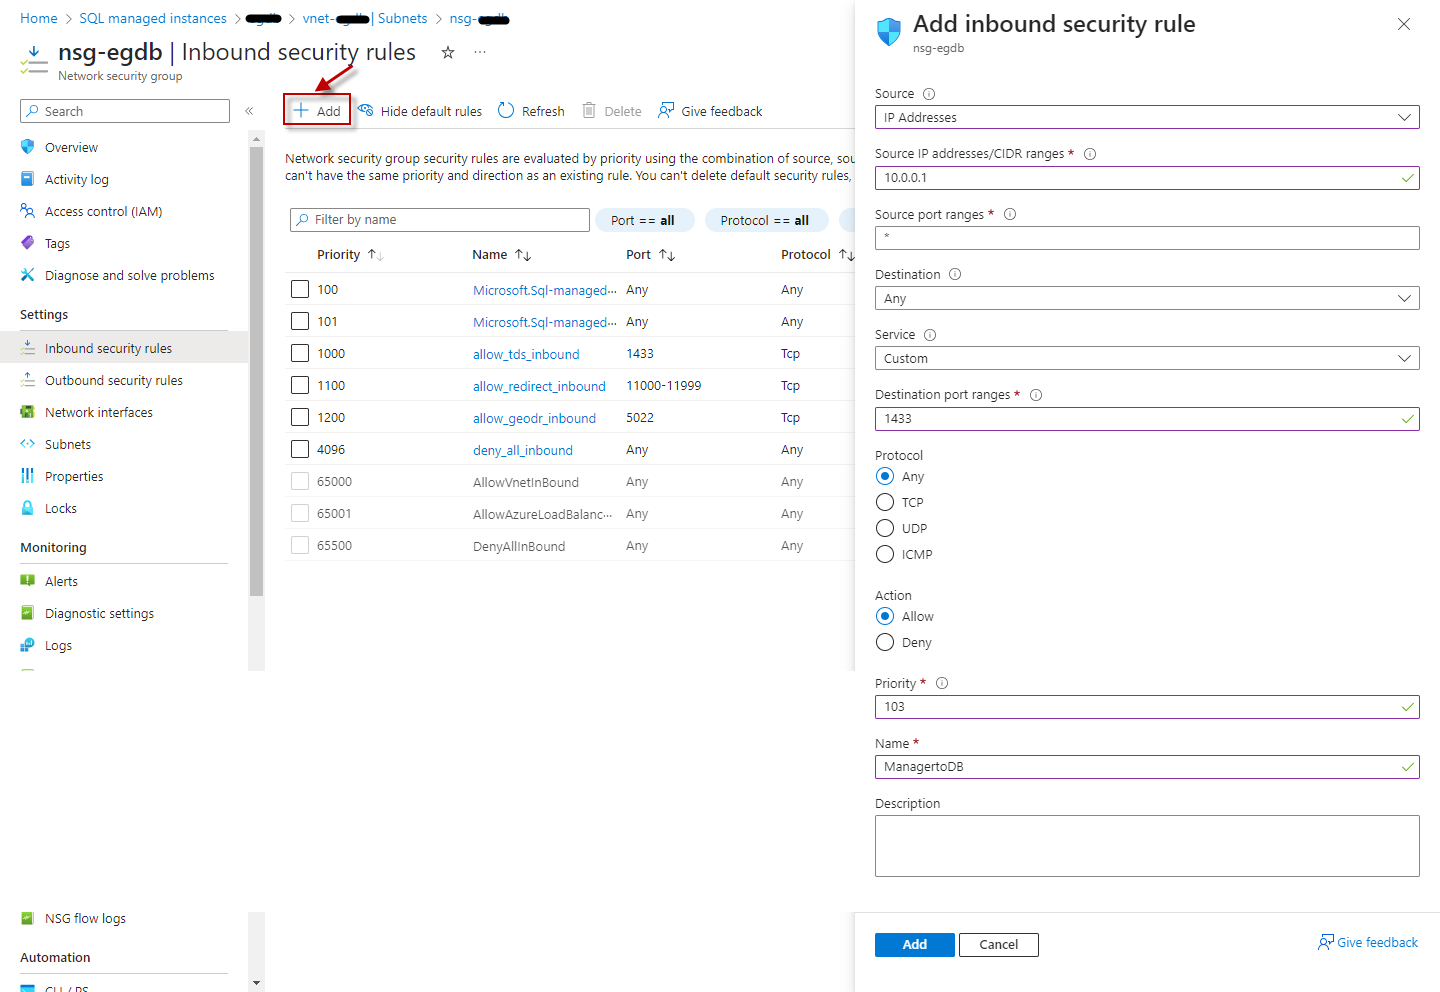
In the right panel of Figure 7, click on the Security group to which the managed instance's subnet belongs. This will invoke Figure 8, where you will see the security rules configured within the security group.
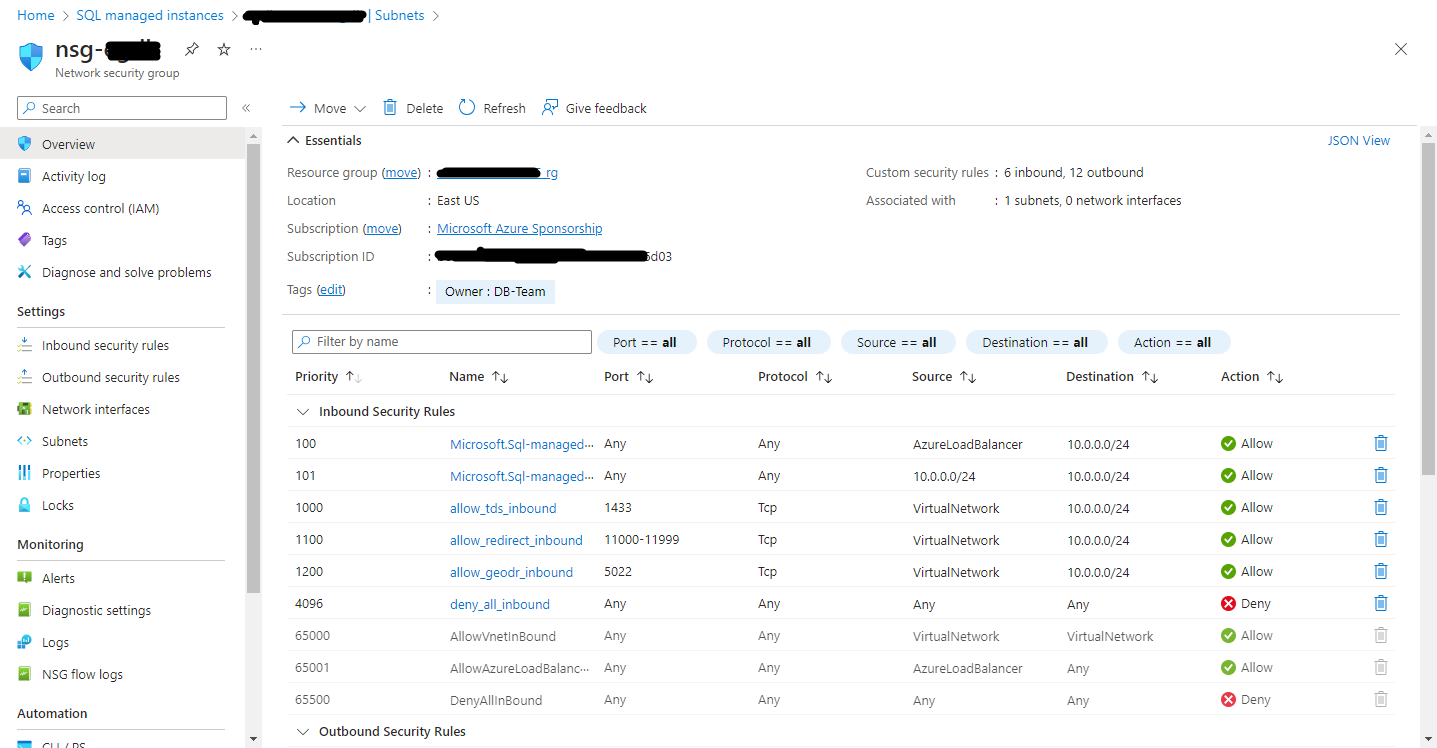
Figure 8 : Inbound security rules configured in the security group
-
To create a new inbound security rule, first click on the Inbound security rules option in the left panel.
-
Figure 9 will then appear. Now, click on the Add link indicated by Figure 9. This will bring up the Add inbound security rule dialog box that you see in the far right side of Figure 9.
-
In the dialog box, select IP addresses from the Source drop-down and enter the eG manager's IP address in the Source IP addresses / CIDR Ranges text box.
-
Then, enter the port number of the managed instance in the Destination port ranges text box, and click the Add button to add the inbound rule.
-
This rule will make sure that the firewall allows traffic between the eG manager and the SQL managed instance.
-
-
Ascertain whether the managed SQL instance on Azure is SSL-enabled. This check is essential because, when setting up the eG manager, you need to indicate how the manager should communicate with the eG database - whether it should be over HTTP or HTTPS? To perform this check, do the following:
-
Login to the Azure portal.
-
Type whole/part of the phrase, 'SQL Managed Instances', in the search text box. Once SQL Managed Instances appears in the search results, select it (see Figure 1).
-
Pick the SQL managed instance that you want to use as the eG backend.
-
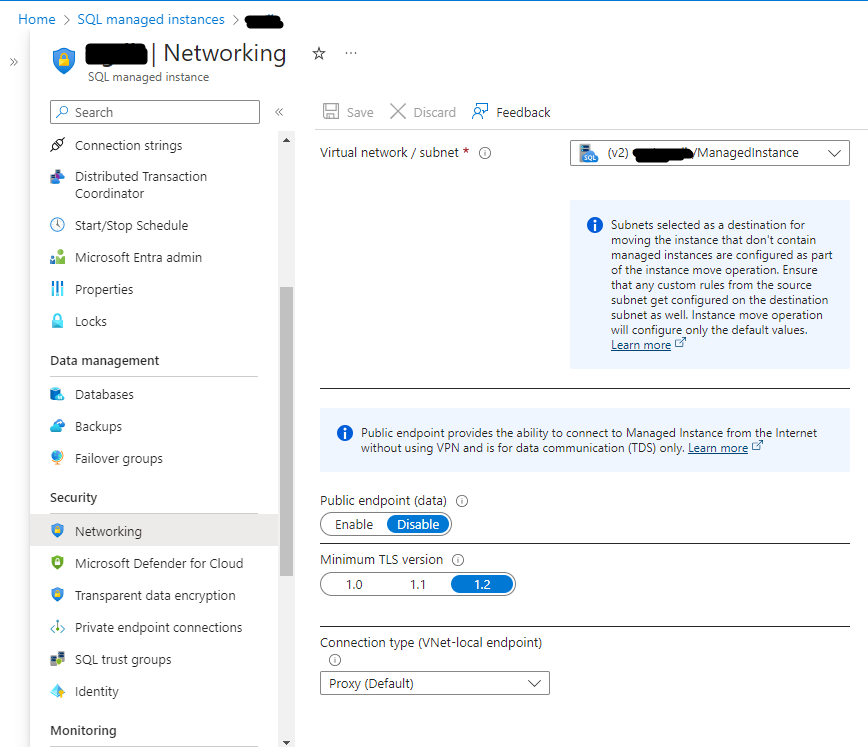
Then, from the list of options in the left panel, select Networking.
-
Figure 10 will then appear. If you find that a Minimum TLS version has been set in the right panel of Figure 10 - i.e., if any of the version numbers has been chosen as the Minimum TLS version - you can conclude that the managed SQL instance is SSL-enabled. If none of the version numbers under Minimum TLS version are selected, it means that the SQL instance is not SSL-enabled.
-
- The Azure SQL managed instance should allow ‘unlimited’ concurrent connections. The steps to achieving this are the same as those detailed in point 1 of the Pre-requisites for Configuring an eG Database on a Microsoft SQL Server.
- The eG manager requires a special database user account for storing measures in the eG database. To know the privileges that should be granted to this account and how to configure such an account, refer to